Table of Contents
Advertisement
Available languages
Available languages
Quick Links
NEDERLANDS
In deze gebruikershandleiding wordt u stap voor stap uitgelegd hoe u de Conceptronic 2,5" Media
Player met Cardreader kunt gebruiken.
In geval van problemen adviseren wij u onze support-site te bezoeken (ga naar:
www.conceptronic.net en klik op 'Support'). Hier vindt u een database met veelgestelde vragen waar
u hoogstwaarschijnlijk de oplossing voor uw probleem kunt vinden.
Heeft u andere vragen over uw product die u niet op de website kunt vinden, neem dan contact met
ons op via e-mail: support@conceptronic.net
Voor meer informatie over Conceptronic producten kunt u terecht op de Conceptronic website:
www.conceptronic.net.
1. Introductie
Voordat u met de bediening van het apparaat begint, wordt geadviseerd om deze handleiding
uitvoerig te lezen en te bewaren als toekomstige naslag.
1.1 Inhoud van de verpakking
Controleer de inhoud van de verpakking voordat u het apparaat aansluit op uw tv of monitor:
1x Conceptronic 2,5" Media Player met Cardreader
1x Afstandsbediening met batterij
1x Spanningsadapter (5V DC, 2.0A)
1x Audio/Video kabel (Composiet, Geel/Rood/Wit RCA aansluitingen)
1x Audio/Video (Composiet) naar SCART Adapter
1x Component Video kabel (Rood/Blauw/Groen RCA aansluitingen)
1x USB kabel
1x Draagtasje voor CMED2PRO
1x Meertalige handleiding
1.2 Mogelijkheden
Schakelt automatisch tussen PC en Media Speler optie:
Aangesloten op de PC werkt het apparaat als Massa-Opslag Apparaat.
Aangesloten op de TV/Monitor werkt het apparaat als Media Speler.
In PC stand:
Plug-n-Play ondersteuning.
Compatible met High Speed USB 2.0/1.1, 480Mb/s maximale data doorvoersnelheid.
Conceptronic CMED2PRO Version 2.0
Gebruikershandleiding
Gefeliciteerd met de aanschaf van uw
Conceptronic CMED2PRO.
1
Advertisement
Table of Contents

Related Manuals for Conceptronic CMED2PRO


Summary of Contents for Conceptronic CMED2PRO
- Page 1 Gefeliciteerd met de aanschaf van uw Conceptronic CMED2PRO. In deze gebruikershandleiding wordt u stap voor stap uitgelegd hoe u de Conceptronic 2,5” Media Player met Cardreader kunt gebruiken. In geval van problemen adviseren wij u onze support-site te bezoeken (ga naar: www.conceptronic.net en klik op ‘Support’).
- Page 2 Gebruik de afstandsbediening niet bij intens zonlicht. NOOIT het apparaat schudden, laten vallen of tegen het apparaat stoten. Om oververhitting tegen te gaan dient u het apparaat niet af te dekken. De CMED2PRO ondersteunt alleen het FAT / FAT32 bestandssysteem (NTFS wordt niet ondersteund). Let op: Als u de harde schijf formatteert met het NTFS bestands-systeem zal het apparaat alleen maar functioneren als Verwisselbare Schijf op uw computer.
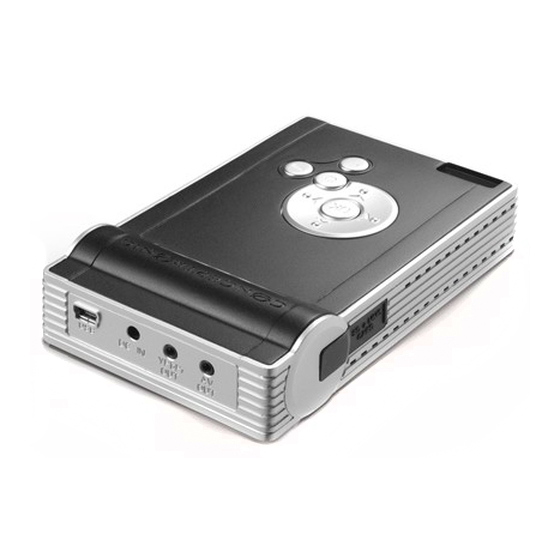
- Page 3 NEDERLANDS 2. Functies van de Mediaspeler 2.1 Uitleg van de CMED2PRO Beschrijving van de nummers: 1. Status LED’s (Zie Hoofdstuk 2.2) 6. Component (YPbPr) uitgang 2. Control Buttons (Zie Hoofdstuk 2.3) 7. A/V uitgang 3. Ontvanger voor afstandsbediening 8. MMC/MS/SD kaartslot 4.
- Page 4 NEDERLANDS 2.2 Status LED’s De CMED2PRO heeft diverse status LED’s om de huidige status van het apparaat te tonen: Beschrijving van de nummers: 1. Mediaspeler Mode LED 4. Composiet uitgang LED 2. USB Mode LED 5. YPbPr uitgang LED 3. HDD Activiteits LED 6.
- Page 5 NEDERLANDS 3. Beschrijving van de afstandsbediening...
- Page 6 NEDERLANDS Beschrijving Beschrijving POWER VIDEO Zet apparaat in/uit stand-by stand. Directe toegangknop naar video map. (AAN/UIT) P / N DISPLAY Selecteer het video systeem. (PAL / NTSC) Geef tijdens het afspelen de bestandsinformatie weer. OUTPUT ROTATE Selecteer het Video Uitgangssignaal. Draai de foto’s.
- Page 7 Zet uw computer aan. Sluit de spannings-adapter aan op de CMED2PRO en een vrij stopcontact. Sluit de USB kabel aan op de CMED2PRO en een vrije USB poort op uw computer. De computer zal de CMED2PRO automatisch herkennen en installeren, een stationsletter toewijzen en gebruiken als Massa-Opslag Apparaat.
- Page 8 Bestandslijst Als er geen geheugenkaarten zijn geplaatst in de CMED2PRO (alleen de interne HDD is aanwezig) zal de CMED2PRO de bestandslijst tonen op uw TV scherm. Als er geheugenkaarten zijn geplaatst zal de ‘Apparaatlijst’ getoond worden op uw TV scherm in plaats van de bestandslijst.
- Page 9 NEDERLANDS 5. Het afspelen of bekijken van Films, Muziek en Foto’s Er zijn 3 hoofdfuncties aanwezig voor de Conceptronic CMED2PRO Het afspelen en bekijken van films Het afspelen en beluisteren van muziek Het afspelen en bekijken van foto’s 5.1 Opties bij het bekijken van foto’s Kies een foto in de bestandslijst en druk op de / ENTER knop voor een diaweergave.
- Page 10 Druk op de REPEAT knop om de foto’s in de map herhaald te laten zien. Foto map aanmaken en bekijken De CMED2PRO kan direct naar de “PHOTO” map gaan bij het drukken op de “Photo” knop op de afstandsbediening. Hierdoor kunt u snel en eenvoudig bij uw foto’s komen.
- Page 11 Videomap aanmaken en bekijken De CMED2PRO kan direct naar de “VIDEO” map gaan bij het drukken op de “Video” knop op de afstandsbediening. Hierdoor kunt u snel en eenvoudig bij uw videobestanden komen.
- Page 12 “CODEC NOT SUPPORTED” zien op uw scherm. DVD’s afspelen De CMED2PRO kan DVD’s van de harde schijf afspelen alsof het een gewone DVD is. U kunt door gebruik te maken van het DVD Menu o.a. de ondertiteling of spreektaal wijzigen.
- Page 13 Druk op de REPEAT knop om een herhalings-stand in te schakelen. Als het apparaat in de STOP stand staat, kunt u op de OTB knop drukken om de complete inhoud van een geplaatste geheugenkaart te kopiëren naar de harde schijf van de CMED2PRO.
- Page 14 NEDERLANDS 6. Configuratie Menu Als het apparaat in STOP stand staat kunt u op de SETUP knop drukken om het Configuratie Menu te openen. Gebruik de / / / knoppen om de selectie te wijzigen en druk op de / ENTER knop om de selectie te bevestigen.
- Page 15 De MUTE functie is ingeschakeld. Druk op de MUTE knop op de afstandsbediening om de MUTE functie uit te schakelen. De CMED2PRO staat in FF/FR stand. Druk op de PLAY/PAUSE knop op de afstandsbediening om terug te keren naar standaard weergave.
- Page 16 NEXT om naar het volgende hoofdstuk te wisselen. Mijn TV toont een zwart/wit beeld in plaats van een kleurenbeeld. Uw TV kan niet overweg met het “Multi” TV systeem van de CMED2PRO. Gebruik het Setup Menu om het TV systeem op PAL te zetten (Zie hoofdstuk 6).
-
Page 17: Declaration Of Ce Conformity
The manufacturer 2L International BV Address Databankweg 7 3821 AL Amersfoort, the Netherlands Hereby declares that the product Type 2,5” MEDIA PLAYER Product CMED2PRO Brandname Conceptronic Complies with following directives: 2004/108/EEC EMC directive: Electromagnetic Compatibility 73/23/EEC Low Voltage Directive: Electrical equipment designed for use within certain voltage limits The following standards were consulted to assess conformity: EN55022/9.98 Class B... -
Page 18: Contents Of The Package
Congratulations on the purchase of your Conceptronic CMED2PRO. This User Guide gives you a step-by-step explanation of how to use the Conceptronic 2,5” Media Player with Cardreader. When problems occur, we advise you to go to our support-site (go to www.conceptronic.net and click ‘Support’. - Page 19 NEVER drop, shake or bump the device. To prevent overheating, do not cover the device. The CMED2PRO only supports the FAT / FAT32 File system (NTFS is not supported). Note: When you format the Harddisk to NTFS, it only functions as removable Harddisk for your computer.
- Page 20 ENGLISH 2. Functionalities of the Media Player 2.1 Identify the parts of the CMED2PRO Description of the numbers: 1. Status LED’s (See Chapter 2.2) 6. Component (YPbPr) Out 2. Control Buttons (See Chapter 2.3) 7. A/V Out 3. Remote Control Receiver 8.
-
Page 21: Control Buttons
3. HDD Activity LED 6. OTB Activity LED 2.3 Control Buttons The CMED2PRO has various control buttons to operate the Media Player without a remote control: Description of the numbers: 1. Navigation Buttons 4. Stop / Music Mode Button (Long-Press for Music Mode) 2. -
Page 22: Explanation Of The Remote Control
ENGLISH 3. Explanation of the Remote Control... - Page 23 ENGLISH Description Description POWER VIDEO Enter or exit Standby mode. (ON/OFF) Direct Access button to VIDEO folder. P / N DISPLAY Select video system. (PAL / NTSC) Show file information during playback. OUTPUT ROTATE Select the Video Output Signal. Rotate photos. SLIDE NEXT Enter Music-slide-show mode or step-play.
-
Page 24: Connecting To Your Computer
Use the OUTPUT button on your remote control to change the VIDEO output signal of the CMED2PRO. For the sound output of the Conceptronic CMED2PRO, you can use the analog RCA Jacks on the Composite A/V cable. If you use the Component Video cable, you can use the Composite A/V cable for the sound output. - Page 25 FILE LIBRARY Change Device: If there are more Memory Cards connected to the CMED2PRO, you can press the MENU button to go back to the DEVICE LIST and select a device by pressing / button and the / ENTER button.
- Page 26 Press the REPEAT button to play back photos repeatedly. Create and view your Photo folder The CMED2PRO can go directly to the folder “PHOTO” on the hard disk when the “Photo” button on the remote control is pressed. This allows you to go quickly to your photos.
- Page 27 ENGLISH 5.2 Options how to play & listen to the music Playing Music The Conceptronic CMED2PRO has various modes in which you can play music (WAV, MP3 and WMA is supported) Select a music file and press the / ENTER Button to start the playback.
- Page 28 Create and watch your video folder The CMED2PRO can go directly to the folder “VIDEO” on the hard disk when the “Video” button on the remote control is pressed. This allows you to go quickly to your video files.
- Page 29 ENGLISH DVD Playback The CMED2PRO plays DVD’s from the hard disk as if they are a normal DVD. You can navigate through the DVD Menu, choose subtitles, change audio languages, etc. Folder Setup To play DVD’s from your Harddisk, you need to setup the DVD folders on the CMED2PRO correctly.
-
Page 30: Setup Menu
Press REPEAT button to select a repeat mode. In STOP state, press the OTB button to copy the contents of the inserted Memory Card to the Harddisk of the CMED2PRO. 6. Setup Menu In stop state, press SETUP button to enter the Setup Menu. -
Page 31: Tips And Troubleshooting
Use the tips below for troubleshooting when your CMED2PRO is not working properly: The Power LED doesn’t light up The power supply is not connected to the CMED2PRO. Reconnect the power supply to the CMED2PRO. There is no activity on the display. - Page 32 My TV shows a black/white picture instead of colour. Your TV cannot handle the "Multi" TV-System of the CMED2PRO. Use the Setup menu to change the TV System to PAL. (See chapter 6). After changing the TV System, turn off and on the CMED2PRO.
-
Page 33: Declaration Of Ce Conformity
The manufacturer 2L International BV Address Databankweg 7 3821 AL Amersfoort, the Netherlands Hereby declares that the product Type 2,5” MEDIA PLAYER Product CMED2PRO Brandname Conceptronic Complies with following directives: 2004/108/EEC EMC directive: Electromagnetic Compatibility 73/23/EEC Low Voltage Directive: Electrical equipment designed for use within certain voltage limits The following standards were consulted to assess conformity: EN55022/9.98 Class B... -
Page 34: Contenido Del Paquete
2,5” con lector de tarjetas de Conceptronic. Si se producen problemas, le aconsejamos que consulte nuestro sitio de servicio técnico (en www.conceptronic.net y haga clic en “Support”). Aquí encontrará la base de datos con las preguntas más frecuentes. Si tiene otras preguntas sobre su producto y no las encuentra en nuestro sitio web, póngase en contacto con nosotros por correo electrónico: apoyo@conceptronic.net. - Page 35 NUNCA deje caer, agite o golpee el dispositivo. Para evitar que se recaliente, no cubra el dispositivo. El CMED2PRO sólo es compatible con el sistema de archivos FAT/FAT32 (no es compatible con el sistema NTFS). Nota: Si formatea el disco duro en formato NTFS, sólo funcionará como disco duro extraíble en su ordenador.
-
Page 36: Funciones Del Reproductor Multimedia
ESPAÑOL 2. Funciones del Reproductor multimedia 2.1 Identificación de las partes del CMED2PRO Descripción de los mandos: 1. LED de estado (consulte el apartado 2.2) 6. Toma de salida Componente (YPbPr) 2. Botones de control (consulte el apartado 2.3) 7. Toma de salida A/V 3. -
Page 37: Led De Estado
ESPAÑOL 2.2 LED de estado El CMED2PRO incorpora varios LED de estado que muestran el estado actual del dispositivo. Descripción de los mandos: 1. LED del modo Reproductor 4. LED de salida Composite activo 2. LED del modo USB 5. LED de salida YPbPr activo 3. - Page 38 ESPAÑOL 3. Descripción del mando a distancia...
- Page 39 ESPAÑOL Nº Descripción Nº Descripción POWER (ENCENDIDO) VIDEO Activa o desactiva el modo Standby. (ON/OFF) Botón de acceso directo a la carpeta VIDEO. DISPLAY (MOSTRAR) Selecciona el sistema de vídeo (PAL/NTSC). Muestra información del archivo durante su reproducción. OUTPUT (SALIDA) ROTATE (ROTACIÓN) Selecciona la señal de salida de vídeo.
-
Page 40: Conexión Al Televisor
Utilice el botón OUTPUT de su mando a distancia para cambiar la señal de salida de VÍDEO del CMED2PRO. Para la salida de sonido del CMED2PRO de Conceptronic, puede utilizar las clavijas RCA análogas del cable A/V Composite. Si utiliza el cable de vídeo Componente, podrá usar el cable A/V Composite para la salida de sonido. - Page 41 Biblioteca de archivos Si no se ha conectado ninguna tarjeta de memoria al CMED2PRO (y sólo está presente el HDD interno), la Biblioteca de archivos aparecerá en la pantalla del televisor cuando el Reproductor multimedia esté...
- Page 42 ESPAÑOL 5. Reproducción de películas, música y fotografías El CMED2PRO de Conceptronic ofrece 3 funciones principales: Reproducir y ver películas Reproducir y escuchar música Reproducir y visualizar fotografías 5.1 Opciones para reproducir y ver fotografías Seleccione una foto del Menú de Fotografías y pulse el botón / ENTER para iniciar una presentación de diapositivas.
- Page 43 ESPAÑOL Crear y ver la carpeta Photo Al pulsar el botón “Photo” del mando a distancia, el CMED2PRO accede directamente a la carpeta “PHOTO” situada en el disco duro, lo cual le permitirá acceder rápidamente a sus fotografías. Para utilizar esta función, necesitará crear una carpeta llamada “PHOTO” en el CMED2PRO y colocar en ella sus archivos de fotografías.
- Page 44 Para utilizar esta función, necesitará crear una carpeta llamada “VIDEO” en el CMED2PRO y colocar en ella sus archivos de vídeo. Si pulsa el botón “Video” del mando a distancia, el CMED2PRO irá directamente a esa carpeta. Opciones adicionales de reproducción de vídeo Compatible para reproducir vídeos MPEG4 con subtítulos...
- Page 45 ESPAÑOL Nota: El CMED2PRO es compatible con la mayoría de codecs de vídeo (como XviD, AVI, MPEG2, etc.), pero es posible que tenga archivos que requieren un codec que el CMED2PRO no incluya. Si trata de reproducir un archivo con un codec no compatible, aparecerá el mensaje “CODEC NO COMPATIBLE”.
-
Page 46: Menú De Configuración
Pulse el botón REPEAT para seleccionar el modo de repetición. En estado de parada, pulse el botón OTB para copiar el contenido de la tarjeta de memoria introducida en el disco duro del CMED2PRO. 6. Menú de configuración En estado de parada, pulse el botón SETUP para acceder al Menú de configuración. -
Page 47: Consejos Y Resolución De Problemas
CMED2PRO no funcione correctamente: El LED de encendido no se ilumina El CMED2PRO no está conectado a la toma de alimentación. Conecte el CMED2PRO a la toma de corriente. No hay actividad en la pantalla El CMED2PRO está... - Page 48 Mi televisor muestra la imagen en blanco y negro en lugar de en color. Su televisor no es compatible con el sistema de TV Multi del CMED2PRO. Utilice el Menú de Configuración para cambiar el sistema de TV a PAL (véase el apartado 6).
- Page 49 Databankweg 7 3821 AL Amersfoort, Países Bajos, tel. +31 (0)33 4549401 CIF/NIF NL801729877B01 Declara mediante este documento que el producto 2,5" MEDIA PLAYER Tipo CMED2PRO Producto Marca Conceptronic Cumple con las siguientes directivas: Directiva EMC 2004/108/CE EMC Directiva 2004/108/EEC EMC (transpuesta a la legislación española mediante RD 1580/2006: Compatibilidad electromagnética.
- Page 50 Bedienungsanleitung Wir gratulieren Ihnen zum Kauf Ihres Conceptronic CMED2PRO. In dieser Bedienungsanleitung wird Ihnen Schritt für Schritt gezeigt, wie der Conceptronic 2,5“ Media Player mit Kartenleser installiert werden muss. Wenn Probleme auftreten sollten, besuchen Sie unsere Support-Seite (unter www.conceptronic.net) und klicken Sie auf ‚Support’. Dort steht Ihnen unsere FAQ-Datenbank mit den häufig gestellten Fragen zur Verfügung.
- Page 51 Lassen Sie das Gerät NIEMALS fallen und setzen Sie es keinen Stößen oder Erschütterungen aus. Decken Sie das Gerät nicht ab, um eine Überhitzung zu vermeiden. Der CMED2PRO unterstützt nur das FAT- / FAT32-Dateisystem (NTFS wird nicht unterstützt). Hinweis: Wenn Sie die Festplatte mit NTFS formatieren, kann sie nur als Wechselfestplatte für Ihren Computer verwendet werden.
- Page 52 DEUTSCH 2. Funktionen des Media Players 2.1 Bedienungselemente des CMED2PRO Legende: 1. Status LED-Anzeigen (siehe Kapitel 2.2) 6. Component (YPbPr)-Ausgang 2. Steuerungstasten (siehe Kapitel 2.3) 7. A/V-Ausgang 3. Fernbedienungsempfänger 8. MMC-/MS-/SD-Kartensteckplatz 4. USB-Buchse (für Anschluss an PC) 9. CF-Kartensteckplatz 5. Netzteilbuchse...
- Page 53 4. LED-Anzeige Composite-Ausgang aktiv 2. USB-Modus-LED-Anzeige 5. LED-Anzeige YPbPr-Ausgang aktiv 3. Festplatten-LED-Anzeige 6. OTB-LED-Anzeige 2.3 Steuerungstasten Der CMED2PRO hat verschiedene Steuerungstasten für den Betrieb des Media Players ohne Fernbedienung: Legende: 1. Navigationstasten 4. Stop- / Musikmodus-Taste (langes Drücken für Musikmodus) 2.
- Page 54 DEUTSCH 3. Erläuterungen zur Fernbedienung...
- Page 55 DEUTSCH Beschreibung Beschreibung POWER PHOTO Standby-Modus aktivieren/deaktivieren. Taste für Direktzugriff auf PHOTO-Ordner. (EIN/AUS) DISPLAY Auswahl des Videosystems. (PAL / NTSC) Zeigt Datei-Informationen während Wiedergabe. OUTPUT ROTATE Auswahl des Video-Ausgabesignals. Fotos drehen. SLIDE NEXT Aufrufen des Modus Musik-Diashow oder Step- Auf nächste Datei / Kapitel wechseln oder Play [schrittweises Abspielen].
-
Page 56: Anschluss An Den Computer
Videoausgabe des CMED2PRO ist. Ändern Sie mithilfe der OUTPUT-Taste auf Ihrer Fernbedienung das VIDEO-Ausgabesignal des CMED2PRO. Für die Tonausgabe des Conceptronic CMED2PRO können Sie die analogen RCA-Stecker des Composite-A/V-Kabels verwenden. Schließen Sie das Gerät mit dem Component-Video-Kabel an, können Sie das Composite-A/V- Kabel für die Tonausgabe verwenden. - Page 57 Dateien indiziert und in Ihrem Menü angezeigt werden. DEVICE LIST [GERÄTELISTE] FILE LIBRARY [DATEI-BIBLIOTHEK] Gerät ändern: Wenn mehrere Speicherkarten an den CMED2PRO angeschlossen sind, können Sie durch Drücken der Taste MENU die GERÄTELISTE aufrufen und durch Drücken der Tasten / und / ENTER ein Gerät auswählen.
- Page 58 DEUTSCH 5. Wiedergabe von Filmen, Musik und Fotos Der Conceptronic CMED2PRO hat 3 Hauptfunktionen: Filme wiedergeben/anschauen Musik wiedergeben/hören Fotos wiedergeben/anschauen 5.1 Optionen für die Fotowiedergabe Wählen Sie ein Foto im Foto-Menü und drücken Sie die Taste a / ENTER, um eine Diashow zu starten.
- Page 59 Über die Taste REPEAT können Sie Fotos wiederholt anzeigen. Einen Photo-Ordner erstellen und anzeigen Der CMED2PRO greift direkt auf den Ordner „PHOTO“ auf der Festplatte zu, wenn die Taste „Photo“ auf der Fernbedienung gedrückt wird. Dies ermöglicht Ihnen einen schnellen Zugriff auf Ihre Photos.
- Page 60 ENTER /.., um zur normalen Geschwindigkeit zurückzukehren. Einen Video-Ordner erstellen und wiedergeben Der CMED2PRO greift direkt auf den Ordner „VIDEO“ auf der Festplatte zu, wenn die Taste „Video“ auf der Fernbedienung gedrückt wird. Dies ermöglicht Ihnen einen schnellen Zugriff auf Ihre Video- Dateien.
- Page 61 Wenn Sie versuchen, eine Datei mit einem nicht unterstützten Codec wiederzugeben, erscheint die Meldung „CODEC NOT SUPPORTED [CODEC NICHT UNTERSTÜTZT]”. DVD-Wiedergabe Der CMED2PRO gibt DVDs von einer Festplatte wie normale DVDs wieder. Sie können durch das DVD- Menü navigieren, Untertitel wählen, die Audiosprache ändern usw. Ordner erstellen Um DVDs von Ihrer Festplatte wiedergeben zu können, müssen Sie die DVD-Ordner auf dem...
- Page 62 Über die Taste REPEAT können Sie einen Wiederholmodus wählen. Wenn keine Wiedergabe läuft (STOP-Taste betätigen), drücken Sie die Taste OTB, um den Inhalt der eingeführten Speicherkarte auf die Festplatte des CMED2PRO zu kopieren. 6. Einstellungsmenü Wenn keine Wiedergabe läuft...
- Page 63 : Show or hide OSD Messages. Default : Reset to factory default settings. Auto Start : Auto start playback after starting the CMED2PRO. File Sort : Select how the files will be sorted on the CMED2PRO. Main Page : Return to the Setup Menu.
- Page 64 Der CMED2PRO ist nicht an die Stromversorgung angeschlossen. Schließen Sie den CMED2PRO an die Stromversorgung an. Es erscheint keine Anzeige auf dem Display. Der CMED2PRO befindet sich im Standby-Modus. Drücken Sie Taste xx auf der Fernbedienung, um den Standby-Modus zu deaktivieren. Auf dem Fernseher wurde die falsche Eingangsquelle ausgewählt. Ändern Sie die Eingangsquelle.
- Page 65 / NEXT, um zum nächsten Kapitel zu wechseln. My TV zeigt ein Schwarz/Weiß- statt ein Farbbild. Ihr Fernseher unterstützt das „Multi” TV System des CMED2PRO nicht. Ändern Sie das TV-System im Setup-Menü auf PAL. (vgl. Kapitel 6). Nachdem Sie das TV-System geändert haben, schalten Sie.
-
Page 66: Ce-Konformitätserklärung
CE - Konformitätserklärung Der Hersteller 2L International BV Adresse Databankweg 7 3821 AL Amersfoort, Niederlande erklärt hiermit, dass das Produkt 2,5” MEDIA PLAYER Produkt CMED2PRO Markenname Conceptronic den folgenden Richtlinien entspricht: 2004/108/EWG EMV-Richtlinie: Elektromagnetische Verträglichkeit 73/23/EWG Niederspannungs-Richtlinie Elektrische Betriebsmittel zur Verwendung innerhalb bestimmter Spannungsgrenzen Für die Beurteilung der Einhaltung der Konformität angewandte Normen:... -
Page 67: Contenu Du Coffret
Pour toute autre question relative au produit dont vous ne pourrez trouver la réponse sur notre site, n’hésitez pas à nous contacter par e-mail à: support@conceptronic.net. Pour toute information complémentaire sur la gamme de produits Conceptronic, veuillez consulter le site Internet de Conceptronic: www.conceptronic.net. - Page 68 NE JAMAIS laisser tomber, heurter ou secouer l’appareil. Pour éviter toute surchauffe, ne pas recouvrir l’appareil. Le CMED2PRO fonctionne uniquement avec les systèmes fichiers FAT / FAT32 (le système NTFS n’est pas supporté). Remarque: Lors du formatage de votre Disque Dur en NTFS, ce premier fonctionnera uniquement comme un Disque Dur amovible pour votre ordinateur.
- Page 69 FRANÇAIS 2. Fonctionnalités du Lecteur Multimédia 2.1 Identifier les différents éléments du CMED2PRO Description des commandes: 1. Témoins Lumineux (Voir Chapitre 2.2) 6. Sortie Composante(YPbPr) 2. Boutons de Contrôle (Voir Chapitre 2.3) 7. Sortie A/V 3. Récepteur de Commande à Distance 8.
-
Page 70: Témoins Lumineux
FRANÇAIS 2.2 Témoins Lumineux Le CMED2PRO possède plusieurs voyants lumineux destinés à indiquer le mode actuel de l’appareil. Description des commandes: 1. Voyant du Mode Lecture 4. Voyant de sortie Composite 2. Voyant du Mode USB 5. Voyant de sortie YPbPr 3. - Page 71 FRANÇAIS 3. Explication de la Commande à Distance...
- Page 72 FRANÇAIS Description Description POWER (ALIMENTATION/MARCHE) VIDEO Entrer ou quitter le mode de Mise en Veille. Touche d'accès direct au répertoire de (MARCHE/ARRÊT) VIDÉO. P / N DISPLAY (AFFICHAGE) Sélectionner le système vidéo. (PAL / NTSC) Afficher les données du fichier lors de la lecture.
- Page 73 Veuillez consulter le manuel d’utilisation de votre Télévision pour connaître la chaîne « auxiliaire » à sélectionner et ainsi permettre l’affichage de la sortie vidéo du CMED2PRO. Utilisez le bouton OUTPUT (SORTIE) de votre commande à distance pour modifier le signal de sortie VIDEO du CMED2PRO.
- Page 74 Bibliothèque de Fichiers Si aucune Carte de mémoire n'est connectée au CMED2PRO (seul le disque dur interne est présent), la Bibliothèque de fichiers s'affiche à l'écran de TV lorsque le Lecteur multimédia est allumé.
- Page 75 FRANÇAIS 5. Lecture de Films, Écoute de Musique et Visualisation de Photos Le CMED2PRO de Conceptronic dispose de 3 modes de fonctionnement principaux : Play & watch movies (reproduire des films) Play & listen to Music (écouter de la musique) Play &...
- Page 76 "Photo" de la télécommande est enfoncée. Cela vous permet d'aller rapidement vers vos photos. Pour utiliser cette fonction, vous devez créer un répertoire sur le CMED2PRO appelé "PHOTO" et placer vos fichiers de photos dans ce répertoire. Lorsque vous appuyez sur la touche "Photo" de la télécommande, le CMED2PRO passe directement à...
- Page 77 Créer et regarder votre répertoire vidéo Le CMED2PRO peut aller directement au répertoire "VIDEO" du disque dur lorsque la touche "Video" de la télécommande est enfoncée. Cela vous permet d'aller rapidement vers vos fichiers de vidéo.
- Page 78 “CODEC NOT SUPPORTED” (CODEC NON SUPPORTÉ). Reproduction du DVD Le CMED2PRO peut lire des DVD du Disque Dur comme s’il s’agissait de DVD normaux. Vous pouvez parcourir le Menu du DVD, choisir des sous-titres, changer la langue audio, etc.
-
Page 79: Menu De Configuration
Appuyez sur le bouton REPEAT (RÉPÉTER) pour sélectionner un mode de lecture répétée. En phase STOP (ARRÊT), appuyez sur le bouton OTB pour copier le contenu de la Carte Mémoire insérée dans le Disque Dur du CMED2PRO. 6. Menu de Configuration En phase Arrêt, appuyez sur le bouton SETUP (RÉGLER) pour accéder au Setup Menu (Menu de... - Page 80 Le câble audio n’est pas bien branché. Vérifiez s’il est correctement connecté à votre TV ou à votre amplificateur. Le CMED2PRO est connecté à un amplificateur, et ce dernier est éteint. Allumez l’amplificateur. Le signal audio du fichier MPEG2 ou VOB n’est pas bien défini. Appuyez sur la touche AUDIO de la télécommande pour l’ajuster en fonction du bon signal audio.
- Page 81 Mon écran de TV affiche une image en noir et blanc et pas en couleurs. Votre TV ne supporte pas le Système TV "Multi" du CMED2PRO. Utilisez le menu Setup pour transformer le Système TV en PAL. (Voir chapitre 6).
-
Page 82: Déclaration De Conformité Ce
2L International BV Adresse Databankweg 7 3821 AL Amersfoort, the Netherlands (Pays-Bas) Déclare, par la présente, que le produit Type 2,5” MEDIA PLAYER Produit CMED2PRO Enseigne Conceptronic Observe les directives suivantes: 2004/108/EEC Directive EMC relative à la: Compatibilité Électromagnétique (Electromagnetic Compatibility) 73/23/EEC Directive Basse Tension (Low Voltage Directive) relative aux: Équipements Électriques conçus pour un usage dans certaines... -
Page 83: Contenuto Della Confezione
Conceptronic. In caso di problemi, vi consigliamo di visitare il nostro sito di supporto (collegandovi su www.conceptronic.net e facendo clic su “Support”), dove si trova il database delle FAQ (Risposte alle domande più frequenti). In caso di domande di altro tipo riguardanti il prodotto, che non appaiono nel nostro sito web, vi preghiamo di mettervi in contatto con noi attraverso l’indirizzo di posta elettronica:... - Page 84 Non lanciare, scuotere o scuotere MAI il dispositivo Per evitarne il surriscaldamento, non coprire il dispositivo. Il CMED2PRO supporta esclusivamente il file system FAT / FAT32 (il sistema NTFS non è supportato). Nota: se il disco rigido viene formattato in NTFS, questo funzionerà solo come disco rigido removibile del computer.
- Page 85 ITALIANO 2. Funzioni del Media Player 2.1 Spiegazione delle parti del CMED2PRO Descrizione dei numeri: 1. LED di stato (vedi Capitolo 2.2) 6. Uscita componente (YPbPr) 2. Pulsanti di controllo (vedi Capitolo 2.3) 7. Uscita A/V 3. Ricevitore telecomando 8. Slot schede MMC/MS/SD 4.
-
Page 86: Led Di Stato
5. LED uscita YPbPr attiva 3. LED HDD 6. LED modo OTB 2.3 Pulsanti di controllo Il CMED2PRO possiede diversi pulsanti di controllo per far funzionare il Media Player senza telecomando: Descrizione dei numeri: 1. Pulsanti di navigazione 4. Pulsante Stop / modo musica (premere a lungo per modo musica) 2. - Page 87 ITALIANO 3. Spiegazione del telecomando...
- Page 88 ITALIANO Descrizione Descrizione POWER (Accensione) VIDEO Entra o esce dalla modalità standby (ON/OFF) Pulsante di accesso diretto alla cartella dei video. DISPLAY Serve per selezionare il sistema video (PAL / Mostra informazioni del file durante la NTSC) riproduzione. OUTPUT (Uscita) ROTATE (Gira) Seleziona il segnale di uscita video.
-
Page 89: Collegamento Al Computer
Usare il pulsante di USCITA del telecomando per cambiare il segnale in uscita del VIDEO del CMED2PRO. Per quel che riguarda l’uscita audio del CMED2PRO Conceptronic, si possono usare i jack RCA analogici del cavo A/V composito. Se viene usato il cavo video componente, si può usare il cavo A/V composito per l’uscita audio. - Page 90 Si consiglia di scollegare il dispositivo dalla corrente se questo non verrà usato per un lungo periodo di tempo. Biblioteca file Nel caso in cui non vi siano schede di memoria collegate al CMED2PRO (solo con l’unità disco rigido presente all’interno), quando il Media Player verrà acceso, sullo schermo televisivo apparirà la Biblioteca File.
- Page 91 ITALIANO 5. Riproduzione di film, brani musicali e foto Il CMED2PRO Conceptronic è dotato di tre funzioni principali: Consente di riprodurre e vedere film Consente di riprodurre e ascoltare musica Consente di riprodurre e visualizzare foto 5.1 Opzioni disponibili per aprire e visualizzare foto...
- Page 92 5.2 Opzioni disponibili per aprire e ascoltare brani musicali Riproduzione musica Il CMED2PRO di Conceptronic dispone di diverse modalità per la riproduzione dei brani audio (sono supportati i sistemi WAV, MP3 e WMA) Selezionare un file audio e premere il pulsante / INTRO per dare inizio alla riproduzione.
- Page 93 “Video” sul telecomando. In questo modo sarà possibile accedere più rapidamente ai file video in esso contenuti. Per usare questa funzione, è necessario creare una cartella nel CMED2PRO chiamata “VIDEO” e mettervi tutti i file video. Quando verrà premuto il pulsante “Video” del telecomando, il CMED2PRO entrerà...
- Page 94 Per riprodurre un DVD contenuto nel disco rigido, sarà necessario impostare correttamente le cartelle DVD del CMED2PRO. Creare una cartella nel disco rigido del CMED2PRO con lo stesso nome del DVD (in questo caso “My Movie”) Copiare la cartella VIDEO_TS dal DVD nella cartella DVD creata nel disco rigido del CMED2PRO.
- Page 95 Premere il pulsante REPEAT per selezionare una modalità di ripetizione. In STOP, premere il pulsante OTB per copiare il contenuto della scheda di memoria introdotta nel disco rigido del CMED2PRO. 6. Menu di configurazione (Setup Menu) In Stop, premere il pulsante SETUP per accedere al Menu di configurazione.
- Page 96 È stata attivata la funzione di Mute. Premere di nuovo il pulsante MUTE del telecomando per disattivarlo. Il CMED2PRO sta operando in modalità FF/FR. Premere il pulsante PLAY/PAUSE del telecomando per tornare alla riproduzione normale.
- Page 97 Viene riprodotto un file AVI, pero il file contenente i sottotitoli possiede un nome di file diverso. Vedi capitolo 5.3 su come visualizzare i sottotitoli. Viene riprodotto un file VOB. Il CMED2PRO non possiede nessun tipo di supporto per i sottotitoli di file VOB.
-
Page 98: Dichiarazione Di Conformità Ce
Indirizzo Databankweg 7 3821 AL Amersfoort, Paesi Bassi Dichiara qui di seguito che il prodotto Tipo 2,5” MEDIA PLAYER Prodotto CMED2PRO Nome marca Conceptronic Risulta in conformità a quanto previsto dalle seguenti direttive comunitarie: 2004/108/CE Direttiva CEM: Compatibilità elettromagnetica 73/23/CE... -
Page 99: Instruções De Uso
Se tiver outras perguntas sobre o produto e não encontrar a resposta no nosso sítio web, contacte connosco por e-mail: apoyo@conceptronic.net. Para mais informações a respeito dos produtos da Conceptronic, visite o sítio web da Conceptronic: www.conceptronic.net. 1. Introdução Antes de pôr a unidade a funcionar, leia este manual atentamente e guarde-o para consultas no... - Page 100 NUNCA deixe cair, sacuda ou bata o dispositivo. Para prevenir o superaquecimento, não cubra o dispositivo. O CMED2PRO suporta apenas os sistemas de ficheiros FAT / FAT32 (NTFS não é suportado). Nota: Quando o disco rígido é formatado em NTFS, funciona apenas como um disco rígido removível para o computador.
- Page 101 PORTUGUÊS 2. Funcionalidades do Reprodutor Multimédia 2.1 Partes do CMED2PRO Descrição dos números 1. LEDs de indicação do estado (ver Capítulo 2.2) 6. Saída Componente (YPbPr) 2. Botões de Controlo (ver Capítulo 2.3) 7. Saída de Áudio/Vídeo 3. Receptor do Controlo Remoto 8.
- Page 102 5. Indicador de saída YPbPr activa 3. Indicador de disco rígido 6. Indicador de Modo OTB 2.3 Botões de Controlo CMED2PRO possui diversos botões de controlo para operar o Reprodutor Multimédia sem o uso do controlo remoto: Descrição dos Números: 1. Botões de Navegação 4.
- Page 103 PORTUGUÊS 3. Descrição do controlo remoto...
- Page 104 PORTUGUÊS Nº Descrição Nº Descrição LIGAR/DESLIGAR VIDEO Entra ou sai do modo de espera Botão de acesso directo à pasta de vídeos (LIGAR/DESLIGAR) VIDEO. P / N DISPLAY Selecciona o sistema de vídeo. (PAL / NTSC) Mostra informações do ficheiro durante reprodução.
-
Page 105: Ligar Ao Computador
Veja no manual do seu televisor qual é o canal de entrada correcto para mostrar a saída de vídeo do CMED2PRO. Use o botão SAÍDA no seu controlo remoto para mudar o sinal de saída de vídeo do CMED2PRO. Para a saída de som do CMED2PRO da Conceptronic é possível usar os conectores RCA analógicos do cabo de Áudio/Vídeo Composite. - Page 106 Biblioteca de Ficheiros Se não houver nenhuma Placa de Memória ligada ao CMED2PRO (apenas o HDD interno), a Biblioteca de Ficheiros vai aparecer no ecrã da televisão quando o Leitor Multimédia for ligado. Se houver alguma Placa de Memória ligada, a LISTA DE DISPOSITIVOS vai aparecer no ecrã da televisão em vez da Biblioteca de Ficheiros.
- Page 107 PORTUGUÊS 5. Reprodução de filmes, música e fotografias Existem 3 funções principais no CMED2PRO da Conceptronic: Reproduzir e ver filmes Reproduzir e ouvir música Reproduzir e ver fotografias 5.1 Opções de reprodução e visualização de fotografias Seleccione uma fotografia no menu de fotografias e prima o botão / ENTER para uma visualização de diapositivos.
- Page 108 “Photo” do comando. Isto permite-lhe ir rapidamente para as suas fotografias. Para usar esta função, tem de criar uma pasta no CMED2PRO chamada “PHOTO” e colocar lá os seus ficheiros de fotografias. Quando carregar no botão “Photo” do comando, o CMED2PRO vai directamente para esta pasta.
- Page 109 “Video” do comando. Isto permite-lhe ir rapidamente para os seus ficheiros de vídeo. Para usar esta função, tem de criar uma pasta no CMED2PRO chamada “VIDEO” e colocar lá os seus ficheiros de vídeo. Quando carregar no botão “Video” do comando, o CMED2PRO vai directamente para esta pasta.
- Page 110 Crie uma pasta no disco rígido do CMED2PRO com o nome do DVD (por exemplo, “Meu filme”) Copie a pasta VIDEO_TS do seu DVD para a pasta criada no disco rígido do CMED2PRO. Após o término da cópia deve estar semelhante a imagem abaixo: Desligue o CMED2PRO do computador e ligue-o no televisor.
-
Page 111: Menu De Configuração
Prima o botão REPEAT para seleccionar o modo de repetição. No estado PARADO, prima o botão OTB para copiar o conteúdo dos cartões de memória inseridos para o disco rígido do CMED2PRO. 6. Menu de configuração No estado PARADO, prima o botão SETUP para entrar no menu de configuração. - Page 112 Use as sugestões seguintes para resolver problemas quando o seu CMED2PRO não estiver a funcionar devidamente: A luz de Alimentação não acende A fonte de alimentação não está ligada ao CMED2PRO. Volte a ligar a fonte de alimentação ao CMED2PRO. Não há qualquer actividade no visor.
- Page 113 A minha televisão mostra uma imagem a preto e branco em vez de a cores. A sua televisão não suporta o "Multi" TV-System do CMED2PRO. Use o menu Setup para mudar o Sistema de TV para PAL. (Ver capítulo 6)
-
Page 114: Declaração De Conformidade Ce
2L International BV Morada Databankweg 7 3821 AL Amersfoort, Países Baixos ECLARA QUE O PRODUTO Tipo 2,5” MEDIA PLAYER Produto CMED2PRO Nome de marca Conceptronic Cumpre as seguintes directivas: 2004/108/EEC Directiva CEM: Compatibilidade Electromagnética 73/23/EEC Directiva de Baixa Tensão: Equipamento eléctrico desenhado para ser usado dentro de determinados limites de tensão... -
Page 115: A Csomag Tartalma
Conceptronic 2,5-colos médialejátszót használnia. Ha probléma jelentkezne, azt tanácsoljuk, hogy keresse fel a terméktámogatást nyújtó webhelyünket (látogasson el a www.conceptronic.net honlapra, majd ott kattintson a „Support”-ra). Itt található ugyanis a gyakran ismétl d kérdések (GYIK) adatbázisa. Ha a termékkel kapcsolatban további kérdése volna és arra választ webhelyünkön nem talál, e- mailben is fordulhat hozzánk: support@conceptronic.net. - Page 116 SOHA NE ejtse le, rázogassa, illetve ütögesse bárminek az eszközt. A felmelegedés megel zése érdekében ne takarja le az eszközt. A CMED2PRO kizárólag az FAT-/FAT32-es fájlrendszert támogatja (az NTFS nem támogatott). Megjegyzés: Ha a merevlemezt NTFS-re formázza, az kizárólag a számítógép kivehet merevlemezeként fog m ködni.
- Page 117 MAGYAR 2. A médialejátszó funkciói 2.1 A CMED2PRO alkatrészeinek azonosítása A számokkal jelzettek ismertetése: 1. Állapotjelz LED-ek (lásd a 2.2. fejezetet) 6. Komponens (YPbPr) -kimenet 2. Kezel szervek (lásd a 2.3. fejezetet) 7. A/V kimenet 3. A távirányító vev készüléke 8.
- Page 118 5. Az YPbPr kimenet aktivitását jelz LED 3. A merevlemez-meghajtó LED-je 6. Az OTB üzemmódot jelz LED 2.3 Kezel szervek A CMED2PRO-nak különböz kezel szervei vannak, hogy a médialejátszót távirányító nélkül is üzemeltetni lehessen: A számokkal jelzettek ismertetése: 1. Navigációs gombok 4.
- Page 119 MAGYAR 3. A távirányító magyarázata...
- Page 120 MAGYAR Leírás Leírás VIDEO POWER Gomb, amely közvetlen hozzáférést biztosít Be-, illetve kilépés készenléti üzemmódból. a VIDEO mappához. (ON/OFF — BE/KI) P / N DISPLAY Videorendszer kijelölése (PAL/NTSC) Fájladatok megjelenítése a lejátszás alatt. OUTPUT ROTATE A kimen videojel kijelölése. Fényképek forgatása. SLIDE NEXT Belépés zenés diavetítés üzemmódba, illetve...
-
Page 121: Csatlakoztatás Számítógéphez
új meghajtóbetüjel(ek)et rendel hozzá, végül pedig háttértárként használja. (Meghajtója el re FAT32-es fájlrendszerben van formálva.) Innent l fogva filmet, zenét, fényképeket stb. adhat hozzá a CMED2PRO-hoz. A CMED2PRO leválasztása a számítógépr l Kattintson egyszer a „Safe Removal” ikonra a tálcán. - Page 122 Fájlkönyvtár Ha nincs több memóriakártya is csatlakoztatva a CMED2PRO-hoz (csak bels HDD van), a Media Player bekapcsolásakor a fájlkönyvtár megjelenik a tévé képerny jén. Ha több memóriakártya is csatlakoztatva van, a eszközlista jelenik meg a tévé képerny jén a fájlkönyvtár helyett.
- Page 123 MAGYAR 5. Filmek, zene és fényképek lejátszása A Conceptronic CMED2PRO-nak három els dleges funkciója van: Play & watch movies (filmek lejátszása és nézése) Play & listen to Music (zene lejátszása és hallgatása) Play & watch Photos (fényképfelvételek megjelenítése és megtekintése) 5.1 Választási lehet ségek a fényképek lejátszásakor és megtekintésekor...
- Page 124 A CMED2PRO közvetlenül a „PHOTO” mappához ugorhat a merevlemezen, ha a távirányítón megnyomják a „Photo” gombot. Ezzel gyorsan el tud jutni saját felvételeihez. E funkció használatához el bb el kell állítania egy mappát „PHOTO” elnevezéssel a CMED2PRO-n, és fényképfájljait ebben a mappában kell elhelyeznie. Amikor megnyomja a „Photo” gombot a távirányítón, a CMED2PRO egyenesen ehhez a mappához lép.
- Page 125 A CMED2PRO egyenesen a „VIDEO” mappához megy a merevlemezen, ha megnyomják a „Video” gombot a távirányítón. Ezzel gyorsan el tud jutni saját videofájljaihoz. E funkció használatához el bb el kell állítania egy mappát „VIDEO” elnevezéssel a CMED2PRO-n, majd ebben a mappában kell elhelyeznie saját videofájljait. Amikor megnyomja a „Video” gombot a távirányítón, a CMED2PRO egyenesen ehhez a mappához lép.
- Page 126 „CODEC NOT SUPPORTED” (a kodek nem támogatott). DVD lejátszása A CMED2PRO a DVD-ket a merevlemezr l úgy játssza le, mintha azok normál DVD-k volnának. Navigálni lehet a DVD-menüben, ki lehet választani a feliratozást, meg lehet változtatni az audió nyelvét stb.
-
Page 127: Beállítások Menü
Nyomja meg a REPEAT gombot, ha ismétlési üzemmódot kíván kijelölni. STOP állapotban nyomja meg az OTB gombot, ha a behelyezett memóriakártya tartalmát át kívánja másolni a CMED2PRO merevlemezére. 6. Beállítások menü Leállított állapotban nyomja meg a SETUP gombot, ha be kíván lépni a beállítások menüjébe. - Page 128 Az audiokábel nem megfelel en csatlakozik. Bizonyosodjon meg arról, hogy a kábel megfelel en csatlakozik a TV-hez vagy az er sít höz. A CMED2PRO csatlakozik ugyan er sít höz, de az er sít ki van kapcsolva. Kapcsolja be az er sít t.
- Page 129 Ügyelni kell arra, hogy a megfelel mappastruktúrát használja. A mappastruktúrát az 5.3 fejezet ismerteti. A DVD-fájlok nem teljesek vagy sérültek. Ha ilyen helyzet áll el , a CMED2PRO nem indítja el a DVD lejátszását. A DVD bemutatófilmjeinek vetítése alatt a képerny üres.
-
Page 130: Declaration Of Ce Conformity
The manufacturer 2L International BV Address Databankweg 7 3821 AL Amersfoort, the Netherlands Hereby declares that the product Type 2,5” MEDIA PLAYER Product CMED2PRO Brandname Conceptronic Complies with following directives: 2004/108/EEC EMC directive: Electromagnetic Compatibility 73/23/EEC Low Voltage Directive: Electrical equipment designed for use within certain voltage limits The following standards were consulted to assess conformity: EN55022/9.98 Class B... - Page 131 ‘Support’ sayfasına tıklayınız) tavsiye ederiz. Burada Sıkça Sorulan Sorular Veritabanını bulacaksınız. Ürününüz ile ilgili ba ka sorularınız oldu unda ve bunların yanıtlarını web sitemizde bulamadı ınız takdirde bize e-posta gönderin: support@conceptronic.net Conceptronic ürünleri ile ilgili daha fazla bilgi için lütfen Conceptronic Web Sitesini ziyaret edin: www.conceptronic.net. 1. Giri Üniteyi çalı...
- Page 132 Dosyalar ad/boyut/tarih/türe göre sıralanabilir. 1.3 Uyarılar Birlikte verilen güç adaptörünü parçalara ayırmaya çalı mayın. Yüksek voltaj yaralanmalarına neden olabilir. Adaptörün tamir edilmesi gerekirse lütfen bayinizle ya da Conceptronic yardım masası ile temasa geçin. Cihazı a ırı nemden uzak tutun. Cihazı sıvı maddelere batırmayın ya da sıvı maddelere maruz bırakmayın.
- Page 133 TüRKÇE 2. Ortam Oynatıcısının Fonksiyonları 2.1 CMED2PRO parçalarının tanıtımı Rakamların açıklaması: 1. Durum LED’leri (Bkz. Bölüm 2.2) 6. Bile en (YPbPr) Çıkı ı 2. Kumanda Dü meleri (Bkz. Bölüm 2.3) 7. A/V Çıkı ı 3. Uzaktan Kumanda Alıcısı 8. MMC/MS/SD Kart Yuvası...
- Page 134 5. YPbPr çıkı aktif LED’i 3. HDD (Sabit Disk) LED’i 6. OTB Modu LED’i 2.3 Kumanda Dü meleri CMED2PRO’da Ortam Oynatıcısını uzaktan kumanda olmaksızın çalı tırmak için çe itli kumanda dü meleri bulunmaktadır: Rakamların açıklaması: 1. Gezinti Dü meleri 4. Durdurma / Müzik Modu Dü mesi (Müzik Modu için Uzun Basın) 2.
- Page 135 TüRKÇE 3. Uzaktan Kumandanın Açıklaması...
- Page 136 TüRKÇE Tanım Tanım POWER (GÜÇ-AÇMA/KAPAMA) VIDEO Hazırda bekleme moduna girer ya da çıkar. VIDEO klasörüne Do rudan Eri im dü mesi. (AÇIK/KAPALI) P / N DISPLAY (EKRAN) Video sistemini seçer. (PAL / NTSC) Oynatım sırasında dosya bilgilerini gösterir. OUTPUT (ÇIKI ) ROTATE (ÇEV R) Video Çıkı...
- Page 137 TV ba lantısını a a ıdaki ekillerde yapabilirsiniz: - Kompozit Video - Bile en Video CMED2PRO’nun video çıkı ını görüntülerken do ru giri kanalını seçmek için lütfen TV kılavuzuna ba vurun. CMED2PRO VIDEO çıkı sinyalini de i tirmek için uzaktan kumandanızda bulunan OUTPUT (ÇIKI ) dü...
- Page 138 AYGIT L STES DOSYA KÜTÜPHANES Aygıt De i tirme: CMED2PRO’ya ba lı daha fazla Bellek Kartı varsa AYGIT L STES ’ne dönmek için MENÜ dü mesine basabilir, / dü mesine ve / ENTER dü mesine basarak bir aygıt seçebilirsiniz.
- Page 139 TüRKÇE 5. Film, Müzik ve Resim Oynatımı Conceptronic CMED2PRO için 3 ana fonksiyon vardır Film oynat ve seyret Müzik çal ve dinle Foto raf oynat ve izle 5.1 Foto raf oynatma ve görüntüleme seçenekleri Photo Menü (Foto raf Menüsü) içinde bir foto raf seçin ve Slayt gösterisi için / ENTER Dü...
- Page 140 ınızda, CMED2PRO do rudan bu klasöre gidecektir. 5.2 Müzik çalma ve dinleme seçenekleri Müzik Çalma Conceptronic CMED2PRO müzik çalabilece iniz çe itli modlara sahiptir (WAV, MP3 ve WMA deste i vardır) Bir müzik dosyası seçin ve çalmaya ba lamak için / ENTER Dü...
- Page 141 5.3 Film oynatma ve izleme seçenekleri Film oynatma CMED2PRO çe itli video biçimlerini destekler: MPEG2/1, MPEG 4 (XVID, VOB biçimi dahil) video içinde MP3, AC3, AAC ve MPG1/2 ses parçalarını çalma deste i dahil. Dosya kütüphanesinden bir video dosyası seçin ve oynatmaya ba lamak için / ENTER Dü...
- Page 142 TüRKÇE DVD Oynatımı CMED2PRO normal bir DVD gibi sabit diskten DVD oynatır. DVD menüsü içinde gezinebilir, alt yazı seçebilir, ses dillerini vb. de i tirebilirsiniz. Klasör Ayarları Sabit diskten DVD çalmak için CMED2PRO’daki DVD klasörlerini do ru olarak ayarlamanız gerekir.
- Page 143 EQUALIZER ekranı gelecektir). Tam ekran modundan çıkmak için / STOP dü mesine basın. Bir tekrar modu seçmek için REPEAT (TEKRAR) dü mesine basın. STOP (DURDURMA) durumunda, takılı Bellek Kartının içeri ini CMED2PRO’nun Sabit diskine kopyalamak için OTB dü mesine basın. 6. Setup (Ayar) Menüsü...
- Page 144 CMED2PRO düzgün bir ekilde çalı madı ında a a ıdaki sorun giderme ipuçlarını kullanın: Güç LED’i yanmıyor Güç kayna ı CMED2PRO’ye ba lı de il. Güç kayna ını CMED2PRO’ye yeniden ba layın. Ekranda hareket yok. CMED2PRO hazırda bekleme durumunda. Cihazı etkinle tirmek için uzaktan kumanda üzerindeki dü...
- Page 145 Play/Pause dü mesine basıldı ında DVD oynatma i lemi ba lamıyor. Do ru klasör yapısını kullandı ınızdan emin olun. Klasör yapısı bölüm 5.3’de açıklanmı tır. DVD dosyaları bitmemi , bozuk ya da hasarlı. Bu durum oldu unda CMED2PRO, DVD oynatmaz. DVD giri filmi sırasında ekran kararıyor.
-
Page 146: Specifications
SPECIFICATIONS Specifications Power 100~240VAC, 50/60HZ Power Consumption 7W (max) Image Resolution 720x480 (NTSC), 720x576 (PAL) Color System PAL/NTSC Frequency Response ±3dB(20HZ~20KHZ) Signal/Noise Ratio 80dB Audio Cross talk 70dB Audio Output 1,0±0,2V(rms) Video Output 1,0±0,2Vp-p, 75 USB Data Transfer Rate USB 2.0, Max. 480Mb/s File Format Supported AVI/MPG/DAT/VOB/WAV/MP3/WMA/JPG HDD Interface... - Page 147 The manufacturer 2L International BV Address Databankweg 7 3821 AL Amersfoort, the Netherlands Hereby declares that the product Type 3,5" MEDIA PLAYER + DISPLAY Product CMED2PRO Brandname Conceptronic Complies with following directives: 2004/108/EEC EMC directive: Electromagnetic Compatibility 73/23/EEC Low Voltage Directive:...
Need help?
Do you have a question about the CMED2PRO and is the answer not in the manual?
Questions and answers