Table of Contents
Advertisement
Quick Links
Keystart 9620 series
Engine & Generator Controls
Installation Instructions
Please read the following information before installing. A visual inspection of this product for damage during
shipping is recommended before installation. It is your responsibility to ensure that qualified mechanical and electrical
technicians install this product. If in doubt, please contact your local Murphy representative.
W A R N I N G
BEFORE BEGINNING INSTALLATION OF THIS PRODUCT
Disconnect all electrical power to the machine
Make sure the machine cannot operate during installation
Follow all safety warnings of the machine manufacturer
Read and follow all installation instructions
General
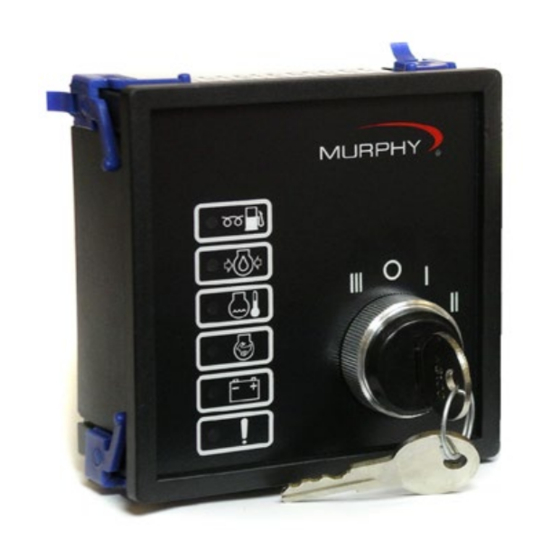
The Keystart 9620 series provides manual start/stop and automatic
fault shutdown protection for generators, pumps and other engine-
driven applications.
Keystart features a 3 way keyswitch for operator control of the engine,
with 6 LEDs for indication of status and faults - see 'front view' diagram
for details. Electrical connection and configuration options are at the rear
- see 'Rear view, connection and settings' diagram.
For each Keystart ordered, the following is supplied:
•
1 x Keystart module, fitted with 2 x panel mounting clips
•
2 x keys
•
these instructions
Panel installation
Keystart is designed for front-of-panel mounting in a DIN standard
92 x 92 mm (3.6 x 3.6 in.) cut-out. Allow 75mm (3.0 in.) behind the
panel for the case depth, keyswitch and cable connection.
Secure the case to the panel with the two ratcheted mounting clips:
1.
2.
Remove the plastic
At the front of the
mounting clips from
panel, insert the
the Keystart case:
Keystart (without
release each clip's
clips) into the panel
ratchet mechanism by
cut-out (C).
pulling outwards (A),
then slide the clip
back and off the
case (B).
GENERAL INFORMATION
3.
At the rear of the panel,
refit the two mounting
clips into the slots on
the Keystart case (D).
Slide each clip forward
until the arms (E) are
secured behind the
panel face. Ratchet
mechanism (F) prevents
the clip from moving
backwards.
Product specifications
power supply:
operating voltage:
steady state
brown out / cranking
current consumption
inputs:
fault switch inputs:
–ve input defined as:
speed sensing input:
generator AC (J2+J3 on)
mag. pickup (J2+J3 off)
outputs:
run, preheat
start (crank)
alarm
calibration/tacho
adjustable settings:
preheat timer
fault override timer
overspeed trip level
general:
overall dimensions (w x h x d)
panel cut-out size
weight
operating temperature
Model options
00-02-0657
nd
revision A, 22
September 2008
catalogue section 40 & 75
7 – 30 VDC
5 VDC
< 100mA
close to negative DC during fault
–1V to +1V w.r.t. – ve DC supply
(model 9621 only)
70 – 270 VAC rms,
<50 to >60 Hz. nominal
10 – 60 VAC peak,
<2000 to >6500 Hz. nominal
(all ratings non-reactive)
positive DC, switched NO relay contact,
10 A max. @ 24VDC
positive DC via keyswitch contacts,
10 A max. @ 24V DC
negative DC (open collector
NPN transistor), 250mA max.
to suit 0 – 1 mA, 75 Ohm meter
output = 0.75mA at rated engine speed
0 or 10 secs (link J1),
default = 0 secs
2 to 20 secs (VR1),
default = 10 secs
100 to 130 % (VR3) of
nominal speed calibration (VR2),
default = 110% (of 50 or 60 Hz)
96 x 96 x 95 mm / 3.8 x 3.8 x 3.7 in.
DIN 92 x 92 mm / 3.6 x 3.6 in.
approx. 300 g / 0.7 lb
–35°C to +55°C / –31°F to 131°F
Advertisement
Table of Contents

Summary of Contents for Murphy Engine and Generator Controls Keystart 9620
-
Page 1: Installation Instructions
Please read the following information before installing. A visual inspection of this product for damage during shipping is recommended before installation. It is your responsibility to ensure that qualified mechanical and electrical technicians install this product. If in doubt, please contact your local Murphy representative. W A R N I N G... - Page 2 Release the screwdriver/spring clamp pressure and check that the wire is secure. General connection recommendations Murphy make several recommendations for the electrical connection of engine and generator controllers. • minimise controller output load current (i.e. wear/tear and potential damage) by using slave relays between the controller outputs and high power end-devices such as fuel and starter solenoids.
- Page 3 VR2, Keystart gives 0 mA at 0 RPM/Hz. and 0.75mA (3/4 scale) at normal running RPM/Hz. Murphy - Keystart 9620 series installation instructions ELECTRICAL CONNECTION (cont.) Pin Function With links J2 & J3 ON:...
- Page 4 MURPHY, the Murphy logo, are registered and/or common law trademarks of Murphy Industries, Inc. This document, including textual matter and illustrations, is copyright protected by Frank W Murphy Ltd., with all rights reserved. © 2008 Frank W Murphy Ltd. FW MURPHY P.O.Box 470248, Tulsa, Oklahoma 74147 USA...


Need help?
Do you have a question about the Engine and Generator Controls Keystart 9620 and is the answer not in the manual?
Questions and answers