Health O Meter 500KL User Instructions
Eye level digital beam scale
Hide thumbs
Also See for 500KL:
- User instructions (72 pages) ,
- Operation manual (17 pages) ,
- Manual (10 pages)
Advertisement
Table of Contents
Ey
ye Lev
Para ver l
as instrucc
Po
ur les instr
uctions de
PELSTAR,
P
LLC
P/N UM500
0KL Rev 20160
0414-Eng Only
Mode
el 500
vel Dig
gital B
U
User In
nstruc
ciones de us
so en españ
l'utilisateur
r dans la vis
th
9500 W
West 55
St.
McCook, IL
© P
elstar, LLC 20
y
1
0KL
Beam
Scale
ctions
ñol visita
ww
ww.homscal
site français
se
www.hom
60525-7110
USA
16
E112
2697
es.com
mscales.com
www
w.homscales
s.com
Advertisement
Table of Contents

Related Manuals for Health O Meter 500KL


Summary of Contents for Health O Meter 500KL
- Page 1 Mode el 500 ye Lev vel Dig gital B Beam Scale E112 2697 User In nstruc ctions Para ver l as instrucc ciones de us so en españ ñol visita ww.homscal es.com ur les instr uctions de l'utilisateur r dans la vis site français www.hom mscales.com...
-
Page 2: Table Of Contents
Model 500KL ® Thank you for your purchase of this Health o meter Professional product. Please read this manual carefully, and keep it for easy reference or training. TABLE OF CONTENTS Cautions and Warnings ..................... 3 Specifications / Definition of Symbols................ 5 Certifications / Connectivity / Disposal .............. -
Page 3: Cautions And Warnings
CAUTIONS AND WARNINGS When operating this scale: To prevent injury and damage to your scale, please follow the enclosed user instructions to assemble and operate very carefully. Exercise caution when assembling the scale column so as to not pinch the load cell connector cable. - Page 4 CAUTIONS AND WARNINGS When operating this scale with the AC adapter: Operate this scale exclusively with the AC adapter provided by Health o meter Professional. Use of an unspecified adapter will void the warranty, and can pose a serious safety hazard.
-
Page 5: Specifications / Definition Of Symbols
SPEC CIFICAT TIONS FOR TH HIS SCA General The Mod del 500KL ey ye level digit tal beam sca ale uses high hly sophistic ated microp rocessor technolog gy. Each pre ecision scale e is designed d to provide accurate, re... -
Page 6: Certifications / Connectivity / Disposal
Medica al Electrical E Equipment 2. CSA C2 22.2 No. 60 1-1 M90: Me edical Electr rical Equipm 500KL S Scale Conn nectivity In nformation To enabl e reliable tra ansmission o of weight, he eight, and Bo... -
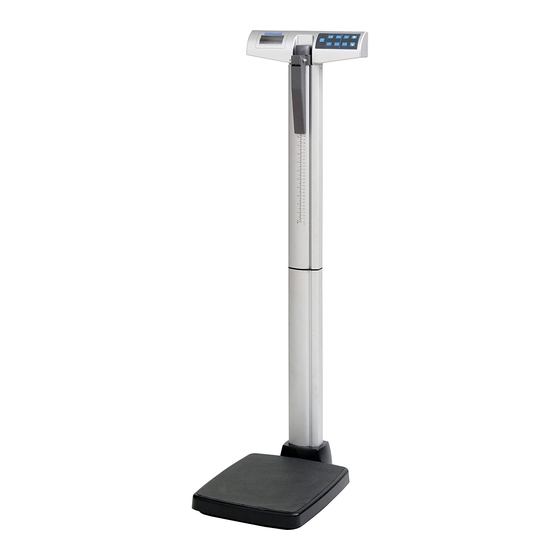
Page 7: 500Kl Assembly Instructions
500KL ASSEMBLY INSTRUCTIONS Before Assembly Each 500KL eye level digital beam scale is shipped disassembled in one carton. Carefully inspect the carton for shipping damage before unpacking. If damage is found, contact your ® shipper or a Health o meter Professional representative immediately at 1-800-815-6615. - Page 8 500KL ASSEMBLY INSTRUCTIONS (CONTINUED) Assembling the 500KL Scale 1. Carefully remove the contents of the carton and place each part on a flat, level, and dry surface. 8 ...
- Page 9 500KL ASSEMBLY INSTRUCTIONS (CONTINUED) 2. Remove the 4 column mounting screws and washers from the bottom of column B Screws and washers and set aside for assembly step 8. Column B 3. Remove the black bracket from scale platform C. Read the “Attention”...
- Page 10 500KL ASSEMBLY INSTRUCTIONS (CONTINUED) 4. Locate the load cell connector cable inside column A. While Column B Column A holding column B, slide the (top) (bottom) cable through the center opening at the top of column B. Push the cable all the way...
- Page 11 500KL ASSEMBLY INSTRUCTIONS (CONTINUED) 6. Place scale platform C on its side and place Column B on its side, perpendicular to the platform. The front of the display head on Column A should be facing forward and above scale platform C.
- Page 12 500KL ASSEMBLY INSTRUCTIONS (CONTINUED) 8. Position and secure the connected columns A and B to scale platform C. Locate the 4 column mounting screws previously removed in step 2. Insert the 4 screws through the bottom of scale platform C screw holes and into Column B.
- Page 13 500KL ASSEMBLY INSTRUCTIONS (CONTINUED) 10. Position the bottom of the fully assembled height rod into the height rod opening G at the top of column A. Press locking tab F inward to insert the height rod into the height rod opening G.
-
Page 14: Set Up / Batteries
Display assembly Battery cover ® 4. Replace or install 6 new AA batteries. Health o meter Professional recommends using an alkaline or lithium battery, rated for 130°F (54°C) operation. Do not use zinc-carbon batteries. 5. Re-attach the battery cover to the display assembly. - Page 15 SET UP / BATTERIES (CONTINUED) Optional AC Adapter 1. Connect the AC adapter (not included) into the adaptor jack on the scale platform C. Warning: To avoid a safety hazard, use AC adapter model ADPT31 (Domestic, USA) or ADPT30WA (International, plug kit) Adaptor Jack 2.
- Page 16 OPER RATING G INSTR RUCTIO Keypad nction scription N/OFF Turns sca le on and of Holds the weight value e of the patie ent on the d isplay until t he button is HOLD/R RELEASE pressed ag gain to clear...
-
Page 17: Operating Instructions
OPERATING INSTRUCTIONS (CONT) Weighing a Patient Note: When this scale is turned on, it will always default to the settings and units last used (LB or KG). 1. Make sure there is nothing on the scale platform. 2. Press the ON/OFF button to turn the display assembly on. 3. - Page 18 OPERATING INSTRUCTIONS (CONT) 2. Position the patient facing the display head. Ensure that the patient’s posture is upright, and that the patient’s head is straight and level. Slide the headpiece down until it rests on the patient’s head. 3. Determine the patient’s height by reading the value on the measuring strip nearest to the line on the indicator, as shown below.
- Page 19 OPERATING INSTRUCTIONS (CONT) BMI Function Body Mass Index (BMI) is a ratio between a person’s weight and height and interpreted as a BMI score. This BMI score is then used as a tool to categorize a patient as underweight, normal, overweight, obese or morbidly obese.
- Page 20 OPERATING INSTRUCTIONS (CONT) KG and LB Lock Out Note: The default weighing mode for this scale can be changed from LB/KG to KG only or LB only. To Change Weighing Mode: 1. Press the ON/OFF button to turn the scale on. 2.
-
Page 21: Maintenance
Maintenance The following pages provide instructions for maintenance, cleaning, calibrating, and troubleshooting of the 500KL scale. Maintenance operations other than those described in this manual should be performed by qualified service personnel. Caution: Before first use, or after long periods of non-use, check the scale for proper operation and function. -
Page 22: Calibration
This scale has been factory calibrated, and does not require calibration prior to use. If required, the scale can be calibrated. Calibration of your 500KL scale is performed using kilograms (KG) or pounds (LB), according to the units of measure used upon entering into the calibration path. -
Page 23: Troubleshooting
TROUBLESHOOTING Troubleshooting Before contacting service personnel, refer to the following instructions to check and to correct any failures. Symptom Possible Cause Corrective Action Scale does not turn on 1. Dead battery 1. Replace batteries 2. Faulty electrical outlet 2. Use a different outlet 3. -
Page 24: Warranty
Pelstar, LLC. ® ® We reserve e the right to im mprove, enhanc ce, or modify H Health o meter Professional p product feature es or specificat tions without not tice. © Pe lstar, LLC 2016...
Need help?
Do you have a question about the 500KL and is the answer not in the manual?
Questions and answers