Table of Contents
Advertisement
Available languages
Available languages
Quick Links
1 1
H H
O O
U U
R R
1 1
H H
O O
U U
R R
INSTRUCTION MANUAL
Catalog Numbers BDFC240, FS240FC
T
T
HANK
YOU
FOR
HANK
YOU
FOR
G
.B
G
.B
O
T
O
WWW
LACKAND
O
T
O
WWW
LACKAND
T
O
REGISTER
T
O
REGISTER
BEFORE RETURNING THIS PRODUCT
FOR ANY REASON PLEASE CALL
1-800-544-6986
BEFORE YOU CALL, HAVE THE CATALOG No. AND DATE CODE AVAILABLE. IN MOST CASES, A
BLACK & DECKER REPRESENTATIVE CAN RESOLVE THE PROBLEM OVER THE PHONE. IF YOU HAVE
A SUGGESTION OR COMMENT, GIVE US A CALL. YOUR FEEDBACK IS VITAL TO BLACK & DECKER.
SAVE THIS MANUAL FOR FUTURE REFERENCE.
VEA EL ESPAÑOL EN LA CONTRAPORTADA.
INSTRUCTIVO DE OPERACIÓN, CENTROS DE SERVICIO Y
PÓLIZA DE GARANTÍA. ADVERTENCIA: LÉASE ESTE
INSTRUCTIVO ANTES DE USAR EL PRODUCTO.
CAT. NO. BDFC240, FS240FC
COPYRIGHT © 2006 BLACK & DECKER
WARNING! Read and understand all instructions. Failure to follow
all instructions listed below may result in electric shock, fire and/or
serious personal injury.
SAVE THESE INSTRUCTIONS
Important Safety Instructions for Battery Chargers
SAVE THESE INSTRUCTIONS: This manual contains important safety and operating
instructions for the BDFC240 and FS240FC battery chargers.
• Before using charger, read all instructions and cautionary markings on charger, battery
pack, and product using battery pack.
DANGER: Electrocution hazard. 120 volts are present at charging terminals. Do not probe
with conductive objects. Electric shock or electrocution may result.
WARNING: Shock hazard. Do not allow any liquid to get inside charger. Electric shock may
result.
CAUTION: Burn hazard. To reduce the risk of injury, charge only Black & Decker Slide Pack
rechargeable batteries. Other types of batteries may burst causing personal injury and
damage.
CAUTION: Under certain conditions, with the charger plugged in to the power supply, the
exposed charging contacts inside the charger can be shorted by foreign material. Foreign
materials of a conductive nature such as, but not limited to, steel wool, aluminum foil, or any
buildup of metallic particles should be kept away from charger cavities. Always unplug the
charger from the power supply when there is no battery pack in the cavity. Unplug charger
before attempting to clean.
• These chargers are not intended for any uses other than charging Black & Decker
rechargeable batteries. Any other uses may result in risk of fire, electric shock or
electrocution.
• Do not expose charger to rain or snow.
• Pull by plug rather than cord when disconnecting charger. This will reduce risk of
damage to electric plug and cord.
• Make sure that cord is located so that it will not be stepped on, tripped over, or
otherwise subjected to damage or stress.
• Do not use an extension cord unless it is absolutely necessary. Use of improper
extension cord could result in risk of fire, electric shock, or electrocution.
• An extension cord must have adequate wire size (AWG or American Wire Gauge) for
safety. The smaller the gauge number of the wire, the greater the capacity of the cable,
that is 16 gauge has more capacity than 18 gauge. When using more than one extension
to make up the total length, be sure each individual extension contains at least the
minimum wire size.
Recommended Minimum Wire Size for Extension Cords
Total Length of Cord
25 ft.
50 ft.
75 ft.
100 ft.
7.6 m 15.2 m
22.9 m 30.5 m 38.1 m 45.7 m
Wire Size AWG
18
18
16
16
• Do not place any object on top of charger or place the charger on a soft surface that
might block the ventilation slots and result in excessive internal heat. Place the
charger in a position away from any heat source. The charger is ventilated through slots in
the top and the bottom of the housing.
• Do not operate charger with damaged cord or plug — have them replaced immediately.
• Do not operate charger if it has received a sharp blow, been dropped, or otherwise
damaged in any way. Take it to an authorized service center.
• Do not disassemble charger; take it to an authorized service center when service or
repair is required. Incorrect reassembly may result in a risk of electric shock, electrocution
or fire.
• Disconnect the charger from the outlet before attempting any cleaning. This will
reduce the risk of electric shock. Removing the battery pack will not reduce this risk.
C C
H H
A A
R R
G G
E E
R R
S S
C C
H H
A A
R R
G G
E E
R R
B
&
D
B
&
D
CHOOSING
LACK
ECKER
CHOOSING
LACK
ECKER
D
.
/N
O
D
.
/N
ECKER
COM
EW
ECKER
COM
EW
.
.
YOUR
NEW
PRODUCT
YOUR
NEW
PRODUCT
FORM NO. 5147849-00
125 ft.
150 ft.
175 ft.
53.3 m
14
14
12
• NEVER attempt to connect 2 chargers together.
• The charger is designed to operate on standard 120V household electrical power. Do
not attempt to use it on any other voltage.
Introduction
Your charger is designed to use standard 120 volt AC, 60 Hz power. It charges Black and
Decker slide pack batteries from 9.6V up to 24V. Do not use DC or any other voltage. Charge
S S
time will depend on battery type and capacity. Black & Decker three terminal slide pack batteries
are designed for fast charging and most will be charged in one hour or less. Special high
capacity batteries may take longer. Two terminal slide pack batteries will be charged at a slower
rate to avoid overheating the pack. Most of these will be charged in 2 hours or less.
• Do not incinerate the battery pack even if it is severely damaged or is completely
worn out. The battery pack can explode in a fire.
• A small leakage of liquid from the battery pack cells may occur under extreme usage
or temperature conditions. This does not indicate a failure. However, if the outer seal is
!
!
broken and this leakage gets on your skin:
a. Wash quickly with soap and water.
O
WNER
WNER
b. Neutralize with a mild acid such as lemon juice or vinegar.
c. If battery liquid gets into your eyes, flush them with clean water for a minimum of 10
minutes and seek immediate medical attention. (Medical Note: The liquid is 25-35%
solution of potassium hydroxide.)
• Charge the battery packs only in Black & Decker chargers.
• DO NOT splash or immerse in water or other liquids.
• Do not store or use the tool and battery pack in locations where the temperature
may reach or exceed 105°F (40˚) (such as outside sheds or metal buildings in
summer).
DANGER: Electrocution hazard. Never attempt to open the battery pack for any reason. If
battery pack case is cracked or damaged, do not insert into charger. Electric shock or
electrocution may result. Damaged battery packs should be returned to service center for
recycling.
NOTE: Battery storage and carrying caps are provided for use whenever the battery is out of
the tool or charger. Remove cap before placing battery in charger or tool.
WARNING: Fire hazard. Do not store or carry battery so that metal objects can
contact exposed battery terminals. For example, do not place battery in aprons, pockets,
tool boxes, product kit boxes, drawers, etc., with loose nails, screws, keys, etc. without battery
cap. Transporting batteries can possibly cause fires if the battery terminals
inadvertently come in contact with conductive materials such as keys, coins, hand
tools and the like. The US Department of Transportation Hazardous Material Regulations
(HMR) actually prohibit transporting batteries in commerce or on airplanes (i.e., packed in
suitcases and carry-on luggage) UNLESS they are properly protected from short circuits. So
when transporting individual batteries, make sure that the battery terminals are protected and
well insulated from materials that could contact them and cause a short circuit.
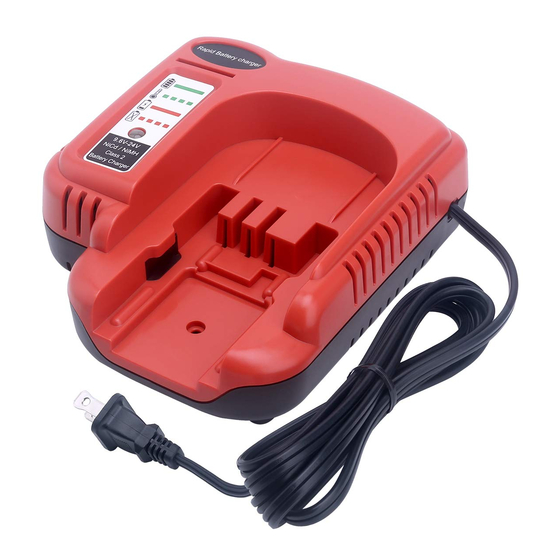
Charging Procedure
1. Plug the charger into an appropriate outlet. NOTE: Do not charge by means
of an engine generator or DC power source. Use only 120V AC.
2. Insert battery into charger (Fig.1) . Be sure the pack(s) is fully seated in the
charger. The red (charging) light will flash continuously indicating that the
charging process has started.
3. The completion of charge will be indicated by the red light remaining ON
continuously. The pack is fully charged and may be used at this time or left in the
charger.
Charge Indicators
Red light flashes continuously: Charging
(JAN. -06)
PRINTED IN CHINA
Red light remains ON continuously: Charged
Red light flashing at a fast rate: Replace Pack
The charger is designed to detect certain problems that can arise with battery packs which
would be indicated by the red light flashing at a fast rate. If this occurs, re-insert battery
pack. If problem persists, try a different battery pack to determine if the charger is OK. If the
new pack charges correctly, then the original pack is defective and should be returned to a
service center for recycling. If the new battery pack gives the same trouble indication as the
original, have charger tested at an authorized service center.
Red light flashes long, then short (dash dot, dash dot): Hot Pack Delay
When the charger detects a battery that is hot, it automatically starts a Hot Pack Delay,
suspending charging until the battery has cooled. After the battery has cooled, the charger
automatically switches to the Pack Charging mode. This feature ensures maximum battery
life. The red light flashes long, then short (dash dot, dash dot) while in
the Hot Pack Delay mode.
Wall Mounting (Figure 2)
A mounting hole is provided for mounting the
charger on a vertical surface.
Leaving the Battery Pack in the Charger
The charger and battery pack can be left connected with the red light glowing indefinitely. The
charger will keep the battery pack fresh and fully charged.
NOTE: A battery pack will slowly lose its charge when kept out of the charger. If the battery
pack has not been kept on maintenance charge, it may need to be recharged before use. A
battery pack may also slowly lose its charge if left in a charger that is not plugged into an
appropriate AC source.
Important Charging Notes
1. Longest life and best performance can be obtained if the battery pack is charged when the
air temperature is between 65°F and 75°F (18°- 24°C). DO NOT charge the battery pack
in an air temperature below +40°F (+4.5°C), or above +105°F (+40.5°C). This is important
and will prevent serious damage to the battery pack.
2. The charger and battery pack may become warm to touch while charging. This is a normal
condition, and does not indicate a problem. To facilitate the cooling of the battery pack
after use, avoid placing the charger or battery pack in a warm environment such as in a
metal shed, or an uninsulated trailer.
3. If the battery pack does not charge properly:
a. Check current at receptacle by plugging in a lamp or other appliance
b. Check to see if receptacle is connected to a light switch which turns power off when you
turn out the lights.
c. Move charger and battery pack to a location where the surrounding air temperature is
approximately 65°F - 75°F (18°- 24°C).
d. If charging problems persist, take the tool, battery pack and charger to your local
service center.
4. The battery pack should be recharged when it fails to produce sufficient power on jobs
which were easily done previously. DO NOT CONTINUE to use under these conditions.
Follow the charging procedure. You may also charge a partially used pack whenever you
desire with no adverse affect on the battery pack.
5. Under certain conditions, with the charger plugged into the power supply, the exposed
charging contacts inside the charger can be shorted by foreign material. Foreign materials
of a conductive nature such as, but not limited to, steel wool, aluminum foil, or any buildup
of metallic particles should be kept away from charger cavities. Always unplug the charger
from the power supply when there is no battery pack in the cavity. Unplug charger before
attempting to clean.
6. Do not freeze or immerse charger in water or any other liquid.
WARNING: Shock hazard. Don't allow any liquid to get inside charger. Electric shock may
result.
CAUTION: Never attempt to open the battery pack for any reason. If the plastic housing of
the battery pack breaks or cracks, return to a service center for recycling.
SAVE THESE INSTRUCTIONS
READ ALL INSTRUCTIONS
MOUNTING HOLE
Fig.1
Fig.2
Advertisement
Table of Contents

Related Manuals for Black & Decker BDFC240


Summary of Contents for Black & Decker BDFC240
-
Page 1: Instruction Manual
SAVE THESE INSTRUCTIONS: This manual contains important safety and operating When the charger detects a battery that is hot, it automatically starts a Hot Pack Delay, instructions for the BDFC240 and FS240FC battery chargers. suspending charging until the battery has cooled. After the battery has cooled, the charger •... - Page 2 CONSERVER CES DIRECTIVES : ce mode d’emploi renferme d’importantes directives de more details. sécurité et d’utilisation pour les chargeurs de pile modèles BDFC240 et FS240FC. • Check current at • Avant d’utiliser le chargeur, lire toutes les directives et les indications d’avertissement receptacle by figurant sur le chargeur, le bloc-piles et le produit utilisé...
- Page 3 CONSERVE ESTAS INSTRUCCIONES: Este manual contiene instrucciones importantes de cadmium déchargées. Aidez-nous à protéger l’environnement et à conserver nos ressources seguridad y de operación para los cargadores de baterías BDFC240 y FS240FC. naturelles en retournant les piles au nickel cadmium épuisées à un centre de réparation •...
- Page 4 Dejar el paquete de baterías en el cargador • No exponga el cargador a la lluvia ni a la nieve. El cargador y el paquete de baterías se pueden dejar conectados con la luz roja encendida • Tire del enchufe en lugar del cable al desconectar el cargador. Esto reducirá el riesgo indefinidamente.
- Page 5 provincia. Si tiene alguna pregunta, comuníquese con el gerente del Centro de Servicio de Black & Decker de su zona. Este producto no está diseñado para uso comercial. REEMPLAZO GRATUITO DE LAS ETIQUETAS DE ADVERTENCIA: si sus etiquetas de advertencia se tornan ilegibles o faltan, llame al (55)5326-7100 para que se le reemplacen gratuitamente.
Need help?
Do you have a question about the BDFC240 and is the answer not in the manual?
Questions and answers
What does the green light on my BDFC240 charger signify?