Table of Contents
Advertisement
Quick Links
Advertisement
Table of Contents

Related Manuals for LEXIBOOK MFC270EN


Summary of Contents for LEXIBOOK MFC270EN
- Page 1 MFC270ENIM1353_24Aug_V04.indd 1 24/08/2013 1:32 PM...
-
Page 2: Welcome
Welcome! Congratulations! You just bought the new Lexibook® tablet. We invite you to read this manual to take full advantage of all the features offered by your Lexibook® tablet as well as detailed instructions and safety tips. One tablet, thousands of possibilities... -
Page 3: Table Of Contents
Presentation of your Lexibook® tablet ..............7 Turning your tablet on and off ................. 7 Configuring the Lexibook® Parent mode ..............8 How to activate the Wi-Fi on your Lexibook® tablet..........10 The Settings menu of your Lexibook® tablet ............13 Headphones Connection ..................14 ®... -
Page 4: Safety Instructions
Safety Instructions CAUTION: TO REDUCE THE RISK OF ELECTRIC SHOCK. DO NOT REMOVE COVER (OR BACK). NO USER SERVICEABLE PARTS INSIDE. REFER SERVICING TO QUALIFIED SERVICE PERSONNEL. The graphic symbols on the back cover of the product mean the following: DANGEROUS VOLTAGE: The lightning flash with arrowhead symbol within an equilateral triangle is intended to alert the user to the presence of... -
Page 5: Important Safety Instructions
IMPORTANT SAFETY INSTRUCTIONS WARNING: THIS PRODUCT IS NOT A TOY, ADULT SUPERVISION IS REQUIRED. 1. Read these instructions. 2. Keep these instructions. 3. Heed all warnings. 4. Follow all instructions. 5. Do not use the product on your lap for more than 30 minutes, without a 5-minute break at least. -
Page 6: Epilepsy Warning
- When in use, take breaks of 10 to 15 minutes every hour. Packaging Contents When unpacking, ensure that the following elements are included: 1 x Lexibook® Tablet Junior 2 1 x USB cable 1 x AC adaptor 1 x Instruction manual WARNING: All packaging materials, such as tape, plastic sheets, wire ties and tags are not part of this product and should be discarded for your child’s safety. -
Page 7: Discover Your Lexibook® Tablet
7. Touch Screen Turning your tablet on and off 1. To turn your Lexibook® tablet on, press the On/Off button (10) for 3 seconds. The button is located on the upper side of the unit. 2. Please wait while the Android operating system is loading. -
Page 8: Configuring The Lexibook® Parent Mode
Note: You can briefly press the On/Off button (10) to put your tablet in standby mode. Configuring the Lexibook® Parent mode The first time you use your tablet, it is recommended to set a password in order to restrict access to the advanced settings (Wi-Fi, Sound, Display…). By default, there is no password. - Page 9 3. To change an existing password, enter your old password in the “Old lock Password” box, then enter a new password in the “New Password” box, confirm it and click “OK”. here To access the advanced settings of the tablet, select the “Settings” icon in the top right side of the Home screen, then enter your password and click “OK”.
-
Page 10: How To Activate The Wi-Fi On Your Lexibook® Tablet
How to activate the Wi-Fi on your Lexibook® tablet 1. On the Home screen, select the “Settings” icon in the top right side of the Home screen, enter your password and click “OK”. 2. Touch the “OFF” switch to turn on the Wi-Fi. - Page 11 3. Please wait while the Wi-Fi turns on. This operation may require 5-10 seconds. 4. The list of available Wi-Fi networks appears on the right side of the screen. Touch the Wi-Fi network that you want to connect to. The name of the network depends on your Wi-Fi modem or router.
- Page 12 5. Enter the password of the Wi-Fi network. The password depends on your Wi-Fi modem or router. If unsure, please check the relevant instruction manuals or contact your network provider. 6. Click on the “Connect” button to connect to the Wi-Fi network. This operation may require 5-20 seconds.
-
Page 13: The Settings Menu Of Your Lexibook® Tablet
7. Once connected, the “Connected” message is displayed under the Wi-Fi network. tact The Settings menu of your Lexibook® tablet • Access the “Settings” menu of the tablet d is On the Home screen, click the button in the top right side, then enter your password and click “OK”. -
Page 14: The Headphones Connection
Apps To manage the applications of the tablet (uninstall…) PERSONAL Security To set the security options of the tablet (passwords…) Warning: Be careful to remember/write down your passwords trad to avoid blocking your tablet in case you forget them. © 2 Language &... -
Page 15: How To Activate The Bluetooth ® On Your Lexibook® Tablet
The Bluetooth word mark and logos are registered trademarks owned by Bluetooth SIG, Inc. and any use of such marks by Lexibook® is under license. Other trademarks and trade names are those of their respective owners. © 2013 Bluetooth SIG, Inc. - Page 16 ® 3. Please wait while the Bluetooth turns on. This operation may require 5-10 seconds. ® 4. Turn your Bluetooth device on. Make sure to activate the search/pair mode. For ® more information, please refer to the instruction manual of your Bluetooth device.
- Page 17 ® 6. If pairing to your Bluetooth device fails, a message indicating communication ® issues appears on the screen. Make sure that your Bluetooth device is turned on and is in search/pair mode. ® 7. The tablet first pairs with the Bluetooth device and then automatically connects to the device.
- Page 18 ® 8. Once connected, the “Connected” message is displayed in the Bluetooth device ® list, under “Paired Devices”. To disconnect your Bluetooth device from the tablet ® (but keep it paired), press on the Bluetooth device again. ® 9. To modify the Bluetooth settings for this particular device, press the “Settings”...
- Page 19 ® 10. Press on the “Rename” option to edit the name of your Bluetooth device. ® 11. Press the “Unpair” button to disconnect and unpair your Bluetooth device from the tablet. To reconnect it to the tablet, the device has to be paired again. ®...
-
Page 20: Using A Memory Card
Using a Memory Card In order to store additional files or to have more storage space on your tablet, you can buy a Micro SD/TransFlash card (sold separately), and then insert it in the tablet. You may also delete the included files in your tablet such as videos, songs and electronic books. - Page 21 2. Press “OK” to confirm and wait for the card to be unmounted. blet. 3. You can now remove the memory card. Press the card into the card slot to release it. Notes: Never remove the memory card without disabling it first. Never remove the memory card while the tablet is reading from or writing to the memory card.
-
Page 22: Et Navigation
• Navigation with the Gallery You can use the “Gallery” application to browse your pictures. Images imported to your Lexibook® tablet via USB or Micro SD card are automatically added to the Gallery. • Precautions when using the touch screen Ensure that the touch screen is not brought into contact with dirt, liquids or •... -
Page 23: Rotating The Screen
Rotating the Screen The tablet is equipped with a motion sensor that will automatically switch the display vertically or horizontally. To change the display orientation, simply rotate your tablet. The size and direction of the current display will be automatically adjusted. Notes: To allow the screen to rotate automatically, you must first enable the “Auto... -
Page 24: Inserting The Micro Usb
Note: You may also connect an external Lexibook® keyboard to your Lexibook® tablet. • Typing numbers To type numbers, press the NUMBERS key to display the keypad of the virtual keyboard. Inserting the Micro USB WARNING: Before connecting the cable’s micro USB side to your tablet, please ask your parents’... -
Page 25: Using The Battery
Using the Battery Notes: • Only use the unit in combination with the adapter supplied. Do not use a different adapter to power the tablet. • Whenever possible, keep the AC adapter plugged into the tablet and an electrical outlet to recharge the battery. •... -
Page 26: The Home Screen Of Your Lexibook® Tablet
2. The Home Screen of your Lexibook® Tablet The Taskbar The taskbar is located at the bottom of the screen. It includes the following: Status icons: These icons provide information on the tablet and its statuses • (battery level, Wi-Fi…) Touch screen keys: These keys provide direct access to specific menus or •... -
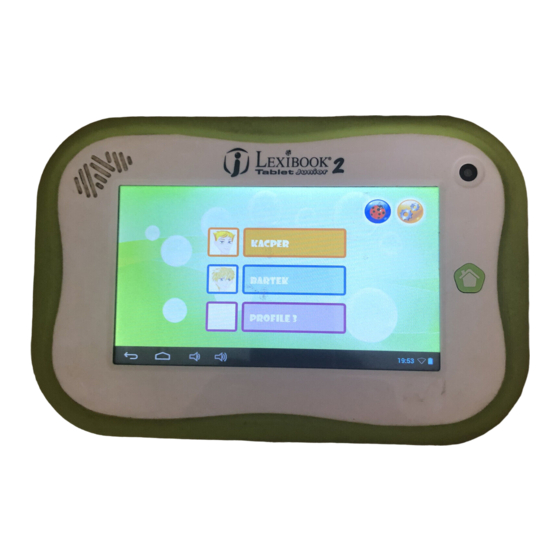
Page 27: Profile Selection Screen
Profile Selection Screen You can create up to three profiles on your tablet. To Create a New Profile 1. Click on the white square located on the left of “PROFILE”. 2. Click on the "Your Name" text input field to enter your name with the keyboard. MFC270ENIM1353_24Aug_V04.indd 27 24/08/2013 1:32 PM... - Page 28 3. If you want, you can click on the “Add your note here” text input field to enter a personal message. 4. Enter your date of birth using the "+" and "-" icons. MFC270ENIM1353_24Aug_V04.indd 28 24/08/2013 1:32 PM...
- Page 29 5. Choose an avatar by scrolling the pictures to the left or right, then confirm by clicking on the avatar you wish to use. 6. Alternatively, you can take your own picture with the integrated camera by selecting the camera icon .
- Page 30 7. Once you are done, press the "Save" button to save your information and create your profile or press the “Cancel” button to abort and go back to the profile selection screen. To Edit an Existing Profile 1. Click on the profile name of an existing profile for 2 seconds, then select "Edit". Alternatively, simply click on the profile picture of an existing profile.
- Page 31 2. Update the information that you want to edit, then press the "Save" button to confirm. To Delete an Existing Profile 1. Click on the profile picture of an existing profile. MFC270ENIM1353_24Aug_V04.indd 31 24/08/2013 1:32 PM...
-
Page 32: The Applications Of Your Lexibook® Tablet
2. Press the “Delete” button at the bottom of the page and confirm by clicking “OK”. The Applications of your Lexibook® tablet • The applications are located on the five homepages of your tablet: - MY KNOWLEDGE On this homepage, you will find all the education apps of your tablet. - Page 33 K”. For more information about the applications, please refer to the section “Applications preinstalled on your Lexibook® tablet”. • Running applications from the Home screen 1. Select an application by clicking on its icon. 2. Click on the Home button to return to the Home screen.
- Page 34 Add one or more apps to the “My Apps” homepage of the tablet You can add your own apps to the “My Apps” homepage of the tablet. 1. Enter your profile, and then select “MY APPS” from the Quick access screen. 2.
- Page 35 3. Scroll the menu up and down and select the apps that you want to add by clicking on them, so that a green tick mark appears on the left. When done, click the confirm button. Note: When you install an app with the “Explorer”, it will automatically be added to the list of available apps.
- Page 36 2. Click on the “+” icon located in the top-right corner of the screen. 3. Scroll the menu up and down and de-select the apps that you want to remove by clicking on them, so that the green tick mark disappears on the left. When done, click the confirm button.
-
Page 37: Applications Preinstalled On Your Lexibook® Tablet
Note: Lexibook cannot guarantee the content or services accessible through the Lexibook® tablet. In addition, Lexibook® cannot be held responsible for any data loss, damage or alteration of the unit linked to downloading or updating applications or software on the tablet. Moreover, it cannot be held liable for any expense, cost or financial loss caused by purchases made on the Internet using this tablet. -
Page 38: My Games Homepage
Help Press this icon to access the complete instruction manual of your Lexibook ® tablet. My Games Homepage My Games This homepage contains 25 fun games already preinstalled on your Lexibook®... -
Page 39: My Internet Apps Homepage
My Internet Apps Homepage Lexibook® Protect Click on this icon to launch the Lexibook® Protect application and surf the Internet safely. This browser includes a built-in parental filter that blocks up to nine categories of websites. For more information, please refer to the section "The Lexibook® Protect Internet browser”. -
Page 40: My Multimedia Apps Homepage
You will find some LEGO® videos in your tablet. Note: Once you add music files, image files and video files to your Lexibook® tablet, they will be automatically available in the corresponding application. Camera Click on this icon to open the Camera application of the tablet and take pictures and videos with the integrated camera. -
Page 41: My Apps Homepage
My Apps Homepage This homepage allows you to display the icons of the apps that you want. Please refer to the section “The applications of your Lexibook® tablet” to see how to add and remove icons from this homepage. MFC270ENIM1353_24Aug_V04.indd 41... -
Page 42: The Lexibook® Protect Internet Browser
The Lexibook® Protect Internet Browser The Lexibook® Protect browser is an Internet browser that allows you to block up to nine website categories, with regularly updated filters. In addition, the Lexibook® Protect browser includes a feature that allows you to block all websites except those that have been approved manually. - Page 43 2. The settings screen is displayed. Check the desired options and then select “Back” to return to the browser. For more information on the browser settings, follow steps 9 to 11. ok® 3. The browser settings are also accessible via the browser’s address bar. Select the “Settings”...
- Page 44 4. Enter the master password created at step 1 and then select “OK”. 5. The settings screen is displayed. Check the desired options and then select “Back” to return to the browser. For more information on the browser settings, follow steps 9 to 11.
- Page 45 6. Once the master password has been created (step 1), it is also possible to access settings from the options bar. Select “Options” at the bottom of the screen and then “Admin. mode”. 7. Enter the master password and then select “OK”. MFC270ENIM1353_24Aug_V04.indd 45 24/08/2013 1:32 PM...
- Page 46 8. The “Settings”, “More options” and “Exit admin. mode” buttons are displayed on the screen. The “Exit admin. mode” button enables you to return to the browser. 9. In the “Settings” menu, the “Block Everything” option enables you to block all websites with the exception of those that have been manually added to the whitelist (list of allowed websites).
- Page 47 10. Still in the “Settings” menu, the “Categories” section enables you to block up to nine website categories. Check the desired categories. 11. Still in the “Settings” menu, the “Blacklist and Whitelist” section enables you to remove websites from the blacklist or from the whitelist added previously. To add websites to the blacklist or to the whitelist, please follow steps 13 and 14.
- Page 48 12. The “More options” menu enables you to add websites to the blacklist or to the whitelist and to erase the browser history. To add websites to the blacklist or to the whitelist, please follow steps 13 and 14. 13. To add a website to the blacklist, go to the website in question (for example, “www.google.co.uk”) and select “Blacklist”...
- Page 49 14. To add a website to the whitelist, it must first be in the blacklist. Go to the website in question (for example, “www.google.co.uk”) and select “Whitelist” in the “More options” menu. The website is immediately unblocked. To remove the website from the whitelist, select it in the “Whitelist”...
-
Page 50: The Lexibook® Market Premium
• Create an account on the Lexibook® Market Premium 1. On the Home screen, click on the Lexibook® Market Premium icon to launch the application. 2. A terms and conditions window will appear on the screen. Read the terms and click on “OK”... - Page 51 3. Click on the “Register” button. 4. Enter your email address and click on “Quick registration” or “Normal registration”. MFC270ENIM1353_24Aug_V04.indd 51 24/08/2013 1:32 PM...
- Page 52 • Connect to the Lexibook® Market Premium 1. On the Home screen, click on the Lexibook® Market Premium icon to launch the application. 2. Enter your username and password. The option “Save username and password” is selected by default. If you wish to login every time you access the Lexibook®...
- Page 53 You can also look for applications on the Lexibook® Market Premium using the search engine: 2. Click on the “Search” button at the top. 3. Type in the keyword(s) for your search and then press the “Enter” key of the keyboard.
- Page 54 • Install an application on the tablet 1. Inside the Lexibook® Market Premium, click on the application you want to download. 2. Please be patient while your application is being downloaded. 3. Click on “Install” to begin the installation. 4. A confirmation window appears. Select “Open” to immediately use the application or “OK”...
- Page 55 5. The application is then available in the applications menu. • Add credit to your account 1. Click on the “Account statement” button, located at the top of the screen. MFC270ENIM1353_24Aug_V04.indd 55 24/08/2013 1:32 PM...
- Page 56 2. Next, click on the “Add funds to your wallet” button and wait for the page to load. 3. Type in the amount that you wish to add in your wallet and choose a payment method. MFC270ENIM1353_24Aug_V04.indd 56 24/08/2013 1:33 PM...
- Page 57 • Purchase an application 1. First, you need to connect to your account. Please follow the steps described in the “Connect to the Lexibook® Market Premium” section above. 2. On the page of the application you want to purchase, click on “Purchase” after checking the application’s price.
- Page 58 3. Enter your credit card information and your email address. Press “Continue” to proceed. 4. After you have entered your billing information, press on “Continue”. MFC270ENIM1353_24Aug_V04.indd 58 24/08/2013 1:33 PM...
- Page 59 If you have uninstalled a previously purchased application, you can reinstall it without having to purchase it a second time. 1. Connect to the Lexibook® Market Premium by identifying yourself (see “Connect to the Lexibook® Market Premium”). 2. On the search screen (see “Find purchased applications”), type the name of the previously downloaded application.
- Page 60 • Changing the Lexibook® Market Premium Language By default, the Lexibook® Market Premium is displayed in the language of your tablet. Should this not be the case, or should you wish to display the Lexibook® Market Premium in a different language, please follow the steps below.
- Page 61 3. In the drop-down list that shows up, select the language required. To do so, slide a finger toward the bottom or the top of the screen. 4. To display the Lexibook® Market Premium in a different language, repeat step 1 to 4 and select the required language at step 3.
-
Page 62: E-Book
E-Book 1. Click on the E-Book application. Note 1: No e-books are pre-loaded in the tablet. The e-books shown below are for reference only. Note 2: The E-Book application is compatible with EPUB1, EPUB2 and PDF files. 2. By default, the e-books are displayed on a bookshelf. Click on the icon to show the available books on a numbered list. - Page 63 3. To go back to the bookshelf display, click on the icon. 4. The E-Book application can be viewed horizontally or vertically. To change the tablet orientation, simply rotate the tablet 90° towards the left or the right. 5. Click on a desired book to start reading. MFC270ENIM1353_24Aug_V04.indd 63 24/08/2013 1:33 PM...
- Page 64 6. Slide your finger to the left to go to the next page and slide your finger to the right to go back to the previous page. 7. To activate the page turning function, click on the “Options” button. Then, choose “Auto Flip”.
- Page 65 9. Click on the icon to adjust the brightness – the more lines, the brighter the text. 10. To display the e-book in full view, click on the icon. 11. Click on “AA” on the top-right corner of the screen to adjust the size of the text. The first ‘A’...
- Page 66 12. Scroll the list up and down to view more size options. Then, choose a desired size and press “OK”. 13. To jump to a certain page, click on the “Options” button then on “Go To”. 66 66 MFC270ENIM1353_24Aug_V04.indd 66 24/08/2013 1:33 PM...
- Page 67 14. Click on the text input field. 15. Enter a desired page number and press “Done”. MFC270ENIM1353_24Aug_V04.indd 67 24/08/2013 1:33 PM...
- Page 68 16. Press “OK”. The selected page will be displayed on the screen. 17. To go to the beginning of a chapter, click on the “Options” button, then on “TOC” (if available). MFC270ENIM1353_24Aug_V04.indd 68 24/08/2013 1:33 PM...
- Page 69 18. Select a desired chapter, and then press “OK” to display the chosen chapter on the screen (if available). C” 19. To create a bookmark, click on the “Options” button. Select the “Bookmarks” option. MFC270ENIM1353_24Aug_V04.indd 69 24/08/2013 1:33 PM...
- Page 70 20. Click on “Add Bookmarks”. 21. Enter a title for the bookmark and click on “OK”. MFC270ENIM1353_24Aug_V04.indd 70 24/08/2013 1:33 PM...
- Page 71 22. In the bookmarks option, select “Show Bookmarks” to show pages that have been bookmarked. 23. Select the bookmarked page you would like to display on the screen. MFC270ENIM1353_24Aug_V04.indd 71 24/08/2013 1:33 PM...
- Page 72 24. In the bookmarks option, select “Delete Bookmarks” to delete a bookmark. 25. Select a desired bookmark to remove. MFC270ENIM1353_24Aug_V04.indd 72 24/08/2013 1:33 PM...
- Page 73 26. Click on “OK” or on “Cancel”. 27. You can also access the bookmark shortcut by clicking on the icon located on the top-left corner of the screen. MFC270ENIM1353_24Aug_V04.indd 73 24/08/2013 1:33 PM...
- Page 74 28. To view information about the book, click on “Options”, then “Book Info” (if available). 29. The title and author of the book are displayed on the screen. MFC270ENIM1353_24Aug_V04.indd 74 24/08/2013 1:33 PM...
- Page 75 30. To delete a book, click on the icon located at the bottom right. 31. Red circles with a cross inside appear on the screen. Click on the cross of a desired book to delete it. MFC270ENIM1353_24Aug_V04.indd 75 24/08/2013 1:33 PM...
-
Page 76: Technical Information
4. Technical Information Tablet Specifications Screen TFT LCD 7 inches capacitive Screen Resolution 800 x 480 pixels O.S. Google Android 4.1 1GHz Storage 8GB – Micro SD cards compatible up to 32GB DDR3 1GB Wi-Fi 802.11 b/g/n (built-in) Audio Built-in mono speaker Connectors 1 micro USB 2.0 port, 1 Micro SD card slot, ®... - Page 77 We recommend that you read this for more information and to respond to your questions. Reference: MFC270EN Designed and developed in Europe – Made in China © 2013 LEXIBOOK®...
-
Page 78: Conformity Declaration
2, avenue de Scandinavie 91953 Courtaboeuf Cedex – France Declare under our sole responsibility that the following product: Kind of product: Tablet Type designation: MFC270EN Is in compliance with the following standards: EN 55022 : 2010 EN 61000-3-2 : 2006 +A1:2009+A2:2009...
Need help?
Do you have a question about the MFC270EN and is the answer not in the manual?
Questions and answers