
Related Manuals for Nivona CAFEROMATICA 610


Summary of Contents for Nivona CAFEROMATICA 610
- Page 1 CafeRomatica Fully automatic coffee centre Operating Instructions and Useful Tips A passion for coffee.
- Page 2 Operating Instructions and Useful Tips Dear Customer, Congratulations and many thanks for choosing a high-quality NIVONA product. To get the most out of your NIVONA machine, please read this manual carefully before use. Please start by reading the safety notes.
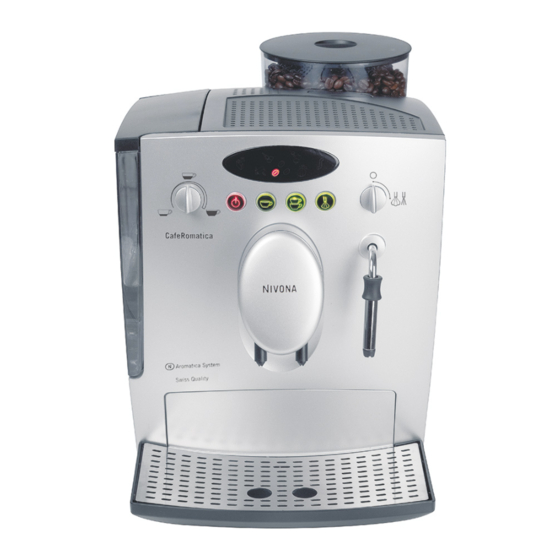
- Page 3 Equipment Bean container Drip grill Grinder settings with lid (on rear) Fill level indicator Symbol display screen for drip tray Steam / hot water jet or ‘spumatore’ Removable water Drip tray (depending on tank Pre-ground coffee model) Water quantity chamber Mains switch control knob Cup warming /...
- Page 4 Equipment Control knob Air inlet valve Air inlet pipe Inlet valve Steam / hot water jet Liquid inlet hose...
- Page 5 Symbols Symbol Number Brief description Coffee strength MILD Coffee strength NORMAL Coffee strength STRONG Not enough coffee beans – fill container Flashing Fill water tank Pre-ground coffee Hot water / steam, open / closed Empty used coffee tray / drip tray Descale machine Clean machine...
-
Page 6: Table Of Contents
Contents 1. Safety instructions 2. Set up 2.1 Preparing the machine 2.2 Getting started 2.3 Grinder settings 3. Making coffee 3.1 Selecting water quantity 3.2 Selecting coffee strength 3.3 Making one cup 3.4 Making two cups 3.5 Using pre-ground coffee 3.7 Drawing steam / frothing milk (models up to 610) 3.8 Drawing steam / frothing milk (models 620 and above) 3.8.1 Drawing steam (model 620 and above) - Page 7 1. Safety instructions • The machine is for domestic use • Do not leave the machine only and is not suitable for com- switched on unnecessarily. mercial applications. • Do not submerge the machine • Operating voltage must be the in water.
-
Page 8: Safety Instructions
(fig. 1/Q) becomes VERY HOT the dealer from whom it was pur- during use. Leave to cool for a chased – or to NIVONA Central few minutes before touching. Customer Services. CE – This machine conforms to... - Page 9 2. Set up 2.1 Preparing the machine Please make sure the steam / hot water valve control knob (fig. 1/N Carefully remove the machine and 5) is turned to ‘0’! and all parts from the packaging. Note: If you need to return your 2.2 Getting started machine for servicing, it can be Plug the machine in.
-
Page 10: Set Up
... 2. Set up All four operating buttons 2.3 Grinder settings (fig. 1/E, F, M, O) then light up, Caution: Grinder settings can only and the selected coffee strength be adjusted when the grinder is in is shown in the display by the operation. - Page 11 3. Making coffee Note: The machine is preset for 3.2 Selecting coffee strength immediate use. However, we There are three levels of coffee recommend that first you adjust strength to which you can adjust the most important settings to suit the brewing unit.
-
Page 12: Making Coffee
... 3. Making coffee 3.3 Making one cup Turn the water quantity control knob (fig. 1/D and 4) to one of the Place your (pre-heated) cup following positions: under the coffee spout (fig. 1/G · middle for an espresso cup, and 3). -
Page 13: Using Pre-Ground Coffee
... 3. Making coffee The machine now starts the Place a cup under the coffee grinding, pre-brewing and brewing spout (fig. 1/G and 3) and press operations and produces two con- the 1-cup button (fig. 1/F). A cup secutive cups of coffee. of coffee is now brewed without grinding. -
Page 14: Drawing Steam / Frothing Milk (Models Up To 610)
... 3. Making coffee above), make sure the control knob to the right. Caution: a little water is in the central position. comes out before the steam. Turn the steam / hot water valve The steam warm-up button (fig. control knob (fig. 1/N and 5) to 1/M) flashes as you draw steam. -
Page 15: Drawing Steam / Frothing Milk (Models 620 And Above)
... 3. Making coffee 3.8 Drawing steam / frothing milk 3.8.2 Frothing milk, hot milk and (models 620 and above) cappuccino (models 620 and above) 3.8.1 Drawing steam (models 620 and above) With the special ‘spumatore’ froth - ing device (fig. 1/Q and 10) you Press the steam warm-up button can heat up milk straight from the (fig. - Page 16 ... 3. Making coffee As soon as the desired amount Cleaning: For optimal cleaning the of milk foam or hot milk has been ‘spumatore’ must from time to drawn, turn the steam valve con- time be dismantled and its parts trol knob (fig.
-
Page 17: Programming Functions
4. Programming functions The following buttons are used for 1/N and 5) to the right to open. programming: The system will now be rinsed Stand-by button (fig. 1/E) through. 1-cup button (fig. 1/F) Wait until no more water comes 2-cup button (fig. - Page 18 ... 4. Programming functions 4.2 Water hardness Switch your machine to Stand- by mode. According to the water hardness in Press the steam warm-up button your region, or if you have not (fig. 1/M) for about 4 seconds. inserted a filter (see chapter 4.1), The water hardness is indicated sooner or later the machine needs by the number of buttons lit up as...
-
Page 19: Temperature
... 4. Programming functions 4.3 Temperature given number of hours after the last brewing operation. The follow - You can change the coffee temp - ing settings are possible. After: er ature as desired (the default 1 hour = Stand-by button sett ing is ‘normal’): is lit up. -
Page 20: Maintenance And Care
5. Maintenance and care 5.1 Changing filter 5.2 Cleaning program The filter loses its efficiency and When the machine must be cleaned, must be replaced after at most Symbol 19 ‘Clean machine’ ap pears two months. in the display. To change filter, empty the water Note: You can continue to brew reservoir (fig. -
Page 21: Manual Cleaning
... 5. Maintenance and care Open the lid of the pre-ground without flashing, the machine is coffee chamber. Symbol 14 ‘pre- operational again. ground coffee chamber’ starts Manual cleaning flashing. Add the cleaning tablet to the If required, the cleaning programme pre-ground coffee chamber and can be started and run as des - shut the lid. - Page 22 ... 5. Maintenance and care Symbol 18, ‘Descale’, flashes The first stage of the descaling during the whole descaling program lasts about 12 minutes. operation. Symbol 16 ‘hot water / steam, Please follow the instructions in open / closed’ flashes. the exact order given below: Now place a fairly large container Please switch the machine to...
-
Page 23: Manual Descaling
... 5. Maintenance and care The internal rinsing operation Wash the case inside and out begins and lasts about 1 minute. with a soft, damp cloth only. Symbol 17 ‘Empty used coffee Empty the drip tray (fig. 1/J) tray / drip tray’ lights up. and the used coffee tray (fig. - Page 24 ... 5. Maintenance and care Cleaning the brewing unit Carefully replace the brewing unit and lock by pressing the red If required, the brewing unit can lever switch and turning the handle be removed and cleaned under to the right until it clicks. running water.
-
Page 25: System Messages
6. System messages Message Meaning What to do Symbol 16 Fill or rinse out water Turn hot water control flashes pipes knob (fig. 1/Q and 7) to the right to open valve Symbol 13 Water reservoir (fig. 2) Fill reservoir with fresh flashes empty water... -
Page 26: Troubleshooting
7. Trouble-shooting Fault Reason What to do No hot water Jet (fig. 1/Q) blocked Clean the jet thoroughly or steam ‘Spumatore’ blocked / Take ‘spumatore’ (fig. 1/Q) comes out stuck apart and clean thoroughly of the jet / (fig. 10) ‘spumatore’... -
Page 27: Further Instructions
- Customer service pliances” provided by your local council. You can obtain further in - NIVONA products are designed to formation from your local council, meet the highest quality standards. the waste collection services or the... - Page 28 - pliance and improve its durability. scaling programme. The The CLARIS filter cartridge, if NIVONA descaler is de - changed regularly, ensures that signed especially for our machines you will have to descale your and will reliably remove limescale NIVONA machine less often.
- Page 29 Notices...
- Page 30 Nivona Apparate GmbH Fritz-Haber-Straße 10 D-90449 Nürnberg www.nivona.com © 2008 by NIVONA...
Need help?
Do you have a question about the CAFEROMATICA 610 and is the answer not in the manual?
Questions and answers