Table of Contents
Advertisement
Available languages
Available languages
Advertisement
Table of Contents

Related Manuals for DFI lanparty UT nF3 250Gb


Summary of Contents for DFI lanparty UT nF3 250Gb
- Page 1 System Board User’s Manual Carte Mère Manuel Pour Utilisateur System-Platine Benutzerhandbuch Manual del Usuario de Placas Base Ðóêîâîäñòâî Ïîëüçîâàòåëÿ Ðóêîâîäñòâî Ïîëüçîâàòåëÿ Ðóêîâîäñòâî Ïîëüçîâàòåëÿ Ðóêîâîäñòâî Ïîëüçîâàòåëÿ Ðóêîâîäñòâî Ïîëüçîâàòåëÿ 935-N32501-000 81000415...
-
Page 2: Quick Setup Guide
Quick Setup Guide Copyright This publication contains information that is protected by copyright. No part of it may be reproduced in any form or by any means or used to make any transformation/adaptation without the prior written permission from the copyright holders. -
Page 3: Table Of Contents
Quick Setup Guide Table of Contents Chapter 1 Quick Setup Guide..........Chapter 2 English..............Chapter 3 Français..............Chapter 4 Deutsch................Chapter 5 Español................Chapter 6 Ðóññêèé..............The user’s manual in the provided CD contains detailed information about the system board. If, in some cases, some information doesn’t match those shown in this manual, this manual should always be regarded as the most updated version. -
Page 4: Chapter 1 Quick Setup Guide
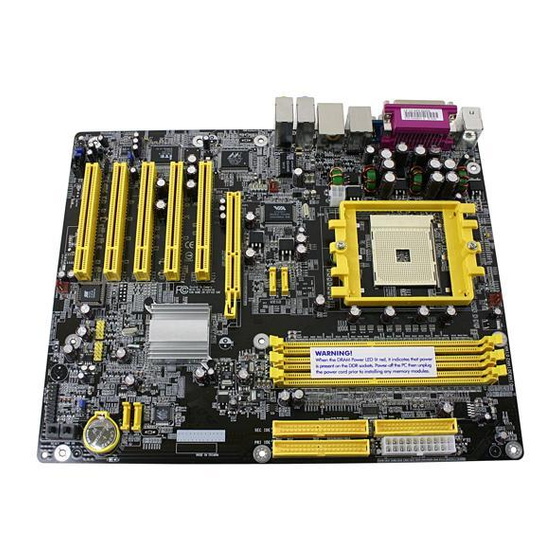
Quick Setup Guide Chapter 1 - Quick Setup Guide 1.1 System Board Layout DDR 2 KB/Mouse CPU fan DDR 1 DDR 3 DRAM Power LED S/PDIF- power S/PDIF- IEEE 1394_1, USB 1-2 LAN, USB 3-4 +12V power Line-in Front R/L Mic-in SATA 3 Center/Subwoofer... -
Page 5: Clear Cmos Data
Quick Setup Guide 1.2 Jumpers 1.2.1 Clear CMOS Data 1-2 On: Normal 2-3 On: (default) Clear CMOS Data 1.2.2 System Beep Select 1-2 On: 2-3 On: PC Speaker Line-out (Front R/L) - Page 6 Quick Setup Guide 1.3 Rear Panel I/O Ports Line-out (Front R/L) Line-in RJ45 PS/2 IEEE Parallel Mouse Center/ 1394_1 Subwoofer Rear R/L Side R/L PS/2 S/PDIF-in USB 1-2 USB 3-4 Mic-in S/PDIF-out IEEE 1394_1 is optional. 1.4 I/O Connectors 1.4.1 S/PDIF S/PDIF-in S/PDIF-out SPDIF out...
-
Page 7: Universal Serial Bus Ports
Quick Setup Guide 1.4.2 IEEE 1394 (optional) 1394_1 1 0 9 Ground +12V (fused) +12V (fused) TPB- TPB+ Ground Ground TPA+ TPA- 1394_2 1.4.3 Universal Serial Bus Ports USB 2 USB 1 USB 4 USB 3 USB 5-6 USB 7-8... - Page 8 Quick Setup Guide 1.4.4 Audio (Rear Panel Audio and Front Audio) Line-in Front R/L Mic-in Center/ Subwoofer Rear R/L Side R/L Front audio 1.4.5 CD-in Internal Audio Connector Ground Ground Left audio Right audio channel channel...
-
Page 9: Floppy Disk Drive Connector
Quick Setup Guide 1.4.6 Floppy Disk Drive Connector 1.4.7 Serial ATA Connectors SATA 3 SATA 4 SATA 1 SATA 2 Note: The system board allows configuring RAID across Serial ATA drives and Parallel ATA drives. It supports RAID 0, RAID 1, 0+1 and JBOD. -
Page 10: Ide Disk Drive Connector
Quick Setup Guide 1.4.8 IDE Disk Drive Connector SEC IDE PRI IDE SEC IDE PRI IDE Note: The system board allows configuring RAID across Parallel ATA drives and Serial ATA drives. It supports RAID 0, RAID 1, 0+1 and JBOD. 1.4.9 Cooling Fan Connectors Sense Ground... -
Page 11: Irda Connector
Quick Setup Guide 1.4.10 IrDA Connector IRRX N. C. Ground IRTX Note: The sequence of the pin functions on some IR cable may be reversed from the pin function defined on the system board. Make sure to connect the cable connector to the IR connector according to their pin functions. - Page 12 Quick Setup Guide 1.4.11 EZ Touch Switches Power Switch Reset Switch The presence of the power switch and reset switch on the system board are user-friendly especially to DIY users. They provide convenience in powering on and/or resetting the system while fine tuning the system board before it is installed into the system chassis.
-
Page 13: Power Connectors
Quick Setup Guide 1.4.12 Power Connectors +12V 5VSB PW-OK Ground Ground Ground Ground Ground PS-ON Ground Ground -12V 3.3V 3.3V 3.3V Ground Ground +12V +12V Important: To ensure that adequate power is provided, use a 300 Watt (or greater) power supply. 1.4.13 DRAM Power LED and Standby Power LED DRAM Power LED Standby Power LED... -
Page 14: Front Panel Connectors
Quick Setup Guide 1.4.14 Front Panel Connectors ATX-SW PWR-LED HD-LED SPEAKER RESET Pin Assignment HD-LED HDD LED Power (Primary/Secondary IDE LED) Reserved N. C. N. C. ATX-SW PWRBT+ (ATX power switch) PWRBT- Reserved N. C. N. C. RESET Ground (Reset switch) H/W Reset SPEAKER Speaker Data... -
Page 15: Chapter 2 English
English Chapter 2 - English 2.1 Features and Specifications Processor • AMD Athlon 64 (up to 3700+) • Socket 754 2T timing which provides better system stability is supported in CG or later revisions of the AMD Athlon 64 processor. You can select the memory timing in the Genie BIOS Setting submenu (“DRAM Configuration”... - Page 16 English Energy Efficient Design • ACPI STR (Suspend to RAM) function • Wake-On-PS/2 KB/Mouse • Wake-On-Ring (external modem) • Wake-On-LAN • RTC timer to power-on the system • AC power failure recovery Hardware Monitor • Monitors CPU/system temperature • Monitors 12V/5V/3.3V/Vcore/Vbat/5Vsb/Vchipset/Vdram/Vagp voltages •...
- Page 17 English IEEE 1394 Interface (optional) • VIA VT6307 controller • Supports two 100/200/400 Mb/sec ports AGP (Accelerated Graphics Port) • Supports AGP 8x up to 2133MB/sec. and AGP 4x up to 1066MB/sec. bandwidth for 3D graphics applications • Supports 0.8/1.5V add-in cards Rear Panel I/O Ports •...
-
Page 18: Raid Configuration
English • ATX form factor • 30.5cm (12") x 24cm (9.44") RAID Configuration The following describes the basic steps on configuring RAID. 1. Set the “IDE RAID” field to “Enabled”. (Integrated Peripherals submenu - “IDE Function Setup” section of the Award BIOS.) 2. -
Page 19: Package Checklist
English 7. This time, select “NVIDIA nForce3 ATA RAID Class Controller”. 8. Follow the prompts on the screen to complete installation. 2.3 Package Checklist The system board package contains the following items: The system board A user’s manual Two IDE round cables One floppy round cable Two Serial ATA data cables One Serial ATA power cable... -
Page 20: Chapter 3 Français
Français Chapter 3 - Français 3.1 Caractéristiques et Spécifications Processeur • AMD Athlon 64 (jusqu’à 3700+) • Socket 754 Le CG, aussi que les versions plus récentes du processeur AMD Athlon 64, supporte la technologie de 2T timing. Vous pouvez choisir un timing de mémoire dans le sous-menu “DRAM Configuration”... - Page 21 Français • Mémoire Flash 4Mbit • AMD Cool‘n’Quiet technologie Intelligence • ACPI STR (Suspend to RAM) fonction • Réveil-Sur-PS/2 Clavier/Souris • Eveil Sonnerie • Réveil Par Le Réseau • Minuterie RTC pour allumer le système • Récupération après Défaillance d’Alimentation CA System Health Monitor Fonctions •...
- Page 22 Français • NVIDIA RAID supporte l’archivage RAID sur les disques Serial ATA et Parallel ATA • RAID 0, RAID 1, RAID 0+1 et JBOD Interface IEEE 1394 (optionnel) • VIA VT6307 contrôleur • Supporte 2 ports 100/200/400 Mb/séc AGP (Accelerated Graphics Port) •...
- Page 23 Français Logements d’Extension • 1 slot AGP 8x/4x • 5 slots PCI • ATX • 30.5cm (12") x 24cm (9.44") 3.2 ConfigurationRAID Configuration du RAID Les instructions suivantes décrivent les étapes essentielles de la configuration du RAID. 1. Activez le champ “IDE RAID” en sélectionnant “Enabled”. (Sous- menu “Integrated Peripherals”...
- Page 24 Français 3. Appuyez sur <S> pour sélectionner “Specify Additional Device”. 4. Vous serez invité à insérer une disquette contenant le pilote RAID. Insérez la disquette “NVRAID Driver”. 5. Sélectionnez “NVIDIA nForce3 ATA Controller”. 6. Appuyez sur <S> pour sélectionner “Specify Additional Device”. 7.
-
Page 25: Chapter 4 Deutsch
Deutsch Chapter 4 - Deutsch 4.1 Leistungsmerkmale und Technische Daten Prozessor • AMD Athlon 64 (bis zu 3700+) • Buchse 754 In CG- oder in den späteren Versionen des AMD Athlon Prozessores wird 2T-Timing unterstützt. Sie können Timing des Speichers im Teil “DRAM Configuration“ (das Teilmenü Genie BIOS Setting) BIOS auswählen. - Page 26 Deutsch BIOS • Kompatibilität mit Award BIOS • CPU/DRAM/AGP Übertaktung • CPU/DRAM/Chipset Überspannung • Flash-Speicher (4Mbit) • AMD Cool‘n’Quiet technologie Intelligente Ausstattungsteile • ACPI STR (Suspend to RAM) funktion • Wecken bei PS/2 Tastatur/Maus • Wecken bei Klingeln • Wecken Netzwerk •...
- Page 27 Deutsch Interface Serial ATA ñ NVIDIA RAID • Vier Interfaces Serial ATA mit der Geschwindigkeit von bis 1.5Gbps Zwei Ports Serial ATA des Chips nForce3 250Gb Zwei Ports Serial ATA des Chips Marvell SATA PHY • NVIDIA RAID unterstützt Serial ATA è Parallel ATA •...
- Page 28 Deutsch • 2 IDE-Anschlüsse • 1 Floppy-Anschluß • 1 Anschlußstecker für das 20-pin ATX-Netzgerät • 1 Anschlußstecker für das 4-pin 12V ATX-Netzgerät • 1 Vorderseite Füllung Anschlüsse • 3-ventilator-Anschlüsse • EZ Umschaltern (der Knopf der Speisung und des Auslasses) Erweiterungssteckfasssungen •...
- Page 29 Deutsch Die Einstellung des RAID Driver während der Installation von ® ® Windows XP oder Windows 2000. Die Einstellung des RAID Driver 1. Starten Sie die Windows-Einstellung vom Einstell-CD. 2. Drücken Sie die Taste <F6>, um die Windows-Installation zu beginnen. 3.
-
Page 30: Chapter 5 Español
Español Chapter 5 - Español 5.1 Características y Especificaciones Procesador • AMD Athlon 64 (hasta 3700+) • Zócalo 754 2T timing se soporta en CG o en las variantes más avanzadas del procesador AMD Athlon 64. Vd puede optar timing de memoria en sección “DRAM Configuration”... - Page 31 Español • Memoria Instante (4Mbitios) • AMD Cool‘n’Quiet tecnología Inteligencia • ACPI STR (Suspend to RAM) función • PS/2 Teclado/Ratón de Wake-On • Wake-On-Ring (external modem) • Wake-On-LAN • Temporizador de RTC para encender el sistema • Recuperación de Fracaso de Energía AC Funciones de Monitor de Salud del Sistema •...
- Page 32 Español Dos puertos Serial ATA soportados por el chip Marvell SATA PHY • El RAID NVIDIA soporta la utilización combinada de Serial ATA y Parallel ATA • RAID 0, RAID 1, RAID 0+1 y JBOD Interfaz IEEE 1394 (opcional) • VIA VT6307 controlador •...
- Page 33 Español • 3 conectores de abanicos • EZ conmutadores (conmutadores de alimentación y reset) Ranuras de Expansión • 1 slot AGP 8x/4x • 5 slots PCI La Placa Imprenta • Form-factor ATX • 30.5cm (12") x 24cm (9.44") 5.2 Configuración RAID A continuación le mostramos los pasos básicos que ha de seguir para llevar a cabo la configuración RAID.
- Page 34 Español Instalación del Controlador RAID 1. Inicie la instalación de Windows arrancando desde el CD de instalación. 2. Pulse <F6> durante el arranque de la instalación. 3. Pulse <S> para seleccionar otros dispositivos adicionales. 4. En este punto, se le solicitará que introduzca un disco flexible conteniendo el controlador RAID.
-
Page 35: Chapter 6 Ðóññêèé
Ðóññêèé Ðóññêèé Ðóññêèé Ðóññêèé Ðóññêèé Ãëàâà Ãëàâà Ãëàâà 6 6 6 6 6 - - - - - Ðóññêèé ÿçûê Ðóññêèé ÿçûê Ðóññêèé ÿçûê Ðóññêèé ÿçûê Ãëàâà Ãëàâà Ðóññêèé ÿçûê 6.1 Õàðàêòåðèñòèêè è ñâîéñòâà 6.1 Õàðàêòåðèñòèêè è ñâîéñòâà 6.1 Õàðàêòåðèñòèêè è ñâîéñòâà 6.1 Õàðàêòåðèñòèêè... - Page 36 Ðóññêèé Ðóññêèé Ðóññêèé Ðóññêèé Ðóññêèé BIOS BIOS BIOS BIOS BIOS • Award BIOS • Ðàçãîí CPU/DRAM/AGP • Óñòàíîâêà íàïðÿæåíèÿ CPU/DRAM/Chipset • 4Mbit Flash Ïàìÿòü • AMD Cool‘n’Quiet òåõíîëîãèåé Ðàçóìíîñòü Ðàçóìíîñòü Ðàçóìíîñòü Ðàçóìíîñòü Ðàçóìíîñòü • ACPI STR (Suspend to RAM) • Àêòèâèçàöèÿ Íà Äâèæåíèå Ìûøè •...
- Page 37 Ðóññêèé Ðóññêèé Ðóññêèé Ðóññêèé Ðóññêèé Èíòåðôåéñ Serial A Èíòåðôåéñ Serial A Èíòåðôåéñ Serial AT T T T T A ñ NVIDIA RAID Èíòåðôåéñ Serial A Èíòåðôåéñ Serial A A ñ NVIDIA RAID A ñ NVIDIA RAID A ñ NVIDIA RAID A ñ...
- Page 38 Ðóññêèé Ðóññêèé Ðóññêèé Ðóññêèé Ðóññêèé • 1 ðàçúåìà ïèòàíèÿ ATX 20-pin • 1 ðàçúåìà ïèòàíèÿ ATX 4-pin 12V • 1 Ôðîíò ïàíåëü ðàçúåì • 3 Ðàçúåìû äëÿ âåíòèëÿòîðà • EZ ïåðåêëþ÷àòåëè (êíîïêà ïèòàíèÿ è ñáðîñà) Ñëîòû Ñëîòû Ñëîòû Ñëîòû Ñëîòû •...
- Page 39 Ðóññêèé Ðóññêèé Ðóññêèé Ðóññêèé Ðóññêèé Óñòàíîâêà äðàéâåðà RAID Óñòàíîâêà äðàéâåðà RAID Óñòàíîâêà äðàéâåðà RAID Óñòàíîâêà äðàéâåðà RAID Óñòàíîâêà äðàéâåðà RAID 1. Çàïóñòèòå óñòàíîâêó Windows ñ óñòàíîâî÷íîãî CD. 2. Íàæìèòå <F6> äëÿ íà÷àëà óñòàíîâêè Windows. 3. Íàæìèòå <S> äëÿ âûáîðà “Specify Additional Device”. 4.
Need help?
Do you have a question about the lanparty UT nF3 250Gb and is the answer not in the manual?
Questions and answers