
Subscribe to Our Youtube Channel
Related Manuals for GME TX4500S


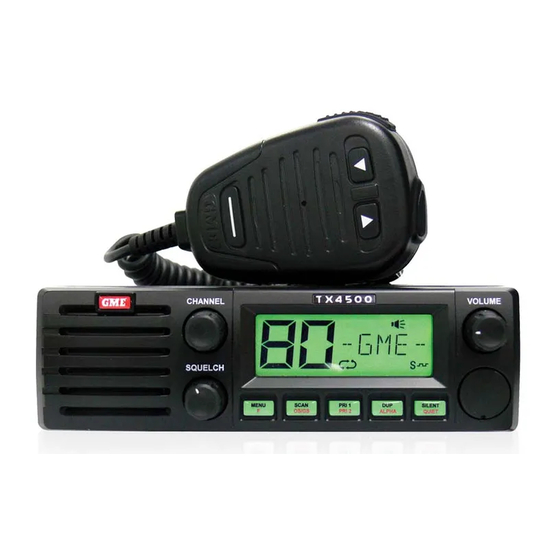
Summary of Contents for GME TX4500S
- Page 1 I N S T R U C T I O N M A N U A L DIN size fully featured 5 watt UHF CB radio ScanSuite ™ faster, smarter scanning...
-
Page 2: Table Of Contents
Bandwidth Filter Settings ......7 Dynamic Volume Control ....... 8 Silent Squelch Tail ......... 8 SUPPLIED WITH Voice Scrambler ..........8 TX4500S radio Repeaters and Duplex Mode......8 DIN mounting kit Priority Channels ........... 9 Screw pack Scanning ............. 10 Microphone Open Scan .......... -
Page 3: Introduction
INTRODUCTION POSSIBLE ISSUES When a new narrowband radio receives a Your GME TX4500S 80 channel radio is Australian transmission from an older wideband radio the designed and built and is the most advanced UHF speech may sound loud and distorted – simply adjust Citizen Band radio available. -
Page 4: Features
FEATURES TRANSMIT (TX) Individually Programmable DUPLEX Function: User selectable for only those individual channels in your area that have repeaters, leaving the others free for use as extra simplex channels. RECEIVE (RX) User Selectable Wide/Narrow Receive Filter User Programmable Receive-Only Channels: Use the radio’s front panel controls to program up to 95 of your own receive-only channels (in 5 banks of 19 channels) within the 403-520 MHz frequency range. -
Page 5: General Operation
GENERAL OPERATION FRONT PANEL CONTROLS Speaker Channel Control Liquid Crystal Display CHANNEL VOLUME Volume Control SQUELCH Front Mic MENU SCAN PRI 1 SILENT Socket OS/GS PRI 2 ALPHA QUIET Squelch Menu/ Scan/ Priority 1/ Duplex/ Silent/ Alpha Quiet Control Function OS-GS Priority 2 LCD PANEL... -
Page 6: Microphone
Squelch control system allowing the user to set the KEYPAD FUNCTIONS Squelch for optimum performance. All controls on the TX4500S front panel have To adjust the Squelch, first rotate the Squelch multiple functions. The primary functions are labelled in BLACK, while the secondary functions are labelled control fully counter-clockwise until the background in RED. -
Page 7: Transmitting
TRANSMITTING WHITE (Whiteness Setting): Controls the whiteness or colour saturation of the selected colour Prior to transmitting, always check the channel is from full colour to white (no colour). not being used. This can be done by listening to the channel or by visually checking that the icon is TIP:... -
Page 8: Dynamic Volume Control
MENU key to enter the menu, then manufacturers, allowing you to enjoy scrambled press the MENU key repeatedly until DVCOF communications with owners of non-GME radios. (Dynamic Volume Control Off) or DVCON (Dynamic Once the scrambler has been activated your Volume Control On) is displayed. -
Page 9: Priority Channels
It can also be used in conjunction with the Group Scan function. Your TX4500S has provision for two separate Priority channels. To Store Priority Channel 1 1. Select the required channel. -
Page 10: Scanning
If a signal is found, the scan will pause on that channel. During this time The TX4500S features three scan groups - Open you can press the PTT switch on the microphone Scan, Group Scan and Network Scan. Each scan and talk on the channel. -
Page 11: Group Scan
If you don’t wish to listen to a busy channel, briefly SCAN key to remove it. will disappear. press the SKIP key on the microphone to skip over b. If is not displayed, the selected channel that channel and resume scanning from the next is not in the Scan memory. -
Page 12: Addtional Open/Group Scan Options
Group Scan into an Open Scan and vice versa. If are scanned with the Priority channel will be this is required, please contact your GME retailer to scanned every fourth channel. During this time the arrange for this feature to be activated. - Page 13 To quickly determine which channels are the next transmission. In this way the group can continue to communicate with minimal interference currently programmed into the Net-Scan to or from other users. group Enabling Net-Scan 1. With the NETWORK scan group selected, briefly press the MENU key.
-
Page 14: Using The Priority Channel While Scanning
CTCSS Tone Set continue seamlessly without any input from the user. The GME CTCSS tone set comprises a table of 50 Ending the Scan tones made up of the standard CCIR-38 Tone Set To stop scanning, briefly press the SCAN key. -
Page 15: Monitor Function
Rotate left Rotate right NOTE: You cannot enable Silent Mode unless a CTCSS or DCS tone has been selected in the Configuration menu. If CTCSS/DCS has been set to OFF, Silent mode is inhibited. CTCSS Off CTCSS Tone 50 DCS Tone 104 To Disable Silent Mode on a Channel 4. -
Page 16: Using Selcall
SelCall Identification Number USING SELCALL Entering a SelCall Ident Your radio is factory programmed with its own unique SelCall Identification Number (Ident). 1. Press the button. is displayed, along CALL This number identifies your radio from others in with the last sent or received SelCall Ident. your area. - Page 17 ‘C9’ (or select ‘Id’ to change your radios own 4. If the ALPHA label is empty, ‘- - - - -’ will be SelCall Ident). If an ALPHA label is displayed you displayed, otherwise it will display the last ALPHA will need to press F then ALPHA to switch to label programmed into that memory.
-
Page 18: Quiet Mode
In addition to the alarm, the symbol will appear the selected channel is now tagged for Quiet on the display along with the callers SelCall Ident or operation. ALPHA label to inform you of the caller’s identity. To Remove the QUIET Tag from Individual Channels 1. -
Page 19: Group Calling
To return your radio to the Quiet mode, briefly GROUP CALLING press F then press QUIET. will re-appear on The SelCall system includes a Group call function the display. which allows you to call up to 1000 radios simultaneously. This can be useful in an emergency Scanning in the Quiet Mode situation where you may need to transmit a message The radio will allow you to scan while the Quiet... -
Page 20: Receive Only Channels
3. Rotate the Channel control to select ‘A’ in the RECEIVE-ONLY CHANNELS flashing digit position. This is the special code The TX4500S supports up to 95 user programmable that will create the Group Call. Receive-only channels with frequencies in the range 4. - Page 21 Combined Channel Banks RXA-E To Activate the Channel Editor 1. Switch the radio OFF. RX-A RX-B RX-C RX-D RX-E 2. Press and hold the Channel control while switching the radio ON again. 3. RXALL will be displayed briefly, indicating the RX Channel Editor has been activated.
- Page 22 the frequency or to the left to decrease the NOTE: Under normal operation, only those channels frequency. The display will show the frequency to that have been programmed with frequencies will the nearest 10 kHz. be visible. Channels that were marked with –OFF- in the channel editor will no longer be visible.
-
Page 23: Configuration Menu
Adding Names to Your RX-only Channels making changes, briefly press the PTT to exit the menu (or simply wait for the menu to time-out). NOTE: You do not need to activate the channel The following settings are available. editor to make changes to RX-only channels that have already been programmed. - Page 24 CTCSS/ DCS Tone Selection Enables and selects CTCSS or DCS tones. To switch CTCSS or DCS tones OFF rotate the Channel 25 kHz steps 12.5 kHz steps control fully to the left until ‘CTCOF’ is displayed. NOTE: This option does not affect the standard 80 Rotate left Rotate right CB channel spacing.
-
Page 25: Installation
INSTALLATION Your TX4500S is supplied with a DIN mounting 5. Feed the antenna connector and DC lead through bracket for mounting into a standard DIN sized the DIN slot in the dashboard and connect these cavity in the vehicle’s console or dashboard. -
Page 26: Dc Power Connection
DC POWER CONNECTION MICROPHONE The TX4500S is designed for 13.8 V DC negative The TX4500S is fitted with two microphone sockets earth installations only (i.e. where the negative side – one on the front panel and one on the rear. The... -
Page 27: Antenna Installation
DC connector will give very poor performance. GME have a huge range of suitable 477 MHz antennas to suit most installations and applications. TX4500S We recommend you contact your local retailer for advice. -
Page 28: Ctcss Tone Frequency Chart
CTCSS TONE FREQUENCIES CHART Frequency Frequency Frequency Frequency 67.0 107.2 167.9 159.8 71.9 110.9 173.8 165.5 74.4 114.8 179.9 171.3 77.0 118.8 186.2 177.3 79.7 123.0 192.8 183.5 82.5 127.3 203.5 189.9 85.4 131.8 210.7 196.6 88.5 136.5 218.1 199.5 91.5 141.3 225.7... -
Page 29: Uhf Cb Operating Frequencies
UHF CB OPERATING FREQUENCIES Frequency Frequency Frequency Frequency (MHz) (MHz) (MHz) (MHz) 476.425 476.925 476.4375 476.9375 476.450 476.950 476.4625 476.9625 476.475 476.975 476.4875 476.9875 476.500 477.000 476.5125 477.0125 476.525 477.025 476.5375 477.0375 476.550 477.050 476.5625 477.0625 476.575 477.075 476.5875 477.0875 476.600 477.100 476.6125... -
Page 30: Specifications
SPECIFICATIONS ELECTRICAL Transmit Frequency Response: +6 dB per octave General 300 Hz to 3 kHz + 1-3 dB Compliant Specification: Meets AS/NZS 4365 for radio communications Demodulated Audio equipment in the UHF Signal to Noise: > 45 dB unweighted citizen and personal Current Consumption: 1.7 amps with 50 radio service. -
Page 31: Sc Contract Warranty Against Defects
(at our option) any materials Communications Pty Ltd ACN 000 346 814 (We, or workmanship which we are satisfied are us, our or GME). Our contact details are set out in defective. clause 2.7. 2.5 We warrant that we will perform services 1. - Page 32 A division of Standard Communications Pty. Ltd. Head Office: PO Box 96, Winston Hills, NSW 2153, Australia. New Zealand: PO Box 58, 446 Botany, Auckland, 2163, NZ. T: (09) 274 0955. All other international enquiries email: export@gme.net.au Part Number: 310595 Drawing Number: 46885-4...
Need help?
Do you have a question about the TX4500S and is the answer not in the manual?
Questions and answers