Table of Contents
Advertisement
Available languages
Available languages
Quick Links
Owner's Manual
Operating and Servicing Instructions
Español - página E1
IMPORTANT: READ CAREFULLY BEFORE ASSEMBLY AND USE.
Questions or concerns? For assistance, please call Customer Service at 1-800-944-9200
Mon-Fri 8am-7pm EST. PLEASE DO NOT RETURN THIS PRODUCT TO THE STORE.
THIS PRODUCT IS INTENDED FOR HOUSEHOLD USE ONLY.
IF USED COMMERCIALLY WARRANTY IS VOID.
©2011 Techtronic Floor Care Technology Limited. All rights reserved. #961101001 ID 100148-R2
www.hoover.com
Advertisement
Table of Contents

Related Manuals for Hoover UH70403


Summary of Contents for Hoover UH70403
- Page 1 Owner’s Manual Operating and Servicing Instructions Español - página E1 www.hoover.com IMPORTANT: READ CAREFULLY BEFORE ASSEMBLY AND USE. Questions or concerns? For assistance, please call Customer Service at 1-800-944-9200 Mon-Fri 8am-7pm EST. PLEASE DO NOT RETURN THIS PRODUCT TO THE STORE.
-
Page 2: Table Of Contents
Troubleshooting ....................13 Service ........................14 Warranty......................15 If you need assistance: Visit our website at hoover.com. Follow the authorized dealer locator link to find the Hoover authorized ® dealer nearest you or call 1-800-944-9200 for an automated referral of Hoover authorized dealer ®... -
Page 3: Important Safety Instructions
IMPORTANT SAFETY INSTRUCTIONS SAVE THESE INSTRUCTIONS When using an electrical appliance, basic precautions should always be followed, including the following: READ ALL INSTRUCTIONS BEFORE USING THIS APPLIANCE. WARNING: TO REDUCE THE RISK OF FIRE, ELECTRIC SHOCK OR INJURY: • Fully assemble before operating. •... - Page 4 CAUTION: TO REDUCE THE RISK OF DAMAGE: • Avoid picking up hard, sharp objects with this product, as they may cause damage. • Do not use sharp objects to clean out hose as they can cause damage. WARNING: • To reduce the risk of electric shock, this appliance has a polarized plug (one blade is wider than the other).
-
Page 5: Vacuum Assembly
1. VaCuuM asseMblY CartOn COntents A. Handle B. Vacuum Base and Dirt Cup C. 3-in-1 Combination Tool D. Stair Hose* *Available on select models only. Remove all parts from carton and identify each item shown. Make sure all parts are located before disposing of packing materials. -
Page 6: How To Use
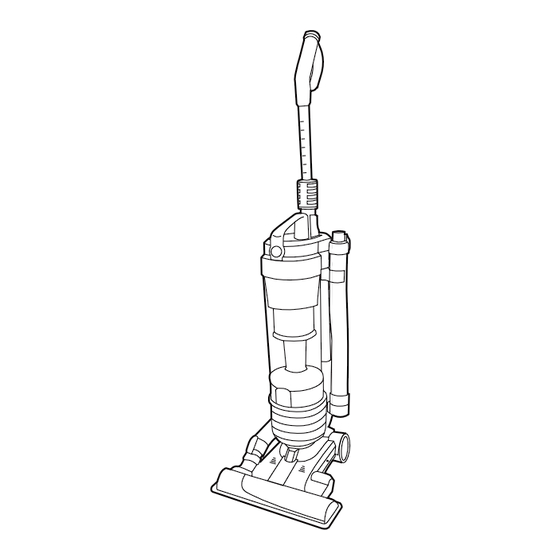
2. hOw tO use VaCuuM desCriPtiOn 1. D-Grip Handle 2. Wand 3. Handle Adjuster 4. ON/OFF Power Switch 5. ON/OFF Brushroll Switch 6. Dirt Cup Release Button 7. Carry Handle 8. Dirt Cup 9. Filter made with HEPA media 10. Rinsable Filter Access 11. -
Page 7: Telescopic D-Grip Handle
telesCOPiC d-GriP handle handle POsitiOns 2.6 Slide the telescopic 2.7 The handle of your handle release down to cleaner easily adjust height of positions: upright for ergonomic handle storage when using cleaning tools; operating position for general operation on carpet and floors; hold nozzle with foot (E) and pull handle back. -
Page 8: Attach Wand And Tools
attaCh wand and tOOls WARNING Unplug vacuum before connecting wand or tools. Cleaner must be in the upright position. Press handle wand release button and pull handle up to remove. Press the hose release button on the nozzle and remove the hose from the nozzle. 3.3 Attach the hose to the handle/extension wand. -
Page 9: Maintenance
4.5 Twist the dirt cup lid to open. Filter should not need replacement within the warranty period. If desired, additional filter is 4.6 Pull tab to remove rinsable filter. available. Ask for Hoover Part No. 303903001. ® Rinse with water for two minutes or until water runs clear. - Page 10 DO NOT RINSE OR WASH THE FILTER CARTRIDGE. filter Made with hePa Media: what to buy When used and maintained properly, your Filter should not need replacement within the warranty period. If desired, additional filter is available. Ask for Hoover Part No. 303902001. ®...
-
Page 11: Brushroll
To reduce the risk of injury from moving parts, unplug vacuum before servicing. 4.14 Turn vacuum over so bottom side is facing up. Remove any debris and/or hair from brushroll. For additional maintenance required for belt or brushroll please contact a HOOVER service provider ® at 1-800-944-9200. 4.16 4.15 Vacuum is equipped with an automatic... -
Page 12: Belt
4.21 Place the bottom plate aligning the screw holes and install the 6 screws as shown. belt: what to buy Use only genuine HOOVER belts with your ® vacuum. When purchasing a new belt, ask for Belt - HOOVER part No. -
Page 13: Troubleshooting
5. trOubleshOOtinG If a minor problem occurs, it usually can be solved quite easily when the cause is found by using the checklist below. Any other servicing should be done by an authorized service representative. WARNING To reduce risk of personal injury - unplug vacuum before servicing. PrObleM POssible Cause POssible sOlutiOn... -
Page 14: Service
® If you need further assistance: To speak with a customer service representative call 1-800-944-9200; Mon-Fri 8am-7pm EST. In Canada, contact Hoover Canada, Toronto: 755 Progress Ave., Scarborough, ON M1H 2W7 OR Hoover Canada, ® ® Edmonton: 18129-111 Ave., Edmonton, AB T5W 2P2, Phone: 1-800-944-9200, Mon-Fri 8am-7pm EST. -
Page 15: Warranty
LIABILITY OR ARISING FROM ANY CAUSE due to misuse, acts of God, nature, vandalism or WHATSOEVER. Some states do not allow the other acts beyond the control of Hoover , owner’s ® exclusion of consequential damages, so the acts or omissions, use outside the country in above exclusion may not apply to you. - Page 17 Manual del PrOPietariO Instrucciones de Funcionamiento y Servicio www.hoover.com IMPORTANTE: LEA ATENTAMENTE ANTES DE ENSAMBLAR Y USAR. ¿Tiene alguna pregunta o inquietud? Para obtener asistencia, llame al Servicio de atención al cliente al 1-800 944 9200, de lunes a viernes, de 8 a.m. a 7 p.m., hora del ESTE.
- Page 18 Si necesita ayuda: Visite nuestro sitio web en www.hoover.com. Haga clic en el enlace que permite localizar los vende- dores autorizados hoover para encontrar el vendedor más cercano, o marque el 1-800-944-9200 para escuchar un mensaje indicando la dirección de los vendedores autorizados Hoover® (sólo en ee. Uu.) O para hablar con un representante de atención al cliente (de 8 am a 7 pm, hora estándar del este, de...
- Page 19 Al usar un aparato eléctrico, observe siempre las precauciones básicas, • Consultando las Páginas amarillas en la sección “Aspiradoras – uso” doméstico. incluyendo las siguientes: • Visite nuestro sitio web en hoover.com (clientes estadounidenses) o hoover.ca (clientes canadienses). Siga el enlace del centro de servicio para LEA TODAS LAS INSTRUCCIONES ANTES DE USAR ESTE APARATO encontrar el centro de servicio más cercano. ADVERTENCIA: PARA REDUCIR EL RIESGO • Para que le informen de manera automática la ubicación de los centros autorizados de servicio, llame...
- Page 20 • No aspire ningún objeto que se esté quemando o que libere humo, como cigarrillos, 5. sOluCión de PrObleMas fósforos o cenizas calientes. Si ocurre un problema menor, generalmente puede resolverse con bastante facilidad cuando se halla la • No use el producto sin el contenedor para polvo y/o los filtros colocados en su causa, usando esta lista de verificación.
-
Page 21: Para Polvo
1.4 En primer lugar, coloque la parte inferior del de que la correa no esté pinchada entre el agitador contenedor para polvo dentro del cuerpo de la de HOOVER ® y el protector del agitador. aspiradora. Gire el contenedor dentro de la aspira- dora. - Page 22 2.4 Enrolle el cordón en sentido horario usando proveedor de servicios HOOVER ® posible que el rodillo de los dos ganchos provistos. cepillos todavía esté...
- Page 23 Si lo desea, hay filtros adicionales disponibles. Solicite la retirO de la ManGuera pieza n.° 303902001 de Hoover ® 3.2 A fin de retirar la manguera para usar el accesorio, presione el botón de liberación y...
- Page 24 Si lo abrirlo. desea, hay filtros adicionales disponibles. Solicite 4.6 Para retirar el filtro enjuagable, tire de la lengüet. la pieza n.° 303903001 de Hoover ® Aclare con agua durante dos minutos o hasta que el IMPORTANTE agua corra limpia.
Need help?
Do you have a question about the UH70403 and is the answer not in the manual?
Questions and answers