Table of Contents
Advertisement
Advertisement
Table of Contents

Related Manuals for Midea WQP6-3208-US


Summary of Contents for Midea WQP6-3208-US
- Page 1 Instruction Manual Instruction Manual WQP6-3208-US...
-
Page 2: Table Of Contents
Read this Manual Dear Customer, Please carefully reading it before using the dishwasher will help you to use and maintain the dishwasher properly. Keep it to refer to at a later date. 1) Safety Information..........1 1) Safety Information..........1 Pass it on to any subsequent owner of the appliance. 2) Operating Instructions........3 2) Operating Instructions........3 This manual contains sections of Safety Instructions,... -
Page 3: Safety Information
1.IMPORTANT SAFETY INFORMATION 1.IMPORTANT SAFETY INFORMATION READ ALL INSTRUCTIONS BEFORE USING READ ALL INSTRUCTIONS BEFORE USING WARNING! WARNING! When using your dishwasher, follow the precautions listed below: GROUNDING INSTRUCTIONS WARNING! This appliance must be grounded. In the event of a Improper connection of the equipment-grounding malfunction or breakdown, grounding will reduce conductor can result in a risk of electric shock. -
Page 4: Operating Instructions
2.Operation Instruction 2.Operation Instruction IMPORTANT IMPORTANT To get the best performance from your dishwasher, read all operating instructions before using it for the first time. Control Panel Control Panel ON/OFF ON/OFF Program indicator button: when you press washing Power on light: To come on when Power ON/OFF program button, the correspond light will display. -
Page 5: Prior Using For The First Time
Prior using for the first time Prior using for the first time A. Fill the Rinse Aid Dispenser A. Fill the Rinse Aid Dispenser Rinse Aid Dispenser The rinse aid is released during the final rinse to prevent water from forming droplets on your dishes. That can leave spots and streaks. -
Page 6: B Function Of Detergent
Adjusting Rinse Aid Dispenser The rinse aid dispenser has four settings.The recommended setting is on "3". Adjust lever Adjust lever If the dishes still are not drying properly or are spotted, adjust the dial to the (Rinse) (Rinse) next higher number on "4". NOTE: NOTE: Increase the dose if there are drops of water or lime spots on the dishes after washing. -
Page 7: Detergent Dispenser
Detergent Dispenser The dispenser must be refilled before the start of each wash cycle following the instructions provided in the Wash Cycle Table . Your dishwasher uses less detergent and rinse aid then conventional dishwasher. Generally, only one tablespoon of detergent is needed for a normal wash load. -
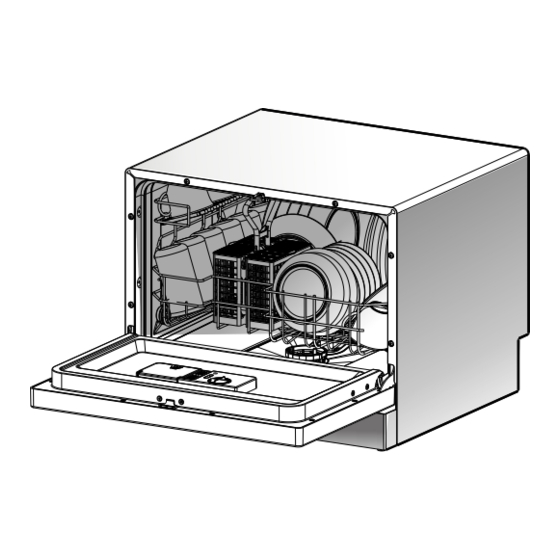
Page 8: Loading The Dishwasher Basket
4.Loading the Dishwasher Baskets 4.Loading the Dishwasher Baskets Recommendation Recommendation Consider buying utensils which are identified as dishwasher-proof. Use a mild detergent that is described as 'kind of dishes'. If necessary, seek further information from detergent manufacturers. For particular items, select a programme with as low a temperature. To prevent damage, do not take glass and cutlery out of the dishwasher immediately after the programme has ended. -
Page 9: Loading The Basket
Loading the Basket Loading the Basket Position the dishes and cookware so that they will not get moved by the spray of water. Cups Serving bowl Glasses Saucers Oval platter Fruit bowl Bread and Dinner plates butter plates Cutlery basket Plate racks of Basket The basket is fitted with plate racks which can be stowed horizontal if required. -
Page 10: Cutlery Basket
Teaspoons Teaspoons 14 , 14 , Cutlery Basket Cutlery Basket Cutlery should be placed in the cutlery basket with handles at the bottom. If the rack has side baskets, the spoon should be loaded individually into the appropriate slots, especially long utensils should be placed in the horizontal position at the front of the upper basket as shown. -
Page 11: Starting A Washing Programme
5.Starting a washing programme 5.Starting a washing programme Wash Cycle Table Wash Cycle Table NOTE: NOTE: Means: need to fill rinse into the Rinse-Aid Dispenser. *AHAM DW-1-2005 : This program is the test cycle, the rinse-aid dispenser setting is recommended to Position 3. Detergent Cycle Selection Running... -
Page 12: Change The Programme
Change the Programme... Change the Programme... Premise: You can modify the washing program, When the dishwasher just runs for a short time. Otherwise, the detergent may have already been released, and the appliance may have already drained the wash water. If this is the case, the detergent dispenser must be refilled (see the section entitled "... -
Page 13: Maintenance And Cleaning
6.Maintenance and Cleaning 6.Maintenance and Cleaning Filtering System Filtering System The filter prevent larger remnants of food or other objects from getting inside the pump. The filter system consists of a coarse filter, a flat (Main filter) and a micro filter (fine filter). Main filter Food and soil particles trapped by this filter are pulverized by a special jet on the spray arm and washed down to drain. -
Page 14: Caring For The Dishwasher
Remarks: - Inspect the filters for blocking every time the dishwasher has been used. - By unscrewing the coarse filter.you can remove the filter system.Remove any food remnants and clean the filters under running water. NOTE: NOTE: The entire filter assembly should be cleaned once a week. Cleaning The Filter To clean the coarse filter and the fine filter, use a cleaning brush. -
Page 15: Installation Instruction
Cleaning the Spray Arms The spray arms can be easily removed for periodic cleaning of the nozzles, to prevent possible clogging. Wash them under running water and carefully replace them in their seats, checking that their rotary movement is in no way impeded. Grasp the middle of the spray arm, pull it upwards to remove it. -
Page 16: Positioning The Appliance
Positioning the Appliance Positioning the Appliance Position the appliance in the desired location. The back should rest against the wall behind it, and the sides, along the adjacent cabinets or wall. The dishwasher is equipped with water supply and drain hoses that can be positioned to the right or the left to facilitate proper installation. About Power Connection About Power Connection For personal safety:... -
Page 17: Water Connection
Water Connection Water Connection Back View Your dishwasher comes equipped with a 'quick connect' assembly (includes inlet and drain hose). The faucet adapter must be installed on the faucet before you can connect the dishwasher. This adapter is included inside your dishwasher. The faucet adapter is compatible with faucets inclusive of either male (outside) or female (inside) threaded faucet connections. -
Page 18: Start Of Dishwasher
1 Screw the faucet adapter onto (or into) the faucet tap. Check for leaks (use Teflon tape to eliminate if necessary). 2. Connect the six-sided connection of the drain hose to the drain port connection on the back of the dishwasher cabinet. -
Page 19: Troubleshooting Tips
8.Troubleshooting Tips 8.Troubleshooting Tips Before Calling for Service Before Calling for Service Review the charts on the following pages may save you from calling for service. Problem Possible Causes What To Do Dishwasher doesn t Fuse blown, or the Replace fuse or reset circuit breaker. Remove any other circuit breaker tripped. -
Page 20: Error Codes
Problem Possible Causes What To Do The dishes The dishes were not See notes in " Loading the Dishwasher Baskets ". loaded correctly. are not clean The programme was Select a more intensive programme. not powerful enough. See" Wash Cycle Table ". Not enough detergent Use more detergent, or change your detergent. -
Page 21: Technical Information
Technical Information Technical Information Height : 438mm Width : 550mm Depth : 500mm Voltage connected Load : see rating label Water pressure: 0.04-1.0MPa Hot water connection : max 60 Power supply: see rating label Capacity: 6 Place settings...
Need help?
Do you have a question about the WQP6-3208-US and is the answer not in the manual?
Questions and answers