Table of Contents
Advertisement
Available languages
Available languages
本文件含美的集团保密信息,禁止任何人未
经授权以任何形式使用(包含不限于全部或
部分地泄露 、 复制或散发)
A
技术要求:
1.该手 册 印 刷 颜 色 均 为 黑 色 : PA NT O N E BL A C K C
2.纸张 规 格 为
3.如果 供 应 商 的 排 版 需 要 加 空 白 页 , 请 加 在 封 面 后 或
者 封 底 前,确保语言角标朝外。
4. 需要符
5. 说明书纸张材料、装订用书钉、印刷油墨及光油,须符合欧盟 REACH 法规、
PAHs 指令及 RoHS 指令等环保指令要求 , 详见 QMWD-J15.001 洗碗机公司
产品及零部件绿色 设计通则。
B
C
标记
处数 分区
D
编
制
审 核
审 定
批 准
1
1
145X210MM
QMWD-J03.092-2021 产品说明书技术条件;
封 底按要求 印刷物 料条码,
红色字和框 不用 印 刷
修改各个语言的
技术参数表
更改文件号 签 名
校对
性能
排版
日期
20230531
用户手册(DE+EN+FR)SF
5.60NW14C(WQP12-7635W)(14套C级)(交替,自
动开门)(两层IEC碗篮,滑动托盘)(普通mini)(普
通喷臂)MIDEA德国
日 期
阶 段 标 记
3
0
REV.
数
量
重
1
共 共 1
张
第
2
6710032173
比 例
80G双胶
1:1
量
佛山市顺德区美的
洗涤电器制造有限公司
1
张
2
A
B
C
D D
Advertisement
Chapters
Table of Contents

Related Manuals for Midea WQP12


Summary of Contents for Midea WQP12
- Page 1 PAHs 指令及 RoHS 指令等环保指令要求 , 详见 QMWD-J15.001 洗碗机公司 产品及零部件绿色 设计通则。 封 底按要求 印刷物 料条码, 红色字和框 不用 印 刷 修改各个语言的 20230531 用户手册(DE+EN+FR)SF 技术参数表 6710032173 5.60NW14C(WQP12-7635W)(14套C级)(交替,自 动开门)(两层IEC碗篮,滑动托盘)(普通mini)(普 通喷臂)MIDEA德国 标记 处数 分区 更改文件号 签 名 日 期 阶 段 标 记 比 例...
- Page 2 Geschirrspüler BEDIENUNGSANLEITUNG MSmartHome SF 5.60NW14C & registrieren Produktverbe...
-
Page 3: Table Of Contents
INHALTSVERZEICHNIS SICHERHEITSHINWEISE TECHNISCHE DATEN PRODUKTÜBERSICHT KURZANLEITUNG INSTALLATIONSANLEITUNG BETRIEB EINSTELLUNG UND VERWENDUNG DER APP REINIGUNG UND WARTUNG TIPPS ZUR FEHLERBEHEBUNG MARKENZEICHEN, UHRHEBERRECHTE UND RECHTLICHE HINWEISE ENTSORGUNG UND RECYCLING DATENSCHUTZHINWEISE KONFORMITÄTSERKLÄRUNG... -
Page 4: Sicherheitshinweise
SICHERHEITSHINWEISE Bestimmungsgemäßer Gebrauch Die folgenden Sicherheitsrichtlinien sollen ● unvorhergesehene Risiken oder Schäden durch unsicheren oder falschen Betrieb des Geräts verhindern. Bitte überprüfen Sie die Verpackung und das Gerät bei der Ankunft, um sicherzustellen, dass alles intakt ist, um einen sicheren Betrieb zu gewährleisten. - Page 5 Warnung Vorsicht Achtung dürfen.
- Page 6 GEFAHR: Brandgefahr/ Brennbare Materialien Vorsichtsmaßnahmen: Wohnumgebungen;...
- Page 7 vermeiden. Erdungsanweisung ● ● ● ●...
- Page 8 ● ● ● ● ● ● ● ● ● ● ●...
- Page 9 ● ● ● ● ● werden. ● ● ● Standby- ● ● ●...
- Page 10 Entsorgung ● ● ● vermeiden. ● ●...
- Page 11 Höhe (H) 845 mm Breite (W) Tiefe (D1) 600 mm Tiefe (D2) 1175 mm 90°...
- Page 12 Datenblatt Lieferantenadresse b -Erhard- – Deutschland SF 5.60NW14C Parameter Parameter Wert Wert Höhe Breite Tiefe Energieeffizienzklasse ( a ) C ( ) c 43,9 Trockenleistungsindex( a ) 1,065 Reinigungsleistungsindex 1,125 Wasserverbrauch in Litern Energieverbrauch in kWh [pro Zyklus], basierend auf [pro Zyklus], basierend auf dem Ökoprogramm.
-
Page 13: Produktübersicht
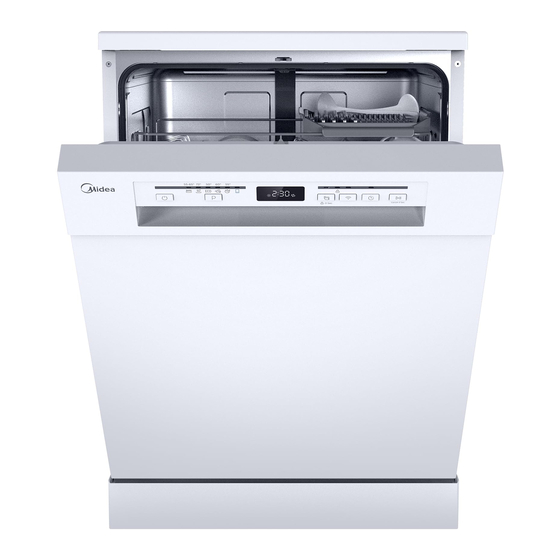
PRODUKTÜBERSICHT Produkt WICHTIG Lesen Sie vor erstmaliger Benutzung des Gerätes alle Bedienungsanweisungen, um bestmögliche Ergebnisse mit Ihrem Geschirrspüler zu erzielen. Deckensprüharm Innenrohr Unterer Sprüharm Salzbehälter Filterbaugruppe Reinigerkammer Besteckfach Oberer Tassenhalter Sprüharm Besteckkorb Oberer Korb Unterer Korb HINWEIS Die Abbildungen dienen nur als Referenz, die einzelnen Modelle können davon abweichen. -
Page 14: Kurzanleitung
KURZANLEITUNG Bitte informieren Sie sich im entsprechenden Kapitel der Bedienungsanleitung ausführlich über die jeweilige Funktionsweise. Innen Außen... -
Page 15: Installationsanleitung
INSTALLATIONSANLEITUNG WARNUNG Stromschlaggefahr Trennen Sie die Stromversorgung, bevor Sie den Geschirrspüler installieren. Andernfalls kann es zu Tod oder Stromschlag kommen. Achtung Informationen zum Stromanschluss WARNUNG Persönliche Sicherheit Verwenden Sie für dieses Gerät kein Verlängerungskabel oder Adapterstecker. Schneiden oder entfernen Sie unter keinen Umständen die Erdungsverbindung vom Netzkabel. Elektrische Anforderungen versorgt. - Page 16 Über den Sicherheitsschlauch HINWEIS Achten Sie beim Anschluss an das Trinkwasser darauf, dass Sie das Gerät mit einer Sicherheitseinrichtung gegen Trinkwasserverunreinigung durch Rückfluss (nach DIN EN 1717) anschließen. Wir empfehlen, die Installation, einschließlich der Wasser- und Elektroanschlüsse, sowie Reparaturen von einem qualifizierten Fachmann durchführen zu lassen.
- Page 17 So lassen Sie überschüssiges Wasser aus den Schläuchen ab Wasseraustritt Verlängerungsschlauch Siphonverbindung Positionieren Sie das Gerät Nivellierung des Ger äts Sobald das Gerät zum Nivellieren positioniert ist, kann die Höhe des Geschirrspülers über Einstellung der Stellfüße eingestellt werden. Aber sollte das gerät nicht mehr als 2°...
- Page 18 Typ 2: Unter bestehender Arbeitsplatte (Bei Anbringung unter einer Arbeitsplatte) In den meisten modernen Küchen gibt es nur eine einzige Arbeitsplatte, unter der Schränke und elektrische Geräte aufgestellt werden. In diesem Fall entfernen Sie die Deckplatte des Geschirrspülers, indem Sie die Schrauben unter der hinteren Kante der Oberseite lösen (a).
-
Page 19: Betrieb
BETRIEB Bedienfeld Beschreibung • Drücken Sie diese Taste zum Ein- oder Ausschalten Nr. 1 Ein/Aus Ihres Geschirrspülers. • Drücken Sie diese Tasten zur Auswahl des Nr.2 Programm geeigneten Spülprogramms. Die entsprechende Programmanzeige leuchtet auf. • Am Ende eines Programms ö net sich die Tür für einen besseren Trocknungse ekt und zur Reduzierung des Stromverbrauchs während der Trocknung automatisch. - Page 20 Beschreibung • Halten Sie die Taste länger als 3 Sekunden gedrückt. Nachdem ein Signalton ausgegeben wurde und das Symbol langsam zu blinken begonnen hat, befindet sich das Gerät im Netzwerkverbindungsstatus mit der App. • Wenn die Anzeige langsam blinkt, bedeutet dies, dass der Geschirrspüler auf einen Verbindungsaufbau wartet.
- Page 21 Beschreibung • Spülen mit automatischer Erkennung, leicht, normal Auto oder stark verschmutztes Geschirr, mit oder ohne eingetrocknete Speisereste. • Zur besonders hygienischen Reinigung von Geschirr HygienePflege+ und Glasware. Die höchste Wassertemperatur beträgt 72 °C. • Dies ist das Standardprogramm. Es eignet sich Nr.8 zur Reinigung normal verschmutzten Geschirrs Programmanzeigen...
- Page 22 Programm Die nachstehende Tabelle zeigt, welche Programme am besten für den jeweiligen Verschmutzungsgrad geeignet sind und wie viel Spülmittel benötigt wird. Zudem enthält sie verschiedene Informationen über die Programme. Verbrauchswerte und Programmdauer sind nur Richtwerte (ECO-Programm ausgenommen). ( ) zeigt an, dass das Programm beim letzten Klarspülen Klarspüler nutzt. Spülmittel Programm- Laufzeit Leistung Wasser...
- Page 23 Geschirr vorbereiten und laden Erwägen Sie den Kauf von Utensilien, die als spülmaschinenfest eingestuft sind. Wählen Sie für bestimmte Elemente ein Programm mit der niedrigsten. Temperatur aus. Nehmen Sie Glas und Besteck nicht unmittelbar nach Programmende aus der Spülmaschine, um Schäden zu vermeiden. Zum Waschen sind die folgenden Bestecks / Geschirrs nicht geeignet Holzplatten...
- Page 24 Geschirr entfernen WARNUNG Das Geschirr ist heiß! wird. Der maximale Durchmesser von Tellern vor dem Spüllmittel spender sollte 19 cm betragen, um das Öffnen des Spenders nicht zu behindern. WARNUNG Es dürfen keine Teile unten am Korb herausragen. Legen Sie gefährliche Gegenstände mit der spitzen oder scharfen Seite nach unten ein!
- Page 25 KÖRBE IN ÜBEREINSTIMMUNG MIT EN60436 BELADEN: Die maximale Auslastung der Geschirrspüler-Kapazität trägt dazu bei, Energie und Wasser zu sparen. 1. Oberer Korb: Nummer Artikel Tassen Untertassen Gläser Becher Kochtöpfe Kleine Töpfe 2. Unterer Korb: Nummer Artikel Dessertteller Essteller Suppenteller Ovale Teller Melamin-Dessertteller Melamin-Schüsseln Glasschüsseln...
- Page 26 4.Besteckkorb: Nummer Artikel Suppenlöffel Gabeln Messer Teelöffel 4 4 4 Dessertlöffel Informationen zu Kompatibilitätstests in Servierlöffel Übereinstimmung mit EN60436 Serviergabeln Kapazität: 14 Gedecke Position des oberen Korbs: untere Position Soßenkelle Programm: ECO Klarspüler-Einstellung: Max. Enthärter-Einstellung: H3 Tipps zum Beladen der Körbe Oberen Korb anpassen Die Höhe des oberen Korbs kann leicht so angepasst werden, dass größeres Geschirr im oberen oder unteren Korb Platz findet.
- Page 27 3. Bringen Sie den oberen Korb wieder an 4. Schieben Sie den oberen Korb hinein. den oberen und unteren Rollen an. Obere Position Besteckkorb verschieben Der Besteckkorb kann je nach Bedarf nach rechts oder links verschoben werden. Tassenhalter nach hinten klappen Durch Anheben des Tassengestells können Sie im oberen Korb Platz für größere Artikel schaffen.
- Page 28 Einfüllen des Salzes in den Wasserenthärter HINWEIS Wenn Ihr Modell nicht über einen Wasserenthärter verfügt, können Sie diesen Abschnitt auslassen. Verwenden Sie immer das für Geschirrspüler vorgesehene Salz. Der Härtegrad des Wassers ist von Ort zu Ort unterschiedlich. Wenn hartes Wasser im Geschirrspüler verwendet wird Wenn hartes Wasser im Geschirrspüler verwendet wird, bilden sich Ablagerungen auf dem Geschirr und den Utensilien.
- Page 29 Wasserenthärter 1. Schließen Sie die Tür und schalten Sie das Gerät ein. 2. Drücken Sie innerhalb von 60 Sekunden nach dem Einschalten des Geräts die Programmtaste für länger als 5 Sekunden, um in den Einstellmodus des Wasserenthärters zu gelangen. 3. Drücken Sie die Programmtaste erneut, um die richtige Einstellung entsprechend Ihrer örtlichen Wasserhärte zu wählen;...
- Page 30 Funktion von Klarspüler und Spüllmittel Die Klarspülerhilfe wird während der letzten Spülung freigegeben, um zu verhindern, dass Wasser auf Ihrem Geschirr Tröpfchen bildet, die Flecken und Streifen hinterlassen können. Es verbessert auch das Trocknen, indem Wasser vom Geschirr ablaufen kann. Ihre Spülmaschine ist für die Verwendung von flüssigen Klarspüler ausgelegt.
- Page 31 Füllen des Klarspülerbehälters Während des letzten Spülgangs wird der Klarspüler verwendet, um die Bildung von Wassertropfen auf dem Geschirr zu vermeiden. Anderenfalls können Flecken und Streifen zurückbleiben. Klarspüler unterstützt auch den Trocknungsvorgang, da das Wasser dann besser vom Geschirr abperlt. Dieser Geschirrspüler ist für die Verwendung von flüssigem Klarspüler vorgesehen.
- Page 32 Befüllen des Spüllmittelspenders 2. Füllen Sie das Spüllmittel in den größeren Hohlraum (A) für die Hauptwäsche. Für ein besseres Reinigungsergebnis, insbesondere bei sehr schmutzigen Gegenständen, geben Sie eine kleine Menge Spüllmittel auf die Tür. Das zusätzliche Spüllmittel wird während der Vorwaschphase aktiviert.
- Page 33 Programm starten 1. Z iehen Sie den unteren und oberen Korb heraus, legen Sie das Geschirr ein und schieben Sie ihn wieder zur ü ck. Sie sollen zuerst den unteren und dann den oberen Korb einlegen. 2. F ü llen Sie das Spüllmittel ein. 3.
-
Page 34: Einstellung Und Verwendung Der App
EINSTELLUNG UND VERWENDUNG DER APP MSmarthome-App herunterladen MSmartHome Suchen Sie im App-Store (Google Play Store, Apple App Store) die App „MSmartHome“. Laden Sie die App MSmartHome herunter und installieren Sie diese auf Ihrem Handy. Sie können die App auch durch Scannen Download the app &... -
Page 35: Hinweise
HINWEIS Vergewissern Sie sich, dass Ihre Geräte eingeschaltet sind. Halten Sie Ihr Handy nah an das Gerät, während Sie dieses mit dem Netzwerk verbinden. Verbinden Sie Ihr Handy mit Ihrem schnurlosen Netzwerk zuhause. Dafür benötigen Sie das Passwort Ihres Netzwerks. Prüfen Sie, ob Ihr schnurloser Router 2.4 GHz unterstützt und schalten Sie ihn ein. - Page 36 Außenpflege Tür und Türdichtung Das Bedienfeld sollte werden. WARNUNG Innenpflege Filtersystem WARNUNG Grobfilter Hauptfilter Feinfilter...
- Page 37 WARNUNG Sprüharme Spülen.
- Page 38 Pflege der Spülmaschine Frost Vorsichtsmaßnahme Nach jedem Spülvorgang Entfernen Sie den Stecker Keine Lösungsmittel oder Scheuermittel Bei längerem Nichtgebrauch Bewegung des Geräts Dichtungen...
- Page 39 FEHLERBEHEBUNG Bevor Sie den Service anrufen Mögliche Ursachen Was tun Problem unterbrochen. Ablaufschlauch. gepumpt Wanne aufwischen. Innenraum enthält.
- Page 40 Mögliche Ursachen Was tun Problem korrosionsbeständig die Turbo- lose. Gegen- Spülmaschine Wasserleitungen geladen. Geschirr". zugegeben. Sprüharme. Sprüharmdüsen. Waschschranks. Glaswaren. Spüllmittel. verursachen.
- Page 41 Mögliche Ursachen Was tun Problem Aluminiumutensilie n beseitigen. Geschirr Geschirr Spüllmittelspend Spender Laden ist. falsches ausgewählt. verringert. Waschzeit. Beschichtung. geeignet. WARNUNG nichtig. Verfügbarkeit von Ersatzteilen...
- Page 42 ERROR CODES erläutert. Problem Mögliche Ursache Behebung Geschirrspülers. Ec/L4/C4 Steuereinheit. Anzeigeplatine. WARNUNG...
- Page 44 Wichtige Hinweise vermeiden. Konformität mit der RoHS-Richtlinie Wichtige Hinweise Verpackungsmaterial.
-
Page 45: Datenschutzhinweise
DATENSCHUTZHINWEISE einzuhalten. MideaDPO@midea.com MideaDPO@midea.com... -
Page 46: Konformitätserklärung
Dokumente) Einschränkung der Gültigkeit (sofern zutreffend): ......................Zusätzliche Informationen: Benannte Stelle:................Aufbewahrung der technischen Unterlagen durch: Foshan Shunde Midea Washing Appliances Mfg. Co., Ltd. Ort und Datum der Ausstellung (dieser DoC): . Foshan/2020-12-25......Unterzeichnet von oder für den Hersteller: ........ - Page 49 Dish Washer USER MANUAL SF 5.60NW14C MSmartHome Download the app & activate product Warning notices: Before using this product, please read this manual carefully and keep it for future reference. The design and specifications are subject to change without prior notice for product improvement. Consult with your dealer or manufacturer for details.
- Page 50 THANK YOU LETTER Thank you for choosing Midea! Before using your new Midea product, please read this manual thoroughly to ensure that you know how to operate the features and CONTENTS THANK YOU LETTER SAFETY INSTRUCTIONS SPECIFICATIONS PRODUCT OVERVIEW QUICK START GUIDE...
-
Page 51: Safety Instructions
SAFETY INSTRUCTIONS Intended Use The following safety guidelines are intended to ● prevent unforeseen risks or damage from unsafe or incorrect operation of the appliance. Please check the packaging and appliance on arrival to make sure everything is intact to ensure safe operation. - Page 52 Caution The signal word indicates a hazard with a low degree of risk which, if not avoided, may result in minor or moderate injury. Attention The signal word indicates important information (e.g. damage to property), but not danger. Observe instructions This symbol indicates that a service technician should only operate and maintain this appliance in accordance with the...
- Page 53 DANGER: Risk of Fire/Flammable materials When using your dishwasher, follow the precautions ● ● listed below: Installation and repair can only be carried out by a ● qualified technician. This appliance is intended to be used in household ● and similar applications such as: -staff kitchen areas in shops, offices and other working environments;...
- Page 54 To protect against the risk of electrical shock, do not immerse the unit, cord or plug in water or other liquid. Please unplug before cleaning and maintenance the ● appliance. Use a soft cloth moisten with mild soap, and then use a dry cloth to wipe it again. If the supply cord is damaged, it must be replaced by ●...
- Page 55 operating, there is a risk of water squirting out. Do not place any heavy objects on or stand on the ● door when it is open. The appliance could tip forward. When loading items to be washed: ● 1) Locate sharp items so that they are not likely to damage the door seal;...
- Page 56 To save energy, in stand by mode, the appliance will ● switch of automatically after 15 minutes without any user interaction. The maximum number of place settings to be ● washed is 14. The maximum permissible inlet water pressure is ●...
-
Page 57: Specifications
SPECIFICATIONS Height (H) 845 mm Width (W) 598 mm Depth (D1) 600 mm (with the door closed) Depth (D2) 1175 mm (with the door opened 90°) - Page 58 Product information sheet (EN60436) Supplier's name or trade mark:Midea Europe GmbH Supplier's address ( ): Ludwig-Erhard-Straße 14 – 65760 Eschborn, Deutschland Model identifier: SF 5.60NW14C General product parameters: Parameter Parameter Value Value Height Dimensions in cm Width Rated capacity ( ) (ps)
-
Page 59: Product Overview
PRODUCT OVERVIEW Product IMPORTRANT To get the best performance from your dishwasher, read all operating instructions before using it for the first time. Top spray arm Inner pipe Lower spray arm Salt container Filter assembly Dispenser Cutlery rack Upper spray Cup rack Cutlery basket Upper basket... -
Page 60: Quick Start Guide
QUICK START GUIDE Please read the corresponding content in the instruction manual for detailed operating method. 1.Install the dishwasher 2. Remove larger residue 3. Load the baskets. from dishes. Avoid pre-rinsing. Inside Outside 4. Fill the dispenser with 5. Select a suitable program detergent and rinse aid. -
Page 61: Product Installation
PRODUCT INSTALLATION WARNING Electrical Shock Hazard Disconnect electrical power before installing dishwasher. Failure to do so could result in death or electrical shock. Attention The installation of the pipes and electrical equipments should be done by professionals. About Power Connection WARNING For personal safety: Do not use an extension cord or an adapter plug with this appliance. - Page 62 About the safety supply hose The safety supply hose consists of the double walls. The system guarantees its intervention by blocking the flow of water in case of the supply hose breaking and when the air space between the supply hose itself and the outer corrugated hose is full of water.
- Page 63 How to drain excess water from hoses If the connection to the drain pipe is positioned higher than 1000 mm, excess water may remain in the drain hose. It will be necessary to drain excess water from the hose into a bowl or suitable container that is held outside and lower than the sink. Water outlet Connect the water drain hose.
- Page 64 Type 2: Underneath existing work top (When fitting beneath a work top) In most modern fitted kitchens there is only one single work top under which cabinets and electrical appliances are fitted. In this case remove the work top of the dishwasher by unscrewing the screws under the rear edge of the top (a).
-
Page 65: Operation Instructions
OPERATION INSTRUCTIONS Control Panel Description Press this button to power on or power off your ● Power No.1 dishwasher. Press these buttons to select the appropriate ● No.2 Program washing program, the corresponding program indicator will be lit. At the end of a program the door will open ●... - Page 66 Description Press the button for more than 3 seconds. After a ● shout bleeping and the icon starts to blink slowly, it's in the network linking status to APP. Indicator light flashing slowly shows DW is waiting ● for connection. Indicator light flashing quickly shows DW is ●...
- Page 67 Description This button refers to a variety of washing programs ● that can be selected in the APP. If the washing program has not been activated in the APP, the Glass will be activated by default. Glass Cloud Wash For lightly soiled crockery and glass. MachineCare+ This program provides an effective cleaning of the dishwasher itself.
- Page 68 Programs The table below shows which programs are best for the levels of food residue on them and how much detergent is needed. It also show various information about the programs. Consumption values and program duration are only indicative except for the ECO program.
- Page 69 Preparing And Loading Dishes Consider buying utensils which are identified as dishwasher-proof. For particular items, select a program with the lowest possible temperature. To prevent damage, do not take glass and cutlery out of the dishwasher immediately after the program has ended. For washing the following cutlery/dishes Are not suitable Cutlery with wooden, horn china or mother-of-pearl handles...
- Page 70 Removing the dishes To prevent water dripping from the upper basket into the lower basket, we recommend that you empty the lower basket first, followed by the upper basket. WARNING Items will be hot! To prevent damage, do not take glass and cutlery out of the dishwasher for around 15 minutes after the program has ended.
- Page 71 LOADING THE BASKETS ACCORDING TO EN60436: Loading the dishwasher to its full capacity will contribute to energy and water savings. 1.Upper basket: Number Item Cups Saucers Glasses Mugs Oven pot Small pot 2.Lower basket: Number Item Dessert plates Dinner plates Soup plates Oval platter Melamine dessert plates...
- Page 72 4.Cutlery basket: Number Item Soup spoons Forks Knives 4 4 4 Tea spoons Dessert spoons Information for comparability tests in accordance with EN60436 Serving spoons Capacity: 14 place settings Serving fork Position of the upper basket: lower position Program: ECO Gravy ladle Rinse aid setting: Max Softener setting: H3...
- Page 73 3. Re-attach the upper basket to upper 4. Push in the upper basket. or lower rollers. upper position Sliding cutlery rack The cutlery rack can slide to the right or left at will. Folding back the cup shelves To make room for taller items in the upper basket, raise the cup rack upwards. You can then lean the tall glasses against it.
- Page 74 Loading The Salt Into The Softener NOTE If your model does not have any water softener, you may skip this section. Always use salt intended for dishwasher use. The hardness of the water varies from place to place. If hard water is used in the dishwasher, deposits will form on the dishes and utensils.
- Page 75 Water Softener The water softener must be set manually, using the water hardness dial. The water softener is designed to remove minerals and salts from the water, which would have a detrimental or adverse effect on the operation of the appliance. The more minerals there are, the harder your water is.
- Page 76 Function Of The Rinse Aid And Detergent The rinse aid is released during the final rinse to prevent water from forming droplets on your dishes, which can leave spots and streaks. It also improves drying by allowing water to roll off the dishes. Your dishwasher is designed to use liquid rinse aids. WARNING Only use branded rinse aid for dishwasher.
- Page 77 Filling The Rinse Aid Reservoir The rinse aid is released during the final rinse to prevent water from forming droplets on your dishes, which can leave spots and streaks. It also improves drying by allowing water to roll off the dishes. Your dishwasher is designed to use liquid rinse aids. 1.
- Page 78 Filling The Detergent Dispenser 1. Please choose an open way according 2. Add detergent into the larger cavity to the actual situation. (A) for main wash. A. Open the cap by sliding the release For better cleaning result, especially latch. if you have very dirt items, pour a small B.
- Page 79 Starting A Program 1. Draw out the lower and upper basket, load the dishes and push them back. It is commended to load the lower basket first, then the upper one. 2. Pour in the detergent. 3. Insert the plug into the socket. The power supply refer to last page ”Product fiche”. Make sure that the water supply is turned on to full pressure.
-
Page 80: App Setup And Operation
APP SETUP AND OPERATION Download the MSmarthome App MSmartHome On an app market (Google Play Store, Apple App MSmartHome app. Download and install it on your phone. You can also download the app by scanning the Download the app QR code below. &... - Page 81 NOTE Make sure your devices are powered on. Keep your mobile phone close enough to your device when you are connecting your device to the network. Connect your mobile phone to the wireless network at home, and make sure you know the password of the wireless network. Check if your wireless router supports 2.4 GHz band and turn it on.
-
Page 82: Cleaning And Maintenance
CLEANING AND MAINTENANCE External Care The door and the door seal Clean the door seals regularly with a soft damp cloth to remove food deposits.When the dishwasher is being loaded, food and drink residues may drip onto the sides of the dishwasher door. - Page 83 3. Larger food remnants can be 4. Reassemble the filters in the reverse cleaned by rinsing the filter under order of the disassembly, replace the running water. For a more thorough filter insert, and rotate clockwise to clean, use a soft cleaning brush. the close arrow.
- Page 84 Caring For The Dishwasher Frost precaution Please take frost protection measures on the dishwasher in winter. Every time after washing cycles, please operate as follows: 1. Cut off the electrical power to the dishwasher at the supply source. 2. Turn off the water supply and disconnect the water inlet pipe from the water valve. 3.
-
Page 85: Troubleshooting
TROUBLESHOOTING Before Calling For Service Reviewing the charts on the following pages may save you from calling for service. Problem Possible reason Solution Fuse blown, or the Replace fuse or reset circuit breaker. ● circuit break tripped. Remove any other appliances sharing the same circuit with the dishwasher. - Page 86 Problem Possible reason Solution The affected items Avoid washing items that are not ● are not corrosion resistant. corrosion resistant in the dishwasher. A program Always run a wash program ● was not run after without any crockery after adding dishwasher salt was salt.
- Page 87 Problem Possible reason Solution Aluminium utensils Use a mild abrasive cleaner to Black or grey ● have rubbed against eliminate those marks. marks on dishes dishes Dishes block Re-loading the dishes properly. Detergent left in ● detergent dispenser dispenser Improper loading Use gloves if detergent residue can ●...
- Page 88 ERROR CODES If there is a malfunction the dishwasher will display an error code. The following table shows possible error codes and their causes. Problem Possible reason Solution Longer inlet time. Faucets is not opened, or water ● intake is restricted, or water pressure is too low.
-
Page 89: Trademarks, Copyrights And Legal Statement
Midea may constitute trademark infringement or unfair competition in violation of relevant laws. This manual is created by Midea and Midea reserves all copyrights thereof. No entity or individual may use, duplicate, modify, distribute in whole or in part this manual, or bundle or sell with other products without the prior written consent of Midea. -
Page 90: Disposal And Recycling
DISPOSAL AND RECYCLING Important instructions for environment Compliance with the WEEE Directive and Disposing of the Waster Product: This product complies with EU WEEE Directive (2012/19/EU). This product bears a classification symbol for waster electrical and electronic equipment (WEEE). This symbol indicates that this product shall not be disposed with other household wastes at the end of its service life. -
Page 91: Data Protection Notice
European Economic Area. Further information are provided on request. You can contact our Data Protection MideaDPO@midea.com. To exercise your rights such as right to object your personal date being processed for direct marketing purposes, please contact us via MideaDPO@midea.com. To find further information, please follow the QR Code. -
Page 92: Declaration Of Conformity
Limitation of validity (if any): ......................Supplementary information: Notified body involved:................Technical file held by:. Foshan Shunde Midea Washing Appliances Mfg. Co., Ltd. Place and date of issue (of this DoC): .Foshan/2020-12-25......Signed by or for the manufacturer: ........(Signature of authorised person) Name (in print):.....Ke Ningsheng...... - Page 95 Lave-vaisselle MANUEL D’UTILISATION MSmartHome SF 5.60NW14C Télécharger l’application et activer le produit Avertissements : Avant d'utiliser ce produit, merci de lire attentivement ce manuel et de le conserver pour toute référence ultérieure. La conception et les spécifications sont susceptibles d'être modifiées sans préavis afin d’améliorer le produit.
- Page 96 LETTRE DE REMERCIEMENTS Merci d'avoir choisi Midea ! Avant d'utiliser votre nouveau produit Midea, merci de lire attentivement ce manuel afin de vous assurer d’être à même d’utiliser les caractéristiques et fonctions de votre nouvel appareil en toute sécurité. SOMMAIRE...
-
Page 97: Consignes De Securite
CONSIGNES DE SECURITE Usage prévu • Les consignes de sécurité qui suivent ont pour but de prévenir les risques ou les dommages imprévus résultant d'une utilisation dangereuse ou incorrecte de l'appareil. Merci de vérifier l'emballage et l'appareil à réception afin de vous assurer que tout est intact, cela afin de garantir un fonctionnement sûr. - Page 98 Avertissement Ce symbole signale un danger avec un niveau de risque intermédiaire qui, s'il n'est pas évité, peut entraîner la mort ou des blessures graves. Attention Ce symbole signale un danger avec un faible degré de risque qui, s'il n'est pas évité, peut entraîner des blessures mineures ou modérées.
- Page 99 DANGER : Risque d'incendie/Matériaux inflammables • En utilisant votre lave-vaisselle, merci de respecter les précautions suivantes • L'installation et la réparation ne peuvent être effectuées que par un technicien qualifié. • Cet appareil est destiné à être utilisé dans des applications domestiques et similaires telles que : -les espaces de cuisine du personnel dans les magasins, les bureaux et autres environnements de...
- Page 100 Cet appareil est destiné à un usage domestique intérieur uniquement. Afin d’éviter tout risque d'électrocution, ne pas immerger l'appareil, le cordon ou la fiche dans l'eau ou tout autre liquide. • Merci de débrancher l'appareil avant de le nettoyer ou de l'entretenir. Utiliser un chiffon doux humidifié avec du savon doux, puis utiliser un chiffon sec pour l'essuyer à...
- Page 101 • Ne pas faire fonctionner votre lave-vaisselle si tous les panneaux d'enceinte ne sont pas mis en place correctement. • Ouvrir la porte très prudemment si le lave-vaisselle est en marche, il y a un risque de projection d'eau. • Ne pas poser d'objets lourds sur la porte ni se tenir debout sur celle-ci lorsqu'elle est ouverte.
- Page 102 • Pendant l'installation, l'alimentation électrique ne doit pas être pliée ou écrasée de manière excessive ou dangereuse. • Ne pas modifier les commandes. • L'appareil doit être raccordé à la vanne d'eau principale à l'aide de nouveaux jeux de tuyaux. Les anciens jeux ne doivent pas être réutilisés.
-
Page 103: Informations Techniques
INFORMATIONS TECHNIQUES Hauteur (H) 845 mm Largeur (W) 598 mm Profondeur (D1) 600 mm (avec la porte fermée) Profondeur (D2) 1175 mm (avec la porte ouverte à 90°) - Page 104 Fiche d'information sur le produit (EN60436) Nom ou marque du fournisseur : Midea Europe GmbH Adresse du fournisseur ( ): Ludwig-Erhard-Straße 14 – 65760 Eschborn, Deutschland Identifiant du modèle: SF 5.60NW14C Paramètres généraux du produit : Paramètres Valeur Paramètres Valeur...
-
Page 105: Vue D'ensemble Du Produit
VUE D’ENSEMBLE DU PRODUIT Produit IMPORTANT Afin d’obtenir les meilleures performances de votre lave-vaisselle, lire toutes les instructions d'utilisation avant de l'utiliser pour la première fois. Haut gicleur supérieur Conduite intérieure Bras gicleur inférieur Bac à sel Ensemble de filtre Distributeur Porte-couverts Bras gicleur Porte-tasses... -
Page 106: Guide De Demarrage Rapide
GUIDE DE DEMARRAGE RAPIDE Merci de lire le contenu correspondant dans le manuel d'instructions pour une méthode d'utilisation détaillée. 1. Installer le lave-vaisselle 2. Enlever les plus gros résidus 3. Charger les paniers. de la vaisselle. Éviter le pré-rinçage. Inside 4. -
Page 107: Consignes D'installation
CONSIGNES D’INSTALLATION AVERTISSEMENT Risque de Choc Electrique Débrancher l'alimentation électrique avant d'installer le lave-vaisselle. Le non-respect de cette consigne peut entraîner la mort ou un choc électrique. Attention L'installation des tuyaux et des équipements électriques doit être effectuée par des professionnels. A propos de la connexion electrique AVERTISSEMENT Pour votre sécurité... - Page 108 A propos du tuyau d'alimentation de sécurité Le tuyau d'alimentation de sécurité est constitué de doubles parois. Le système garantit son intervention en bloquant le flux d'eau en cas de rupture du tuyau d'alimentation et lorsque l'espace d'air entre le tuyau d'alimentation lui-même et le tuyau ondulé...
- Page 109 Comment évacuer l'excès d'eau des tuyaux Si le raccordement au tuyau d'évacuation est placé à une hauteur supérieure à 1000 mm, un excès d'eau peut rester dans le tuyau d'évacuation. Il sera nécessaire d'évacuer l'excès d'eau du tuyau dans une cuvette ou un récipient approprié maintenu à...
- Page 110 Type 2 : En dessous du plan de travail existant (en cas d’installation sous un plan de travail) Dans la plupart des cuisines modernes, il n'y a qu’un seul plan de travail sous lequel sont installés les armoires et les appareils électriques. Dans ce cas, retirez le plan de travail du lave-vaisselle en dévissant les vis situées sous le bord arrière de celui-ci (a).
-
Page 111: Instructions Sur Le Fonctionnement
INSTRUCTIONS SUR LE FONCTIONNEMENT Control Panel Description • Appuyez sur ce bouton pour mettre votre N° 1 Alimentation lave-vaisselle en marche ou à l’arrêt. • Appuyez sur ces touches pour sélectionner le Programme programme de lavage approprié, le voyant indiquant le programme correspondant sera allumé. - Page 112 Description • Appuyez sur le bouton pendant plus de 3 secondes. Après un bref signal sonore et l'icône commence à clignoter lentement, il est dans l’état de liaison réseau avec l’APP. • Le clignotement lent du voyant indique que le •...
- Page 113 Description • Ce bouton renvoie à une variété de programmes de lavage qui peuvent être sélectionnés dans l’APP. Si le programme de lavage n’a pas été activé dans l’APP, le «Vitre» sera activé par défaut. Lavage à l’aide du Vitre Cloud Pour la vaisselle et le verre peu sales.
- Page 114 Programme Le tableau ci-dessous indique les programmes appropriés en fonction des niveaux de résidus alimentaires et de la quantité de détergent nécessaire. Il affiche également diverses informations relatives aux programmes. Les valeurs de consommation et la durée des programmes sont données à titre indicatif, sauf pour le programme «ÉCO». ( ) indique que le programme a utilisé...
- Page 115 Préparation et chargement de la vaisselle Penser à acheter des ustensiles identifiés comme résistant au lave-vaisselle. Pour les articles particuliers, sélectionner un programme avec la température la plus basse possible. Afin d’éviter tout dommage, ne pas sortir les verres et les couverts du lave-vaisselle immédiatement après la fin du programme.
- Page 116 Retirer la vaisselle Afin d’éviter que l'eau ne s'écoule du panier supérieur dans le panier inférieur, nous vous recommandons de vider d'abord le panier inférieur, puis le panier supérieur. AVERTISSEMENT Les éléments seront chauds ! Afin d’éviter tout dommage, ne pas sortir le verre et les couverts du lave-vaisselle pendant environ 15 minutes après la fin du programme.
- Page 117 CHARGEMENT DES PANIERS CONFORMÉMENT À LA NORME EN60436 : Le fait de charger le lave-vaisselle à pleine capacité permet de réaliser des économies d’énergie et d’eau. 1. Panier supérieur : Numéro Élément Tasses Soucoupes Verres Grandes tasses Casseroles pour four Petites casseroles 2.
- Page 118 4. Panier à couverts : DANS Numéro Élément Cuillères à soupe Fourchettes Couteaux Cuillères à café 4 4 4 Cuillères à dessert Informations pour les tests de comparabilité Cuillères de service conformément à la norme EN60436 Fourchettes de service Capacité : 14 couverts Position du panier supérieur : Louches à...
- Page 119 3. Fixez à nouveau le panier supérieur aux 4. Poussez le panier supérieur. rouleaux supérieurs ou inférieurs. position supérieure Insertion du porte-couverts Le porte-couverts peut être inséré vers la droite ou la gauche. Replier les support-tasses Pour faire de la place aux objets plus grands dans le panier supérieur, soulevez le porte-tasses. Vous pouvez alors appuyer dessus les grands verres.
- Page 120 Charger le sel dans l’adoucisseur REMARQUE Si votre modèle n'est pas équipé d'un adoucisseur d'eau, vous pouvez sauter cette section. Utilisez toujours du sel destiné au lave-vaisselle. La dureté de l'eau varie d'un endroit à l'autre. Si de l'eau dure est utilisée dans le Si de l'eau dure est utilisée dans le lave-vaisselle, des dépôts se formeront sur la vaisselle et les ustensiles.
- Page 121 Adoucisseur d'eau L'adoucisseur d'eau doit être réglé manuellement, à l'aide du cadran de dureté de l'eau. L'adoucisseur d'eau est conçu pour éliminer les minéraux et les sels de l'eau, qui auraient un effet néfaste ou défavorable sur le fonctionnement de l'appareil. Plus il y a de minéraux, plus votre eau est dure.
- Page 122 Fonction du produit de rinçage et du détergent Le produit de rinçage est libéré pendant le dernier rinçage pour empêcher l'eau de former des gouttelettes sur votre vaisselle, ce qui peut laisser des taches et des traces. Il améliore également le séchage en permettant à l'eau de s'écouler de la vaisselle. AVERTISSEMENT N'utiliser que du produit de rinçage de marque pour le lave-vaisselle.
- Page 123 Remplissage du réservoir du produit de rinçage Le produit de rinçage est libéré pendant le dernier rinçage pour empêcher l'eau de former des gouttelettes sur votre vaisselle, ce qui peut laisser des taches et des traces. Il améliore également le séchage en permettant à l'eau de rouler sur la vaisselle. Votre lave-vaisselle est conçu pour utiliser des produits de rinçage liquides.
- Page 124 Remplir le distributeur de détergent 1. Veuillez choisir une voie ouverte 2. . Ajouter le étergent dans la plus grande fonction la situation actuelle. cavité (A) pour le lavage principal. A. . Ouvrez le bouchon en faisant gliss Pour un meilleur résultat de nettoyage, le de déverrouillage.
- Page 125 Démarrer un programme 1. Sortir le panier inférieur et le panier supérieur, charger la vaisselle et les remettre. Il est recommandé de charger d'abord le panier inférieur, puis le panier supérieur. 4. Ouvrir la porte, appuyer sur le bouton d'alimentation. 5.
-
Page 126: Fonctionnement Et Reglage App
FONCTIONNEMENT ET REGLAGE APP Télécharger l’App MSmarthome App MSmartHome Sur le marché d'applications (Google Play Store, Apple App Store), rechercher l'application "MSmartHome". Télécharger et l’installer sur votre téléphone. Vous pouvez également télécharger Télécharger l'application en scannant le code QR ci-dessous. l’application et activer le produit S'inscrire et se connecter... - Page 127 REMARQUE 1. Vérifier que vos dispositifs sont sous tension. 2. Garder votre téléphone mobile à proximité de votre dispositif lorsque vous le connectez au réseau. 3. Connecter votre téléphone mobile au réseau sans fil de votre domicile, et s’assurer de connaître le mot de passe du réseau sans fil. 4.
-
Page 128: Nettoyage Et Entretien
NETTOYAGE ET ENTRETIEN Entretien externe La porte et le joint de porte Nettoyer régulièrement les joints de la porte à l’aide d’un chiffon doux et humide afin d’éliminer les dépôts d'aliments. Lorsque le lave-vaisselle est chargé, des résidus d'aliments et de boissons peuvent s'égoutter sur les côtés de la porte du lave-vaisselle. - Page 129 3. Les restes d'aliments plus 4. Remonter les filtres dans l'ordre importants peuvent être nettoyés inverse du démontage, replacer en rinçant le filtre à l'eau courante. l'insert du filtre et tourner dans le Pour un nettoyage plus approfondi, sens des aiguilles d'une montre utiliser une brosse de nettoyage douce.
- Page 130 Entretien du lave-vaisselle Précautions contre le gel Merci de prendre des mesures de protection contre le gel du lave-vaisselle en hiver. Après chaque cycle de lavage, merci de procéder comme suit : 1. Couper l'alimentation électrique du lave-vaisselle à la source d'alimentation. 2.
-
Page 131: Conseils Pour Le Depannage
CONSEILS POUR LE DEPANNAGE Avant d'Appeler Le Service L'examen des tableaux des pages suivantes peut vous éviter de faire appel au service après-vente. Problème Causes Possibles Que Faire • Le fusible a sauté, ou le Remplacer le fusible ou réarmer le disjoncteur s'est disjoncteur. - Page 132 Problème Causes Possibles Que Faire • Les éléments concernés ne Eviter de laver les éléments qui ne sont pas résistants à la sont pas résistants à la corrosion corrosion. dans le lave-vaisselle. • Un programme n'a pas Après avoir ajouté du sel, toujours été...
- Page 133 Problème Causes Possibles Que Faire • Les ustensiles en Utiliser un nettoyant abrasif doux pour Marques noires ou aluminium ont frotté éliminer ces marques. grises sur la contre la vaisselle vaisselle • La vaisselle bloque le Recharger correctement la vaisselle. Reste de détergent distributeur de dans le distributeur...
- Page 134 CODES ERREUR En cas de dysfonctionnement, le lave-vaisselle affiche un code d'erreur. Le tableau suivant indique les codes d'erreur possibles et leurs causes. Codes Significations Causes Possibles • Durée d’arrivée plus Les robinets ne sont pas ouverts, longue. ou l'arrivée d'eau est limitée, ou la pression d'eau est trop faible.
-
Page 135: Marques, Droits D'auteur Et Mentions Legales
Le logo , les marques verbales, le nom commercial, l'habillage commercial et toutes les versions de ces éléments sont des actifs précieux de Midea Group et/ou de ses filiales ("Midea"), auxquels Midea appartient en tant que marques commerciales, droits d'auteur et autres droits de propriété intellectuelle, ainsi que l’intégralité du fonds de commerce dérivé... -
Page 136: Elimination Et Recyclage
ELIMINATION ET RECYCLAGE Consignes importantes pour l'environnement Conformité avec la Directive DEEE et Elimination des Produits Usagés : Ce produit est conforme à la directive européenne DEEE (2012/19/EU). Ce produit porte un symbole de classification pour les déchets d'équipements électriques et électroniques (DEEE). -
Page 137: Avis Sur La Protection Des Donnees
Economique Européen. De plus amples informations sont fournies sur demande. Vous pouvez contacter notre Délégué à la Protection des Données à l'adresse MideaDPO@midea.com. Pour exercer vos droits, tels que le droit d'opposition au traitement de vos données personnelles à... -
Page 138: Declaration De Conformite
Déclarons sous notre seule responsabilité que le produit : Nom du produit: Lave-vaisselle Nom commercial : Midea Type ou modèle : WQP12-W7635W (SF 5.60NW14C) Informations complémentaires pertinentes :................(Par exemple, numéro de lot, de lot ou de série, sources et numéros des articles) Auquel se rapporte cette déclaration est conforme aux exigences essentielles et aux... - Page 141 00000000000000 此红框内丝印此用户手册对应的14位物料编码 红色框不需印 刷字体为Gotham-Book 8pt 位置大小严格按图纸操作...
Need help?
Do you have a question about the WQP12 and is the answer not in the manual?
Questions and answers