
Subscribe to Our Youtube Channel
Summary of Contents for Quadivator HyperCut RD62
- Page 1 +\SHU&XW 0RZHU EODGH $VVHPEO\ 2SHUDWRUV 3DUWV 0DQXDO (QJOLVK /DQJXDJH 9HUVLRQ 3ULQWHG -XQH %ODGH 0RZHU 5HDU 'LVFKDUJH 5($' 6$9( 7+,6 0$18$/ 48$',9$725 ,1& WK $YH 1( 3RUWDJH /D 3UDLULH 0% &DQDGD 5 1 & ZZZ TXDGLYDWRU FRP 3DUW...
- Page 3 This may result in some of the minor parts in the manual becoming outdated. Quadivator will have the most up to date information – call 866 770-2169 for information and parts orders or contact us on-line @ www.quadivator.com!
-
Page 4: Safety First
SAFETY FIRST This symbol, the industry’s “Safety Alert Symbol”, is used throughout this manual and on labels on the machine to warn of the possibility of personal injury. Read these instructions carefully. It is essential that you read the instructions and safety regulations before you attempt to assemble or operate this unit. - Page 5 HyperCut Mower Pre-Delivery Check List Check off all items as they are found satisfactory or after adjustments are made: All safety shields and guard are securely in place! All decals are in place and readable! Tighten all hardware – see Checking Bolt Torque in Service Section. Check and tighten blade holder and blade bolts –...
- Page 6 OWNER Register Name Address City State/Prov Mail Code Model (s) Serial (s) Date Sold – D/M/Yr DELIVERY Checklist Tell the customer not to remove any of the safety shields or guards. Review the HyperCut Warranty with customer. Safe Operation and Service. Daily and Periodic Lubrication and Maintenance Daily and Periodic Inspections.
-
Page 7: Table Of Contents
Table of Contents --------------------------- SAFE OPERATION 2. Introduction .1 Specifications 3. Setup .1 Mower Deck Assembly .2 Mounting Mower to Power Unit .3 Mounting Mower to ATV .4 Removing and Re-attaching the Mower 4. Operation .1 Making the best of your Mower .2 Cutting Height .3 Operating Mower 5. -
Page 8: Safe Operation
1. Safe Operation This cutting machine is capable of amputating hands DANGER and feet and throwing objects. Failure to observe the following safety instructions could result in serious injury or death. 1.1 GENERAL OPERATION Read, understand, and follow all instructions on the machine and in the manual(s) before starting. -
Page 9: Slope Operation
Operate machine only in daylight or good artificial light. Do not operate machine while under the influence of alcohol or drugs. Watch for traffic when operating near or crossing roadways. Use extra care when loading or unloading the machine into a trailer or truck. Always wear eye protection when operating machine. - Page 10 1.3 CHILDREN Tragic accidents can occur if the operator is not alert to the presence of children. Children are often WARNING attracted to the machine and the mowing activity. Never assume that children will remain where you last saw them. Keep children out of the mowing area and in the watchful care of the responsible adult other than the operator.
-
Page 11: Introduction
Check grass catcher components and discharge guard frequently and replace with manufacturer’s recommended parts, when necessary. Mower blades are sharp. Wrap the blade or wear gloves, and use extra caution when servicing them. Check brake operation frequently. Adjust and service as required. Maintain or replace safety and instruction labels, as necessary. -
Page 12: Setup
3. SETUP 3.1 Mower Deck Assembly Step 1. Remove the components from the shipping container: 1. The assembled deck. 2. The packaged height adjustment handle. 3. The tower assembly kits, packaged with the height adjustment handle. Step 2. Note the Serial Number of the Deck - it is located as shown in the attached pictures! Step 4. -
Page 13: Mounting Mower To Power Unit
3.2 Mounting Mower to Power Unit Step 1. Insert the tubes of the Power Unit into the matching brackets on the mower deck as shown. You may need to manoeuvre the Power Unit into place by grasping the rear nerf bar and wheeling it into position Step 2. -
Page 14: Mounting Mower To Atv
DO NOT over-tighten the belt – over-tightening the belt will IMPORTANT cause excessive heat build up in the belt and premature belt wear! Step 4. Re-Install the deck drive shield. Step 5. It is possible to start the mower at this time, before it is mounted to any ATV. If you choose to do so, follow these steps: Ensure that there is nothing under the cutting deck that has been inadvertently left on the ground that would contact the blades –... - Page 15 This initial fit up – HyperCut Mower to ATV - should take place on a flat hard surface that has enough room to mount the mower to the ATV, and then manoeuvre the assembled unit! Step 1 - Install the supplied Pin – Part # 88652 in the ATV as shown – place the pin through the top and the large washer on the top of the ATV hitch.
- Page 16 Step 5 - When the ATV contacts the ground with all 4 wheels, and the mower between the ATV wheels – shut off the ATV and place it in neutral for manual maneuvering. Step 6 – Remove the floating hitch (by removing the bolt/pivot – with the swivel and number of holes) –...
- Page 17 NOTE – the hitch with the swivel can be installed in either the “L – UP” or “L- Down” positions as shown. What is important is that the floating hitch member is in the horizontal position when installed on your ATV! NOTE –...
-
Page 18: Removing And Re-Attaching The Mower
Looping the chain around your frame should be done in a secure place to the frame of the ATV, there should be a connection point that is a minimum of 12” inward from the “tower” and as much as possible, the connection point - should be in-line with the tower on the other side. Use the provided D-Pins to lock the chain in place to the tower, the other side of the tower is bolted to the chain! NOTE - When installed - the tether chains are secure, but they will remove some paint from... -
Page 19: Making The Best Of Your Mower
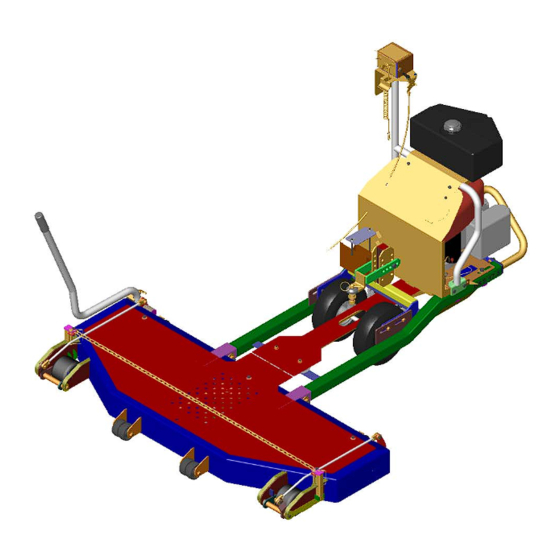
4. Operating Section The Quadivator HyperCut Mower mounted to an ATV is designed to produce a quality finish on lawns, golf courses, etc. It is NOT designed to clear brush or to cut saplings. Your HyperCut mower should be attached to an ATV in... -
Page 20: Operating Mower
Check the pneumatic wheels on the HyperCut mower daily. They should have 45psi. Cutting height can be adjusted from 1 – 3.75 inches (25 to 95 mm) to set the cutting height, operate the RHS Height Control Lever. On thick springy grass or soft ground, the mower’s rollers may sink into the ground giving too low a cut –... -
Page 21: Blade Replacement
Ensure Hitch Security Pin is in place - through the ATV hitch pin Ensure the Deck Restraining Chains are secure – BOTH ENDS Ensure that Hitch Assembly on the Mower is secure and moves freely Remove any Debris build up on Engine Cooling Air Intake. -
Page 22: Belt Replacement
To remove the blade(s) from the mower, lift one side of the mower up in the air and block it securely. Wedge a block of wood between the blade and the mower deck housing of that blade to prevent the spindle from rotating while the blade retaining bolt is removed. Loosen the blade by turning the blade retaining bolt counterclockwise. -
Page 23: Storage Of The Hypercut Mower
If the deck belt needs replacing, at this point in the INFORMATION disassembly replace the deck belt! Place the new deck drive belt in pulley in the front, then loop it through the idlers on the rear section of the power unit and attach around the drive clutch pulley. Re-tension the new deck drive belt by applying tension to the belt through the tensioning bolts at the rear of the power unit frame. -
Page 24: Troubleshooting Section
6. Troubleshooting Section Problem Cause Remedy Discharge chute Grass too wet. Wait for grass to dry. plugged Grass too long. Raise cutting height and cut grass twice. Cutting too low. Raise cutting height. Engine RPM too low. Mow at full throttle. Ground speed too fast. - Page 26 4XDG +\SHU&XW 0RZHUV 0RGHO 5' 0DLQ 0RZHU $VVHPEO\ %ODGH 0DLQ 0RZHU $VVHPEO\ 3DUWV 0DQXDO 9HUVLRQ...
- Page 27 4XDG +\SHU&XW 0RZHUV 0DLQ $VVHPEO\ 3DUWV /LVW 0RZHU $VVHPEO\ 3DUWV /LVW ,7(0 3$57 '(6&5,37,21 47< 6SULQJ ([WHQVLRQ 7UDQVSRUW /RFN :KHHO 2' [ 3ODLQ %RUH 7LH 5RG +HLJKW $GM %DU :HOGPHQW &XWWLQJ 'HFN 5' 6KLHOG 'HFN 6KDIW 3LYRW $VVHPEO\ 7HQVLRQHU $UP ,GOHU $VVHPEO\ )URQW :KHHO /+ $VVHPEO\ )URQW :KHHO 5+...
- Page 28 4XDG +\SHU&XW 0RZHUV 0RZHU 6XE DVVHPEOLHV $VVHPEO\ )URQW :KHHO /+ ,7(0 3$57 '(6&5,37,21 47< )URQW :KHHO )URQW :KHHO )UDPH /+ %XVKLQJ :KHHOV %XVKLQJ 3LYRW +H[ +HDG %ROW )ODQJH /RFN 1XW 1& 8QLWRUTXH $VVHPEO\ )URQW :KHHO 5+ ,7(0 3$57 '(6&5,37,21 47< )URQW :KHHO )URQW :KHHO )UDPH 5+ %XVKLQJ :KHHOV...
- Page 29 4XDG +\SHU&XW 0RZHUV 'HFDOV 3DUWV /LVW /RFDWLRQ 7KH IROORZLQJ LV WKH OLVW RI SDUW QXPEHUV DVVRFLDWHG ZLWK HDFK GHFDO ,7(0 3$57 '(6&5,37,21 47< 'HFDO 'DQJHU 6SLQQLQJ %ODGHV 'HFDO &DXWLRQ .HHS +DQGV &OHDU 'HFDO 'DQJHU .HHS +DQGV DQG )HHW $Z D\ 'HFDO &DXWLRQ 8QVWDEOH 6XUIDFH 'HFDO 0RGHO +\SHU &XW 5' 'HFDO 6HULDO 3ODWH...
-
Page 30: How To Order Repair Parts
1. Engine Warranty – all engines utilized on our products have a separate warranty extended to them by the engine manufacturer. Any engine service difficulty is the responsibility of the engine manufacturer and in no way is Quadivator Inc. or its agents responsible for the engine warranty. -
Page 31: Warranty Registration
WARRANTY REGISTRATION – HyperCut Mower – 05 Please fax this sheet to (204) 239-4271 or mail it to: Quadivator Inc. PO Box 1127 1000 – 6 Ave NE Portage la Prairie Manitoba R1N3C5 CANADA Mower Model # - Mower Model Type –...
Need help?
Do you have a question about the HyperCut RD62 and is the answer not in the manual?
Questions and answers