Table of Contents
Advertisement
*P516-865*
P516-865
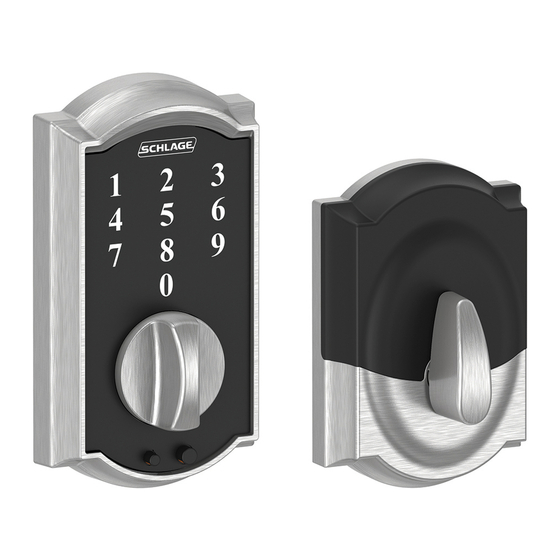
Model BE375
Alternate Faceplate
Prepare for Installation
Tools Needed
•
Phillips screwdriver
•
Tape Measure
•
Pencil
IMPORTANT NOTES
DO NOT use a power drill for installation!
•
Install and test lock with door open to avoid being locked out.
•
If tailpiece is not installed,
insert into slot on the back of
the touchscreen and snap into
place.
A
Check door dimensions.
See consumer.schlage.com/Service-Support for door preparation
instructions if dimensions are different.
2³⁄₄" (70 mm)
OR
2³⁄₈" (60 mm)
1" (25 mm)
Door Edge
Keyless Touchscreen Deadbolt
Optional
•
Flathead Screwdriver
•
Wood Block
•
Hammer
2¹⁄₈" (53 mm)
Hole
5¹⁄₂" (140 mm)
Minimum
B
Adjust bolt length, if necessary.
Measure the dimension shown. If the measurement is 2C\v" (70 mm),
extend the bolt.
2³⁄₈" (60 mm)
No adjustment needed.
Installation Instructions
2³⁄₄" (70 mm)
OR
Rotate faceplate
180° to extend.
Extended
Advertisement
Table of Contents

Related Manuals for Schlage BE375


Summary of Contents for Schlage BE375
- Page 1 No adjustment needed. Rotate faceplate 180° to extend. Check door dimensions. See consumer.schlage.com/Service-Support for door preparation instructions if dimensions are different. 2³⁄₄" (70 mm) 2³⁄₈" (60 mm) 2¹⁄₈" (53 mm) Hole 1" (25 mm) 5¹⁄₂"...
- Page 2 Change faceplate, if necessary. Install the touchscreen on the outside of the door. Choose the drawing that matches your door edge. Slide tailpiece through the slot in the bolt, and route wire over bolt. Door Edge No change necessary. Door Edge Install the thumbturn assembly.
- Page 3 Place thumbturn assembly against the door and Install reinforcement plate and strike into door jamb. secure with two (2) screws. Door Stop For maximum security, install reinforcement plate. Actual Size Actual Size Actual Size Strike Cut-Out (not to scale) Connect the wires. 1"...
- Page 4 Lifetime Limited Mechanical and Finish Warranty and 3-Year Limited Electronics Warranty Subject to the terms and conditions of this warranty, Schlage extends a lifetime limited mechanical and finish warranty and a three-year limited electronics warranty to the original consumer user (“Original User”) of our Schlage brand product (“Product”) against defects in material and workmanship, as long as the Original User occupies the residential premises upon which the Product was originally installed.
- Page 5 Modèle BE375 Consulte consumer.schlage.com/Service-Support para obtener instrucciones para la preparación de la puerta si las dimensiones son diferentes. Consultez le site consumer.schlage.com/Service-Support pour obtenir les instructions de préparation de la porte si les dimensions sont différentes. 2³⁄₄" (70 mm) O OU 2³⁄₈"...
- Page 6 Instale la pantalla táctil en la parte externa de la Si es necesario, cambie la placa frontal. puerta. Changez la têtière au besoin. Installez l’écran tactile à l’extérieur de la porte. Elija el dibujo que coincida con el borde de su puerta. Deslice la cola del pestillo a través de la ranura en el perno y pase el Sélectionnez le dessin qui correspond à...
- Page 7 Pase el cable de la batería desde la pantalla táctil a Instale la cubierta de las baterías. ¡No pellizque los través del orificio en el conjunto del pestillo giratorio. cables! Passez le câble de la pile provenant de l’écran tactile Installez le couvercle pour piles.
- Page 8 Guía del usuario de Schlage Touch. produit; (ii) les frais de transport et de fret nécessaires au retour du produit à Schlage; et (iii) tout autre dommage accessoire, indirect, particulier ou punitif, que ce soit en vertu d’un contrat, d’une garantie, d’un 1.
Need help?
Do you have a question about the BE375 and is the answer not in the manual?
Questions and answers