Schlage BE375,FE695 - Keyless Touchscreen Locks Manual
- Installation instructions manual (8 pages) ,
- Manual (13 pages)
Advertisement
INTRODUCTION

REGISTER YOUR LOCK!
To ensure the best warranty coverage and customer service, please register your product at Schlage.com/register.
 Please keep this guide
This guide contains important information about your lock!
- Default User Codes and Programming Code are located on the sticker on the front of this guide! You will need these if you ever need to reset your lock back to factory default settings!
- The sticker also contains your serial number, which may be needed for warranty and customer service support.
- Instructions for adding and deleting User Codes, changing the lock behavior, troubleshooting, customer service and more are explained in this guide!
How do I unlock my door if my battery dies?
Good question! In the event that the battery is dead, you can use a 9 volt battery to jump start your lock! Just press a 9 volt battery onto the contacts below the thumbturn or lever, and enter your user code to unlock.
UNLOCK YOUR SOLUTION
Browse to answers.schlage.com and click on Keyless Touchscreen Locks in the menu on the right side for videos, troubleshooting, FAQ and more.
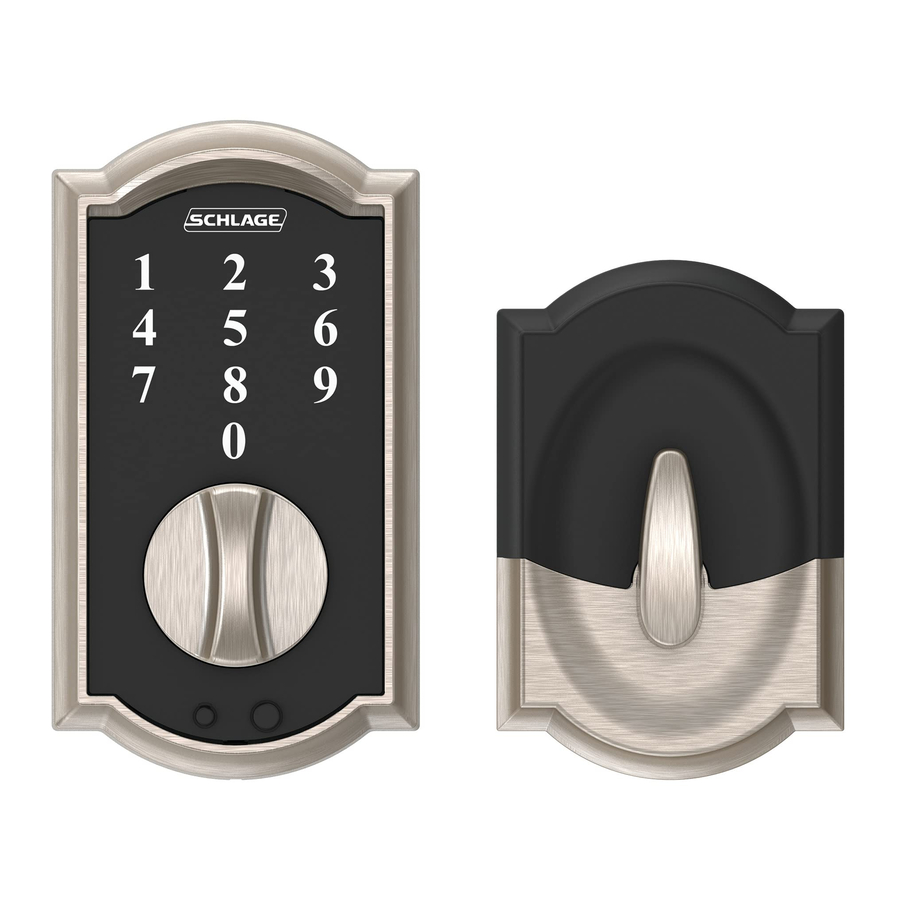
LOCK PARTS
Keyless Touchscreen Deadbolt
Model BE375
DOOR EXTERIOR

Touchscreen Keypad
- Used to enter codes for programming and unlocking. See Programming Guide and Locking and Unlocking for more information.
Indicator Light
- Multi-color light indicator for lock status. See Indicator Light Signals.
Outside Thumbturn
- Used to unlock the lock after a valid User Code has been entered, or to lock the lock after the Schlage button has been pressed.*
Emergency Jump Start Contacts
- Used to jump start the lock if the battery is dead.
* If the Lock & Leave feature is disabled, a valid User Code must be entered to lock the door. See Enable or Disable Lock & Leave.
DOOR INTERIOR

Inside Thumbturn
- Used to lock or unlock the lock.
Keyless Touchscreen Lever
Model FE695
DOOR EXTERIOR

Touchscreen Keypad
- Located on the outside of the lock. Used to enter codes for programming and unlocking. See Programming Guide and Locking and Unlocking for more information.
Indicator Light
-
Multi-color light indicator for lock status. See Indicator Light Signals.
Lever
- The outside lever can be rotated at any time, but will only retract the latch when the lock is unlocked.
Emergency Jump Start Contacts
- Used to jump start the lock if the battery is dead.
DOOR INTERIOR

Lever
- The inside lever can be rotated at any time to retract the latch.
Thumbturn
- Used to put the lock in a locked or unlocked state.
KEYLESS TOUCHSCREEN DEADBOLT
Locking and Unlocking
MODEL BE375
From the outside:
To Lock
- Press the Schlage button.*


- Rotate the thumbturn away from the hinges.


* If the Lock & Leave feature is disabled, a valid User Code must be entered to lock the door. See Enable or Disable Lock & Leave.
To Unlock
If lighting is low, press the Schlage button to illuminate the touchscreen numbers before beginning.
- Enter a User Code into the keypad.


- Rotate the thumbturn toward the hinges.


Changing the Battery
Tip: Replace the batteries in your lock at the same time each year that you test and replace the batteries in your smoke alarms. This will ensure continued reliable operation. Use a high-quality alkaline 9 volt battery for replacement.
If your lock's low battery icon is lit, replace the battery as soon as possible.

- Remove the inside cover.


- Replace the battery.


- Re-tuck wires so they will not be crimped. Replace the cover.


Battery Jump
The emergency battery jump start can be used if your battery is dead to unlock your door. Do not remove the battery until you have opened your door.

The lock will remain unlocked until you change the battery or manually relock the door from the inside!
- Connect a new highquality alkaline 9 volt battery to the contacts below the touchscreen keypad.

![]() Keep the battery connected to the jump start contacts as you unlock your door.
Keep the battery connected to the jump start contacts as you unlock your door.

- Enter a User Code into the keypad.


- Rotate the thumbturn toward the hinges.


- Replace the dead battery with the new 9 volt battery. See Changing the Battery above.
Lithium Batteries?

Lithium batteries may have a longer life, but when they begin to fail, they fail quickly. We don't recommend them because they don't give you a lot of time to change your batteries before the lock is completely dead.
KEYLESS TOUCHSCREEN LEVER
MODEL FE695
Locking and Unlocking
Keyless touchscreen locks are always locked from the outside, by default.
Temporarily Unlock
If lighting is low, press the Schlage button to illuminate the keypad before beginning.
- Enter a User Code into the keypad.


- Rotate the lever to open the door. Door will automatically re-lock.


Set to Unlocked
- Rotate the inside thumbturn to the vertical position.*


- Rotate the thumbturn back to the horizontal position to re-lock.


* No User Code is required to open the door when the lock is set to unlocked.
Changing the Battery
Tip: Replace the batteries in your lock at the same time each year that you test and replace the batteries in your smoke alarms. This will ensure continued reliable operation. Use a high-quality alkaline 9 volt battery for replacement.
If your lock's low battery icon is lit, replace the battery as soon as possible.

- Unscrew the battery cover.


- Replace the battery.


- Replace the cover.


Battery Jump
The emergency battery jump start can be used to unlock your door if your battery is dead. Do not disconnect the battery before you open your door.
The lock will remain unlocked until you change the battery or manually relock the door from the inside!
- Connect a new highquality alkaline 9 volt battery to the contacts below the touchscreen keypad.
![]() Keep the battery connected to the jump start contacts as you unlock your door.
Keep the battery connected to the jump start contacts as you unlock your door.


- Enter a User Code into the keypad.


- Rotate the lever to open the door.


- Replace the dead battery with the new 9 volt battery. See Changing the Battery above.
Lithium Batteries?

Lithium batteries may have a longer life, but when they begin to fail, they fail quickly. We don't recommend them because they don't give you a lot of time to change your batteries before the lock is completely dead.
PROGRAMMING GUIDE
Indicator Light Signals
The color of the light indicates the status of the lock.
Orange
- the lock is in programming mode
Green
- a correct user code was entered
- the programming process is complete
Red
- an incorrect user code was entered
- there was an error in programming
Low Battery Icon
- the battery is low.
- red blinking indicates critically low battery
- See Changing the Battery
Codes
Control of the lock is simply managed via six-digit Programming Code and four-digit User Codes.
PROGRAMMING CODE
(Six Digits)
- The lock comes preset with one unique default Programming Code. It can be found on the stickers, one on the back of the touchscreen keypad assembly and one on the front of this User Guide.
- Used to put the lock in programming mode.
- DOES NOT unlock the lock.
- The first four digits must be different from all of the User Codes currently in the lock.
- If you forget the Programming Code, you can reset the lock to factory settings, which restores the default Programming Code. See Restore Factory Settings.
USER CODES
(Four Digits)
- The lock comes preset with two unique default User Codes. They may be found on the stickers, one on the back of the keypad assembly and one on the front of this User Guide.
- Used to unlock the lock.
- These four digits must be different from the first four digits of the Programming Code.
- Up to 19 possible User Codes can be stored in the lock at one time.
Default Code Locations
The Default User Codes and Programming Code are located in two places:

- Back of the Touchscreen Keypad
![]() You must remove the touchscreen keypad from the door to see this sticker.
You must remove the touchscreen keypad from the door to see this sticker. - Front of this User Guide
Basic Controls
Write your programming code here for easy access. Also see Record Your Codes for space to record User Codes.

If you make a mistake during programming, press the Schlage button repeatedly until the keypad lights up. Then start over.
ADDING USER CODES*
- Enter Programming Code (six digits)
Wait for 3 Orange Lights + 3 Beeps - Press
![]()
Keypad lights up - Press
![]()
Wait for 3 Orange Lights + 3 Beeps - Enter New User Code (four digits)
Wait for 3 Orange Lights + 3 Beeps - Enter Same New User Code (four digits)
Success! 1 Green Light + Long Beep

* These four digits must be different from the first four digits of the Programming Code.
DELETING USER CODES
- Enter Programming Code (six digits)
Wait for 3 Orange Lights + 3 Beeps - Press
![]()
Keypad lights up - Press
![]()
Wait for 3 Orange Lights + 3 Beeps - Enter Unwanted User Code (four digits)
Wait for 3 Orange Lights + 3 Beeps - Enter Same Unwanted User Code (four digits)
Success! 1 Green Light + 1 Long Beep

CHANGING THE PROGRAMMING CODE*
- Enter Programming Code (six digits)
Wait for 3 Orange Lights + 3 Beeps - Press
![]()
Keypad lights up - Press
![]()
Wait for 3 Orange Lights + 3 Beeps - Enter New Programming Code (six digits)
Wait for 3 Orange Lights + 3 Beeps - Enter Same New Programming Code (six digits)
Success! 1 Green Light + Long Beep

* The first four digits must be different from all of the User Codes currently in the lock.
Want to see a video?

Browse to answers.schlage.com and search on "How to Program Touchscreen Lock" for a video. Other videos and information are also available.
Enhanced Controls
Schlage's keyless touchscreen locks were designed with added features that allow you to adapt the lock to your needs. Additional features that you can choose to use include:
ENABLE VACATION MODE
- Enter Programming Code (six digits)
Wait for 3 Orange Lights + 3 Beeps - Press
![]()
Keypad lights up - Press
![]()
Success! 1 Green Light + 1 Long Beep

When enabled, no User Codes will unlock the door, preventing any unauthorized attempts of entry when no one is home for a prolonged period of time.
DISABLE VACATION MODE
Enter Programming Code (six digits)
Success!1 Green Light + 1 Long Beep
ENABLE OR DISABLE BEEPER
- Enter Programming Code (six digits)
Wait for 3 Orange Lights + 3 Beeps - Press
![]()
Keypad lights up - Press
![]()
Success! 1 Green Light + 1 Long Beep

The beeper can be turned off if desired. Beeps will still sound to indicate a low battery.
The beeper may not be audible to everyone.
DELETE ALL USER CODES
- Enter Programming Code (six digits)
Wait for 3 Orange Lights + 3 Beeps - Press
![]()
Keypad lights up - Press
![]()
Wait for 3 Orange Lights + 3 Beeps - Enter Programming Code (six digits)
Success! 1 Green Light + 1 Long Beep

Removes ALL User Codes from the lock.
ENABLE OR DISABLE LOCK & LEAVE
KEYLESS TOUCHSCREEN DEADBOLT (BE375) ONLY
- Enter Programming Code (six digits)
Wait for 3 Orange Lights + 3 Beeps - Press
![]()
Keypad lights up - Press
![]()
Success! 1 Green Light + 1 Long Beep

Enabled by default. When enabled, the deadbolt can be locked from the outside by pressing Schlage and rotating the thumbturn. When disabled, a User Code must be entered before rotating the thumbturn. Disabling this feature keeps an unauthorized person from locking the door from the outside.
RECORD YOUR CODES
SECURITY
Remember to change your codes periodically for extra security!

User Codes
Up to 19 User Codes can be stored in the lock at one time.

TROUBLESHOOTING
Browse to answers.schlage.com for videos, troubleshooting, FAQ and more.
| Lock Issue | Beeps* | Lights | Solution | |
| KEYLESS TOUCHSCREEN DEADBOLT | I can unlock my deadbolt by simply pushing the Schlage button. I don't need a code. | 1 High | Green Blinking | Your lock has been installed incorrectly. Repeat the installation process. Browse to answers.schlage.com and search "Installing BE375" for a video. |
After pushing  and rotating thumbturn, the deadbolt does not extend. and rotating thumbturn, the deadbolt does not extend. | None | None | Lock & Leave feature is disabled. See Enable or Disable Lock & Leave. | |
| After entering my User Code, the light flashes green, but I cannot unlock the lock. | 1 High | Green Blinking | Lock is malfunctioning. Call Customer Service. | |
| Outside thumbturn does not freely spin after deadbolt is thrown. | None | None | Lock is malfunctioning. Call Customer Service. | |
I forgot my Programming Code | None | None | Check the front of this guide or the back of the keypad assembly for the default Programming Code. | |
| If needed, restore lock to factory settings. See Restore Factory Settings. | ||||
| I need to delete a User Code that I don't remember. | None | None | Delete all User Codes. Then add all needed User Codes back into the lock. See Programming Guide. | |
User Code does not unlock lock | 2 | Red | User Code entered is not a valid User Code. | |
| 1 High, 1 Low | Green then Red | Vacation Mode is enabled. See Disable Vacation Mode. | ||
| does not illuminate the touchscreen when numbers are pressed. | None | None | Too many incorrect User Codes have been entered. Wait 30 seconds and try again. | |
| If keypad does not respond after 30 seconds, then replace battery. See Changing the Battery for Keyless Touchscreen Deadbolt or Changing the Battery for Keyless Touchscreen Lever. | ||||
| There is a delay before unlock after a valid User Code is entered. | High/Low, then 1 | Red then Green | Battery is low and should be replaced. See Changing the Battery for Keyless Touchscreen Deadbolt or Changing the Battery for Keyless Touchscreen Lever. | |
| Indicator light blinking red but no codes have been entered. | None | Quick Red Blinking | Battery is dead and MUST be replaced. See Changing the Battery for Keyless Touchscreen Deadbolt or Changing the Battery for Keyless Touchscreen Lever. | |
Cannot add a new User Code | High/ Low | Red | 19 User Codes already exist. Delete a User Code before adding a new one. See Deleting User Codes. | |
| 2 | Red | Second User Code entered did not match first User Code entered. See Adding User Codes*. | ||
| The User Code matches the first four digits of the existing Programming Code. | ||||
Cannot delete a User Code | 2 | Red | Second User Code entered did not match first User Code entered. | |
Cannot change Programming Code | 2 | Red | Second Programming Code entered did not match first Programming Code entered. See Changing the Programming Code*. | |
| First four digits of new Programming Code match an existing User Code. | ||||
Cannot delete all User Codes | 2 | Red | Programming Code entered second time is incorrect. | |
Lock will not stay in programming mode | 2 | Red | Any key other than was pressed immediately after programming mode was entered. | |
| An incorrect entry was made during the programming process. | ||||
* Number of beeps if beeper is turned on.
Restore Factory Settings
If you lose or forget your Programming Code, you can restore the factory settings, which will restore the default Programming code.
- Disconnect the battery.
- Press and release the Schlage button.
- The following steps must occur within 10 seconds:
- Reconnect the battery. The indicator light will light green for one second.
- Then, press and hold the Schlage button until the indicator light is green and the lock beeps.
- Try entering one of the default User Codes. If it does not unlock the lock, start over at step 2.
Once you've done this, you can change the programming code to a personalized number. See Changing the Programming Code*.
Locate the default Programming and User Codes on the front of this guide or the back of the touchscreen before beginning! Default Programming and User Codes will be restored. All existing User Codes and current Programming Code will be erased.
CUSTOMER SERVICE CANNOT RETRIEVE LOST DEFAULT CODES! DO NOT RESTORE FACTORY SETTINGS UNLESS YOU CAN LOCATE THE DEFAULT CODES.
Warranty
Lifetime Limited Mechanical and Finish Warranty and 3-Year Limited Electronics Warranty Subject to the terms and conditions of the warranty, Schlage extends a lifetime limited mechanical and finish warranty and a three-year limited electronics warranty to the original consumer user ("Original User") of our Schlage brand product ("Product") against defects in material and workmanship, as long as the Original User occupies the residential premises upon which the Product was originally installed.
See answers.schlage.com for specific warranty details and limitations, or contact Schlage Customer Service at (888) 805-9837 in the U.S., 800-997-4734 in Canada or 018005067866 in Mexico for assistance.
Questions about your new Schlage Touch ™?
Please don't return it to the store!
Let us help you first!
Need Help?

For technical documents and videos, visit schlage.com

U.S.A.: 888-805-9837
Canada: 800-997-4734
Mexico: 018005067866

Documents / Resources
References
Product Registration
Contact us | Schlage Door Locks Customer Support
![schlage.com]() Door Locks, Entry Door Knobs & Hardware for Doors | Schlage
Door Locks, Entry Door Knobs & Hardware for Doors | Schlage

Download manual
Here you can download full pdf version of manual, it may contain additional safety instructions, warranty information, FCC rules, etc.
Download Schlage BE375,FE695 - Keyless Touchscreen Locks Manual
Advertisement


Need help?
Do you have a question about the BE375 and is the answer not in the manual?
Questions and answers