Advertisement
Parts List:
No.
Description
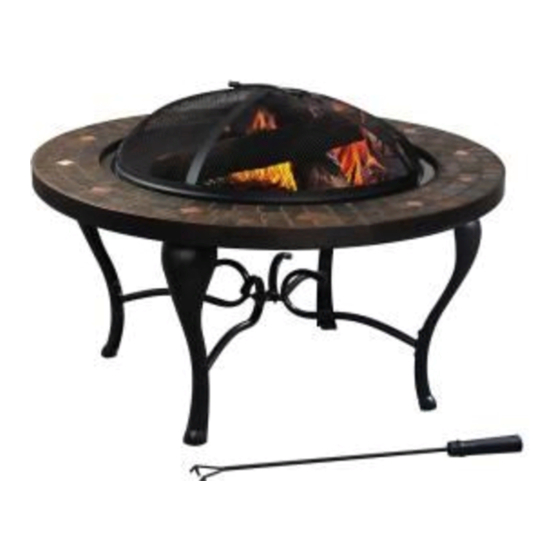
A
Fire screen
B
Cooking grate
C
Grate
D
Fire bowl
E
Ash catcher
F
Slate top
G
Leg
H
Leg connector
I
Middle connect piece
J
Poker
K
PVC cover
AA
M6x15 bolt
BB
M5x10 bolt
CC
M6 flanged nut
DD
M5 flanged nut
EE
M6 flat washer
FF
M6/M5 wrench
Tools Required for Assembly:
Wrench (include) and Philips Screwdriver (Not included)
BB
AA
Assembly instructions:
Step 1: Put Slate top (F) upside down on a soft,
non-abrasive surface, connect Leg (G) to Slate top (F)
with flanged nut CC). Please do not tighten the bolt
here!
Assembly Instructions
Item# L-FT521PST-3A
Qty
1
1
1
1
1
1
4
4
1
1
1
12
3
12
3
8
1
CC
DD
A
B
C
D
E
F
G
H
I
J
H
K
EE
FF
Step 2: Connect Leg connector (H) and Middle
connect piece (I) with bolt (AA) and nut (CC). Please
do not tighten the bolt here!
Advertisement
Table of Contents

Subscribe to Our Youtube Channel
Related Manuals for HAMPTON BAY L-FT521PST-3A


Summary of Contents for HAMPTON BAY L-FT521PST-3A
-
Page 1: Parts List
Assembly Instructions Item# L-FT521PST-3A Parts List: Description Fire screen Cooking grate Grate Fire bowl Ash catcher Slate top Leg connector Middle connect piece Poker PVC cover M6x15 bolt M5x10 bolt M6 flanged nut M5 flanged nut M6 flat washer M6/M5 wrench... -
Page 2: Warnings And Cautions
Step 3: Connect assembled Leg connector (H) and Step 4: Connect ash catcher (E) and fire bowl (D), Leg (G) with bolt (AA) and washer (EE). Tighen all tighten with bolt (BB) and flanged nut (DD). bols here. Step 5: Turn over the whole assembled piece. Place Fire bowl (D), Grate (C), Cooking grate (B) and Fire screen (A) in order. -
Page 3: Limited Warranty
Care & Maintenance: 1. Before using, clean the product completely with a soft dry towel. 2. To extend the life of your fire pit, clean the bowl after each use and cover the unit to protect it from the elements, cover is not included. Due to natural properties of steel material, if rust develops, please clean rust area by sanding slightly, then wipe thoroughly and apply touch-up paint if possible.
Need help?
Do you have a question about the L-FT521PST-3A and is the answer not in the manual?
Questions and answers