Table of Contents
Advertisement
Available languages
Available languages
Item # 1002693250
DFC # 1002630436
Model # OFW992RA
USE AND CARE GUIDE
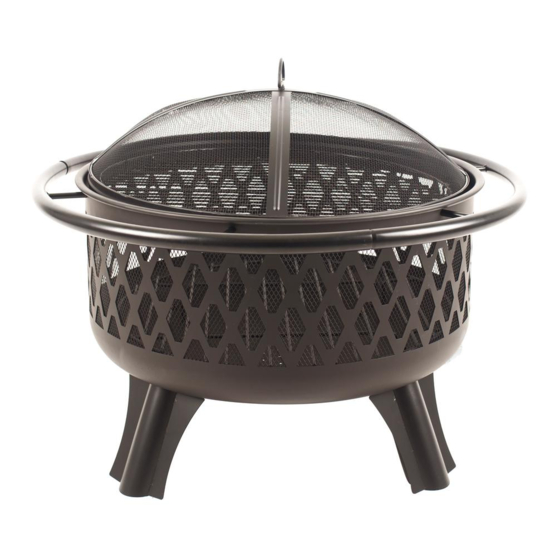
PIEDMONT OUTDOOR FIRE PIT
Questions, problems, missing parts? Before returning to the store,
call Hampton Bay Customer Service 8 a.m. - 7 p.m., EST, Monday - Friday, 9 a.m. - 6 p.m., EST, Saturday
1-855-HD-HAMPTON
HAMPTONBAY.COM
THANK YOU
We appreciate the trust and confidence you have placed in Hampton Bay through the purchase of this outdoor fire pit. We strive to
continually create quality products designed to enhance your home. Visit us online to see our full line of products available for your
1
home improvement needs. Thank you for choosing Hampton Bay!
Advertisement
Chapters
Table of Contents

Related Manuals for HAMPTON BAY OFW992RA


Summary of Contents for HAMPTON BAY OFW992RA
- Page 1 THANK YOU We appreciate the trust and confidence you have placed in Hampton Bay through the purchase of this outdoor fire pit. We strive to continually create quality products designed to enhance your home. Visit us online to see our full line of products available for your...
-
Page 2: Table Of Contents
Table of Contents Table of Contents ......2 Assembly ....... 6-10 Safety Information . -
Page 3: Safety Information
Safety Information (continued) WARNING: Never burn wood on the cooking grate. WARNING: Use caution after the fire has been extinguished. Surfaces will remain hot for some time. WARNING: The outdoor fire pit must be completely WARNING: Do not store with the pivoting cooking cooled off and all embers must be extinguished before any grate left on the pivoting rod. -
Page 4: Pre-Assembly
Pre-Assembly Carefully remove all pieces from the carton and make sure that you have all parts listed (refer to parts list). If you are missing parts, please contact 1-855-HD-HAMPTON for further assistance. TOOLS REQUIRED Phillips screwdriver (Not included) HARDWARE INCLUDED Part Description Quantity... -
Page 5: Package Contents
Pre-Assembly (continued) PACKAGE CONTENTS Part Description Quantity Part Description Quantity Mesh Cover Bracket Heat Shield Mesh Cover M8x45mm Bolt Cooking Grate Poker Cooking Grate Support M8 Nut Outer Ring Mesh Cover Rest Fire Bowl Legs Sleeve HAMPTONBAY.COM Please contact 1-855-HD-HAMPTON for further assistance. -
Page 6: Assembly
Assembly Assembling the legs Assembling the Heat Shield Assemble the four legs (I) to the fire bowl (H) using eight washers (DD) Attach the heat shield (K) to the bottom of the fire bowl (H) by inserting the M8x45mm bolt (L) into the heat shield (K) and through the sleeve (J) and and eight M8 nuts (CC). - Page 7 Assembly Assembling the Ring Sections Assembling the Mesh Cover Assemble each of the three outer ring sections (F) to the fire bowl (H) Assemble the mesh cover bracket (A) to the mesh cover (B) using using two bolts (AA). For each ring section, assemble one mesh cover one M6 nut (BB).
- Page 8 Assembly Assembling the fire pit Place the mesh cover (B) on top of the fire bowl (H) as shown. Always use the mesh cover (B) during use. HAMPTONBAY.COM Please contact 1-855-HD-HAMPTON for further assistance.
- Page 9 Cooking Grate 1 Assembly Assembling the cooking grate Adjusting the cooking grate Attach the cooking grate support (D) to the fire bowl (H) by sliding it Slide the cooking grate (C) up or down the cooking grate support (D) to into the holder.
- Page 10 Cooking Grate 2 Assembly Attaching the cooking grate directly to the firebowl Place the cooking grate (C) on to the fire pit as shown. Wipe the cooking grate (C) with vegetable oil. Add food to the cooking grate (C). The weight capacity of the cooking grate (C) is 4 lbs. HAMPTONBAY.COM Please contact 1-855-HD-HAMPTON for further assistance.
-
Page 11: Operation
Operation Placing the sand Place the fire pit on dirt, stone, gravel or sand. Do not place on combustible surfaces. Before using, add a 1-1.5 in. layer of sand or about 5 lbs. to the bottom of the fire bowl. This will help against the corrosive nature of the ashes and help radiate the heat upwards. -
Page 12: Care & Maintenance
Care and Maintenance Clean out ashes after each use only after the fire pit is completely cooled. Do not attempt to clean while hot. Store the fire pit in a dry place out of the weather. Clean the cooking grate with soap and water. Dry with a clean rag. HAMPTONBAY.COM Please contact 1-855-HD-HAMPTON for further assistance. -
Page 13: Replacement Parts List
Replacement Parts List Part Description Part Number Part Description Part Number Mesh Cover Bracket 40-07-453 Heat Shield 30-01-252 Mesh Cover 30-01-147 M8x45mm Bolt 30-09-136 Cooking Grate 30-01-148 Poker 30-01-155 Cooking Grate Support 30-01-149 Instruction Manual 30-10-138 M8 Nut 30-09-134 Hardware Pack 30-09-524 Outer Ring 30-01-151... - Page 14 Questions, problems, missing parts? Before returning to the store, call Hampton Bay Customer Service 8 a.m. - 7 p.m., EST, Monday - Friday, 9 a.m. - 6 p.m., EST, Saturday 1-855-HD-HAMPTON HAMPTONBAY.COM Retain this manual for future use. 30-10-138...
- Page 15 GRACIAS Le agradecemos la confianza que ha depositado en Hampton Bay al comprar este brasero de exterior. Nos esforzamos continuamente por fabricar productos de calidad diseñados para mejorar su hogar. Visite nuestro sitio web para conocer la línea completa de...
-
Page 16: Contenido
Contenido Contenido ....... . . 16 Ensamblaje......20-24 Información de seguridad . -
Page 17: Información De Seguridad
Información de seguridad (continuación) ADVERTENCIA: Tenga precaución cuando el fuego ADVERTENCIA: Nunca queme madera sobre la se haya apagado. Las superficies permanecen calientes por rejilla para cocinar. un rato. ADVERTENCIA: Antes de colocarle una cubierta, ADVERTENCIA: No guarde el brasero con la rejilla el brasero de exterior debe estar completamente frío y las giratoria para cocinar colocada sobre la varilla giratoria. -
Page 18: Preensamblaje
Preensamblaje Retire cuidadosamente todas las piezas de la caja y asegúrese de que estén todas las piezas que figuran en la lista (consulte la lista de piezas). Si falta alguna pieza, llame al 1-855-HD-HAMPTON para obtener ayuda. HERRAMIENTAS REQUERIDAS Destornillador Phillips (no incluido) TORNILLERÍA INCLUIDAS Pieza... -
Page 19: Contenido Del Embalaje
Preensamblaje (continuación) CONTENIDO DEL EMBALAJE Pieza Descripción Cantidad Pieza Descripción Cantidad Soporte de la cubierta de malla Pantalla térmica Cubierta de malla Perno M8 x 45 mm Rejilla para cocinar Atizador Soporte de la rejilla para cocinar M8 Tuerca Anillo externo Apoyo de la cubierta de malla Contenedor de brasas Patas... -
Page 20: Ensamblaje
Ensamblaje Ensamblar las patas Cómo ensamblar la pantalla térmica Ensamble las cuatro patas (I) con el contenedor de brasas (H) utilizando ocho Fije la pantalla térmica (K) a la parte inferior del contenedor de brasas (H) arandelas (DD) y ocho tuercas M8 (CC). Ajústelas firmemente. insertando el perno M8 x 45 mm (L) en la pantalla térmica (K) y a través de la manga (J) y la parte inferior del contenedor de brasas (H) como se muestra en la figura 2. - Page 21 Ensamblaje Ensamblar las secciones del anillo Ensamblar la cubierta de malla Ensamble el soporte de la cubierta de malla (A) con la cubierta (B) utilizando Ensamble cada una de las tres secciones del anillo externo (F) con el una tuerca M6 (BB). contenedor de brasas (H) utilizando los dos pernos (AA).
- Page 22 Ensamblaje Ensamblar el brasero Coloque la rejilla para madera (E) en el contenedor de brasas (H). Cuando utilice el brasero, siempre debe usar la rejilla para madera. Coloque la cubierta de malla (B) sobre la parte superior del contenedor de brasas (H), como se muestra.
- Page 23 Ensamblaje 1 de la rejilla para cocinar Ensamblar la rejilla para cocinar Ajustar la rejilla para cocinar Coloque el soporte de la rejilla para cocinar (D) en el contenedor de brasas (H) Deslice la rejilla para cocinar (C) hacia arriba o hacia abajo por el soporte deslizándolo en el contenedor.
- Page 24 Ensamblaje 2 de la rejilla para cocinar Fijar la rejilla para cocinar directamente al contenedor de brasas Coloque la rejilla para cocinar (C) sobre el contenedor de brasas, como se muestra. Cubra ligeramente la rejilla (C) con aceite vegetal. Coloque los alimentos sobre la rejilla para cocinar (C).
-
Page 25: Funcionamiento
Funcionamiento Colocar la arena Coloque el brasero sobre tierra, piedra, grava o arena. No lo coloque sobre superficies combustibles. Antes de utilizar el brasero, agregue una capa de arena de 1 a 1,5 pulg. de espesor o aproximadamente 5 lb de arena en el fondo del contenedor de brasas. Esto ayudará a preservar el brasero de la naturaleza corrosiva de las cenizas y a irradiar el calor hacia arriba. -
Page 26: Cuidado Y Mantenimiento
Cuidado y mantenimiento Retire las cenizas después de cada uso y solo una vez que el brasero esté completamente frío. No intente limpiarlo cuando esté caliente. Guarde el brasero en un lugar seco y al resguardo de la intemperie. Limpie con agua y jabón las rejillas para cocinar. Séquelas con un trapo limpio. HAMPTONBAY.COM Llame al 1-855-HD-HAMPTON para obtener ayuda. -
Page 27: Lista De Piezas De Repuesto
Lista de piezas de repuesto Pieza Descripción N.º de pieza Pieza Descripción N.º de pieza Soporte de la cubierta de malla 40-07-453 Pantalla térmica 30-01-252 Cubierta de malla 30-01-147 Perno M8 x 45 mm 30-09-136 Rejilla para cocinar 30-01-148 Atizador 30-01-155 Soporte de la rejilla para Manual de instrucciones... - Page 28 ¿Preguntas, problemas, piezas faltantes? Antes de hacer una devolución a la tienda, llame al Servicio de Atención al Cliente de Hampton Bay, de lunes a viernes de 8:00 a. m. a 7:00 p. m. (hora estándar del este) y sábados de 9:00 a. m. a 6:00 p. m. (hora estándar del este).
Need help?
Do you have a question about the OFW992RA and is the answer not in the manual?
Questions and answers
I need the gate. The cooking gate
The cooking grate for the HAMPTON BAY OFW992RA is a metal grate that attaches to the fire bowl using a support. It can be adjusted up or down to the desired height using a wing bolt and rotated left or right for positioning. It should be wiped with vegetable oil before use and has a specific weight capacity (not stated in the context).
This answer is automatically generated