
Related Manuals for RCA 25403


Summary of Contents for RCA 25403
- Page 1 4-Line Intercom Speakerphone User’s Guide Please read this manual before operating this product for the first time. TOCOM 16247490 Model 25403/04...
-
Page 2: Important Information
Important Information Equipment Approval Information Your telephone equipment is approved for connection to the Public Switched Telephone Network and is in compliance with parts 15 and 68, FCC Rules and Regulations and the Technical Requirements for Telephone Terminal Equipment published by ACTA. 1 Notification to the Local Telephone Company On the bottom of this equipment is a label indicating, among other information, the US number and Ringer Equivalence Number (REN) for the equipment. -
Page 3: Table Of Contents
Table of Contents ............2 ......................17 MPORTANT NFORMATION LASH ............. 2 ....................17 QUIPMENT PPROVAL NFORMATION LERT ................ 2 25403.) ......18 NTERFERENCE NFORMATION NKNOWN LOCKED OT APPLICABLE TO MODEL ............... 5 ....................18 NTRODUCTION ISPLAY ONTRAST & S ............6 25403.) ........ - Page 4 ........27 ............34 ECEIVING A RANSFERRED ALL FROM NOTHER TATION TORING A UMBER AND AME IN EMORY ................35 25403.) ........27 EMORY ESSAGE AITING OT APPLICABLE TO MODEL ......................27 ..........35 RIVACY EVIEWING HONE IRECTORY EMORY ) ......36 Providing Privacy ....................
-
Page 5: Introduction
IMPORTANT: In order to use all of the features of this unit, you must subscribe to either the standard Name/Number Caller ID Service or Call Waiting Caller ID Service. To know who is calling while you are on the phone, you must subscribe to Call Waiting Caller ID Service. NOTE: FEATURES AND OPERATIONS PERTAINING TO CALLER ID DO NOT APPLY TO Model 25403.-... -
Page 6: Connections & Setup
VERY IMPORTANT: In order to achieve full system operation (i.e. intercom, page, etc.), Line 1 must be connected and must be common to all phones connected to the system. Only other 25403 or 25404 models are compatible for full system operation. Connecting phones other than the 25403/25404 to Line 1 may inhibit the intercom and paging operations. -
Page 7: Base Layout
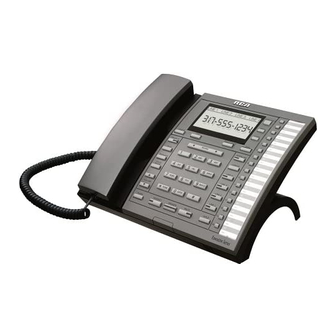
Connections & Setup Base Layout NEW MESSAGE indicator (Not applicable to model 25403) REVIEW button SELECT/SAVE button EXIT button MEMORY buttons DELETE button DIRECTORY button INTERCOM/MEMORY LOG MENU button INT. DIRECTORY MEM. PRIVACY button INT. MEM. MENU INT. STORE button MEM. -
Page 8: Important Installation Information
Connections & Setup Important Installation Information • Never install telephone wiring during a lightning storm. • Never install telephone jacks in wet locations unless the jack is specifically designed for wet locations. • Never touch non-insulated telephone wires or terminals, unless the telephone line is disconnected from the network. •... -
Page 9: Installing The Phone
Connections & Setup Installing the Phone The phone may be connected to two 2-line (RJ14C) wall jacks or four single line (RJ11C) wall jacks to accomodate all four lines. 1. Choose an area near an electrical outlet and telephone wall jack. Your phone should be placed on a level surface, such as a table top or desk. - Page 10 Connections & Setup 3. Plug the AC power supply cord into an electrical outlet and the DC connector into the back of the base. CAUTION: Use only the ATLINKS USA 5-2495 power supply that is compatible with this unit. Using other power supplies may damage the unit.
- Page 11 ID. To set your own Phone ID, or change your phone ID, follow the steps in the Phone ID section. You may connect up to 16 RCA 25404 and/or RCA 25403 phones to the system at one time. Features like intercom, page and call transfer may be used among the units, but Line 1 must be common for all 25404 or 25403 units for these features to work properly.
-
Page 12: Data Port
Line 1 must be connected to the LINE 1 + 2 jack, and the phone must have a phone ID. VERY IMPORTANT: In order to achieve full system operation (i.e. intercom, page, etc.), Line 1 must be connected and common to all phones on the system. Only other 25403 or 25404 models are fully compatible. -
Page 13: Other System Phones
Connections & Setup Other System Phones 1. Press LINE 1. 2. Look at all the other stations. If they all indicate line 1 is being used, the connection is correct. 1. Press the INTERCOM button. The display shows INTERCOM and ENTER CALLING PHONE ID. 2. -
Page 14: Priority Line
CID records for the corresponding telephone line. OFF disables the function for the corresponding telephone.) Press the SELECT/SAVE button. NOTE: On model 25403, you cannot select CID ON/OFF. 7. Press the SELECT/SAVE button to save. The cursor automatically moves to LINE 2. -
Page 15: Delay Ring
Connections & Setup Delay Ring Use this setting to delay the Central Office ring. 1. Press the MENU button while in standby mode. 2. Use the < REVIEW > button to scroll to SET PHONE OPTIONS. 3. Press the SELECT/SAVE button. 4. -
Page 16: Ame
Connections & Setup NOTE: If the phone cannot find an ID, determine if there are too many phones connected to the system. A maximum of 16 phones can be connected in the system at one time. NOTE: You may press the EXIT button at any time to exit , except during the ID search. Phone Name 1. -
Page 17: Ime
Connections & Setup 3. Press the SELECT/SAVE button. 4. Use the < REVIEW > button to scroll to INTERCOM AUTO ANS. 5. Press the SELECT/SAVE button. 6. Use the < REVIEW > button to choose YES or NO. 7. Press the SELECT/SAVE button to save. Flash Time 1. -
Page 18: Nknown /Blocked (Not Applicable To Model 25403.)
8. Repeat steps 6 and 7 for each telephone line. After you select a tone for Line 4, press the EXIT button. No Unknown/Blocked (Not applicable to model 25403.) This option allows you to decide whether the unknown or blocked caller ID calls are saved or not. If you select YES, the unknown or blocked calls will be saved. -
Page 19: Area Code (Not Applicable To Model 25403.)
Connections & Setup Local Area Code (Not applicable to model 25403.) 1. Press the MENU button while in standby mode. 2. Use the < REVIEW > button to scroll to SET AREA CODE. 3. Press the SELECT/SAVE button. 4. Use the < REVIEW > button to scroll to LOCAL AREA CODE. -
Page 20: Anually Setting The Time And Date
The time and date is automatically set when you receive the first CID call. To manually reset the time and date, follow the steps below. NOTE: Automatic time set is not applicable to model 25403. 1. Press the MENU button while in standby mode. -
Page 21: Format
Connections & Setup 12. Use the < REVIEW > button to select the date. 13. Press the SELECT/SAVE button, and the cursor moves back to the hour field. 14. Press the EXIT button. NOTE: You may press EXIT at any step in the process. It is not necessary to re-program the complete time & date if you only want to adjust certain fields (i.e.; hour only). Hour Format You may set this phone to a 12 or 24-hour format. -
Page 22: Peration
Operation Basic Operation Your phone provides the convenience of accessing four separate telephone lines, each obtained from the telephone company and each having its own phone number. This is generally applicable to small offices. It provides for 16 telephones (or stations) to share multiple lines. Each station is interconnected to all others by an intercom. -
Page 23: Dialing
Operation Making Calls with the Optional Headset 1. Connect the headset plug to the HEADSET jack on the side of the base. 2. Adjust the headset to rest comfortably on top of your head and over your ear. 3. Move the microphone to approximately 2 to 3 inches from your mouth. 4. -
Page 24: Witching Between The Speakerphone , Handset , And ................................................................................................................. 24 Disturb
Operation 3. Press the HEADSET button (headset mode). 4. When finished, hang up the handset, press the SPEAKER button or press the HEADSET button. If you receive a call on a line other than the priority line, 1. Pick up the handset and press the corresponding line button, OR 2. -
Page 25: Hold
Operation Do Not Disturb 1. When the unit is idle, press the PRIVACY button. The Privacy indicator flashes and the last setting is displayed. 2. Use the < REVIEW > button to select the duration. You may choose from 15 minutes, 30 minutes, 45 minutes, 1 hour, or 2 hours and increase the duration by 1 hour intervals up to 24 hours. -
Page 26: Flash
Operation Flash Use the FLASH button to activate custom calling services such as call waiting or call forwarding, which are available through your local phone company. Redial 1. Pick up the handset or press the SPEAKER button (speakerphone mode), and the priority line is automatically selected, OR 2. -
Page 27: Receiving A Transferred Call Froma
Privacy While in use, a line can be secured so that no one else can listen to the conversation. This feature only applies to 25403/25404 phones. However, other phone which are not compatible with these models can still access the line. -
Page 28: Volume
Operation Volume The ringer, speaker, and handset/headset volume is set independently with the VOLUME up and down buttons. There are 8 possible volume settings per mode. The volume indicator scale is displayed during volume adjustment. Ringer Volume 1. While the phone is on the hook, press the VOLUME up or down button. The phone rings according to the current setting. 2. -
Page 29: Intercom Calls
Operation To disconnect one party: Press the line button for the person you want to continue speaking with, and the other party is automatically disconnected. To disconnect both parties: Hang up the handset, or press the SPEAKER or HEADSET button. NOTE: If you press the HOLD button to put them on hold first, you may then disconnect from each party individually. -
Page 30: Intercom Hold
Operation NOTE: If you want to answer with the speakerphone, press the INTERCOM or SPEAKER button. If you want to answer by headset, press the HEADSET button (the headset must be connected). To answer by handset, lift the handset. NOTE: Press SPEAKER or lift the handset to automatically select a party. If you receive an incoming call and intercom call at the same time the unit automatically selects the ringing line. -
Page 31: Paging All Stations
NOTE: Paging can be done with optional headset. Caller ID (CID) NOTE: The Caller ID section of this user's guide (from page 31 to page 34) is not applicable to model 25403. Summary Screen The summary screen shows the current time, current date, number of CID records to be reviewed and total number of records saved to CID memory. -
Page 32: Receiving And Storing Cid Records
Caller ID Receiving and Storing CID Records This unit receives and displays information transmitted by your local phone company. This information can include the phone number, date and time; or the name, phone number, date and time. The unit can store up to 99 calls for later review. When the memory is full, a new call automatically replaces the oldest call in memory. -
Page 33: Dialing Back
Caller ID Deleting a CID Record CID REVIEW LINE 2 To delete the record shown in the display, press the DELETE button once. JOHN SMITH Deleting All Call Records 1-317-123-4567 12:34 PM 12/25 This feature allows you to clear all CID records at once. 1. -
Page 34: Call Waiting Caller Id
Caller ID If You Did Not Program Your Local Area Code 1. Use the < REVIEW > button to display the number you want to dial. You will only see 10-digit numbers (i.e.234-555-1234). 2. Press DIAL to dial back. You may adjust the number format if “Press < > to adjust format ” shows in the display. Call Waiting Caller ID This feature allows you to see who is calling when you hear the call waiting beep. -
Page 35: Storing A Number And Name In Memory Memory
Memory 4. Use the touch-tone pad to enter a name (up to 21 characters). More than one letter is stored in each of the number keys. For example, to enter Bill Smith, press the 2 key twice for the letter B. Press the 4 key 3 times for the letter I. Press the 5 key 3 times for the letter L. Press the 5 key 3 times for the second letter L, and press the 1 key to insert a space between the first and last name. -
Page 36: Reviewing The Intercom /Memory Log
Memory Reviewing the Intercom/Memory Log (memory location) 1. Press the DIRECTORY button. 2. Press the INTERCOM/MEMORY LOG button (1-16). 3. Press the EXIT button when you are finished reviewing memories. Editing a Name or Number Stored in Phone Book (Directory) Memory 1. -
Page 37: Storing A Pause In Memory
Memory Storing a Pause in Memory Use the REDIAL/PAUSE button to insert a delay in the dialing sequence of a stored telephone number when a pause is needed (for example, when you must dial a 9 to get an outside line or when you must enter codes to access your bank’s information line). Dialing a Stored Number 1. -
Page 38: Clear All Memories
Memory To delete an INTERCOM/MEMORY LOG: 1. Press the DIRECTORY button. 2. Press the corresponding button (1-16) for the Intercom/Memory Log you want to delete. 3. Press the DELETE button and delete. DELETE again shows in the display. 4. Press the DELETE button again to confirm. NOTE: Press the EXIT button to cancel the "delete"... -
Page 39: Other Information
INCOMPLETE DATA Caller information has been interrupted or corrupted during transmission. (Not applicable to model 25403.) NO DATA No Caller ID signal has been detected, or Caller ID service has not been activated. (Not applicable to model 25403.) START/END You are at the beginning or the end of the Caller ID memory log. (Not applicable to model 25403.) -
Page 40: Operation By Battery
Other Information Operation By Battery If the power cord is not plugged into the unit, and the battery is available, the unit enters Battery Operation Mode. In this mode, the unit fully supports all operational features, except the intercom call function. Operation without Power If the power cord is not plugged into the unit and no battery is installed, the unit enters into No Power Operation mode. - Page 41 Other Information Phone does not ring. • Make sure the ringer is turned on. • Make sure the Do Not Disturb feature is not activated. • You may have too many extension phones on your line. Try unplugging some phones. •...
-
Page 42: General Product Care
Other Information General Product Care To keep your telephone working and looking good, follow these guidelines: • Avoid putting the phone near heating appliances and devices that generate electrical noise (for example, motors or fluorescent lamps). • DO NOT expose to direct sunlight or moisture. •... -
Page 43: Limited Warranty
Other Information Limited Warranty What your warranty covers: • Defects in materials or workmanship. For how long after your purchase: • One year, from date of purchase. (The warranty period for rental units begins with the first rental or 45 days from date of shipment to the rental firm, whichever comes first.) What we will do: •... - Page 44 Other Information What your warranty does not cover: • Customer instruction. (Your Owner’s Manual provides information regarding operating instructions and user controls. Any additional information, should be obtained from your dealer.) • Installation and setup service adjustments. • Batteries. • Damage from misuse or neglect.
-
Page 45: Accessory Order Form
Other Information Accessory Order Form AC power adapter Headset Charge your order on your VISA, MasterCard, or Discover Card by filling in below USE YOUR CREDIT CARD ® IMPORTANT: Copy complete account number from your VISA card 5-2495 5-2425 Part No. Price Qty Total Description... - Page 46 Hour Format 21 Limited Warranty 43 Do Not Disturb 25 Answering Calls 23 Local Area Code (Not applicable to model 25403.) 19 If You Did Not Program Your Editing a Name or Number Base Layout 7 Local Area Code 34...
- Page 47 Storing the Last Number Regional Area Codes (Not Dialed 36 applicable to model Summary Screen 31 One -Touch Intercom 29 25403.) 19 Switching Between the Operation 22 Releasing a Call 25 Speakerphone, Handset, Operation By Battery 40 Restoring the Default Settings...
- Page 48 Visit the RCA web site at www.rca.com Please do not send any products to the Indianapolis address listed in this manual or on the carton. This will only add delays in service for your product. ATLINKS USA, Inc. 101 West 103rd Street Indianapolis, IN 46290 ©2004 ATLINKS USA, Inc.
Need help?
Do you have a question about the 25403 and is the answer not in the manual?
Questions and answers