Table of Contents
Advertisement
Available languages
Available languages
Advertisement
Chapters
Table of Contents

Related Manuals for Krups T.O by Lipton


Summary of Contents for Krups T.O by Lipton
- Page 2 INTRODUCTION Pourquoi T.O by Lipton? Plus qu’une innovation, T.O by Lipton incarne une rupture dans le monde du thé. C’est une révolution dans la manière de l’infuser. Là où tout se joue. Au cœur de la bulle d’infusion transparente se cache une perle d’intelligence technologique baptisée Air Movement Infusion, conçue pour révéler les précieux...
- Page 3 INTRODUCTION Why T.O by Lipton? T.O by Lipton is more than an innovation, it is a revolution in the world of tea. It is a revolutionary brewing process, which has at its heart the brewing orb. The brewing orb allows for the AIR MOVEMENT INFUSION technology to release the flavours and aromas of our delicious teas.
-
Page 4: Table Of Contents
SOMMAIRE VERSION FRANÇAISE Consignes de sécurité Aperçu de la machine T.O by Lipton Installation de votre machine T.O by Lipton Initialisation avant la première utilisation Préparation d’une tasse de T.O by Lipton Rinçage de la Bulle D’infusion Intelligente Nettoyage de la Bulle D’infusion Intelligente Détartrage de la machine T.O by Lipton... -
Page 5: Consignes De Sécurité
Puis conservez-les en lieu sûr afin de pouvoir les consulter ultérieurement. L’appareil est destiné à préparer des boissons conformément aux instructions suivantes. Lors de l’utilisation de la machine T.O by Lipton: • N’utilisez pas la machine à d’autres fins que celles prévues pour cet appareil. - Page 6 CONSIGNES DE SÉCURITÉ respect des instructions. • Votre machine a été conçue pour un usage domestique seulement. Elle n’a pas été conçue pour être utilisée dans les cas suivants qui ne sont pas couverts par la garantie: dans des coins de cuisines réservés au personnel dans des magasins, bureaux et autres environnements professionnels, dans des fermes, par les clients des hôtels, motels et autres environnements à...
- Page 7 CONSIGNES DE SÉCURITÉ personnes dénuées d’expérience ou de connaissance, sauf si elles ont pu bénéficier, par l’intermédiaire d’une personne responsable de leur sécurité, d’une surveillance ou d’instructions préalables concernant l’utilisation de l’appareil. Pour éviter tout risque de choc électrique et d’incendie •...
- Page 8 • Si la machine est endommagée, ne l’utilisez pas. • Pour votre propre sécurité, utilisez uniquement des pièces et accessoires T.O by Lipton qui sont conçus pour votre machine. Toutes les machines T.O by Lipton font l’objet de contrôles •...
- Page 9 Risques de brûlures. • T.O by Lipton se réserve le droit de modifier les instructions sans préavis. CONSERVEZ CES INSTRUCTIONS – Le cas échéant,...
-
Page 10: Aperçu De La Machine T.o By Lipton
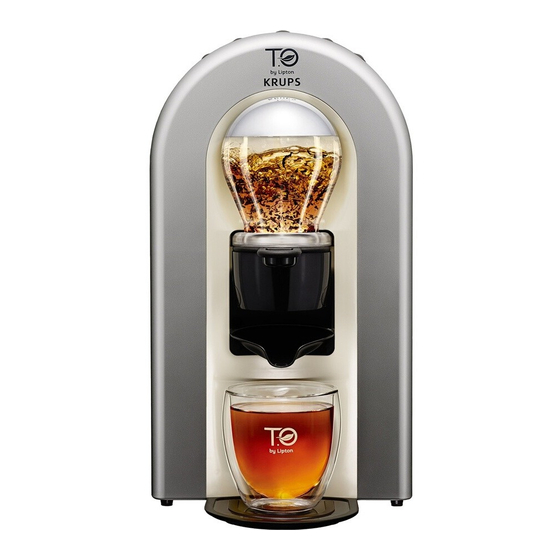
APERÇU DE LA MACHINE T.O by Lipton* Cartouche filtrante BRITA INTENZA Boîte de capsules T.O by Lipton Réservoir à Bulle d’infusion intelligente Bec verseur Repose tasse Tablette nettoyante T.O by Lipton À utiliser lors du nettoyage de la bulle d’infusion intelligente. - Page 11 APERÇU DE LA MACHINE T.O by Lipton Capsule T.O by Lipton Emplacement de capsule Filtre Support filtre Cartouche filtrante BRITA INTENZA Machine T.O by Lipton Boîte de capsules Réservoir à eau Tablette nettoyante Repose tasse Filtre et support filtre Mode d’Emploi, Guide d’Utilisation Rapide et Guide d’Entretient...
- Page 12 APERÇU DE LA MACHINE T.O by Lipton Boutons de commande Sélection de Sélection de la taille de tasse et l’intensité démarrage de l’infusion Moins fort Plus fort Marche / Arrêt Petite tasse Grande tasse 1 réservoir plein 3 grandes tasses...
-
Page 13: Installation De Votre Machine T.o By Lipton
INSTALLATION DE VOTRE MACHINE T.O by Lipton Étape 1 Déballez soigneusement votre machine T.O by Lipton et retirez le film plastique placé sur l’avant de la machine. Déroulez la longueur désirée du cordon situé sous le socle de la machine et branchez-le sur une prise secteur. - Page 14 INITIALISATION AVANT LA PREMIÈRE UTILISATION Étape 3 Appuyez sur le bouton marche/ arrêt situé sur le haut de la machine jusqu’à ce que la bulle d’infusion intelligente s’allume. Étape 4 Placez le filtre dans le support, sans capsule, et insérez le support dans la machine. Assurez-vous que le support avec le filtre soit enfoncé...
-
Page 15: Préparation D'une Tasse De T.o By Lipton
Petite tasse et 25cl pour la Grande tasse) sous le bec verseur. Étape 4 Insérez une capsule T.O by Lipton sur l’avant du filtre, comme indiqué sur l’illustration. Ne retirez pas l’opercule d’aluminium de la capsule et ne le percez pas. Votre machine est conçue pour offrir une performance optimale... - Page 16 PRÉPARATION D’UNE TASSE DE T.O by Lipton Étape 6 Pour chacun de vos thés et infusions, la machine présélectionne automatiquement une intensité optimale. Cependant, si vous aimez votre boisson plus forte ou plus légère, sélectionnez l’intensité souhaitée en appuyant sur le bouton approprié. La graduation allumée indique l’intensité...
- Page 17 PRÉPARATION D’UNE TASSE DE T.O by Lipton Pour économiser l’énergie, la machine s’éteint automatiquement après 8 minutes de non utilisation. Lors du fonctionnement de la machine, commencez toujours par vérifier qu’il y ait de l’eau au dessus du niveau minimum (MIN) du réservoir. Si ce n’est pas le cas, lors de l’utilisation de la machine, celle-ci produira plus de vapeur que d’habitude...
-
Page 18: Rinçage De La Bulle D'infusion Intelligente
RINÇAGE DE LA BULLE D’INFUSION INTELLIGENTE Dans l’éventualité où des feuilles seraient restées dans la bulle, vous pouvez rincer celle-ci hors du cycle d’infusion, sans utiliser de capsule. Étape 1 Allumez votre machine. Remplissez le réservoir d’eau potable jusqu’à la graduation Maximum (MAX). -
Page 19: Nettoyage De La Bulle D'infusion Intelligente
Placez un grand récipient (>50cl) sur le repose tasse, sous le bec verseur. Étape 3 Retirez la tablette nettoyante T.O by Lipton de son emballage. Enlevez le support filtre et le filtre de la machine puis placez une tablette nettoyante sur le filtre, comme indiqué... - Page 20 NETTOYAGE DE LA BULLE D’INFUSION INTELLIGENTE Ne retirez pas directement le grand récipient car le nettoyage sera suivi d’un rinçage automatique. Étape 6 Jetez avec précaution la solution de nettoyage chaude qui est versée dans le récipient. La machine est prête a l’emploi. ATTENTION •...
-
Page 21: Détartrage De La Machine T.o By Lipton
DÉTARTRAGE DE LA MACHINE T.O by Lipton Le détartrage de votre machine T.O by Lipton doit être effectué 1 fois par mois pour préserver votre machine et lui assurer une plus grande longévité. Conseil: Si l’eau est dure et calcaire, veuillez détartrer votre machine à intervalles réguliers. - Page 22 DÉTARTRAGE DE LA MACHINE T.O by Lipton Etape 7 Pour réaliser le cycle de rinçage, appuyez simultanément sur les boutons Moins fort et Grande tasse (situés aux deux extrémités) pendant 3 secondes jusqu’au soulèvement du support et au lancement du cycle. Puis jetez l’eau de rinçage.
-
Page 23: Changement De La Cartouche Filtrante Brita
CHANGEMENT DE LA CARTOUCHE FILTRANTE BRITA Seules les cartouches filtrantes BRITA INTENZA peuvent être utilisées avec votre T.O by Lipton machine La cartouche filtrante doit être remplacée 4 fois par an ou plus fréquemment si la machine l’indique, afin d’optimiser la filtration et protéger la machine. - Page 24 CHANGEMENT DE LA CARTOUCHE FILTRANTE BRITA Informations importantes: • Toujours conserver les cartouches filtrantes de rechange scellées dans leur emballage d’origine dans un endroit frais et sec. • La cartouche filtrante BRITA INTENZA est conçue pour être utilisée uniquement avec de l’eau du robinet traitée par les municipalités (Remarque: cette eau est contrôlée en permanence et est potable conformément à...
-
Page 25: Entretien
ENTRETIEN Entretien et nettoyage quotidiens • Avant de nettoyer la machine, débranchez-la de la prise secteur et laissez-la refroidir. • Remplissez le réservoir avec de l’eau potable fraîche avant chaque usage quotidien. • La surface de la machine uniquement avec un chiffon ou une éponge humide. •... -
Page 26: Diagnostic Des Pannes
Assurez-vous que rien ne bloque le filtre lorsqu’il est en mouvement. • Lors du cycle d’infusion, vérifiez que la capsule T.O by Lipton est neuve et que son opercule est intact. • Lors de toutes autres actions, vérifiez qu’il n’y ait pas de capsule dans le filtre. - Page 27 • Si cela ne résout pas le problème, effectuez un cycle de détartrage. Référez-vous à la section ‘Détartrage de la machine T.O by Lipton’ page 21. Les voyants Moins fort et Grande tasse • La machine nécessite un cycle (situés aux deux extrémités) clignotent.
-
Page 28: Caractéristiques
Poids à sec: 3.2Kg Dimensions de la machine L x H x P (mm): 200 x 360 x 283 Hauteur de tasse maximum: 100mm Accessoires: Cartouche filtrante BRITA INTENZA et Tablettes nettoyantes T.O by Lipton. Disponibles sur le site www.TO-Lipton.com... -
Page 29: Traitement Des Déchets
TRAITEMENT DES DÉCHETS T.O by Lipton Capsules Après utilisation, vous pouvez enlever les feuilles restantes de la capsule. L’opercule en aluminium peut être séparé de la capsule en plastique et être recyclé. Reportez vous à vos consignes de tri locales. Les feuilles restantes dans le filtre peuvent être ajoutées aux déchets compostables, si vous utilisez ce mode de recyclage, ou peuvent simplement être... - Page 30 T.O by Lipton machine overview Setting up your T.O by Lipton machine Priming before first use Making a cup of T.O by Lipton tea Rinsing the Smart Brewing Orb Cleaning the Smart Brewing Orb Descaling the T.O by Lipton machine...
-
Page 31: Safety & Operation Precautions
• Protect the appliance from direct sunlight, prolonged or large splashes of water, and humidity. Do not operate the T.O by Lipton machine near water jets • or water taps. • The manufacturer accepts no responsibility and the... - Page 32 SAFETY & OPERATION PRECAUTIONS by clients in hotels, motels and other residential type environments; bed and breakfast type environments. • Children should be supervised to ensure that they do not play with the appliance. • This appliance can be used by children aged from 8 years and above if they have been given supervision or instruction concerning use of the appliance in a safe way and understand the hazards involved.
- Page 33 • Never put the appliance into water, or allow it to stand in water. Do not use your T.O by Lipton machine if the power cord, • plug or appliance has been damaged. The power cord must only be replaced by the manufacturer, after-sales service or similar qualified persons in order to avoid any danger.
- Page 34 Smart Brewing Orb whilst the appliance is brewing and keep a safe distance from the hot steam while the machine is operating. Burning risks. • T.O by Lipton reserves the right to change instructions without prior notice. SAVE THESE INSTRUCTIONS - Pass them on to any...
-
Page 35: T.o By Lipton Machine Overview
T.O by Lipton MACHINE OVERVIEW* BRITA INTENZA Water filter T.O by Lipton capsule box Water tank Smart Brewing Orb Pouring spout Cup stand Cleaning tablet T.O by Lipton To be used when cleaning the Smart Brewing Orb. * Colour for reference only... - Page 36 T.O by Lipton MACHINE OVERVIEW T.O by Lipton Capsule Capsule placement Strainer Holder T.O by Lipton machine BRITA INTENZA Water filter Box of capsules Water tank Cleaning tablet Cup stand Strainer & holder User Guide, Quick User Guide & Machine care leaflet...
- Page 37 T.O by Lipton MACHINE OVERVIEW Control buttons Tea intensity Cup size selection & start selection of the brewing cycle Weaker Stronger On/Off Small Large 1 full tank 3 large cups (1L)
-
Page 38: Setting Up Your T.o By Lipton Machine
SETTING UP YOUR T.O by Lipton MACHINE Step 1 Carefully unpack your T.O by Lipton machine and remove the plastic film covering the front of the machine. Unwind the cable from the base of the machine to the desired length and plug into a mains wall socket. - Page 39 PRIMING BEFORE FIRST USE Step 3 Press on/off button on the top of the machine until the Smart Brewing Orb illuminates. Step 4 Without a capsule place the strainer into the holder and slide into the machine. Ensure the holder and strainer are fully inserted.
-
Page 40: Making A Cup Of T.o By Lipton Tea
250ml for the large cup) underneath the pouring spout. Step 4 Insert a T.O by Lipton capsule at the front of the strainer as shown. Do not remove or pierce the foil lid of the capsule, your machine is designed for optimum performance with new, unopened T.O by Lipton... - Page 41 MAKING A CUP OF T.O by Lipton TEA Step 6 For each of your teas, the machine preselects automatically an optimal intensity. However, if you like your tea stronger or weaker select your preferred tea strength by pressing the intensity buttons.
- Page 42 Smart Brewing Orb during use. The machine will stop, the water tank will need to be refilled and the appliance primed before starting again. ATTENTION This appliance operates with T.O by Lipton capsules only. • • Never use a damaged or used capsule. This could...
-
Page 43: Rinsing The Smart Brewing Orb
RINSING THE SMART BREWING ORB In the unlikely event of leaves still remaining in the Smart Brewing Orb, you can rinse it separately to the brewing cycle, without a capsule. Step 1 Switch on your machine. Fill the water tank with drinking water to the Maximum mark (MAX). -
Page 44: Cleaning The Smart Brewing Orb
CLEANING THE SMART BREWING ORB To maintain the Smart Brewing Orb clarity of your T.O by Lipton machine, we recommend cleaning the brewing chamber once a month. Cleaning tablets are available on the website www.TO-Lipton.com. Step 1 Switch on your machine. Fill the water tank with potable water to the Maximum mark (MAX). - Page 45 CLEANING THE SMART BREWING ORB As part of the cleaning cycle an additional rinse will now be automatically performed by the machine. Do not remove the large vessel. Step 6 Carefully dispose of the cleaning solution once it has poured into the vessel. The machine is ready for use.
-
Page 46: Descaling The T.o By Lipton Machine
T.O by Lipton MACHINE The descaling of your T.O by Lipton machine must be performed once a month to protect and ensure a longer life for your machine. Tip: With very hard and calciferous water, please make sure to descale your machine regularly. - Page 47 DESCALING THE T.O by Lipton MACHINE Step 7 Perform a rinsing cycle by pressing and holding simultaneously the small and large cup buttons until the holder moves up and the rinsing process starts (about 3 seconds). Dispose of the rinse water after the rinsing cycle.
-
Page 48: Replacing The Brita Water Filter
REPLACING THE BRITA WATER FILTER T.O by Lipton Only BRITA INTENZA water filters can be used with your machine. The cartridge must be replaced 4 times per year or sooner if the machine indicates it to ensure optimum filtration performance and machine protection. - Page 49 REPLACING THE BRITA WATER FILTER Step 6 Perform a priming cycle by pressing simultaneously the Weak Brew and Large Cup buttons (far left and far right) for 5 seconds until the holder moves up and the cycle starts. Step 7 Refill the water tank with water.
- Page 50 REPLACING THE BRITA WATER FILTER • Should your tea machine not be in use for a prolonged period (e.g. holiday), we recommend that you discard any water left inside the water tank and leave the cartridge inside the tank. Before using the tea machine again take out the cartridge, clean the water tank and reinsert the cartridge before performing a rinse cycle as explained in the section ‘Rinsing the Smart Brewing Orb’...
-
Page 51: Machine Care
MACHINE CARE Daily Care & Cleaning • Before cleaning, remove the plug from the mains socket and let the appliance cool down. • Refill water tank with drinking water before each daily use. • Clean the machine only with a damp soft cloth. •... -
Page 52: Troubleshooting
• Make sure the holder and strainer are fully inserted. • When making tea make sure a new T.O by Lipton capsule with the foil intact is used. • When performing any other actions make sure there is no capsule in place into the strainer. - Page 53 • The machine requires a prime cycle. left and far right) lights are flashing Please refer to the section ‘Setting up your T.O by Lipton Machine’ page 38. All lights flashing • Please switch off the machine for 10 minutes and switch on again.
-
Page 54: Specifications
Water tank capacity: 1L Operating ambient temperature range: +5°C to 35°C Dry Weight: 3.2Kg Machine dimensions WxHxD (mm): 200 x 360 x 283 Maximum cup height: 100mm Accessories BRITA INTENZA Water filter and T.O by Lipton cleaning tablets. Available online at www.TO-Lipton.com... -
Page 55: Disposal
DISPOSAL T.O by Lipton capsules After use, the capsule can be separated from the remaining leaves; the foil lid can be removed from the plastic capsule and recycled according to local authority regulations. The remaining tea from the strainer can be added to food waste if you use this method of recycling or simply be disposed of via household waste according to your local recycling guidelines. - Page 56 : www.krups.fr Ce produit est réparable par KRUPS, pendant et après la période de garantie. KRUPS s’efforce de conserver la plus grande partie du stock de pièces disponible pour la réparation de vos produits pendant une durée moyenne de 5 à...
- Page 57 Liste des Pays. En cas d’utilisation dans un pays différent de la France : a) La Garantie Internationale de KRUPS ne s’applique qu’en cas d’adéquation du produit avec les standards et normes locales, tels que le voltage, la fréquence électrique, le type de prise électrique, ou toute autre spécification...
- Page 58 This product is repairable by KRUPS during and after the guarantee period. KRUPS endeavours to keep most of the stock of the spare parts available for the repair of your product for up to 5 to 7 years on average, from the last date of production.
- Page 59 The repair process for products purchased outside the country of use may require a longer time if the product is not locally sold by KRUPS c) In cases where the product is not repairable in the new country, the international KRUPS guarantee is limited to a replacement by a similar product or an alternative product at similar cost, where possible.
Need help?
Do you have a question about the T.O by Lipton and is the answer not in the manual?
Questions and answers