Table of Contents
Advertisement
Quick Links
Advertisement
Table of Contents

Related Manuals for Transvideo cinemonitorhd


Summary of Contents for Transvideo cinemonitorhd
- Page 1 CineMonitorHD Operator Manual Rev. 2.0 Dec 1st 2008 Doc ref: 751TS0017...
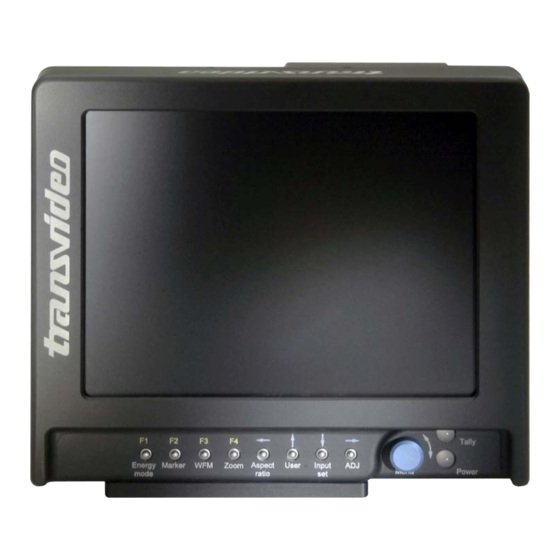
- Page 2 Figure 1 - CineMonitorHD6 front Figure 2 - CineMonitorHD6 back CineMonitorHD Page 2 Rev. 2.0 Dec 1 2008...
- Page 3 Figure 3 - CineMonitorHD6 back (SDI Only) CineMonitorHD Page 3 Rev. 2.0 Dec 1 2008...
- Page 4 Figure 4 - CineMonitorHD8 front Figure 5 - CineMonitorHD8 back (SDI + Analog) CineMonitorHD Page 4 Rev. 2.0 Dec 1 2008...
- Page 5 Some options can be not implemented in your CineMonitorHD. It is possible to upgrade the CineMonitorHD, for that, please contact your local Transvideo representative. The products described in this book are professional equipments; they are not designed for consumer use.
-
Page 6: Table Of Contents
Arrows & Blue knob ........................19 ASPECT RATIO............................ 19 USER ..............................20 INPUT ..............................21 ADJUST..............................22 MENU FUNCTIONS ..........................23 ADJUSTMENTS ........................... 23 HUE (TINT) ............................23 BRIGHTNESS ..........................23 CONTRAST ............................. 23 CineMonitorHD Page 6 Rev. 2.0 Dec 1 2008... - Page 7 B&W ..............................34 SCAN..............................34 FULL ..............................34 TECHNICAL ............................35 CVBS STD SELECT ........................35 NTSC ............................... 35 REVERSE SCROLLING ........................35 ACCESSORY ..........................35 COMPONENT RGB ........................35 COMPONENT YPrPb ........................ 35 CineMonitorHD Page 7 Rev. 2.0 Dec 1 2008...
- Page 8 Useful tips ..............................37 CLEANING ............................37 FULL RESET ............................37 Software and Firmware.......................... 38 Calibration..............................38 Product Return ............................38 ACCESSORIES ............................39 SPECIFICATIONS ............................ 42 CONNECTORS............................44 TRANSVIDEO EQUIPMENT LIMITED WARRANTY ................45 CineMonitorHD Page 8 Rev. 2.0 Dec 1 2008...
- Page 9 Refer to the standard ESD procedures before disassembly of the component. Very high voltage are present in the unit, there is some risk of electric shock if opened by a non accredited technician. CineMonitorHD Page 9 Rev. 2.0 Dec 1...
-
Page 10: Condensed Operating Instructions
② Connect a video source to the input ③ Switch on the monitor with the back switch ④ Select the correct input with INPUT SEL For more information, please read the manual in SECTION III “OPERATION” CineMonitorHD Page 10 Rev. 2.0 Dec 1 2008... -
Page 11: Introduction
Introduction Unpacking and Inspection The CineMonitorHD is delivered in a rugged waterproof case. Use this case for storage and transportation. Control the content of the package accordingly to the packing list. Fill up the warranty card and send it by mail or by fax to your distributor or to the factory. -
Page 12: Product Overview
Product Overview Front Panel Controls and Indicators Rear Panel Controls and Connectors CineMonitorHD Page 12 Rev. 2.0 Dec 1 2008... -
Page 13: Installation
Installation The CineMonitorHD must be securely fixed on the camera or on the location of use. TRANSVIDEO manufactures high quality brackets and accessories for the comfort of use and security for the equipment and user. Do not use the monitor with loose fixation or damaged brackets it is a question of security for yourself and other persons working on the same location. -
Page 14: Power Requirements
The power supply is protected against reverse polarity. Over voltage may cause severe damages to the equipment. For safety of use the CineMonitorHD family feature a galvanic insulation of the DC input. Do not connect the power ground to the chassis of the monitor or to the metallic body of the power connector to keep the galvanic insulation. -
Page 15: Operation
(if any). Depending of the function, options and environment, the content of F1 … F4 can vary. Pressing the pad just under the engraving will activate or CineMonitorHD Page 15 Rev. 2.0... -
Page 16: Using The Menus
If your monitor do not show the feature described in this manual, please check first if you bough the described option. You can contact your distributor to upgrade your product and/or to install some optional tools. CineMonitorHD Page 16 Rev. 2.0... -
Page 17: Direct Functions Description
Not active when the ZOOM or FORMAT 2.40:1 are selected This menu is contextual; some functions can be unavailable depending of the input format. 14:9 16:9 -> Next page SAFE area <- CineMonitorHD Page 17 Rev. 2.0 Dec 1 2008... -
Page 18: Wfm (Waveform, Vectorscope, Histogram)
When a measurement tool is displayed. Pressing the WFM pad gives the possibility to adjust the representation by using the blue rotating knob. Waveform : 3 sizes of waveform are available Histogram : Adjustment of the gain of the histogram CineMonitorHD Page 18 Rev. 2.0 Dec 1 2008... -
Page 19: Zoom
This pictogram indicates the relative position of the magnified zone in the original picture. ASPECT RATIO Allows the change of aspect ratio between: 1.33:1 4/3 SD only 1.78:1 16/9 HD & SD 2.40:1 HD & SD CineMonitorHD Page 19 Rev. 2.0 Dec 1 2008... -
Page 20: User
Jump to next page Page 2 Access to the Memory menu Horizon* <- Jump to previous page * The horizon is optional, if the horizon is not implemented, this menu will not appear. CineMonitorHD Page 20 Rev. 2.0 Dec 1 2008... -
Page 21: Input
“INPUT SEL”. Inactivating the accessory input reduce the power consumption of the CineMonitorHD of about 4 Watts. The format of the ACCessory can be configured in the TECHNICAL MENU. It is possible to select between component YPrPb, component RGB and CVBS. -
Page 22: Adjust
There is one memory per input. That means you can setup the ACCessory input differently of the SDI input. It is useful with some specific digital cameras offering a viewfinder menu and a HD SDI preview output. CineMonitorHD Page 22 Rev. 2.0 Dec 1... -
Page 23: Menu Functions
Allows the manual adjustment of RGB gain (from 0 to 2, nominal 1.00) and offset of the black (-127mV to + 126mV, nominal 0 mV). The nominal value in manual mode correspond to the D65 setup. CineMonitorHD Page 23 Rev. 2.0... -
Page 24: D56
STANDARD 0.45 Set the monitor to reproduce linearly a signal corrected by a of 0.45 γ Use in LINEAR To use the monitor in linear mode, adjust the gamma to 1.00 CineMonitorHD Page 24 Rev. 2.0 Dec 1 2008... -
Page 25: Lock
H POS Move the horizontal position of the cross FRAME 1 FRAME 1 ON/OFF Activation of the frame CENTER ON Activation of the center cross COLOR Modification of the color of the frame CineMonitorHD Page 25 Rev. 2.0 Dec 1 2008... - Page 26 Horizontal homothetic modification of the frame FRAME 2 … FRAME 3 … SEND ALL TO CENTER Send all frames to the center of the screen. BCKGND COLOR Change the background color outside of the frames. CineMonitorHD Page 26 Rev. 2.0 Dec 1 2008...
-
Page 27: Horizon (If Option Installed)
Selects the presence or not of the horizon. 0 CAL Set the horizon to 0 A temporization of 5 seconds allows stabilizing the position of the system. Pushing the blue knob during calibration exits the timing. CineMonitorHD Page 27 Rev. 2.0 Dec 1 2008... -
Page 28: Limits
LIMITS The limits menu is a very important item of the CineMonitorHD family. It is used to setup the characteristics of the camera you are using and some safety levels which will be used in different tools. MAX LEVEL Set up the upper clipping level (White). -
Page 29: Sorin's Marker
The Sorin’s area is displayed in false colors when activated. BLACK LIMITS: ON/OFF Switch ON or OFF the black limits control. The MIN LEVEL and the BLACK CLIP are displayed in false colors when activated. CineMonitorHD Page 29 Rev. 2.0 Dec 1 2008... -
Page 30: Measurement
Displays the measurement of a group of 12 lines, the first line is selected with the blue knob. ALL LINES Displays the measurement of the whole picture. SPOT INTENSITY Adjusts the brightness of the waveform spot RETICULE INTENSITY Adjusts the brightness of the waveform reticule CineMonitorHD Page 30 Rev. 2.0 Dec 1 2008... -
Page 31: Tally
Sets the active mode in TALLY ON STYLE Selects the style of the TALLY, including the TALLY FRAME which is active on FRAME3 of the FRAMELINE (The FRAMELINE option must be installed to use this mode. CineMonitorHD Page 31 Rev. 2.0 Dec 1 2008... -
Page 32: Normal
PICTURE FX NORMAL Restores the standard display HORIZONTAL FLIP Returns horizontally the picture. VERTICAL FLIP Returns vertically the picture. PICTURE REVERSE CineMonitorHD Page 32 Rev. 2.0 Dec 1 2008... -
Page 33: Auto Reverse
AUTO REVERSE Returns automatically the picture if the monitor is up side down. AUTO FLIP VERTICAL ONLY Returns automatically the picture (vertical axis only) if the monitor is up side down CineMonitorHD Page 33 Rev. 2.0 Dec 1 2008... -
Page 34: Display Mode
GREEN Display the picture in green color only. TINT and SATURATION are not working in this mode. This mode has been invented by TRANSVIDEO in 1990 and is used since this time in Film & Night Vision systems. B&W Displays the picture with 256 gray levels. -
Page 35: Technical
An appropriate cable must be used. COMPONENT RGB HD or SD RGB signal with composite synchronization on the green channel is allowed. COMPONENT YPrPb HD or SD YPrPb signal is allowed. CVBS Composite video signal is allowed. CineMonitorHD Page 35 Rev. 2.0 Dec 1 2008... -
Page 36: Exit Tempo
The standard settings a factory loaded in this memory, they will be replaced at the first SAVE from the user. PRESET Set the default values in the setting registers. PRESET does not erase the user presets. CineMonitorHD Page 36 Rev. 2.0 Dec 1 2008... -
Page 37: Service & Maintenance
Distributor/retailer or use the following procedure. Useful tips CLEANING The painting of the CineMonitorHD is resistant to general cleaners and solvents. Do not use abrasive products to clean the CineMonitorHD. The front glass is a high quality optical part. A metallic multi-layers vacuum deposit makes the anti-reflection coating. -
Page 38: Software And Firmware
The calibration doesn’t need to be performed except after some specific service operation as the replacement of the backlight unit or if you need to match a large inventory of CineMonitorHD after hundreds hours of use. To perform the calibration, you need to send the product(s) to the factory. -
Page 39: Accessories
Can be attached with 2 x M4 on left, right, top and back of the CineMonitorHD Clamp for P/N 918TS0131 Slide Firmly secures the CineMonitorHD on a Spigot. 3D SWING ARM P/N 918TS0148 Strong with Clamp for slide Includes a Clamp for slide,... - Page 40 High Quality Sun & Night Hood with 4” extension. 6” P/N 918TS0161 Light Hood 8” P/N 918TS0150 Light Lexan® hood to use on Steadicam applications. 6” P/N 918TS0136 Raincover 8” P/N 918TS0141 CineMonitorHD Page 40 Rev. 2.0 Dec 1 2008...
- Page 41 Recommended cleaning cloth for the front glass Micro fiber P/N 918TS0144 Protects during transportation and on camera between takes. Power Supply P/N 918TS0040 AL24 For CineMonitorHD 6, 6SBL, 8 & 15 Studio. CineMonitorHD Page 41 Rev. 2.0 Dec 1 2008...
-
Page 42: Specifications
Display type AMLCD Color calibration D65 ITU-R BT.709-5 Color space Rec. ITU-R BT.709-5 Latency Less than 1 frame in 1080 i and PsF, SD. Less than 1 image in 720 and 1080 p CineMonitorHD Page 42 Rev. 2.0 Dec 1 2008... - Page 43 Grams / Lbs Power 10– 36 / 30 (50 SB) Volts DC/watts Brightness 350 (1200 SB) NITs Contrast ratio 800:1 (500 : 1 SB) Sight angle ±85H&V, (±85 H, +70-80V SB) ° CineMonitorHD Page 43 Rev. 2.0 Dec 1 2008...
-
Page 44: Connectors
Connectors TRANSVIDEO manufactures high quality cable assemblies and custom cables. We encourage you to use original cables. TRANSVIDEO cannot be liable for use of defective cables. Accessory connector 1 GND 2 10 to 36 IN/OUT 3 Y/CVBS2/G 4 GND VIDEO... -
Page 45: Transvideo Equipment Limited Warranty
(shipping charges apply). Non-Transvideo brand peripheral equipment and software which may be distributed with Transvideo products are sold “AS IS” without warranty of any kind by Transvideo, including any implied warranty regarding merchantability or fitness for a particular purpose. - Page 46 This Limited Warranty does not cover cabinet (exterior finish). This warranty does not cover units sold to military operations or avionics. These uses are covered only by such specific warranty as Transvideo may issue with such sales. This Limited Warranty does not apply to accessories or consumables for the product, which are sold “AS IS”, without warranty of any kind by Transvideo.
- Page 47 Notes My CineMonitor CineMonitorHD__ Model Serial number CineMonitorHD Page 47 Rev. 2.0 Dec 1 2008...
- Page 48 Dealer: TRANSVIDEO S.A. Zone Industrielle F-27135 Verneuil sur Avre Tel +33 2 3232 2761 Fax +33 2 32 601479 Email info@transvideo.fr http://transvideo.fr http://transvideointl.com Rev. 2.0 Dec 1st 2008 Doc ref: 751TS0017...
Need help?
Do you have a question about the cinemonitorhd and is the answer not in the manual?
Questions and answers