Dyson AM10 Operating Manual
Hide thumbs
Also See for AM10:
- Operating manual (104 pages) ,
- Operating manual (21 pages) ,
- Operating manual (21 pages)
Table of Contents
Advertisement
Available languages
Available languages
Quick Links
Service Questions: Contact Dyson at 1-866-693-9766
Sales Inquiries: Contact Sylvane at 1-800-934-9194
OPERATING MANUAL
INSTRUCCIONES DE SEGURIDAD
Important!
Weekly and monthly
cleaning required.
¡Importante!
Requiere una limpieza
semanal y mensual.
Register
Your free 2 year
warranty today.
Regístrese
Obtenga hoy su garantía
gratuita de 2 años.
Advertisement
Table of Contents

Related Manuals for Dyson AM10


Summary of Contents for Dyson AM10
- Page 1 Service Questions: Contact Dyson at 1-866-693-9766 Sales Inquiries: Contact Sylvane at 1-800-934-9194 OPERATING MANUAL INSTRUCCIONES DE SEGURIDAD Important! Weekly and monthly cleaning required. ¡Importante! Requiere una limpieza semanal y mensual. Register Your free 2 year warranty today. Regístrese Obtenga hoy su garantía...
-
Page 2: Important Safety Instructions
14. If the machine is not working as it should, has and unattended. received a sharp blow, has been dropped, 4. This Dyson machine is not intended for use damaged, left outdoors, or dropped into water, by persons (including children) with reduced do not use and contact the Dyson Helpline. -
Page 3: Important Safety Features
For your safety this machine is fitted with 23. When refilling, only do so as described in automatic cut-out switches that operate if it this Dyson operating manual. Do not use tips over. If the switches operate, unplug the hot water. -
Page 4: Instrucciones De Seguridad Importantes
12. No manipule el enchufe o de la máquina con 4. Este aparato Dyson no está destinada para las manos mojadas. el uso por parte de personas (incluso niños) 13. No lo use si el cable o el enchufe están con capacidades físicas, cognitivas o mentales... - Page 5 32. Este equipo debe recibir solo un suministro de corriente eléctrica de voltaje extra bajo de seguridad correspondiente a la indicación incluida en la base. Dyson recomienda usar No jale el No utilice No guarde...
- Page 6 2 years from the date of purchase, subject to the terms of the warranty. If Online you have any questions about your Dyson machine, call the Convenient and instant. www.dyson.com/register Dyson Helpline with your serial number and details of where/ Phone when you bought the machine.
-
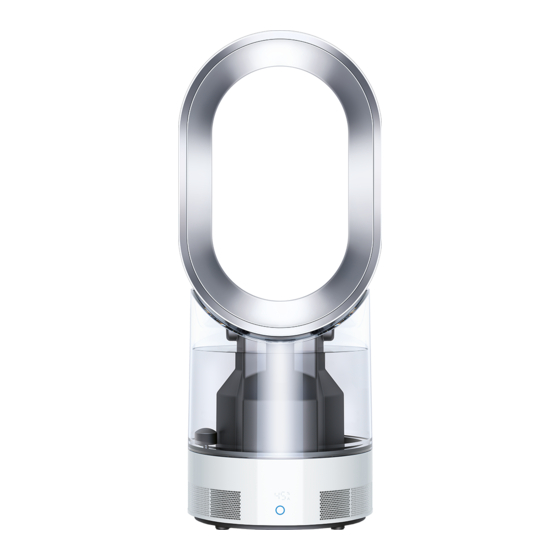
Page 7: Know Your Humidifier
Know your humidifier Remote control Loop Handle Chimney Seal Tank Loop release button Base Inlet Piezo UV-C emitter LED display On/ off button Plug... -
Page 8: Getting Started
Getting started For the best performance place humidifier on the floor in the corner of the room, facing into the center. It should be at least 3.2ft from any wall. To avoid a cooling effect while humidifying, the unit should be at least 3.2ft from any people. - Page 9 Plug into the socket and base. A small Switch ‘ON’. The water treatment After 3 minutes the machine will start blue LED on the back of the appliance procedure automatically starts. to humidify. The display will show the lights up to confirm that the machine Water passes over a UV-C emitter to target humidity setting.
-
Page 10: How To Use
How to use Fan/ humidity toggle ON/ OFF switches between humidifier and fan modes. Control with airflow and timer buttons. On/off Controlling the humidity manually Airflow Increase target humidity. Increase airflow. 30 to 70% 1 to 10 Decrease target humidity. Decrease airflow. - Page 11 On/off Press and hold the power button on the machine to adjust the humidity setting. Blue light indicates that the AM10 is in humidity mode. White light indicates that the AM10 is Switch ‘ON’: the water treatment procedure starts. in fan mode.
-
Page 12: Cleaning - Important
Cleaning – important! Cleaning procedures must be routinely followed to ensure that the humidifier continues to operate efficiently. Cleaning regimes are designed to help prevent the build up of scale within the machine, which will be more prominent in hard water areas. Failure to adhere to the cleaning regimes may invalidate the warranty. - Page 13 Once a week Wipe over air loop amplifier, paying close attention to the air gaps. Wipe with a lint-free Turn the machine into standby mode/‘OFF’. Unplug from the mains electricity supply. microfiber cloth. Empty the water. Rinse and wipe over all surfaces. Repeat if necessary.
- Page 14 Once a month (and before/after storage) Turn the machine into standby mode/‘OFF’. Unclip the loop amplifier surround: pull from Unplug from the mains electricity supply. the lower edge by hand, gently but firmly. 15 mins Empty the water tank. To release the water chimney, twist the dial a quarter of a turn.
- Page 15 Some cleaning chemicals are harmful to the machine and should not be used. Use of these may invalidate your warranty. Do not use: Alcohol and strong acid mixes, solvent (acetone) and oil based products, alkali bleach mixes, air fresheners, aroma oils, scented oils, hot water, brushes, abrasive materials, etc.
-
Page 16: What Do The Lights Mean
What do the lights mean? Water treatment The AM10 is treating the water. This takes 3 minutes. When the animation stops, the AM10 will start to humidify. Tank is empty Switch ‘OFF’ and refill. Tilted The base is not level. -
Page 17: Using Your Humidifier
Using your humidifier PLEASE READ THE ‘IMPORTANT SAFETY INSTRUCTIONS’ IN THIS DYSON machine will switch itself ‘ON’ or ‘OFF’ as necessary to maintain OPERATING MANUAL BEFORE PROCEEDING. that level. The fan will remain running when the target humidity has been reached. -
Page 18: Troubleshooting
(battery type CR 2032). What is not covered • Limited functionality is available without the remote control Dyson shall not be liable for costs, damages or repairs incurred as a (see 'Control without remote'). result of, due to, or from: •... - Page 19 Dyson or others on behalf of Dyson so that we can assist you more quickly with our Dyson Helpline. From time to time, Dyson may send you special offers and news of our latest innovations.
- Page 20 Después de registrar la garantía gratuita de 2 años, su equipo registrarse sus 2 años de Dyson tendrá la cobertura de los repuestos y la mano de obra garantía. por 2 años desde la fecha de compra, según los términos de la garantía.
-
Page 21: Conozca Su Humidificador
Conozca su humidificador Control remoto Bucle Tapa Manija Chimenea Sello Tanque Botón de liberación del bucle Base Entrada Piezoeléctrico Emisor UV-C Pantalla LED Botón de encendido/ apagado Enchufe... - Page 22 Inicio Para obtener un mejor rendimiento, coloque el humidificador en el piso en un rincón de la habitación y con la parte frontal hacia el centro. Debe estar, al menos, a 3.2ft de distancia de cualquier pared. A fin de evitar el efecto de enfriado cuando se humidifica, la unidad debe estar, al menos, a 3.2ft de distancia de cualquier persona.
- Page 23 Encienda la unidad. El procedimiento Conéctelo a la toma de corriente y la Después de 3 minutos, el equipo de tratamiento de agua se inicia base. Un pequeño indicador LED azul comenzará a humidificar. La pantalla automáticamente. El agua pasa sobre en la parte posterior del equipo se mostrará...
-
Page 24: Modo De Uso
Modo de uso Interruptor bidireccional para ventilador/humedad Interruptores de encendido/apagado entre los modos de humidificador y ventilador. Control con botones para el flujo de aire y el temporizador. Encendido/apagado Cómo controlar manualmente Flujo de aire la humedad Aumente el flujo de aire. Aumente la humedad objetivo. - Page 25 Mantenga presionado el botón de encendido en el equipo para ajustar la configuración de humedad. La luz azul indica que el AM10 está en modo de humedad. La luz blanca indica que el AM10 está Encienda la unidad: Se inicia el procedimiento de en modo de ventilador.
- Page 26 Limpieza: ¡Importante! Los procedimientos de limpieza deben seguirse regularmente a fin de asegurarse de que el humidificador siga funcionando eficientemente. Los regímenes de limpieza están diseñados para ayudar a prevenir la acumulación de sarro dentro del equipo, que será aún más notable en las áreas de agua dura. La falta de cumplimiento de los regímenes de limpieza puede invalidar la garantía.
- Page 27 Una vez a la semana Ponga el equipo en modo de espera o Seque el bucle amplificador de aire, especialmente apáguelo. Desconéctelo del suministro de en los huecos de aire. Seque con un paño de corriente eléctrica. microfibra sin pelusas. Vacíe el agua.
- Page 28 Una vez al mes (y antes/después de guardarlo) Ponga el equipo en modo de espera o Desabroche el anillo que rodea el bucle amplificador: apáguelo. Desconéctelo del suministro de Con la mano, tire desde el borde inferior con cuidado corriente eléctrica. pero con firmeza.
- Page 29 Algunos productos químicos de limpieza son dañinos para el equipo y no deben usarse. El uso de esos productos puede invalidar su garantía. No utilice: mezclas de alcohol y ácidos fuertes, solvente (acetona) y productos a base de aceite, mezclas de blanqueador y álcali, aromatizadores de aire, aceites aromáticos, aceites perfumados, agua caliente, cepillos, materiales abrasivos, etc.
-
Page 30: Qué Significan Las Luces
¿Qué significan las luces? Tratamiento de agua El AM10 está tratando el agua. Este proceso tarda 3 minutos. Cuando se detenga la animación, el AM10 empezará a humidificar. El tanque está vacío Apague y recargue. Inclinada La base no está nivelada. - Page 31 Cómo usar su humidificador ANTES DE CONTINUAR, SÍRVASE LEER LAS ‘INSTRUCCIONES DE SEGURIDAD • El equipo se ajustará automáticamente para evitar una IMPORTANTES’ DE ESTE MANUAL DE FUNCIONAMIENTO DYSON. humedad excesiva. • El vapor será visible solo en ciertas condiciones (cuando reciba el impacto de la luz, haya un color de fondo, etc.) o en las...
- Page 32 Daño como resultado de un uso que contravenga las indicaciones de la placa de especificaciones. Si tiene alguna duda acerca de su máquina Dyson, llame a la línea de • Además, esta garantía limitada no se aplica a ningún aparato ayuda de Dysonal con el número de serie e información de cuándo y...
- Page 33 Antes de llevar a cabo el servicio, los términos de la garantía limitada requieren que usted se comunique a la línea de ayuda de Dyson con el nombre o número de su modelo, el número de serie, así como el lugar y la fecha de compra.
- Page 34 JN.64333 PN.302491-03-02 26.01.15...
- Page 35 Recomendación de amigos o familiares Other Otro Where did you first hear about Dyson fans? ¿Dónde se enteró por primera vez de los ventiladores Dyson? From friends and family Por amigos y familiares Saw it on the internet Lo vi en Internet From a TV/magazine advertisement Por un anuncio en televisión/revista...
-
Page 36: Warranty Form
Ocasionalmente, nos gustaría enviarle correos electrónicos con información sobre los nuevos servicios y tecnologías de Dyson o para saber su opinión sobre su compra. Si desea que nos mantengamos en contacto, seleccione esta casilla. 3 EASY WAYS TO REGISTER 3 MANERAS FÁCILES DE REGISTRARSE...
Need help?
Do you have a question about the AM10 and is the answer not in the manual?
Questions and answers