Table of Contents
Advertisement
Quick Links
Advertisement
Table of Contents

Related Manuals for SPL TwinTube 2920


Summary of Contents for SPL TwinTube 2920
- Page 1 SPL Analog Code Plug-in ® Manual TwinTube Processor...
- Page 2 This document is the property of SPL and may not be copied or reproduced in any way, in part or fully, without authorization by SPL electronics GmbH.
-
Page 3: Table Of Contents
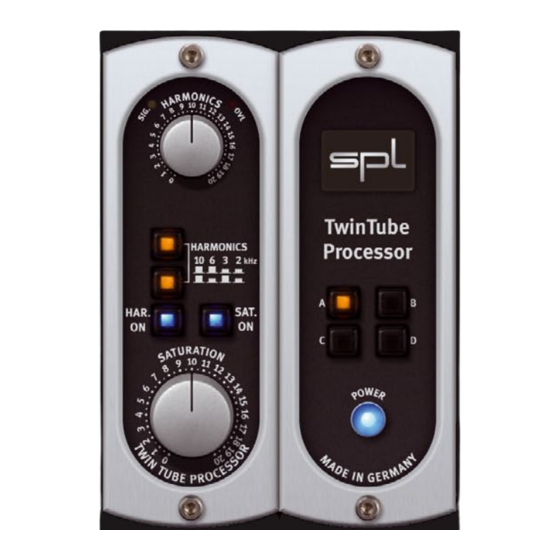
Content Installation Plugin Alliance Activation System Requirements and Compatibility MAC and Windows Installation Introduction ® The Analog Code TwinTube Control Elements Mouse Wheel Control Power LED HAR. ON/SAT. ON HARMONICS Control HARMONICS Switches SATURATION Control Signal LED Overload LED Settings A, B, C, D Applications Vocals Acoustic Guitars... -
Page 4: Installation
For details about system requirements and supported platforms or formats visit http://www.plugin-alliance.com/compatibility MAC and Windows Installation 1. Check for the latest plug-in software version before installation: http://software.spl.info/download 2. Execute the installer file and follow the instructions. TwinTube Analog Code Plug-in... -
Page 5: Introduction
Introduction The Analog Code ® While SPL hardware products have been fascinating audio pro- fessionals from home studio owners to mastering engineers in the world’s most renowned facilities for years, the need for this technology in the form of plug-ins has also been an ever-growing demand. - Page 6 Introduction On one hand (and depending on the amount applied), from subtle to extensive harmonic distortion and on the other hand, a com- paction of the sonic event, that is, a limiting effect that exhibits a pleasant, rounded or soft sound. Acoustically and also in its range of applications this can be compared very well with tape saturation effects.
-
Page 7: Control Elements
Control Elements Mouse Wheel Control All SPL Analog Code plug-ins support mouse wheel control for rotary controls and faders. Place the mouse cursor over a rotary control or fader and move the wheel or scroll ball of your mouse to adjust the control or fader. Hold the CTRL (Windows) or APPLE/ COMMAND key while moving the wheel or scroll ball for fine adjust- ments with higher control resolution. -
Page 8: Harmonics Switches
Control Elements HARMONICS Switches With the HARMONICS switches you choose the fre- quency range of the fundamental tone area that should be processed with the HARMONICS control. There are four avail- able frequency ranges. For reasons of space, we have rounded fre- quency values for the front lettering. -
Page 9: Signal Led
Control Elements Signal LED The SIG. LED indicates that an audio signal reaches the input. In the analog world this LED helps the operator especially in complex setups to determine immediately whether the TwinTube actually receives any signal. In the digital domain it simply tells you that the channel where you inserted the plug contains a signal that is loud enough to ensure correct processing. -
Page 10: Applications
Applications Here we refer to only two significant examples, of course with- out suggesting completeness. We would like to simplify starting with the TwinTube by sharing some thoughts and experiences. The effects and results described here can be applied to many other instruments—nothing should keep you away from using the TwinTube without restriction. -
Page 11: Your Notes
Your Notes ............ - Page 12 TwinTube Processor Analog Code Plug-in ® Manual SPL – Sound Performance Lab Sohlweg 80, 41372 Niederkrüchten, Germany Fon: +49 (0) 21 63 9 83 40 Fax: +49 (0) 21 63 98 34 20 E-Mail: software@spl.info, Website: spl.info...
Need help?
Do you have a question about the TwinTube 2920 and is the answer not in the manual?
Questions and answers