Table of Contents

Related Manuals for SPL Phonitor 2730


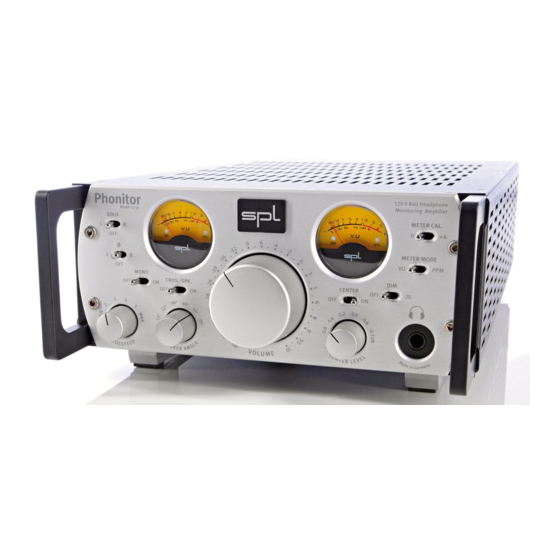
Summary of Contents for SPL Phonitor 2730
- Page 1 Manual Phonitor 120 V Rail Headphone Monitoring Amplifier Model 2730 SOLO METER CAL. Ø METER MODE MONO CROS./SPK. CENTER Phonitor Model 2730 Headphone Monitoring Amplifier...
- Page 2 This document is the property of SPL and may not be copied or reproduced in any manner, in part or fully, without prior authorization by SPL.
-
Page 3: Table Of Contents
Contents Symbols And Notes, Scope of Delivery ......Important Security Information ........Hook Up . -
Page 4: Symbols And Notes, Scope Of Delivery
Attention Do not attempt any alterations to this machine without the approval or supervision of SPL electronics GmbH. Doing so could nullify com- pletely any and all of your warranty/guarantee rights and claims to user support. -
Page 5: Important Security Information
Important Security Information Please note and retain this manual. Carefully read and follow all of the safety and operating instructions before you use the machine. Be dou- bly careful to follow all warnings and special safety instructions noted in this manual and on the unit. Connections: Only use the connections as described. - Page 6 Important Security Information Air Circulation: Chassis openings offer ventilation and serve to protect the machine from overheating. NEVER cover or otherwise close off these openings. NEVER place the machine on a soft surface (carpet, sofa, etc.). Make sure to provide for a mounting space of 4-5 cm/2 inch- es when mounting the machine in racks or cabinets.
-
Page 7: Hook Up
Hook Up Be very careful to check that the rear chassis power selection switch is set to the correct local line voltage position before using the unit (230 V position: 220-240 V/50 Hz, 115 V position: 110-120 V/60 Hz)! When in doubt about a source, contact your dealer or a professional electrician. -
Page 8: Introduction
(if note impossibility) in properly judging room ambiance. Therefore, several years ago SPL began planning the development of a compact, professional headphone amplifier design based on its 120 volt technology. The essential inspiration came from project manager Hermann Gier‘s desire to eliminate the major disadvantage in working... -
Page 9: Applications
Introduction Applications Aside from its outstanding abilities as loudspeaker substitute the Phonitor offers well equipped studios a fully functional monitoring alternative. In addition one can take along the Phonitor into an unfamiliar studio or production environment that always provides the engineer’s own monitor sound. -
Page 10: The End Of Ear Fatigue
Introduction With And Without Magnifiers, The End Of Ear Fatigue On loudspeakers such analyses are much more difficult, as such prob- lems just are not as apparent when one is working without being able to “zoom in” aurally. Conversely, loudspeakers provide monitoring with the advantage of spatial balance in a (definable through placement) stereo width, which in turn provides the illusion of an acoustic stage. - Page 11 Introduction The End Of Ear Fatigue For some years, now, SPL has addressed this issue in all of its master- ing product series through its own specifically developed 120 volt tech- nology. Consoles and signal processors of the SPL Mastering Series appear as central elements in installations of today’s most renowned...
-
Page 12: Rear Panel/Connections
Rear Panel/Connections Wiring Phonitor... -
Page 13: Voltage, Power Connection, Power, Xlr Connectors
Rear Panel/Connections Connections & Switches Voltage The rear panel voltage selector switch serves to let the user switch to the local line voltage standard. IMPORTANT ADVICE: Before you use the Phonitor, make sure that this switch setting reflects the correct local power line voltage (115 V position: 110-120 volts/6o Hz, 230 V position: 220-240 volts/50 Hz). -
Page 14: Pin Wiring Xlr Connectors, Gnd Lift Switch
Rear Panel/Connections Pin Wiring XLR Connectors, GND Lift Pin Wiring XLR Connectors Input Output balanced unbalanced balanced unbalanced 1= GND 2 = hot (+) 3 = cold (-) The diagram shows how to wire the balanced XLR connections if unbal- anced connections are required. -
Page 15: Front Panel/Connection
Front Panel/Connection Headphone Connection Phonitor 120 V Rail Headphone Monitoring Amplifier Model 2730 SOLO METER CAL. Ø METER MODE MONO CROS./SPK. CENTER Headphone Connection Connect headphones to the standard 1/4” (TRS) stereo plug on the lower right front panel. The layout is: Tip =left channel, Ring = right Channel, Sleeve = ground. -
Page 16: Control Elements
Control Elements Crossfeed, Speaker Angle Crossfeed The Crossfeed switch allows you to adjust the frequency-dependent crossfeed simulation of both channels by adjustments of interaural level difference – as if this characteristic would be heard from moni- tors when in their own room ambiance. One can compare variations in crossfeed values as approximating the influence of different room sizes and characteristics on a given loudspeaker setup. -
Page 17: Interaural Level And Time Differences
Control Elements Crossfeed, Speaker Angle Interaural Level and Time Differences as Related to Crossfeed Setup The following two diagrams show, respectively (on the left), the fre- quency response of interaural level differences and (on the right) the interaural time difference at maximum Crossfeed value and at a Speaker Angle of 30 degrees. -
Page 18: As Related To Speaker Angle Setup
Control Elements Crossfeed, Speaker Angle Interaural Level and Time Differences as Related to Speaker Angle Setup The following two diagrams show (on the left) the frequency response of interaural level difference with respect to the interaural time differ- ence (on the right) at maximum Crossfeed value and a Speaker Angle of 75 degrees. - Page 19 Control Elements Crossfeed, Speaker Angle Crossfeed and Speaker Angle Parameters Speaker Angle Crossfeed Level Time Diff. Speaker Angle (Result) Switch Switch Difference (µs) The accentuated lines show at which Crossfeed values the Speaker Angle most precisely matches the theoretically determined time differ- ence values.
-
Page 20: Cros./Spk., Center Level, Center Off
Control Elements CROS./SPK., Center Level, Center Off/On CROS./SPK. With CROS/SPK. you switch on or off Crossfeed and Speaker Angle functions globally. This provides for direct A/B comparisons. Your impression may at first be that the results are not so spectacular as expected –... -
Page 21: Vu Meter, Signal Led, Overload Led
6 dB so that the gauge goes up to +11 dB output level (see “Meter Cal.“ on page 22). The VU meter is custom made to meet SPL specifications and assures a balanced optical perception thanks to it’s optimized ballistics. -
Page 22: Meter Mode, Meter Cal., Dim
Control Elements Meter Mode, Meter Cal., Dim The Dim function reduces the listening level (Volume) by around 20 dB. Normally you employ this function when mixing to choose between two defined volumes to avoid having to move the Volume control. A dim value of 20 dB has established itself as good standard. -
Page 23: Solo, Phase Ø
Control Elements ø Solo, Phase Solo You can engage the solo switch to monitor only the left or right channel of the stereo signal. The Solo switch has three positions: L, R and OFF. The middle or OFF position allows monitoring the stereo signal. Switched to L or R, and you will hear only the left or right channels, respectively. -
Page 24: Mono, Volume
Control Elements Mono, Volume Mono The Mono switch creates a sum of the stereo channels. If, per the above description, you employ this Mono switch along with the Solo, the overall signal level will be approximately 6 dB below a stereo signal and mono-switch only. -
Page 25: Operation: Quick Guide To Headphone Monitoring
Operation Quick Guide To Headphone Monitoring Adjust Headphone Reproduction To Loudspeaker Monitoring The Phonitor offers foremost a complete set of options required for professional monitoring: Solo L/R, Phase Reverse L/R, Mono, Dim, Volume, VU & PPM Metering. In addition, new functions such as Crossfeed, Speaker Angle and Center Level transform the Phonitor from a traditional headphone am- plifier into a headphone monitoring amplifier, with which it is possible to achieve reproduction equivalent to studio monitors. - Page 26 Operation QUICK GUIDE To Monitoring Functions You should now compare what you hear with headphones and loud- speakers. First, whether or not you have the correct width in your stereo image. If this appears too narrow or too broad with the head- phone, you have always two ways for further adjustments: A.
- Page 27 Operation QUICK GUIDE To Monitoring Functions 5. After you have set up Crossfeed and Speaker Angle, you can then de- termine your Center Level setting. Although at normal hearing levels over headphones the center signal generally seems too quiet, after Crossfeed and Speaker Angle processing it then can seem too loud.
-
Page 28: Specifications
Specifications Audio Frequency Response: ‹10 Hz to ›200 kHz (-3dB) CMR: -80 dBu @ 1 kHz, 0dBu input level and unity gain Crosstalk @ 1 kHz: -67 dB THD @ 1 kHz: 0,005 % @ 0dBu input level and unity gain Noise (A-weighted): -97 dBu Dynamic Range:... -
Page 29: Measurements
Measurements Audio Precision Phonitor Model 2730 05/27/08 09:50:42 200k Frequency Response Input/Headphone Output, Left and Right Channel Measuring output and input 600 Ohm, Volume control Phonitor 0 dB: ‹10 Hz to ›200 kHz (-3dB). The large Frequency response range excludes that the frequency spec- trum is limited at any point. -
Page 30: Thd Vs. Output Level, Thd Vs. Frequency
0 dBu, the Phonitor‘s THD values are extremely low. With a 0 dB input signal and 600 Ohm headphones the SPL is at ca. 83 dB (stereo signal in 3 cm distance). Volumes that would result from 10 dBu are already far above healthy levels. -
Page 31: Copy Master: Recall Settings
Copy Master: Recall Settings Phonitor... -
Page 32: Guarantee
Direct SPL product support requires product registration. Please fill out the guarantee card enclosed in the package legibly in printed let- ters and send it directly to SPL. Or use the online registration form that may be reached at www.soundperformancelab.com (international cli- ents) or www.spl-usa.com (US clients).
Need help?
Do you have a question about the Phonitor 2730 and is the answer not in the manual?
Questions and answers