Table of Contents
Advertisement
Advertisement
Table of Contents

Related Manuals for thomann Stairville Hz-200 DMX


Summary of Contents for thomann Stairville Hz-200 DMX
- Page 1 Hz-200 DMX hazer user manual...
- Page 2 Musikhaus Thomann e.K. Treppendorf 30 96138 Burgebrach Germany Telephone: +49 (0) 9546 9223-0 E-mail: info@thomann.de Internet: www.thomann.de 19.11.2013...
-
Page 3: Table Of Contents
Table of contents Table of contents General notes............................... 5 Safety instructions............................. 8 Features............................... 14 Installation..............................15 Starting up..............................16 Connections and operating elements................... 18 Operating..............................23 7.1 DIP switch operation........................25 7.2 Remote control operation......................26 7.3 Operating mode ‘DMX’........................27 Technical specifications........................ - Page 4 Table of contents Protecting the environment......................34 hazer...
-
Page 5: General Notes
General notes General notes This user manual contains important information on safe operation of the device. Read and follow all safety notes and all instructions. Save this manual for future reference. Make sure that it is available to all persons using this device. If you sell the device to other users, be sure that they also receive this manual. - Page 6 General notes Symbols and signal words This section provides an overview of the symbols and signal words used in this user manual. Signal word Meaning DANGER! This combination of symbol and signal word indicates an immediate dangerous situation that will result in death or serious injury if it is not avoided.
- Page 7 General notes Warning signs Type of danger Warning – high-voltage. Warning – flammable substances. Warning – suspended load. Warning – harmful or irritating substances. Warning – danger zone. Hz-200 DMX...
-
Page 8: Safety Instructions
Safety instructions Safety instructions Intended use This device is intended to be used to produce fine haze by vaporising fog fluid. Use the device only as described in this user manual. Any other use or use under other operating conditions is considered to be improper and may result in personal injury or property damage. - Page 9 Safety instructions DANGER! Electric shock caused by high voltages inside Within the device there are areas where high voltages may be present. Never remove any covers. There are no user-serviceable parts inside. DANGER! Electric shock caused by short-circuit Always use proper ready-made insulated mains cabling (power cord) with a pro‐ tective contact plug.
- Page 10 Safety instructions WARNING! Risk of burns from flammable liquids The use of flammable liquids in this device may cause severe burns and damage to property. Always use approved fog fluids. Never fill flammable liquids into the tank of the device. WARNING! Risk of slipping caused by condensation Fog machines can produce condensation.
- Page 11 Safety instructions WARNING! Health hazard caused by fog fluid handling Fog fluid does contain glycols complying with the regulations for foodstuffs. However, it may be harmful if swallowed. Do not induce vomiting. Seek medical advice immediately. Keep fog fluid in a safe place.
- Page 12 Safety instructions NOTICE! Risk of fire Do not cover the device nor any ventilation slots. Do not place the device near any direct heat source. Keep the device away from naked flames. NOTICE! Operating conditions This device has been designed for indoor use only. To prevent damage, never expose the device to any liquid or moisture.
- Page 13 Safety instructions NOTICE! Power supply Before connecting the device, ensure that the input voltage (AC outlet) matches the voltage rating of the device and that the AC outlet is protected by a residual current circuit breaker. Failure to do so could result in damage to the device and possibly injure the user.
-
Page 14: Features
Features Features This hazer is suitable to be used in clubs, bars, discotheques and on stages. Special features of the device: Control via DMX, integrated DIP switches or via the supplied remote control Suitable for mobile use due to compact design hazer... -
Page 15: Installation
Installation Installation Unpack and carefully check that there is no transportation damage before using the unit. Keep the equipment packaging. To fully protect the device against vibration, dust and moisture during transportation or storage use the original packaging or your own packaging material suitable for transport or storage, respectively. -
Page 16: Starting Up
Starting up Starting up Establish all connections as long as the unit is switched off. Use the shortest possible high- quality cables for all connections. NOTICE! Possible data transmission errors For error-free operation make use of dedicated DMX cables and do not use ordi‐ nary microphone cables. - Page 17 Starting up Connections in DMX mode Connect the DMX input of the device to the DMX output of a DMX controller or another DMX device. Connect the output of the first DMX device to the input of the second one, and so on to form a daisy chain.
-
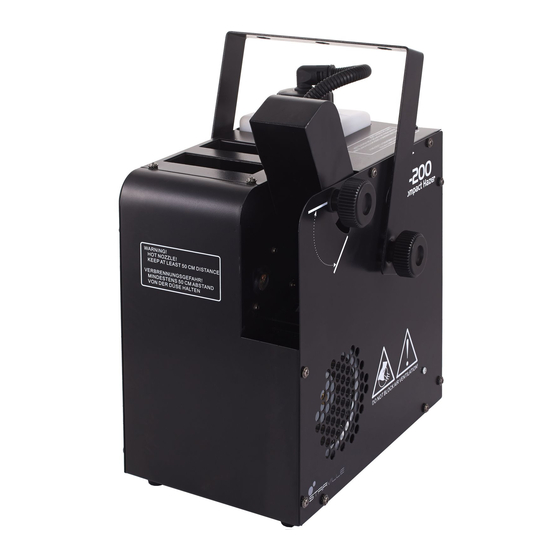
Page 18: Connections And Operating Elements
Connections and operating elements Connections and operating elements Front and rear panel hazer... - Page 19 Connections and operating elements 1 Main switch to turn the device on and off. 2 IEC chassis plug with fuse holder for the power supply. 3 Connection for the supplied remote control. 4 [DMX IN | OUT] DMX in and output 5 Locking screws for the mounting bracket.
- Page 20 Connections and operating elements 12 Liquid level indicator. 13 Haze / air nozzle. hazer...
- Page 21 Connections and operating elements Remote control 14 [TIMER] With this button, you can turn the Timer function on or off. In this mode, the set amount of haze / air is output in certain intervals. The corresponding LED lights while the function is enabled. 15 [CONT] Press this button to turn continuous operation on or off.
- Page 22 Connections and operating elements 18 [INTERVAL] Rotary control to set the interval between two haze blasts. 19 [WIND SET] Rotary control to set the amount of air to be output. hazer...
-
Page 23: Operating
Possible damages caused by unsuitable fog fluid Fog liquids not approved by the manufacturer may permanently damage the unit. Only use the fog fluids listed on www.thomann.de and follow their instructions for use. First, make sure the unit is disconnected from the mains. - Page 24 Operating Turning the unit on NOTICE! Fire hazard Do not operate the machine unattended. Connect the device to the mains and switch the device on with the main switch. The appliance heats up, the red LED on the rear panel lights up. As soon as the required operating temperature is reached, the red LED on the rear panel goes out.
-
Page 25: Dip Switch Operation
Operating 7.1 DIP switch operation If you want to control the device only via the DIP switches on the rear panel, first set the switches 1 to 9 to [OFF] and switch 10 to [ON]. The unit then operates continuously and does not respond to DMX commands nor the remote control. -
Page 26: Remote Control Operation
Operating Function 50 % air output 75 % air output 100 % air output 0: DIP switch is in ‘OFF’ position. 1: DIP switch is in ‘ON’ position. 7.2 Remote control operation If you want to control the device via remote control, set the switches 1 to 9 to [ON] and switch 10 to [OFF]. -
Page 27: Operating Mode 'Dmx
Operating 7.3 Operating mode ‘DMX’ Setting up the DMX address The value of the DIP switches 1-9 is binary coded. To set the desired DMX address, set the DIP switches so that the sum of the resulting numbers yields the desired DMX address. Please orient yourself by the following table: DMX address Hz-200 DMX... - Page 28 Operating DMX address 0: DIP switch is in ‘OFF’ position. 1: DIP switch is in ‘ON’ position. Example: To set the DMX address 10 set DIP switches 2 and 4 to ‘ON’, all others to ‘OFF’. The highest possible DMX address is 511 (all DIP switches to ‘ON’). DIP switch 10 has no function in this mode.
-
Page 29: Technical Specifications
Technical specifications Technical specifications Heater power 615 W Fog output approx. 34 m /min Fog fluid container capacity 1.2 l Warm-up time approx. 1.5 min Operating supply voltage AC 230 V , 50 Hz Fuse 3.15 A / 250 V, slow-blow, 5 mm × 20 mm Dimensions (W ×... -
Page 30: Plug And Connection Assignments
Plug and connection assignments Plug and connection assignments Introduction This chapter will help you select the right cables and plugs to connect your valuable equip‐ ment so that a perfect light experience is guaranteed. Please take our tips, because especially in ‘Sound & Light’ caution is indicated: Even if a plug fits into a socket, the result of an incorrect connection may be a destroyed DMX controller, a short circuit or ‘just’... -
Page 31: Troubleshooting
Troubleshooting Troubleshooting In the following we list a few common problems that may occur during operation. We give you some suggestions for easy troubleshooting: Symptom Remedy The unit does not work Check the mains connection and the main fuse. No haze output 1. -
Page 32: Cleaning
Possible damages caused by unsuitable cleaning agents Cleaners not approved by the manufacturer may permanently damage the unit. Only use the fog machine cleaners listed on www.thomann.de and follow their instructions for use. Clean the appliance after every 30 operating hours, or if it was not in use for a longer period of time. - Page 33 Cleaning As soon as the required operating temperature is reached, the red LED on the rear panel goes out. The device is now operational. Let the device produce haze with maximum output volume for about 20 seconds. Insert the suction hose of the haze machine back into the fog fluid container and let the device again produce haze for about 20 seconds.
-
Page 34: Protecting The Environment
Protecting the environment Protecting the environment Disposal of the packaging mate‐ rial For the transport and protective packaging, environmentally friendly materials have been chosen that can be supplied to normal recycling. Ensure that plastic bags, packaging, etc. are properly disposed of. Do not just dispose of these materials with your normal household waste, but make sure that they are collected for recycling. - Page 36 Musikhaus Thomann e.K. · Treppendorf 30 · 96138 Burgebrach · Germany · www.thomann.de...
Need help?
Do you have a question about the Stairville Hz-200 DMX and is the answer not in the manual?
Questions and answers
The LED in the bottle is flashing red and machine isn’t doing anything… any suggestions?
A flashing red LED on the Thomann Stairville Hz-200 DMX indicates that the device is warming up. Once the required operating temperature is reached, the LED will go out. No action is needed unless the LED keeps flashing indefinitely, in which case checking the power supply and connections may help.
This answer is automatically generated