Table of Contents
Advertisement
Advertisement
Table of Contents

Related Manuals for CEL Robox

Summary of Contents for CEL Robox
- Page 1 Quick Start Guide including AutoMaker ™ Version 1.0 www.cel-robox.com...
-
Page 2: Package Contents
Welcome Package Contents Check your product package for the following items. 2m USB A-B Cable IEC C5 Power Cable Robox® USB Flash Drive Tweezers 10x Bed Wipes Set of 4 Cleanup Tools Axis Lubricant SmartReel™ Safety Guide Warranty Card •... -
Page 3: Unpacking Robox
1. Carefully cut the tape along the top of the box, being careful not to cut too deep, and open the box. 2. Remove the accessories box from the side by pulling on the plastic handle. 3. Lift Robox® from the box using the two handles in the packing trays on either side. www.cel-robox.com... - Page 4 6. Ensure that the head and bed are free to move before proceeding. You can move them both by hand to check. • We recommend that you keep hold of all of your packaging materials, should you need to return any parts to us. www.cel-robox.com...
-
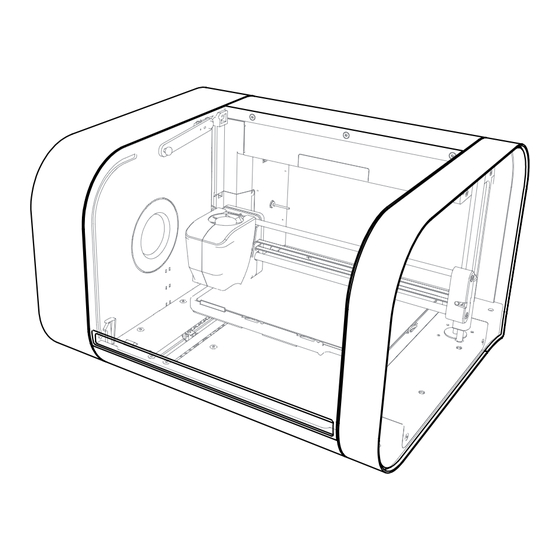
Page 5: Hardware Overview
Hardware Overview At A Glance This section highlights all the major features of Robox®. Print Head X Axis Belt X Carriage Tip Wipe Blade X Axis Rails Reel Hub Cover Print Bed Door Interlock Latch Y Axis Rail Enclosure Door... - Page 6 Robox® SmartReel™ • Although there is a microSD card accessible from the back of Robox®, this cannot be read by any other machine and is only for use as internal flash storage - access is provided only for diagnostic/repair purposes.
-
Page 7: Software Installation
This section explains in detail how to install the AutoMaker™ software package for controlling your Robox®. The included USB card drive contains this software and an electronic version of this document, as well as some sample .stl files for you to print. - Page 8 Shortcuts to the Start Menu or Desktop. Then click Next > and wait as AutoMaker™ is installed to your hard drive. 9. Installation is complete. Tick the checkbox if you would like to read the ‘Readme’ file after clicking Finish. www.cel-robox.com...
-
Page 9: Attaching The Usb Cable
Please complete all sections before continuing. Attaching the USB Cable Robox® comes supplied with a 2 metre USB Type A-Type B cable for connecting to your PC. Please connect as shown. •... -
Page 10: Hardware Setup
Loading Filament This section explains how to load your chosen 3D printing plastic filament into Robox® ready to produce your first print! It is designed to be a very simple process with most functions taking place automatically. Preparing the Filament Before attempting to load filament, it is advisable to cut the end at a shallow angle using a knife or sharp scissors to produce a sharp tip as shown below. - Page 11 Once the filament reaches the extruder, you will hear the motor start; at this point continue to feed in until you feel the filament has been grabbed. Robox® will then automatically feed the material all the way to the head.
-
Page 12: Print Workflow
You can also scale and rotate models by typing values into the input boxes on the left hand side of the screen. www.cel-robox.com... - Page 13 • Layer Height in microns (µm). • Perimeters use - which nozzle is used to print the outside surface • Infills use - which nozzle is used to print the inside fill of the object. www.cel-robox.com...
- Page 14 For more information on all aspects of operation - hardware and software, please refer to the User Manual which you will find pre-loaded onto the enclosed USB drive, or to our website, shown below. Happy Manufacturing! www.cel-robox.com...
- Page 15 Please send all general feedback on Robox® to: feedback@cel-robox.com Distributor Contact Details If you purchased your Robox® from an authorised CEL reseller - please find their contact details below: Please direct all support and sales enquiries here in the first instance.
- Page 16 RBX01-ACC-QSG © 2014 CEL Technology Ltd. All rights reserved.
Need help?
Do you have a question about the Robox and is the answer not in the manual?
Questions and answers