Table of Contents
Advertisement
Available languages
Available languages
Termostato programable
Programmable thermostat
Aparato conforme a las exigencias de las directivas
2004/108/CE (Compatibilidad Electromagnética)
y 2006/95/CE (Seguridad baja tensión).
Device complying with the requirements of directives
89/336/EEC (ElectroMagnetic Compatibility)
and 73/23/EEC modified 93/68/EEC (low voltage safety)
www.elnur.es
elnur@elnur.es
Debido a la evolución de las normas y del material, las características indicadas en el texto
y las imágenes de este documento solamente nos comprometen previa confirmación por nuestros
servicios.
Because of changes in standards and equipment, the characteristics given in the text and
the illustrations of this document are not binding unless confirmed by our services.
Advertisement
Chapters
Table of Contents

Subscribe to Our Youtube Channel
Related Manuals for Gabarron CTP10


Summary of Contents for Gabarron CTP10
-
Page 1: Programmable Thermostat
Termostato programable Programmable thermostat Aparato conforme a las exigencias de las directivas 2004/108/CE (Compatibilidad Electromagnética) y 2006/95/CE (Seguridad baja tensión). Device complying with the requirements of directives 89/336/EEC (ElectroMagnetic Compatibility) and 73/23/EEC modified 93/68/EEC (low voltage safety) www.elnur.es elnur@elnur.es Debido a la evolución de las normas y del material, las características indicadas en el texto y las imágenes de este documento solamente nos comprometen previa confirmación por nuestros servicios. -
Page 2: Table Of Contents
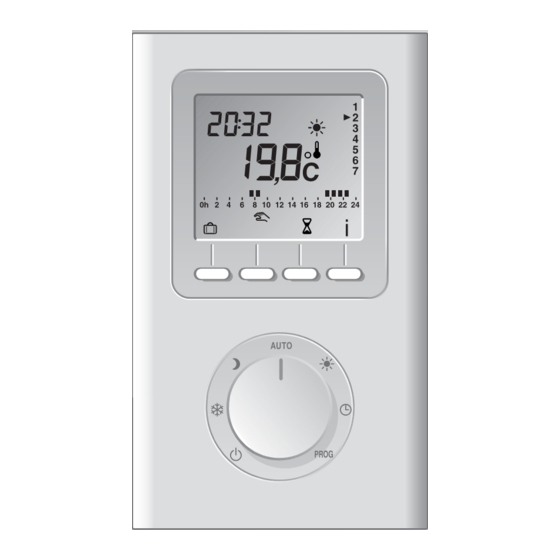
Descripción Índice Testigo de pilas Programa en curso INSTALACIÓN usadas (ej.: confort) Emplazamiento ..... . . pág. 4 Fijación ......pág. 5 Conexión . -
Page 3: Emplazamiento
Emplazamiento Fijación La sonda de medición de la temperatura está en Levante la tapa con la caja, por lo tanto debe colocar la caja de empotrar un destornillador. del termostato en: - una pared accesible, a una altura de 1,50 m, - alejado de fuentes de calor (chimenea, influencia Saque las pilas entregadas con del sol) y de corrientes de aire (ventana, puerta). -
Page 4: Conexión
Conexión Por motivos de claridad, sólo debe tenerse en cuenta el principio de los esquemas. No contienen las protecciones y otros accesorios exigidos por las normas. Se debe respetar la norma UTE C15 y las reglas del oficio. Reemplazar un termostato 2 hilos o conectar Es necesario que los aparatos conectados o cercanos no creen perturbaciones demasiado fuertes (directivas 2004/108/CE). -
Page 5: Puesta En Servicio
Puesta en servicio CF02 - Opción de visualizar la temperatura en modo Posicione el botón en Paro y AUTO pulse 5 segundos la tecla derecha hasta que aparezca H100 vx:xx (menú de mantenimiento reservado al instalador). Visualización permanente Pulse OK. de la temperatura ambiente Temperatura mostrada Visualización permanente de la consigna... -
Page 6: Volver A Los Ajustes Iniciales
CF04 - Antigripado Volver a los ajustes iniciales del circulador Puede realizar un reinicio general para volver a los ajustes de fábrica: - los ajustes instalador (en gris en los menús de puesta en servicio) - la hora y el día, - las temperaturas de consigna, Paso de antigripado - la programación por defecto. -
Page 7: Ajuste Hora
Ajuste hora Programación En la puesta en servicio, el programa “Confort de 6.00 Posicione el botón en Día a 23.00 h” se aplica a todos los días de la semana. Los días parpadean. Horas Para cambiar la programación, Para realizar su elección pulse + posicione el botón en PROG. -
Page 8: Modo Automático
Modo automático Modo ausencia Posicione el botón en AUTO. Este modo permite ajustar Consigna una temperatura (de 5 a 15°C) en curso para un intervalo ajustable de 1 (ej.: confort) Hora a 365 días. Día En modo automático (AUTO), Temperatura Demanda de medida pulse la tecla... -
Page 9: Modo Manual
La duración del modo manual Modo manual Modo manual en curso parpadea. Modo manual ) Hasta el próximo Para ajustar la duración deseada, en curso cambio de programa pulse + ó - (ej.: 1.30 h). Este modo permite pasar del modo Confirme con OK. -
Page 10: Cambiar Las Pilas
Cambiar las pilas Características A partir del momento en que • Alimentación con 2 pilas alcalinas 1,5 tipo LR03 o Testigo de pilas usadas aparece el símbolo de desgaste AAA (suministradas), autonomía superior a 2 años de las pilas, dispone de alrededor con una utilización normal. - Page 11 Description Contents INSTALLATION Battery level Current mode Location ......22 indicator (e.g.
-
Page 12: Location
Location Mountings As the temperature measuring probe is in the unit, you Lift off the cover by using must install the thermostat flush-mounted box: a screwdriver. - on an accessible wall at a height of 1.50 m, - away from heat sources (fireplaces, sunlight) and draughts (windows, doors), Remove the batteries supplied with the unit (using the... -
Page 13: Connection
Connection The diagrams provided are simplified for greater clarity. The protective devices and other accessories required by the standards are not illustrated. Standard UTE C15-100 and good practice must be complied Replace a 2-wire thermostat or connect with.Connected or nearby equipment must not generate excessive interference (directive 89/336/EEC). -
Page 14: Starting Up
Starting up CF02 - AUTO mode temperature display option Turn the knob to Shutdown and press the right-hand button for 5 seconds until H100 vx:xx is displayed (maintenance menu reserved for the installer). Continuous room temperature Press OK. display Temperature displayed Continuous display of the set-point The screen displays CF01. -
Page 15: Return To The Initial Settings
CF04 - Circulator anti-seizing Return to the initial settings You can carry out a general reset to return to the factory settings: - the installer settings (grayed out on the start up menus) - the time and day, - set-point temperatures, No anti-seizing - default program. -
Page 16: Time Setting
Time Setting Programming When starting up, the “Comfort mode from 6am to Turn the knob to 11pm” program is applied to all the days of the week. The days flash. Hours To change the programming, Press + or - to make your turn the knob to PROG. -
Page 17: Automatic Mode
Automatic mode Absence mode Turn the knob to AUTO. This mode is used to set a temperature (5 to 15°C) for Current setting (e.g. comfort) a period that can be set from 1 Time to 365 days. From the automatic mode (AUTO), Measured Heating temperature... -
Page 18: Manual Mode
The manual mode period flashes Manual mode Manual mode is the current mode on and off. Press + or - to set the period Manual mode is ) Up to the next the current mode required (e.g. 1.5 hours). program change Press OK to confirm. -
Page 19: Changing The Batteries
Changing the batteries Characteristics From the moment the battery level • Power supplied by two LR03 or AAA-type 1.5 V Battery level symbol symbol appears, you have around alkaline batteries (supplied), autonomy greater than 3 months to change them 2 years for normal use, (2 LR03 or AAA-type 1.5 V alkaline •... - Page 20 - 38 - - 39 -...
Need help?
Do you have a question about the CTP10 and is the answer not in the manual?
Questions and answers