Table of Contents
Advertisement
Available languages
Available languages
OBJ_DOKU-0000003391-002.fm Page 1 Monday, November 18, 2013 10:44 AM
FEIN Service
USA
Headquarter
FEIN Power Tools Inc.
C. & E. FEIN GmbH
1030 Alcon Street
Hans-Fein-Straße 81
Pittsburgh, PA 15220
D-73529 Schwäbisch Gmünd-Bargau
Telephone: (412) 922-8886
Toll Free: 1-800-441-9878
www.fein.com
www.feinus.com
®
JCM 200 QX
7 270 45
JCM 200 U
7 270 44
JCM 200 auto
7 270 46
JCM 256 U
7 270 47
®
Advertisement
Table of Contents

Related Manuals for Slugger JCM 200 QX


Summary of Contents for Slugger JCM 200 QX
- Page 1 OBJ_DOKU-0000003391-002.fm Page 1 Monday, November 18, 2013 10:44 AM ® ® JCM 200 QX 7 270 45 JCM 200 U 7 270 44 JCM 200 auto 7 270 46 JCM 256 U 7 270 47 FEIN Service Headquarter FEIN Power Tools Inc.
- Page 2 OBJ_BUCH-0000000130-002.book Page 2 Monday, November 18, 2013 10:38 AM Instruction Manual Instrucciones de uso...
-
Page 3: For Your Safety
OBJ_BUCH-0000000130-002.book Page 3 Monday, November 18, 2013 10:38 AM For your safety. Read all safety warnings and b) Avoid body contact with earthed or WARNING all instructions. Failure to fol- grounded surfaces such as pipes, radia- low the warnings and instructions may result tors, ranges and refrigerators. -
Page 4: Special Safety Instructions
Wear hearing protection. The safety Use Slugger Cutting Paste instead. Liquids glasses/goggles must be suitable to protect penetrating your electric power tool may- against the particles emitted from different cause electric shock. - Page 5 OBJ_BUCH-0000000130-002.book Page 5 Monday, November 18, 2013 10:38 AM To prevent injuries, always keep your hands, Do not rivet or screw any name-plates or clothing, etc. away from rotating swarf. The signs onto the power tool. If the insulation is swarf can cause injuries.
-
Page 6: Extension Cable
120 V – single- ductor cross-section must be adequate for the phase a. c., with only JCM 200 QX, JCM 200 U, application in order to prevent a voltage drop JCM 200 auto, JCM 256 U connected: in the extension cord, power loss and over- heating of the power tool. - Page 7 Slugger. Operation of the power tool off power generators. This power tool is also suitable for use Operating the power tool off...
- Page 8 OBJ_BUCH-0000000130-002.book Page 8 Monday, November 18, 2013 10:38 AM Symbol, character Explanation High speed Magnetic holding power, sufficient Magnetic holding power, insufficient Start drill motor. Rotation direction: clockwise Start drill motor in inch mode. Rotation direction: counterclockwise Speed reduction in steps Speed increase in steps Stop motor Switches the magnet On/Off...
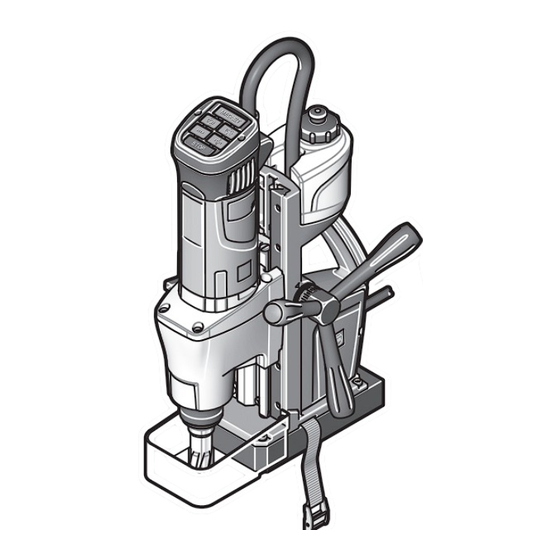
- Page 9 This preventive safety measure rules out the danger of injuries through acciden- tal starting of the power tool. All accessories described or shown in this instruction manual will not be included with your- power tool. JCM 200 QX, JCM 200 U, JCM 256 U Drill-motor cable Viseo Touch Pad Coolant container...
- Page 10 OBJ_BUCH-0000000130-002.book Page 10 Monday, November 18, 2013 10:38 AM JCM 200 auto Drill-motor cable Viseo Touch Pad Coolant container Spoke handle Gear switch Tool holder Magnetic foot Application tool Clamping strap Chip guard Switches the magnet On/Off Starts the drill motor in inch mode Rotation direction: anticlockwise Starts the drill motor Speed reduction in steps...
- Page 11 OBJ_BUCH-0000000130-002.book Page 11 Monday, November 18, 2013 10:38 AM Type JCM 200 QX JCM 200 U JCM 200 auto JCM 256 U Order number 7 270 45 7 270 44 7 270 46 7 270 47 Current consumption 12.5 A 12.5 A...
-
Page 12: Assembly Instructions
This preventive safety measure rules out the danger of injuries through acci- dental starting of the power tool. Mounting the spoke handle (JCM 200 QX, JCM 200 U, JCM 256 U) (figure 4). The hub assembly can be mounted on either side. - Page 13 Filling the mounted coolant container (figure 5) Unscrew the cap from the coolant container. Fill in pump-feedable cooling lubricant, e.g. Slugger cutting oil. Screw the cap onto the coolant container Upper closing cap again. Coolant container Filling the dismounted coolant container...
- Page 14 OBJ_BUCH-0000000130-002.book Page 14 Monday, November 18, 2013 10:38 AM Mounting the coolant hose (figure 7). Connect the coolant hose.
- Page 15 OBJ_BUCH-0000000130-002.book Page 15 Monday, November 18, 2013 10:38 AM Changing the tool (figure 8). Secure the power tool with the WARNING safety strap supplied at all times, especially for work carried out at ele- Clamping sleeve vated heights, when drilling horizontally or above the head.
-
Page 16: Working Instructions
Press the Magnet button to start the machine. – When the green Magnet button on the control panel lights up permanently, the JCM 200 QX, JCM 200 U, JCM 256 U magnetic holding power is sufficient and the power tool can be operated with man- Switches the magnet On/Off ual or automatic feed. - Page 17 OBJ_BUCH-0000000130-002.book Page 17 Monday, November 18, 2013 10:38 AM Adjusting the stroke range (figure 11). Hold the power tool firmly CAUTION with one hand when releasing the two fastening levers. To move the fastening levers over each other, pull a fastening lever outward and then turn the fastening lever in 45°...
- Page 18 For switching off or when working overhead, deactivate the cooling-lubri- cant flow. Shut the ventilation and turn the flow valve to the position shown. When working overhead, use a cooling-lubri- cant paste from Slugger. Cooling- lubricant paste...
- Page 19 27 – 50 mm 21 – 40 mm 16 mm – 23 mm M6 – M16 JCM 200 QX, 1 1/16 in – 2 in 3/16 in – 1 5/8 in 5/8 in – 7/8 in 1/4 in – 5/8 in...
- Page 20 OBJ_BUCH-0000000130-002.book Page 20 Monday, November 18, 2013 10:38 AM Starting and stopping the drill motor Fig.15 (figure 15). To start the drill motor with clockwise rota- tion, press the button with the „ “ symbol. The drill motor starts with the highest speed. The last set speed is automatically stored (Memory Function).
- Page 21 OBJ_BUCH-0000000130-002.book Page 21 Monday, November 18, 2013 10:38 AM Feed (JCM 200 QX, JCM 200 U, Fig.16 JCM 256 U) (figure 16). To generate feed, turn the spoke handle man- ually while the drill motor is switched on. The scale can be used with “inch” or with “cm”...
- Page 22 Do not touch the magnet with your bare hands. For core drilling in layered material, use a suit- able Slugger ID cutter. When changing a cutting tool, pay attention not to damage the cutting edges.
- Page 23 Therefore, regularly blow out the interior Slugger or by an authorized Slugger Service of the power tool from outside via the ventila- Agent, in order to avoid hazardous situations.
-
Page 24: Warranty And Liability
OBJ_BUCH-0000000130-002.book Page 24 Monday, November 18, 2013 10:38 AM Do not attempt to clean Cooling-lubricant system. CAUTION clogged or dirty ventilation Flush the cooling-lubricant system with openings of the power tool with pointed water, clean and drain it completely when not metal objects;... - Page 25 Tool holder JCM 200 U JCM 200 auto JCM 256 U Chip guard JCM 256 U Drift JCM 200 U JCM 200 auto JCM 256 U Chip guard JCM 200 QX JCM 200 U Power tool JCM 200 auto carrying case...
-
Page 26: Para Su Seguridad
OBJ_BUCH-0000000130-002.book Page 26 Monday, November 18, 2013 10:38 AM Para su seguridad. Lea íntegramente estas b) No utilice la herramienta eléctrica en un ADVERTENCIA advertencias de peligro e entorno con peligro de explosión, en el instrucciones. En caso de no atenerse a las que se encuentren combustibles líqui- advertencias de seguridad siguientes, ello dos, gases o material en polvo. - Page 27 OBJ_BUCH-0000000130-002.book Page 27 Monday, November 18, 2013 10:38 AM 3) Seguridad de personas 4) Trato y uso cuidadoso de herramientas a) Esté atento a lo que hace y emplee la eléctricas herramienta eléctrica con prudencia. No a) No sobrecargue el aparato. Use la herra- utilice la herramienta eléctrica si estu- mienta prevista para el trabajo a reali- viese cansado, ni tampoco después de...
-
Page 28: Instrucciones De Seguridad Especiales
OBJ_BUCH-0000000130-002.book Page 28 Monday, November 18, 2013 10:38 AM Instrucciones de seguridad especiales. Utilice un equipo de protección. Dependiendo No intente retirar el útil mientras éste esté del trabajo a realizar use una protección para girando todavía. Podría lesionarse grave- la cara o lentes de protección. - Page 29 Emisión de ruidos (Indicación de dos cifras según ISO 4871) Emisión de ruido JCM 200 QX JCM 200 U JCM 200 auto JCM 256 U Nivel de de presión sonora 20 μPa), medido con filtro A en el puesto de trabajo, en decibelios 82.4...
- Page 30 OBJ_BUCH-0000000130-002.book Page 30 Monday, November 18, 2013 10:38 AM Emisión de ruido JCM 200 QX JCM 200 U JCM 200 auto JCM 256 U Inseguridad , en decibelios pCpeak Promedio de vibraciones (tala- drado con coronas) – m/s < 2.5 <...
- Page 31 OBJ_BUCH-0000000130-002.book Page 31 Monday, November 18, 2013 10:38 AM Simbología. Símbolo Definición Es imprescindible leer los documentos que se adjuntan, como las instruc- ciones de servicio y las instrucciones generales de seguridad. ¡Seguir las instrucciones indicadas al margen! ¡Seguir las instrucciones indicadas al margen! Antes de realizar el paso de trabajo descrito, sacar el enchufe de la red.
- Page 32 OBJ_BUCH-0000000130-002.book Page 32 Monday, November 18, 2013 10:38 AM Símbolo Definición Conexión/desconexión del imán Valor válido para JCM 200 auto en modo de operación manual Símbolo Unidad nacional Definición rpm; /min; min ; r/min Revoluciones en vacío Unidad de medida de la potencia °...
- Page 33 El material de serie suministrado con su herramienta eléctrica puede que no corresponda en su totalidad al material descrito o mostrado en estas instrucciones de servicio. JCM 200 QX, JCM 200 U, JCM 256 U Línea del motor de taladrar Viseo Touch Pad Depósito de...
- Page 34 OBJ_BUCH-0000000130-002.book Page 34 Monday, November 18, 2013 10:38 AM JCM 200 auto Línea del motor de taladrar Viseo Touch Pad Depósito de refrigerante Palanca Selector de velocidad Base magnética Útil Cinta tensora Guarda contra virutas Conexión y desconexión Arranque del motor de taladrar el imán con pulsador.
- Page 35 OBJ_BUCH-0000000130-002.book Page 35 Monday, November 18, 2013 10:38 AM Tipo JCM 200 QX JCM 200 U JCM 200 auto JCM 256 U Nº de referencia 7 270 45 7 270 44 7 270 46 7 270 47 Corriente absorbida 12.5 A 12.5 A...
-
Page 36: Instrucciones De Montaje
Esta medida de seguridad preventiva evita los accidentes que pudieran presentarse en caso de una puesta en marcha involuntaria. Montaje de la palanca (JCM 200 QX, JCM 200 U, JCM 256 U) (Figura 4). Es posible acoplar la palanca al lado que Ud. - Page 37 Desenrosque la tapa de cierre del depósito de refrigerante. Llene líquido lubricante refrigerante apro- piado para ser bombeado, p. ej., aceite de Tapón superior corte Slugger. Vuelva a cerrar el tapón del depósito de refri- gerante. Depósito de refrigerante Llenado del depósito de refrigerante, desmon- tado (Figura 6) Tapón superior...
- Page 38 OBJ_BUCH-0000000130-002.book Page 38 Monday, November 18, 2013 10:38 AM Montaje de la manguera de refrige- rante (Figura 7). Conecte la manguera de refrigerante.
- Page 39 OBJ_BUCH-0000000130-002.book Page 39 Monday, November 18, 2013 10:38 AM Cambio de útil (Figura 8). Si en el trabajo a realizar ADVERTENCIA existiese el peligro de que pueda caerse la herramienta eléctrica, ase- Casquillo tensor gure ésta con la cinta tensora suministrada, especialmente al trabajar a cierta altura, en elementos verticales, o al trabajar por encima de la cabeza.
-
Page 40: Instrucciones Para La Operación
– Si la tecla verde Magnet del panel de JCM 200 QX, JCM 200 U, JCM 256 U mando parpadea, es probable que no sea suficiente la fuerza de sujeción magnética Conexión y desconexión del imán... - Page 41 OBJ_BUCH-0000000130-002.book Page 41 Monday, November 18, 2013 10:38 AM Ajuste del recorrido (Figura 11). Al aflojar ambas palancas de ATENCIÓN sujeción agarre bien con una mano la herramienta eléctrica por el motor de taladrar. Para poder girar las palancas de sujeción de manera que no se crucen, jale hacia afuera la palanca de sujeción y vaya girándola en pasos de 45°.
- Page 42 Cierre el pur- gador y gire la llave de paso a la posi- ción mostrada. Al realizar trabajos por encima de la cabeza emplee pasta refrigerante Slugger. Pasta de refrigeración...
- Page 43 27 – 50 mm 21 – 40 mm 16 mm – 23 mm M6 – M16 JCM 200 QX, 1 1/16 in – 2 in 3/16 in – 1 5/8 in 5/8 in – 7/8 in 1/4 in – 5/8 in...
- Page 44 OBJ_BUCH-0000000130-002.book Page 44 Monday, November 18, 2013 10:38 AM Encendido y apagado del motor de Fig.15 taladrar (Figura 15). Para arrancar el motor de taladrar con giro a derechas, pulse la tecla con el símbolo „ “. El motor de taladrar comienza a funcionar a la velocidad máxima.
- Page 45 OBJ_BUCH-0000000130-002.book Page 45 Monday, November 18, 2013 10:38 AM Avance (JCM 200 QX, JCM 200 U, Fig.16 JCM 256 U) (figura 16). Avance el motor de taladrar conectado girando a mano la palanca. La escala la puede Ud. utilizar con la unidad de medida en “inch”...
- Page 46 No toque el imán directamente con las manos. Al taladrar material compuesto de varias capas utilice una corona perforadora Slugger ID apropiada para ello. Al cambiar la broca no dañe sus filos.
-
Page 47: Reparación Y Servicio Técnico
Deje efectuar el servicio reque- de trabajo de limpieza o de mantenimiento. rido por un servicio técnico Slugger. Si el aire ambiente con- ADVERTENCIA En caso de que se dañe la línea tiene material en polvo ATENCIÓN... -
Page 48: Protección Del Medio Ambiente, Eliminación
OBJ_BUCH-0000000130-002.book Page 48 Monday, November 18, 2013 10:38 AM No intente limpiar las rejillas Circuito de refrigeración. ATENCIÓN de refrigeración de la herra- Enjuague el circuito de refrigeración con agua, mienta eléctrica con objetos metálicos en límpielo, y vacíelo completamente si tiene punta, emplee para ello objetos que no sean previsto no utilizar la máquina durante más de de metal. - Page 49 JCM 200 U JCM 200 auto JCM 256 U Guarda contra virutas JCM 256 U Cuña extractora JCM 200 U JCM 200 auto JCM 256 U Guarda contra virutas JCM 200 QX JCM 200 U Maletín de JCM 200 auto transporte...
Need help?
Do you have a question about the JCM 200 QX and is the answer not in the manual?
Questions and answers