
Related Manuals for Uniden UH5000


Summary of Contents for Uniden UH5000
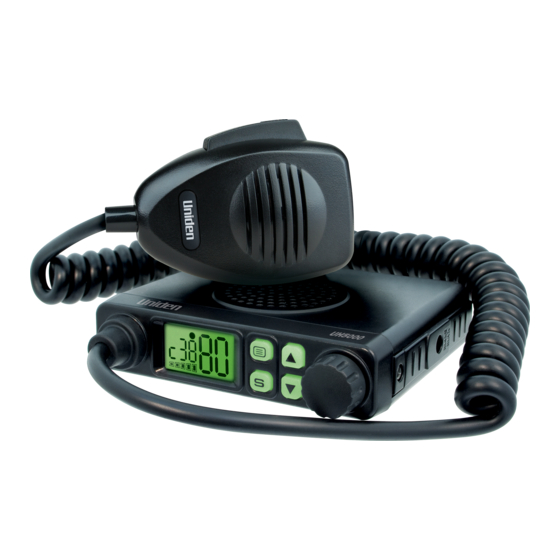
- Page 1 UH5000 Mini Compact UHF CB Transceiver For more exciting new products please visit our website: Australia: www.uniden.com.au...
-
Page 2: Table Of Contents
Contents Introduction Controls & Connectors Indicators Included with your UH5000 Transceiver Connecting the Microphone Mounting the MIC Hanger Operation Turning on the Power Setting the Squelch Level Monitor Selecting a Channel Programming the Instant Priority Channel Recalling the Instant Channel... -
Page 3: Introduction
Introduction The Uniden UH5000 is designed to provide you with years of trouble free service. Its rugged components and materials are capable of withstanding harsh environments. Please read this Operating Manual carefully to ensure you gain the optimum performance of the unit. -
Page 4: Controls & Connectors
Controls & Connectors UNIDEN UH5000 UHF CB Transceiver... - Page 5 RJ45 type plug Channel Scan button Front MIC Jack Cover / Scan Memory (press & hold) Liquid Crystal Display (LCD) MIC - Front Microphone Jack Speaker Power Input Connection (13.8VDC) EXT SP - External Speaker Jack UNIDEN UH5000 UHF CB Transceiver...
-
Page 6: Indicators
- Receive Signal Level (Channel Busy Indicator) - Transmit Signal Power Level - Channel Number / Menu Item Setting - CTCSS/DCS Code number / Menu Item - Scan mode - Channel in Memory - Instant Channel UNIDEN UH5000 UHF CB Transceiver... -
Page 7: Included With Your Uh5000 Transceiver
Included with your UH5000 Transceiver Microphone Owner’s Manual Microphone Hanger with screws, washers Mounting Bracket with DC Power Cord mounting screws with fuse Optional Accessories: • UHF Antenna • External Speaker Visit the UH5000 page on the website for more information on the availability of optional accessories; www.uniden.com.au for Australia UNIDEN UH5000 UHF CB Transceiver... -
Page 8: Connecting The Microphone
Pull back the rubber cover and move it down along the cord. Using the flat blade of a screwdriver or similar object carefully push the lock tab of the MIC plug towards the MIC cord and at the same time tug on the MIC cord to draw back the MIC plug. UNIDEN UH5000 UHF CB Transceiver... -
Page 9: Mounting The Mic Hanger
High quality Double-Sided tape can be found at good retail stores. Secure the front and back pieces of the MIC Hanger using the supplied binding screws. Locate a suitable mounting position. Apply high quality Double-Sided tape onto the flat area of the MIC Hanger back piece and then press firmly to the mounting position. UNIDEN UH5000 UHF CB Transceiver... -
Page 10: Operation
If the input voltage falls below 10VDC, dc Lo flashes for 5 seconds. The power turns off automatically if voltage falls below 8.5VDC. Switch your UH5000 OFF and disconnect it from the power source, before locating the cause of the power supply problem. Setting the Squelch Level Press the Power/Channel Selector momentarily. SqL shows and the current squelch level will flash. - Page 11 If unwanted weak and noisy signals are getting through increase the squelch level (‘Squelch Gate’) to a medium level. Now only medium and strong signals get through. UNIDEN UH5000 UHF CB Transceiver...
-
Page 12: Monitor
NOTE and 35 are reserved for Emergency Calls. Programming the Instant Priority Channel Turn the Channel Selector to select the Priority Channel you prefer. Press and hold [INST] on the microphone for 2 seconds to store the new setting. icon appears. UNIDEN UH5000 UHF CB Transceiver... -
Page 13: Recalling The Instant Channel
If there is a barrier that partially blocks your transmitted signal, the probability of another radio receiving the signal is very slim. Hills, tall buildings, metallic structures,...etc tend to act as a screen between radios. UNIDEN UH5000 UHF CB Transceiver... - Page 14 This operation is called “Duplexing”. For example, CH01 on Duplex Mode will Receive on CH01 but Transmit on CH31 CH02 on Duplex Mode will Receive on CH02 but Transmit on CH32 etc... If you transmit on CH01 Duplex mode, you are actually transmitting on CH31 the repeater station down-converts your signal and retransmits on CH01. UNIDEN UH5000 UHF CB Transceiver...
-
Page 15: Operating The Uhf Cb Radio In Duplex Mode
Check with your local Retailer for information on available repeaters. NOTE Scanning The scan feature allows you to search for active channels automatically. The UH5000 has two types of scanning; Open Scanning (OS) and Group Scanning (GS), to give you flexibility and allow you to use the radio more effectively. 1. Press and Scanning starts. The icon appears. -
Page 16: Open Scan (Os) Mode
To use GS Mode Scanning; 1. Press 3 times. Scn shows and the oS/GS setting flashes. 2. Turn the Channel Selector or press to change the setting to GS. 3. Press to store the setting. 4. Press and hold to save & exit the menu mode. GS Scanning checks the Instant Priority Channel for activity every 1.5 seconds. UNIDEN UH5000 UHF CB Transceiver... -
Page 17: Add/Remove Channels From Scan Memory
1 time. CTCSS/DCS setting appears. 2. Turn the Channel Selector or press to select the desired CTCSS code 01 - 38 or DCS code 01 - 104 (code 100 - 104 is represented by o0 - o4). To turn off CTCSS/DCS select the oF code. 3. Press to store the setting. 4. Press & hold to save & exit menu mode. The CTCSS/DCS code displays for the selected channel. UNIDEN UH5000 UHF CB Transceiver... -
Page 18: Busy Channel Lockout
& exit menu mode. Selecting the Call tone 1. Press 5 times. The call tone setting flashes. 2. Turn the Channel Selector or press to change the setting between 1, 2, 3, 4 and 5. 3. Press to store the setting. 4. Press and hold to exit from the menu mode. UNIDEN UH5000 UHF CB Transceiver... -
Page 19: Roger Beep
1. Press 8 times. The Backlight setting flashes. 2. Turn the Channel Selector or press to change the setting between Blue, Red, Purple(magenta), Green, Cyan, Yellow and Clear (white). 3. Press to store the setting. 4. Press and hold to exit from the menu mode. UNIDEN UH5000 UHF CB Transceiver... -
Page 20: Backlight Brightness
4. Press and hold to save & exit menu mode. LCD Flip 1. Press 10 times. The Flip setting flashes. 2. Turn the Channel Selector or press to change the flip orientation. 3. Press to store the setting. 4. Press and hold to save & exit menu mode. UNIDEN UH5000 UHF CB Transceiver... -
Page 21: Ctcss Codes Table
71.9 141.3 74.4 146.2 77.0 151.4 79.7 156.7 82.5 162.2 85.4 167.9 88.5 173.8 91.5 179.9 94.8 186.2 97.4 192.8 100.0 203.5 103.5 210.7 107.2 218.1 110.9 225.7 114.8 223.6 118.8 241.8 123.0 250.3 127.3 UNIDEN UH5000 UHF CB Transceiver... -
Page 22: Dcs Codes Table
DCS codes table DCS Code DCS Code DCS Code Code No. Code No. Code No. (Octal) (Octal) (Octal) 100 (do0) 101 (do1) 102 (do2) 103 (do3) 104 (do4) UNIDEN UH5000 UHF CB Transceiver... -
Page 23: Uhf Cb Channel Guidelines
ACMA website in Australia and the MED website in New Zealand. Interference / Poor Audio When a new narrowband radio receives a signal from an older wideband radio the speech may sound loud - however the UH5000’s NOTE built-in AVS (Automatic Volume Stabilizer) circuitry will detect and manage incoming audio to comparable levels. -
Page 24: Uhf Cb Channels & Frequencies
477.275 (CH35) 477.025 476.550 477.300 (CH36) 477.050 476.575 477.325 (CH37) 477.075 476.600 477.350 (CH38) 477.100 476.625 477.125 476.650 477.150 476.675 477.175 476.700 477.200 476.725 477.225 476.750 477.250 476.775 477.275 476.800 477.300 476.825 477.325 476.850 477.350 476.875 477.375 476.900 477.400 UNIDEN UH5000 UHF CB Transceiver... - Page 25 477.2875 (CH 75) 477.0375 476.5625 477.3125 (CH 76) 477.0625 476.5875 477.3375 (CH 77) 477.0875 476.6125 477.3625 (CH 78) 477.1125 476.6375 477.1375 476.6625 477.1625 476.6875 477.1875 476.7125 477.2125 476.7375 477.2375 476.7625 477.2625 476.7875 477.2875 476.8125 477.3125 476.8375 477.3375 476.8625 477.3625 476.8875 477.3875 476.9125 477.4125 UNIDEN UH5000 UHF CB Transceiver...
-
Page 26: Warranty
Warranty UNIDEN UH5000 UHF CB Transceiver IMPORTANT: Satisfactory evidence of the original purchase is required for warranty service Please refer to our Uniden website for any details or warranty durations offered in addition to those contained below. Warrantor: The warrantor is Uniden Australia Pty Limited ABN 58 001 865 498 (“Uniden Aust”). - Page 27 Product, together with satisfactory evidence of your original purchase (such as a legible copy of the sales docket) to Uniden. Please refer to the Uniden website for address details. You should contact Uniden regarding any compensation that may be payable for your expenses incurred in making a warranty claim.
- Page 28 THANK YOU FOR BUYING A UNIDEN PRODUCT. © 2015 Uniden Australia Pty Limited. Printed in Vietnam. : U01UT945HZZ(0)
Need help?
Do you have a question about the UH5000 and is the answer not in the manual?
Questions and answers