Table of Contents
Advertisement
Quick Links
Advertisement
Table of Contents

Related Manuals for HP quickdock


Summary of Contents for HP quickdock
- Page 1 HP Notebook QuickDock Maintenance and Service Guide...
- Page 2 Development Company, L.P. The information contained herein is subject to change without notice. The only warranties for HP products and services are set forth in the express warranty statements accompanying such products and services. Nothing herein should be construed as constituting an additional warranty.
- Page 3 Safety warning notice WARNING! To reduce the possibility of heat-related injuries or of overheating the computer, do not place the computer directly on your lap or obstruct the computer air vents. Use the computer only on a hard, flat surface. Do not allow another hard surface, such as an adjoining optional printer, or a soft surface, such as pillows or rugs or clothing, to block airflow.
- Page 4 Safety warning notice...
-
Page 5: Table Of Contents
Rear components ...................... 3 Right-side components ....................4 Left-side components ....................5 Setting up the QuickDock ......................5 Step 1: Connect to AC power ..................5 Step 2: Connect the computer ..................6 Step 3: Prevent the computer from initiating Sleep or Standby ........9 Disconnecting the computer .................. - Page 6 6 Power cord set requirements Requirements for all countries or regions ................... 19 Requirements for specific countries or regions ................20 Index ..........................21...
-
Page 7: Product Description
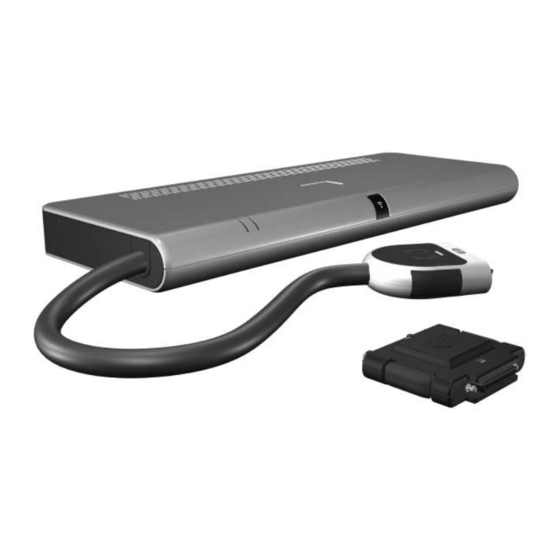
Product description The HP Notebook QuickDock provides an efficient, less-cluttered work environment and improved cable management. The HP Notebook QuickDock is compatible with the following platforms: Compaq Presario CQ45 Notebook PC ● Compaq Presario V3000 Notebook PC ● Compaq Presario V3500 Notebook PC ●... -
Page 8: Features
HP Pavilion tx1000 Entertainment PC ● HP Pavilion tx2000 Entertainment PC ● ● HP Pavilion tx2500 Notebook PC Features External AC adapter (charges docked computer) ● Security slot ● Lights (power connection and docking connection) ● Connectors: ● Expansion cable ◦... -
Page 9: Identifying Components
(purchased separately). External monitor port Connects an optional external VGA monitor or projector. RJ-45 (network) jack Connects a network cable. *There are 2 additional USB ports on the right side of the QuickDock. Identifying components... -
Page 10: Right-Side Components
NOTE: Speakers connected to the QuickDock are muted when a device is connected to the headphone jack on the QuickDock or the computer. Audio-in (microphone) jack Connects an optional computer headset microphone, stereo array microphone, or monaural microphone. -
Page 11: Left-Side Components
Do not disable the power cord grounding pin, for example, by attaching a 2-pin adapter. The grounding pin is an important safety feature. To ensure the correct performance of all QuickDock features, connect the QuickDock to an AC power source using the computer AC adapter and power cord. -
Page 12: Step 2: Connect The Computer
Connect the AC power cord to the AC outlet (3). Step 2: Connect the computer To connect the computer to the QuickDock: Press and hold the buttons on the sides of the expansion cable (1). Chapter 1 Product description... - Page 13 The location of the expansion port on your computer varies by computer series and model. NOTE: The expansion port may also be called expansion port 3 in the computer user guide. If the computer is on, the good dock connection light on the expansion cable turns on. Setting up the QuickDock...
- Page 14 Press the power button on the QuickDock. ● NOTE: The power button on the QuickDock has the same function as the power button on the computer, even if the computer display is closed. The power light on the front of the QuickDock turns on.
-
Page 15: Step 3: Prevent The Computer From Initiating Sleep Or Standby
Click Power Options, and then click the Advanced tab. In the Power Buttons section, click Do nothing from the When I close the lid of my portable computer list, and then click OK. Disconnecting the computer To disconnect the computer from the QuickDock: Setting up the QuickDock... - Page 16 Press and hold the buttons on the sides of the expansion cable (1), and then remove the cable from ▲ the computer (2). NOTE: The location of the expansion port on the computer varies by computer series and model. Chapter 1 Product description...
-
Page 17: Troubleshooting
Connect a standard AC adapter to ● power connector 2 on the QuickDock and to an AC outlet. The ports or jacks on the QuickDock are The QuickDock is not connected to AC Connect a smart AC adapter to ●... -
Page 18: Audio Problems
QuickDock, the microphone jack on the computer is disabled. A connected home entertainment system Audio is not connected properly. Be sure that the QuickDock is properly does not have audio. connected to the home entertainment system. A connected home entertainment system... -
Page 19: Technical Support
For the fastest possible resolution of your problem, have the following information available when you call or e-mail: The computer and QuickDock model types ● Serial numbers for the computer and QuickDock ● Dates the computer and QuickDock were purchased ●... -
Page 20: Illustrated Parts Catalog
This chapter provides an illustrated parts breakdown and a reference for spare part numbers. Serial number location When ordering parts or requesting information, provide the QuickDock serial number and model number located on the bottom of the base plate. QuickDock component... -
Page 21: Specifications
-20°C to 60°C -4°F to 140°F Relative humidity (noncondensing) Operating 10% to 90% Nonoperating 5% to 95%, 38.7°C (101.6°F) maximum wet bulb temperature *Applicable product safety standards specify thermal limits for plastic surfaces. The QuickDock operates well within this range of temperatures. -
Page 22: Connector Pin Assignments
Connector pin assignments Audio-out (headphone) Signal Audio out, left channel Audio out, right channel Ground Audio-in (microphone) Signal Audio signal in Audio signal in Ground Chapter 5 Connector pin assignments... -
Page 23: External Monitor
External monitor Signal Red analog Green analog Blue analog Not connected Ground Ground analog Ground analog Ground analog +5 VDC Ground Monitor detect DDC 2B data Horizontal sync Vertical sync DDC 2B clock External monitor... -
Page 24: Network)
RJ-45 (network) Signal Transmit + Transmit - Receive + Unused Unused Receive - Unused Unused Universal Serial Bus Signal +5 VDC Data - Data + Ground Chapter 5 Connector pin assignments... -
Page 25: Requirements For All Countries Or Regions
Power cord set requirements The wide range input feature of the computer permits it to operate from any line voltage from 100 to 120 volts AC or from 220 to 240 volts AC. The 3-conductor power cord set included with the computer meets the requirements for use in the country or region where the equipment is purchased. -
Page 26: Requirements For Specific Countries Or Regions
Requirements for specific countries or regions Country or region Accredited agency Applicable note number Australia EANSW Austria Belgium CEBC Canada Denmark DEMKO Finland FIMKO France Germany Italy Japan METI South Korea The Netherlands KEMA Norway NEMKO The People's Republic of China Sweden SEMKO Switzerland... -
Page 27: Index
3 location 3 pin assignments 18 button, power 4, 8 headphone (audio-out) jack 4 Help and Support 12 pin assignments HP Notebook QuickDock cable, expansion audio-in 16 components 3 connecting 6 audio-out 16 setting up 5... - Page 28 RJ-45 (network) jack location 3 pin assignments 18 S/PDIF audio jack 3 security cable slot 4 serial number 14 setting up the QuickDock 5 slot, security cable 4 specifications 15 technical support 13 troubleshooting audio problems 12 general use and connection...
Need help?
Do you have a question about the quickdock and is the answer not in the manual?
Questions and answers