Volvo Penta D2-55 Workshop Manual
Hide thumbs
Also See for D2-55:
- Operator's manual (76 pages) ,
- Installation manual (53 pages) ,
- Installation instructions manual (14 pages)
Table of Contents
Advertisement
Quick Links
Advertisement
Table of Contents

Related Manuals for Volvo Penta D2-55


Summary of Contents for Volvo Penta D2-55
- Page 1 Workshop manual Group 20-23, 26, 30 2(0) D2-55, D2-75...
-
Page 3: Table Of Contents
Marine engine D2-55 A/B/C • D2-75 A Contents Valve lifters, inspection ......... 47 Safety Precautions ..........Valves, adjustment ..........49 General information ..........Flywheel, replace ring gear ........49 Special tools ............Crankshaft seal, rear, replace ....... 50 Design and function ..........10 Crankshaft seal, front, replace ...... -
Page 4: Safety Precautions
Check that the warning or information labels on the product are always clearly visible. Replace tions and repair instructions for the Volvo Penta prod- labels which have been damaged or painted over. ucts or product versions noted in the table of con- tents. - Page 5 Safety Precautions Avoid getting oil on your skin! Repeated expo- Never expose a battery to naked flame sure to oil or exposure over a long period can re- or electrical sparks. Never smoke close to the sult in the skin becoming dry. Irritation, dryness batteries.
- Page 6 On a diesel engine, poor quality fuel can Components in the electrical and fuel systems on Volvo Penta products have been designed to cause the control rod to bind and the engine to minimize the risks of explosion and fire. The en-...
-
Page 7: General Information
Spare parts for electrical and fuel systems are subject spare parts, entails that AB Volvo Penta can no to various national safety requirements such as the longer guarantee that the engine conforms to the US Coast Guard Safety Regulations. -
Page 8: Repair Procedures
Warning symbols used in this Service Manual (for full maintained, that systems with adjustment facilities are explanation of the symbols refer to the section; correctly adjusted and that Volvo Penta Original Spares “Safety Precautions” ) are used for the engine. The stated service intervals in WARNING! the Maintenance Schedule must be observed. - Page 9 Strength classes ® workshop manual: Loctite 574, Silicone GE RTV1473W, Permatex ® No. 3, Volvo Penta 1161099- Screws and nuts are sub-divided into different 5, Permatex ® No 77. Old sealant can be removed strength classes. Classification is indicated by using denatured alcohol in all cases.
- Page 10 Repair instructions • Handle the removed seal in the same way as Safety rules for corrosive acid. All residue, including ash, can be Fluorocarbon rubber highly corrosive. Never use compressed air to blow anything clean. Fluorocarbon rubber is a common material in seal •...
-
Page 11: Special Tools
885 498 Pressure foot (used together with valve 384 9641 Assembly tool for oil pump shaft spring compressor 885 023) 998 6485 or 999 2520 Overhaul stand This tool is used with one or more of Volvo Penta’s older products... -
Page 12: Design And Function
Design and function Location of information decals and type plates There are type plates on the engine and transmission, marked with identification numbers. This information must always be used a reference when spare parts are ordered. The appearance and location of the type plates is shown below. -
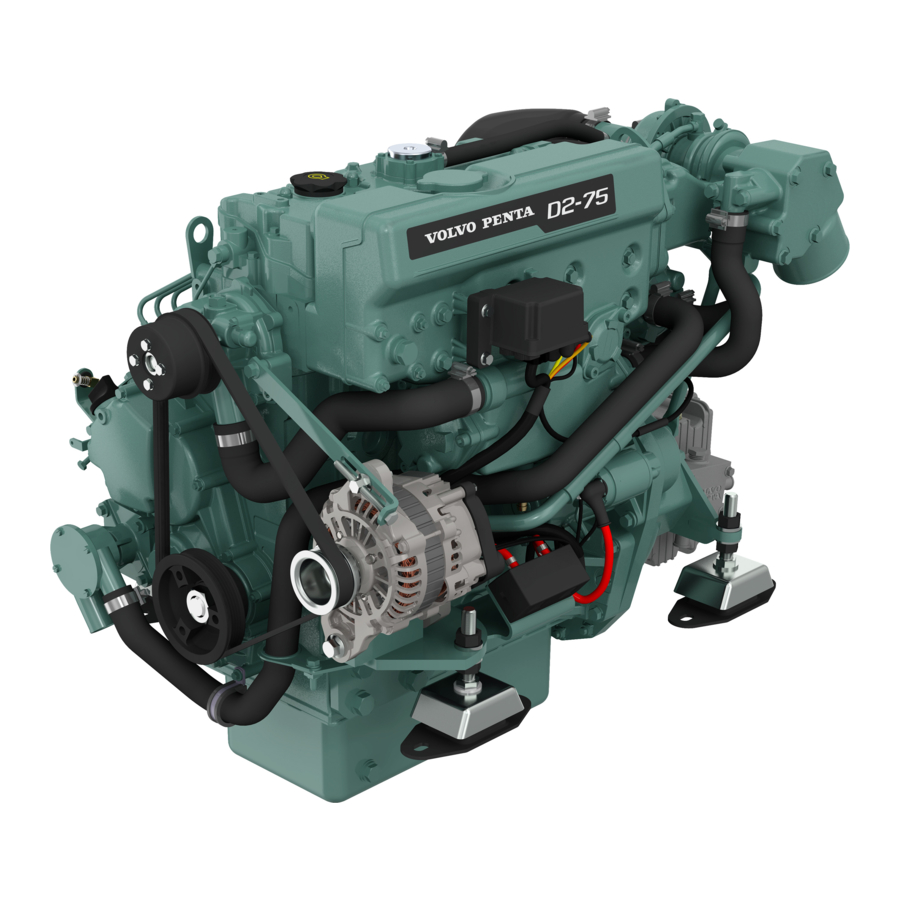
Page 13: Engine Introduction
Design and function Engine introduction D2-55 A/B with reverser MS25L D2-55 A/B with reverser MS25L D2-55 A/B with reverser HS25A D2-55 A/B with reverser HS25A 1. Coolant filling 6. Oil cooler, reversing gear 11. Fuel pump 2. Heat exchanger 7. Oil dipstick, reverser/S-drive 12. - Page 14 Design and function D2-55 A/B with sail-drive MS25S D2-55 A/B with sail-drive MS25S 1. Coolant filling 8. Air filter/Air intake 15. Sea water pump 2. Heat exchanger 9. Oil dipstick, engine 16. Cooling water inlet, S-drive 3. Relay box with fuses 10.
- Page 15 Design and function D2-55 C with sail-drive 130S D2-55 C with sail-drive 130S 1. Coolant filling 8. Air filter/Air intake 15. Sea water pump 2. Heat exchanger 9. Oil dipstick, engine 16. Cooling water inlet, S-drive 3. Relay box with fuses 10.
- Page 16 Design and function D2-75 A with reverser MS25L D2-75 A with reverser MS25L D2-75 A with reverser HS25A D2-75 A with reverser HS25A...
- Page 17 Design and function D2-75 A with sail-drive 150S D2-75 A with sail-drive 150S 1. Coolant filling 9. Oil dipstick, reverser/S-drive 17. Sea water pump 2. Relay box with fuses 10. Air filter/Air intake 18. Cooling water inlet, S-drive 3. Heat exchanger 11.
-
Page 18: Component Description
Cylinder head The cylinder head is made from specially alloyed cast iron. It has replaceable valve seats for inlet and ex- haust valves on D2-55 A/B/C and for exhaust valves on D2-75 A. Engine block The cylinder block is cast in one piece from specially alloyed cast iron. - Page 19 Design and function Camshaft The camshaft is of conventional design with eight lobes that operate the pushrods and valves. Crankshaft The crankshaft is suspended in five main bearings. Axial thrust is taken up by separate thrust washers placed on the rear main bearing. The crankshaft is statically and dynamically balanced, and has induc- tion hardened bearing surfaces.
- Page 20 Design and function Cooling system, general The engine is fresh water cooled with a closed cooling system. The system is divided into two circuits. In the inner circuit, the fresh watersystem, coolant is pumped around by a circulation pump, driven via a belt from the crankshaft pulley.
-
Page 21: Injection Pump
Design and function Fuel system, general The fuel is sucked from the fuel tank by the feed pump, through a water separator/pre-filter (extra equip.) and is pressed through a fine filter to the injec- tion pump. Return fuel from the injectors is fed through return fuel lines, back to the tank. - Page 22 Design and function Feed pump The feed pump is driven by an eccentric on the cam- shaft rear end. The pump on D2-55 A/B is also equipped with a manual hand pump. Injectors The engines is provided with pintle - type injectors.
- Page 23 Design and function Lubrication system, general The engine has a pressurized lubrication system with full-flow oil filter. Oil pump The lubrication pump is located within the idler gear on the timing gears, from where it is also driven. The pump is a rotor pump, with an inner rotor and an outer rotor, eccentrically mounted in relation to each other.
-
Page 24: Crankcase Breather
Design and function Reduction valve The lubricating oil pressure is limited by a reduction valve. The valve is located in the lubricating system just before the oil filter. The valve opens with high pressure and allows the oil to flow back into the sump. Crankcase breather To prevent over-pressure and to separate fuel vapor, water vapor and other gaseous combustion products,... -
Page 25: Repair Instructions
Repair instructions General Actions before lifting the engine from the boat A condition test should be done before each major service activity, if possible, to determine the general 1 Lift the boat ashore. condition of the engine and discovery any concurrent 2 Disconnect battery power, remove battery con- fault causes. -
Page 26: Engine Fixture, Fixing
Repair instructions Engine fixture, fixing Special tools: 885 485, 998 6485 or 856 927 Use fixture 885 485 to attach the engine to overhaul stand 998 6485 or 856 927. The fixture is attached to the right side of the engine as illustrated below. -
Page 27: Group 21 Short Block
Group 21 Short block Short block, disassembly Special tools: 885 510, 885820, 885822 Empty the oil and water from the engine. Lift the engine with a suitable lifting device. Installing the engine fixture, please refer to “Engine fixture, fixing”. 1. Remove the exhaust bend (1). 2. - Page 28 Group 21 Short block 8. Remove (13) oil pressure monitor and oil pressure pipe (12) to the cylinder head. 9. Remove the fuel lines (14) between the injection pump, fuel filter and feed pump. WARNING! Observe the greatest possible cleanliness in work on the fuel system. Watch out for fuel spillage, diesel oil is hazardous on repeated skin contact.
- Page 29 Group 21 Short block 14. Remove the rocker cover, power rail and glow plugs. 15. Remove the lower part of the rocker cover with in- tegrated rocker arm bridge. Start by unscrewing the two M6 screws at the outer edge, then loosen the rocker arm bridge nuts half a turn at a time, until the rocker arms are no longer under load.
- Page 30 Group 21 Short block 24. Remove the idler lock ring. Save the sleeve wash- er, spring and shims. Lift away the idler gear complete with cover and oil pump. Note the thrust washer behind the oil pump. 25. Remove the camshaft and gear. Remove the screws from the locking plate, the screws are ac- cessible through a hole in the camshaft gear.
-
Page 31: Inspecting The Engine Block
Group 21 Short block 29. Remove the oil pressure valve to allow removal of the crankshaft and simplify flushing of the oil channels. IMPORTANT! Check that the oil pressure valve on the right side of the block is removed before removing the crankshaft. -
Page 32: Cylinder Head, Overhaul
Group 21 Short block Cylinder head, overhaul 885 498 885 023 Disassembling cylinder head Special tools: 885 023, 885 498 1. Remove the valves (1) and valve springs (3). Compress the springs with compressor 885 023 together with pressure foot 885 498 and remove the valve cotters (5). -
Page 33: Valve Seat, Replace
Group 21 Short block Changing the valve seats NOTE! On D2-75 only the inlet valve seat can be changed. On D2-55 both the inlet and exhaust valve seats can be changed. The valve seat should be changed when the distance “A”... -
Page 34: Valve Guides, Check
Group 21 Short block 4. Grind the valves in a valve grinding machine. Grind the sealing surface as little as possible, just enough to “clean” it up. If the edge of the valve head (B) after grinding is less than 0.5 mm, the valve must be scrapped. -
Page 35: Rocker Arm Mechanism, Overhaul
Group 21 Short block Overhauling the rocker arm mechanism Special tools: 999 6400 1. Remove the screw from the front edge of the rocker arm shaft. Screw an M8 bolt into the rocker arm shaft. Grab the bolt with i.e. a pair of pliers and pull the rocker arm shaft out. -
Page 36: Crankshaft, Inspection
Group 21 Short block Inspecting the crankshaft Clean the crankshaft carefully in all channels after dis- assembly and inspect thoroughly to determine if over- haul is really necessary. 1. Check wear and ovality with a micrometer. Mea- sure the diameters “A-A” and “B-B” at points “1” and “2”. -
Page 37: Crankshaft Bush, Front, Inspection
Group 21 Short block Inspection of front crankshaft bush Check the bearing play between the crankshaft journal and the bush. Use both internal and external microme- ters. 1. Measure the bushes inner diameter at points 1 and 2. Measure in two directions (“A” and “B”) at each point. -
Page 38: Crank Bearing Play, Check
Group 21 Short block Checking the big end bearing clearance Special tools: 856 927 The big-end bearing radial play can be checked by us- ing plastigauge 856 927 as follows: 1. Wipe off any oil from the big end bearing and big end journal. -
Page 39: Piston Rings, Inspection And Adjustment
Group 21 Short block Piston ring inspection and adjustment 1. Remove the piston rings with piston ring pliers. 2. Remove the gudgeon pin circlips and remove the gudgeon pin carefully, with a suitable mandrel. 3. Check that the rings do not bind in the ring grooves. -
Page 40: Con Rods, Inspection
Group 21 Short block Inspecting the con rod 1. Check the con rods for cracking, straightness and twist before considering changing the gudgeon pin bush. Discard the connecting rod if it is cracked, bent or twisted. Check the wear of the little end with a gudgeon pin. -
Page 41: Piston, Piston Rings And Con Rods, Installation
Group 21 Short block Assembling the piston, piston rings and con rod 1. Install one of the circlips in the piston. 2. Oil the gudgeon pin and con rod bush. 3. Heat the piston to approx. 100 C. Place the piston and con rod so that the marks align. -
Page 42: Camshaft, Measurement
Group 21 Short block Measuring the camshaft Cam height (inlet and exhaust), “A” 33.7 mm Cam height “B” (for injection pump) 41.8 mm Cam height “C” (for feed pump) 30.0 mm Change the camshaft if the wear limits have been ex- ceeded. -
Page 43: Piston, Installation In Cylinder
Group 21 Short block 4. Place the thrust washers in the rearmost bearing cap (flywheel side) with the oil groove towards the crankshaft. Torque the bearing caps, please refer to the “Technical Data” chapter for tightening torque. 5. Carefully lift the crankshaft into position in the cyl- inder block. -
Page 44: Camshaft, Installation
Group 21 Short block 3. Check that the markings on the piston crown or inside the piston line up with those on the con rod. Use a piston ring compressor and install the pis- ton with con rod in its cylinder, starting with cylin- der no. - Page 45 Group 21 Short block Mounting and installation Gears that are of importance in the timing gear as- sembly are marked as follows: Crankshaft gear (1) and idler gear (2) are marked with a punch mark. The idler gear (2) and camshaft gear (3) with a punched line in front of a tooth and tooth groove re- spectively.
-
Page 46: Cylinder Head, Installation
Group 21 Short block 7. Place a new gasket on the timing gear cover. NOTE! If the gasket contains a center part, this must be cut away. Install the timing gear cover with the new gasket. Check that the start spring is in position in the timing gear cover and is connected to the regula- tor arm (link arm). - Page 47 Group 21 Short block 4. Dip them completely (even bolt heads) in rust pre- ventative 116 1346 and let them run off on a net. The bolts should have stopped dripping when they are installed (otherwise oil cold may well up and be regarded as leakage).
- Page 48 27. Fill with oil, refer to “Technical data”. Fill with cool- ant, refer to “Technical data”. 28. Connect the battery cables. Open the fuel taps and the sea cock. Start the engine and check carefully that no leakage occurs. D2-55 C & D2-75...
-
Page 49: Valve Lifters, Inspection
Group 21 Short block Camshafts and valve lifters, inspection Check, using a steel ruler (1), that valve lifter contact surface facing the camshaft is convex or flat. If the surface is concave, change the valve lifter. If the valve lifter is worn all across the lifting surface, the valve lifter should be scrapped. - Page 50 Group 21 Short block Acceptable wear. The camshaft does not need to be changed. Unacceptable wear. NOTE! Camshaft with associated rocker arms must be replaced.
-
Page 51: Valves, Adjustment
Group 21 Short block Adjusting valves NOTE! The clearances shall never be checked while the engine is running, but on a stationary cold engine. Valve clearances: Inlet and exhaust: 0.2 mm. 1. Remove the valve cover. 2. Turn the engine in normal direction of rotation until no.1 piston is at TDC after the compression stroke. -
Page 52: Crankshaft Seal, Rear, Replace
Group 21 Short block Replacement of rear crankshaft seal The seal consists of a rubber ring and is accessible once the plate behind the flywheel housing and the elastic coupling, flywheel* and flywheel housing have been removed. *Note. Mark the flywheel position on the crankshaft (simplifies installation). -
Page 53: Group 22 Lubrication System
Group 22 Lubrication system Repair Instructions Checking lubrication oil pressure The lubrication oil pressure can be checked by con- necting a manometer with a hose to the connection for the oil pressure switch (thread size in cylinder block = 1/8"). For the correct pressure at operating speed and temperature, refer to “Technical data”. - Page 54 Group 21 Short block 3. Remove the idler lock ring. Save the sleeve wash- er, spring and shims. Lift away the idler gear complete with cover and oil pump. Note the thrust washer behind the oil pump. Inspection of oil pump 1.
- Page 55 Group 21 Short block Installing the oil pump Gears that are of importance in the timing gear as- sembly are marked as follows: Crankshaft gear (1) and idler gear (2) are marked with a punch mark. The idler gear (2) and camshaft gear (3) with a punched line in front of a tooth and tooth groove re- spectively.
-
Page 56: Oil Channels
Group 21 Short block 6. Install a new gasket on the timing cover. NOTE! If the gasket contains a center part, this must be cut away. Install the timing gear cover with the new gasket. Check that the start spring is in position in the timing gear cover and is connected to the regula- tor arm (link arm). -
Page 57: Oil Pump Bearing, Overhaul
Oil pump bearing, overhaul Special tools: 384 9641 In order to remove the oil pump, the timing gear and crankshaft must be removed. 1. Drive out the oil pump bearing section (1) located in the engine block. Tap it out from inside the crankcase. -
Page 58: Group 23 Fuel System
Group 23 Fuel system Repair Instructions Observe the greatest possible cleanliness in work on the fuel system. Injection pump Removing the injection pump NOTE! Repair work that requires work on the injection pump and which can change it’s settings shall only be performed by a specially trained mechanic who has the necessary equipment at his/her disposal. -
Page 59: Setting Injection Timing
Group 23 Fuel system Installing the injection pump Check that the pump is free from faults and if neces- sary has been tested and approved before installation. Do not remove the protective plugs before the pipes are to be connected. 1. - Page 60 Group 23 Fuel system 4. Connect a fuel container with stopcock to the inlet of the injection pump. It should hold about 0.7 li- ter. Use the hose between the fuel filter and the injection pump to connect the fuel container. If ev- erything is correctly arranged, fuel should start to run out of the drop pipe.
-
Page 61: Setting The Engine Speed
Group 23 Fuel system Setting the engine speed Check that the accelerator control functions normally, i.e. the actuator arm (1) is pressed against the low idle stop (2) when the accelerator control is at idle, and is pressed against the full throttle screw (3) when the ac- celerator control is at full throttle. -
Page 62: Feed Pump
Group 23 Fuel system Feed pump Removal of the feed pump 1. Clean around the pump. 2. Close the fuel taps. Loosen the fuel connections from the pump. 3. Remove the feed pump from the cylinder block. Empty the pump from fuel. Disassembly and inspection of the feed pump 1. -
Page 63: Venting The Fuel System
“Technical Data” chapter. The glow plugs are activated at the same time as the starter motor. You can save the batteries if the starter motor is only used for short periods when priming. D2-55 A, B... - Page 64 Tighten the pressure pipe nuts. Tightening torque, D2-55 C, D2-75 A please refer to the “Technical Data” chapter. The glow plugs are activated at the same time as the starter motor.
-
Page 65: Fuel Filter, Replace
Group 23 Fuel system Fuel filter, replace Clean the filter bracket. To prevent fuel spill, a plastic bag can be pulled over the filter. Unscrew the filter. Wipe a film of oil on the gasket of the new filter. Screw the filter on by hand until it touches the contact surface. -
Page 66: Injectors
Group 23 Fuel system Injectors Changing the injectors 1. Wash around the injectors. 2. Undo the delivery pipes at the injection pump and at the injectors. Lift the fuel delivery pipes away together. 3. Undo the nut at the top of each injector, use the nuts beneath the return fuel line as a counterhold so that the pipes are not bent. -
Page 67: Checking Injectors
Group 23 Fuel system Opening pressure With the pressure gauge connected, press the injector tester lever down slowly until the injector opens and releases fuel. Read off the opening pressure at the opening instant. If the value read does not coincide with the specified value, the setting must be changed. - Page 68 Group 23 Fuel system Overhauling injectors 1. Clean the injector externally. 2. Fix the injector (holder) in a vise. Unscrew the in- jector nut and disassemble the injector. Note. Be careful that the injector nozzle does not fall out during disassembly. 3.
-
Page 69: Group 26 Cooling System
“Volvo Penta Coolant, Ready Mixed” is a ready- mixed coolant, 40 % “Volvo Penta Coolant” and 60 % water. This concentration protects the engine against corrosion, cavitation damage and freezing conditions... -
Page 70: Coolant
-28 °C. (Using 60 % glycol lowers the freezing point to -54 °C.) Never mix more than 60 % concentrate (Volvo Penta Coolant) in the cooling liquid, since this would give reduced cool- ing effect and increase the risk of overheating and frost damage. -
Page 71: Draining Coolant
Group 26 Cooling system Draining coolant Stop the engine before draining the cooling system. Freshwater system WARNING! Do not open the filler cap when the engine is hot, except in emergencies. Steam or hot fluid may spray out 1. Place a suitable collection vessel beneath the en- gine block drain plug (1) and at the heat exchang- er drain tap. -
Page 72: Checking The Coolant Level
Group 26 Cooling system Checking the coolant level WARNING! Do not open the filler cap when the engine is hot, except in emergencies. Steam or hot fluid may spray out. Turn the filler cap to the first stop and allow any ex- M I N cess pressure to hiss out before removing the cap completely. -
Page 73: Cleaning Heat Exchanger
Group 26 Cooling system Coolant losses There are two types of coolant losses: • Coolant losses during operation. • Coolant losses after stopping a hot engine. Coolant losses during operation can be due to a leak- ing cooling system or air or combustion gases being forced into the cooling system. -
Page 74: Circulation Pump
Group 26 Cooling system 5. Install the insert in the heat exchanger. NOTE! Be careful to install the insert in the correct position. Make sure the hole in the insert aligns with the hole in the housing and that the venting hole is upwards. -
Page 75: Sea Water Pump
Check that the thermostat has opened at least 8 mm after 3-5 minutes. Replace the thermostat if it does not fulfill the requirements. NOTE! If the thermostat does not close completely, the engine will run too cold. D2-55 C & D2-75... -
Page 76: Group 30 Electrical System
Group 30 Electrical system General The engine is fitted with an AC alternator. The system voltage is 12V and the electrical system is single-pole. The electrical system can include, as extra equip- ment, sensors for monitoring the engine’s coolant temperature and oil pressure. The electrical system is shown in two ways. - Page 77 When delivered from Volvo Penta, the sensor system is not activated. The connection has probably been done during engine installation, however.
-
Page 78: The Electrical System
The charging circuits must never be re-connected with the engine running, for the same reason. For simulta- neous charging of two independent battery circuits, a Volvo Penta charge splitter can be fitted to the stan- dard alternator (accessory). Batteries Never mix up the battery’s positive and negative ter- minals when fitting batteries. -
Page 79: Galvanic Corrosion
Group 30 Electrical system Electrical wiring Never make holes in the cables insulation to perform measurements with needles. In a corrosive atmo- sphere such as a boat, it only takes 2 years for a small cable with a needle hole to oxidize off. If it is absolutely necessary to make a hole in the in- sulation, this must be repaired in a suitable way after testing. -
Page 80: Fault Tracing, Glow Plugs, Charging System
Group 30 Electrical system Repair Instructions Fault finding glow plugs Special tools: 9812519 1. Remove both battery cables. 2. Remove the power rail between the glow plugs. 3. Measure the resistance of each glow plug to the engine block with an ohmmeter. The resistance shall be 1.6 ±... - Page 81 Group 30 Electrical system WARNING! Be extremely careful so that the measurement cables, clothes or similar come into contact with the drive beltor pulleys on the engine or alternator when the engine is running. Check the tension of the alternator belt and the belt condition.
- Page 82 Group 30 Electrical system Checking charge status Check the charge status with an acid densitometer. Measure the acid density of all cells at +25 C. Mea- surement shall not be done immediately after charging or filling with battery water. The acid density of a fully charged battery at +25 shall be 1.28 g/cm .
- Page 83 Group 30 Electrical system Checking the battery leads Set the multimeter to voltage test and connect the multimeter between the battery’s positive and nega- tive poles. Run the engine at 2000 r.p.m. Read off and note the voltage across the poles. The alternator delivers approx.14.0 V: Perform the test as follows: 1.
-
Page 84: Alternator
Group 30 Electrical system Checking negative (-) battery lead 1. Connect the multimeter between the alternator connections B- and battery negative pole (-). 2. Run the engine at 2000 r.p.m. The voltage drop shall not exceed 0.2 V. If the voltage drop ex- ceeds this, the battery lead/connection must be remedied according to “Actions”. - Page 85 Group 30 Electrical system Replacing alternator brushes Unscrew the voltage regulator. Unscrew the brush holder. Check the length of the brushes. Replace the brushes if they are 5 mm or shorter. The brush and holder are replaced as a unit. Unsolder the connection cables and solder on the new with acid-free solder.
- Page 86 Group 30 Electrical system Checking the rotor winding Once the regulator and brushes have been removed, it is possible to measure the resistance of the rotor windings. Set the measurement instrument to position Ω. Make sure the probes have good contact with the slip rings. The rotor resistance should be 3.0-5.0 Ω.
- Page 87 Group 30 Electrical system Checking B- diodes 1. Connect the instruments positive probe to the di- ode plate B- connection and the instruments neg- ative probe to one of the stator windings connec- tions (1-2-3). 2. Read off the instrument as previously. A normal value should be between 450 and 650 mV.
-
Page 88: Starter Motor
Group 30 Electrical system Checking the stator windings Once the diode bridge is removed, the stator windings can be measured by setting the multimeter to “buzzer position”. Measure the resistance of each winding. NOTE! First check the internal resistance of the mea- surement wires. - Page 89 Group 30 Electrical system Disassembling the starter motor 1. Clean the starter motor externally. 2. Remove the solenoid. 3. Remove the protective cover from the rear bearing casing. Remove the locking ring and where fitted, the shim(s). 4. Remove the rear bearing casing. 5.
- Page 90 Group 30 Electrical system Inspecting the starter motor Fault tracing the starter motor should be left to an au- thorized electrical workshop which has the necessary test equipment. 1. Test the rotor with regard to winding breakdown and open circuits with the appropriate test equip- ment.
-
Page 91: Electrical Components
Group 30 Electrical system Electrical components Relay box with fuses The engine is equipped with a fuse block with four fus- es (15A). One fuse safeguards the electrical system and blows if overloaded, the others are spares. If a fuse blows, the electrical system can be recon- nected by moving the cable to the next fuse/connec- tor. -
Page 92: Coolant Temperature Sensor
Group 30 Electrical system Sensor Note. Sensors are only supplied together with the “De Luxe” instrument panel. Lubrication oil pressure sensor Resistance checking, measured with falling pressure and instrument connected. Measured with ohmmeter class 1 at + 20 Pressure 10 + 3 /-5 Ω 0 bar: 52 ±... - Page 93 12. Glowplug relay White 13. Magnetisation resistance Yellow 14. Engine speed sensor Cable cross section in mm is given after the color code on the wiring diagram. Cross section not given = 1.0 mm Dotted wires not included from Volvo Penta.
-
Page 94: Wiring Diagrams
Group 30 Electrical system Instrument panel, alternative “A” * * (without starter switch) Cable colors 1. Instrument illumination 2. Tachometere with built-in running hours timer (extra equip.). Blue Or blanking plug Brown 3. Connector for connecting extra warning display Green (optional equipment) Gray 4. - Page 95 Group 30 Electrical system Instrument panel, alternative “B” * * (with starter switch) Spring biased 1. Instrument illumination 2. Tachometere with built-in running hours timer (extra equip.). Or blanking plug 3. Connector for connecting extra warning display (optional equipment) 4. Electronic unit (alarm) Spring biased 5.
- Page 96 Group 30 Electrical system Instrument panel, alternative “C” Spring biased 1. Instrument lighting 2. Voltmeter 3. Oil pressure gauge 4. Coolant temperature gauge Spring biased 5. Connector for connection of extra warning display (extra equip.) 6. Electronic unit (alarm) 7. Warning lamp, coolant temperature 8.
-
Page 97: Piston Rings
47.66-47.74 mm Piston clearance ............0.038-0.072 mm 0.038-0.072 mm Front marking ..............“SHIBAURA”-mark inside piston shall when mounted face the fuel pump (D2-55 A/B/C & D2-75). Piston rings Compression rings: Quantity ................ Upper compression ring, height ........1.97-1.99 mm 1.97-1.99 mm 2nd compression ring, height ........ -
Page 98: Group 20 Technical Data
Group 20 Technical data D2-55 A/B/C D2-75 A Cylinder head Height ................69.7-70.3 mm 69.7-70.3 mm Valve seat (inlet and exhaust) Inlet, diameter ............... 36.35-36.45 mm 36.35-36.45 mm Exhaust, diameter ............32.35-32.45 mm 32.35-32.45 mm Inlet, width ..............1.5-2.0 mm 1.5-2.0 mm... -
Page 99: Valve Springs
Group 20 Technical data D2-55 A/B/C D2-75 A Camshaft Drive ................Gear wheel Gear wheel No of bearings ............... Valve timing: inlet valves opens b.t.d.c... closes a.b.d.c..exhaust valves opens b.b.d.c..closes a.t.d.c..Valves Inlet Valve stem diameter ............. -
Page 100: Fuel System
Group 20 Technical data D2-55 A/B/C D2-75 A Fuel system Injection sequence ............1-3-4-2 1-3-4-2 Feed pump max. suction height ........0.8 m 0.8 m Feed pressure ............... 15-25 kPa 15-25 kPa Injection pump Injection start, crankshaft position ........ 22.0 ±... -
Page 101: Wear Tolerances
Group 20 Technical data Wear tolerances D2-55 A/B/C D2-75 A General Compression pressure at starter motor speed (min. 200 rpm) ........... min. 25 Bar min. 25 Bar Pistons Piston clearance ............max. 0.25 mm max. 0.25 mm Piston rings Piston ring clearance in groove: Compression rings ............ -
Page 102: Tightening Torque
Group 20 Technical data Tightening torque in Nm Cylinder head* ............100 Main bearings: upper to lower bearing caps ........52 main bearing caps to cylinder block (hex bolts) ..52 rear cap (Allen bolt) ............ 27 Big end bearings ............52 End plate/flywheel housing ......... - Page 103 References to Service Bulletins Group Date Refers to ......................................................................................................................................................................................................................................................................................................................................................................................................................................................................................................................................................................................................................................................................................................................................................................................................................................................................................................................................................................................................................................................................................................................................................................................................................................................................
- Page 104 Notes ..........................................................................................................................................................................................................................................................................................................................................................................................................................................................................................................................................................................................................................................................................................................................................................................................................................................................................................................................................................................................................................................................................................................................................................................................................................................................................................................
- Page 105 Notes ..........................................................................................................................................................................................................................................................................................................................................................................................................................................................................................................................................................................................................................................................................................................................................................................................................................................................................................................................................................................................................................................................................................................................................................................................................................................................................................................
- Page 106 Notes ..........................................................................................................................................................................................................................................................................................................................................................................................................................................................................................................................................................................................................................................................................................................................................................................................................................................................................................................................................................................................................................................................................................................................................................................................................................................................................................................
- Page 107 From: ....................................................................Refers to publication: ............................. Publication no: ............... Date of issue: ..............Suggestion/Motivation: ..................................................................................................................................................................................................................................................................................................................Date: ..............Name: .............. AB Volvo Penta Technical Information Dept. 42200 SE-405 08 Göteborg Sweden...
Need help?
Do you have a question about the D2-55 and is the answer not in the manual?
Questions and answers
hi good morning do you have vidio for this how to ren=move the injection pump