Table of Contents
Advertisement
Quick Links
Advertisement
Table of Contents

Related Manuals for Best 6K Series


Summary of Contents for Best 6K Series
- Page 2 Printed in the United States of America. Information in this document is subject to change without notice and does not represent a commitment on the part of Best Access Systems. The software described in this document are furnished under a license agreement or nondisclosure agreement.
-
Page 3: Table Of Contents
2–9 L function—privacy lock (ANSI F76) 2–10 LL function—hospital privacy 2–11 N function—passage lock (ANSI F75) 2–12 P function—patio lock (ANSI F77) 2–13 R function—classroom lock (ANSI F84) 2–14 Y function—exit lock 2–15 Function conversion 2–16 6K Series Service Manual... - Page 4 Replacing the inside rose and rose liner 3–7 Replacing the outside rose and liner assembly 3–8 Replacing the lock chassis assembly 3–9 Lubricating the core 3–10 Aligning the chassis and trim 3–11 Troubleshooting 3–12 A–1 NSTALLATION NSTRUCTIONS B–1 NDEX 6K Series Service Manual...
- Page 5 2–19 Throw member and spacer 2–19 Dummy trim parts 2–20 Latches 2–21 Latch tube sleeve 2–21 Installation tools 2–22 Boring jig kit 2–23 ERVICE AND AINTENANCE Removing and reinstalling the core 3–2 Removing the knob 3–3 6K Series Service Manual...
- Page 6 Reinstalling the inside rose and rose liner 3–8 Removing the outside rose and liner assembly 3–8 Reinstalling the outside rose and liner assembly 3–9 Engaging the retractor in the latch 3–10 Engaging the retractor in the latch 3–11 6K Series Service Manual...
-
Page 7: Getting Started
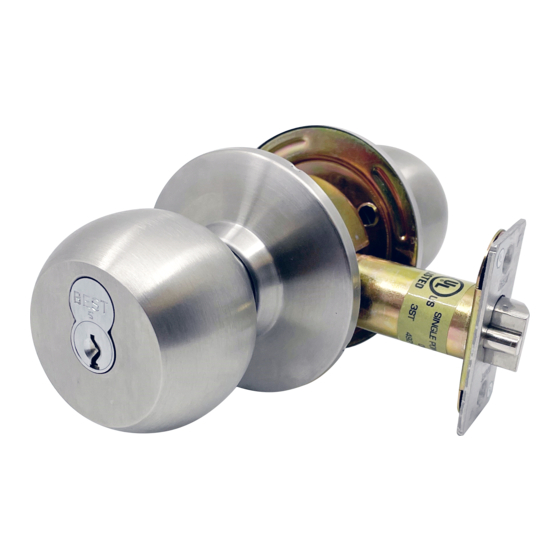
ETTING TARTED NTRODUCTION The 6K Series Service Manual contains essential information to help you maintain your 6K Series Lock. ERTIFICATIONS AND STANDARDS The locks comply with ANSI A156.2, Series 4000 Grade 2 standards. The locks are listed by Underwriter’s Laboratories for use on 3 Hr., A label single swinging doors... -
Page 8: Technical Support
65K, 85K & 95K Locks with Large (S3) Strike ECHNICAL SUPPORT Support When you have a question about the 6K Series Lock, your first resource services for help is the 6K Series Service Manual. If you cannot find a satisfactory answer, contact your local BEST Representative. - Page 9 UNCTIONS AND ARTS ISTS The following pages contain function descriptions for all 6K Series Locks. This chapter also includes exploded diagrams that show all field serviceable mechanical parts, diagrams of trim and other miscellaneous parts, and function conversion information. 6K Series Service Manual...
-
Page 10: Functions And Parts Lists
Inside knob is always unlocked 2–2 6K Series Service Manual... -
Page 11: Functions And Parts Lists
Outside knob unlocked by: inside knob inside slotted button when rotated counterclockwise outside key closing the door when the inside button is pushed in but not rotated Inside knob is always unlocked 6K Series Service Manual 2–3... -
Page 12: Non-Keyed Functions
Outside knob locked by: inside button Outside knob unlocked by: inside knob closing the door Inside knob is always unlocked 1DT–Single dummy trim This lock is a single, surface-mounted knob for an inactive door or a non-latching door. 2–4 6K Series Service Manual... -
Page 13: Special Functions
Outside knob unlocked by: outside button when inside knob pushed in and rotated counterclockwise outside key Inside knob is always closing the door unlocked Inside knob is always unlocked Functions ANSI No. Function by ANSI designation F109 6K Series Service Manual 2–5... -
Page 14: Exploded Diagrams And Parts Lists
XPLODED DIAGRAMS AND PARTS LISTS — (ANSI F109) FUNCTION ENTRANCE LOCK Item Part No. Qty. Description (see page 2–19) Button knob A80050 Turn button assembly (see page 2–18) Rose A80041 Chassis screw (see page 2–18) Rose liner B80048 Bearing † B80105 AB function chassis (see page... -
Page 15: B Function Exploded Diagram
— (ANSI F82) FUNCTION ENTRANCE LOCK Item Part No. Qty. Description (see page 2–19) Button knob A80052 Push button assembly (see page 2–18) Rose A80041 Chassis screw (see page 2–18) Rose liner B80048 Bearing † B80105 AB function chassis (see page 2–18) Rose and rose liner assembly (see page... -
Page 16: D Function Exploded Diagram
— (ANSI F86) FUNCTION STOREROOM LOCK Item Part No. Qty. Description (see page 2–19) Plain knob (see page 2–18) Rose A80041 Chassis screw (see page 2–18) Rose liner B80048 Bearing † B80102 D function chassis (see page 2–18) Rose and rose liner assembly (see page 2–19) Keyed knob... -
Page 17: E Function Exploded Diagram
— (ANSI F92) FUNCTION SERVICE STATION LOCK Item Part No. Qty. Description (see page 2–19) Button knob A80051 Slotted button assembly (see page 2–18) Rose A80041 Chassis screw (see page 2–18) Rose liner B80048 Bearing † B80105 AB function chassis (see page 2–18) Rose and rose liner assembly... -
Page 18: L Function-Privacy Lock (Ansi F76)
— (ANSI F76) FUNCTION PRIVACY LOCK Item Part No. Qty. Description (see page 2–19) Button knob A80052 Push button assembly (see page 2–18) Rose A80041 Chassis screw (see page 2–18) Rose liner B80048 Bearing † B80105 AB function chassis (see page 2–18) Rose and rose liner assembly A80053... -
Page 19: Ll Function-Hospital Privacy
— FUNCTION HOSPITAL PRIVACY Item Part No. Qty. Description (see page 2–19) Button knob A80050 Push button assembly (see page 2–18) Rose A80041 Chassis screw (see page 2–18) Rose liner B80048 Bearing † B80105 AB function chassis (see page 2–18) Rose and rose liner assembly A80054 Turn button assembly... -
Page 20: N Function-Passage Lock (Ansi F75)
— (ANSI F75) FUNCTION PASSAGE LOCK Item Part No. Qty. Description (see page 2–19) Plain knob (see page 2–18) Rose A80041 Chassis screw (see page 2–18) Rose liner B80048 Bearing † B80171 N function chassis (see page 2–18) Rose and rose liner assembly (see page 2–19) Plain knob... -
Page 21: P Function-Patio Lock (Ansi F77)
— (ANSI F77) FUNCTION PATIO LOCK Item Part No. Qty. Description (see page 2–19) Button knob A80053 Push button assembly (see page 2–18) Rose A80041 Chassis screw (see page 2–18) Rose liner B80048 Bearing † B80105 AB function chassis (see page 2–18) Rose and rose liner assembly (see page... -
Page 22: R Function-Classroom Lock (Ansi F84)
— (ANSI F84) FUNCTION CLASSROOM LOCK Item Part No. Qty. Description (see page 2–19) Plain knob (see page 2–18) Rose A80041 Chassis screw (see page 2–18) Rose liner B80048 Bearing † B80106 R function chassis (see page 2–18) Rose and rose liner (see page 2–19) Keyed knob... -
Page 23: Y Function-Exit Lock
— FUNCTION EXIT LOCK Item Part No. Qty. Description (see page 2–19) Plain knob (see page 2–18) Rose A80041 Chassis screw (see page 2–18) Rose liner B80048 Bearing † B80107 Y function chassis B54794 Y function rose assembly † If you are replacing a chassis, order one trim ring (part number B80004) in addition to the chassis, and indicate the finish. -
Page 24: Function Conversion
L, LL inside button assembly A80053 L outside button assembly A80054 LL outside button assembly † † (see page 2–19) Button knob (see page 2–19) Keyed knob † † B80004 Bearing A80170 Throw member † Requires two. 2–16 6K Series Service Manual... -
Page 25: Trim Parts
ANSI plastic strike box ‡ 6KS3 A53773 ANSI strike A18724 Strike screw † Includes one A53761 strike, two A25359 strike screws, and one B25640 strike box. ‡ Includes one A53773 strike and two A18724 strike screws. 6K Series Service Manual 2–17... -
Page 26: Roses And Rose Liners
Item For rose Part No. Qty. Description B80010 Small rose C80014 Small liner B80108 Small outside rose and liner assembly B80009 Large rose C80013 Large liner B80109 Large rose and liner assembly C & D A80041 Through-bolt screw 2–18 6K Series Service Manual... -
Page 27: Knobs And Throw Member
Figure 2.15 Throw member and spacer Throw member part list Item Part No. Qty. Description † A80170 Throw member A06831 Spacer † For information about cores and keys, see the Core and Key Service Manual. 6K Series Service Manual 2–19... -
Page 28: Dummy Trim
Qty. Description C80018 Round plain knob or not shown C80020 Tulip plain knob B80024 Small rose or not shown B80023 Large rose A18724 Mounting screw B80119 Small hub assembly or not shown B80118 Large hub assembly 2–20 6K Series Service Manual... -
Page 29: Latches And Latch Tube Sleeve
Semi-automatic latch † Includes the latch and two A25359 latch screws. ‡ Use only for B function replacements. Figure 2.18 Latch tube sleeve Latch tube sleeve part list Part No. Qty. Description B80044 Latch tube sleeve 6K Series Service Manual 2–21... -
Page 30: Tools
Part No. Description A25341 Knob keeper tool KD325 A01514 Strike plate locating pin KD315 1350393 Faceplate marking chisel (1 1/8″ x 2 1/4″) not shown KD312 1487975 Faceplate marking chisel (1″ x 2 1/4″) 2–22 6K Series Service Manual... -
Page 31: Boring Jig Kit
Part No. Description KD304 B54083 Boring jig KD309 A54084 2 1/8″ diameter chassis hole bit assembly KD318 A54085 1″ diameter drill bit assembly KD319 A54086 Adaptor for 3/8″ drill chuck KD304A B54082 Boring jig kit 6K Series Service Manual 2–23... - Page 32 Functions and Parts Lists 2–24 6K Series Service Manual...
-
Page 33: Service And Maintenance
Replace knobs 3–3 Replace inside roses and rose liners 3–7 Replace outside rose and liner assemblies 3–8 Replace button assemblies 3–4 Lubricate cores 3–10 Align chassis and trim 3–11 Troubleshoot common problems 3–12 6K Series Service Manual 3–1... -
Page 34: Replacing Parts
2. Insert the control key into the core and rotate the key 15 degrees to the right. 3. Using the control key, insert the core and throw member into the knob. Rotate the control key 15 degrees to the left and remove the key. 3–2 6K Series Service Manual... -
Page 35: Replacing The Knob
2. Slide the knob onto the sleeve and firmly push on the knob until it is seated. 3. Turn the knobs to check that they operate smoothly. Long slot in the sleeve Lugs Inside of door Figure 3.3 Reinstalling the non-keyed knob 6K Series Service Manual 3–3... -
Page 36: Replacing The Button Assembly
1. Remove the knob (page 3–3). 2. Insert a flat screwdriver behind the plastic button retainer and pry the button assembly from the locking bar. Insert screwdriver here. Inside of door Figure 3.5 Removing the button assembly 3–4 6K Series Service Manual... -
Page 37: Reinstalling The Outside Button Assembly
2. Firmly press the button assembly onto the locking bar until it is seated. 3. Reinstall the knob (page 3–3). Top slot in the sleeve Button tab Locking bar Inside of door Figure 3.7 Reinstalling the inside button assembly 6K Series Service Manual 3–5... -
Page 38: Replacing The Bearing
1. Position the bearing so that the cutouts face the trim ring. Slide the bearing onto the sleeve and snap it into place underneath the trim ring. 2. Reinstall the knob (page 3–3). Slide bearing to here. Bearing Trim ring Inside of door Figure 3.9 Reinstalling the bearing 3–6 6K Series Service Manual... -
Page 39: Replacing The Inside Rose And Rose Liner
3. Tighten the rose liner onto the door with the through-bolts. 4. Align the slot in the rose with the tab on the rose liner and firmly press the rose until it is flush with the door. 6K Series Service Manual 3–7... -
Page 40: Replacing The Outside Rose And Liner Assembly
3. Remove the rose and liner assembly from the sleeve. Threading on the sleeve Rose and liner assembly Outside of door Figure 3.12 Removing the outside rose and liner assembly 3–8 6K Series Service Manual... -
Page 41: Replacing The Lock Chassis Assembly
1. Remove the following components: knobs (page 3–3) inside rose and rose liner (page 3–7) outside rose and liner assembly (page 3–8). 2. From the outside of the door, slide the lock chassis out of the door. 6K Series Service Manual 3–9... -
Page 42: Lubricating The Core
Create a preventive maintenance plan that includes lubricating the core. To extend the life of the core, lubricate it regularly. Powdered graphite is the best choice for lubrication; LPS spray can also be used. Do not lubricate a core with oil. Doing so will attract dirt. -
Page 43: Aligning The Chassis And Trim
4. Test the knob operation to make sure that the latch tailpiece does not bind with the chassis retractor. 5. Reinstall the following components: inside rose and rose liner (page 3–7) inside knob (page 3–3). 6K Series Service Manual 3–11... -
Page 44: Troubleshooting
Replace the button assembly are damaged. (page 3–4). Latch doesn’t retract. a. Latch tailpiece is broken. a. Replace the latch assembly. b. Latch tailpiece didn’t engage the b. Reinstall the lock chassis retractor correctly during (page 3–10). installation. 3–12 6K Series Service Manual... -
Page 45: Installation Instructions
NSTALLATION NSTRUCTIONS The following pages contain the Installation Instructions for 6K Cylindrical Locks. 6K Series Service Manual A–1... - Page 46 Installation Instructions A–2 6K Series Service Manual...
- Page 47 3 Remove the rose and liner assembly. 1 Fold the template and place in position on the high edge of the door bevel (see Figure 2). 2 Mark the drill points for lock and latch. BEST ACCESS SYSTEMS T56061/Rev – 1797989 ER-7991-19 Mar 2000 Indianapolis, Indiana...
- Page 48 Check handing at the tab slot). 2 Place the liner in position with the tab slot at the bottom and tighten the clamp Note: When BEST 6K locks are properly installed, the figure-8 hole must be in the screws. Retractor upper half of the knob.
- Page 49 LL chassis and trim 2–5 lubricating 3–10 for N chassis and trim 2–4 reinstalling 3–2 for P chassis and trim 2–4 removing from a knob 3–2 for R chassis and trim 2–3 for Y chassis and trim 2–4 6K Series Service Manual...
- Page 50 3–7 Y chassis assembly 2–15 keyed knob 3–4 P chassis and trim Y function rose assembly 2–15 lock chassis assembly 3–10 function description for 2–4 non-keyed knob 3–3 outside button assembly 3–5 6K Series Service Manual...
Need help?
Do you have a question about the 6K Series and is the answer not in the manual?
Questions and answers