Table of Contents
Advertisement
Quick Links
Advertisement
Table of Contents
Troubleshooting

Related Manuals for Belkin BoB


Summary of Contents for Belkin BoB
- Page 1 – 4 port wireless VoIP router...
-
Page 2: Table Of Contents
Table of Contents Chapter 1 : Introduction Pg. 0 1 Chapter 2 : Product Overview Pg. 02 Chapter 3 : Knowing BoB Pg. 04 Chapter 4 : Connection & Configuration Pg. 05 Chapter 5 : Advanced Setup Pg. 07 Setup Wizard Pg. - Page 3 Security Log Pg. 58 Appendices Pg. 59 A1 Troubleshooting Pg. 6 1 A2 Troubleshooting Pg. 62 B Cables Pg. 63 C Specification Pg. 64 Glossary- 1 Pg. 65 Glossary-2 Pg. 66 Belkin International, Inc. Limited 2 Year Product Warranty Pg. 67...
-
Page 4: Chapter 1 : Introduction
Introduction 4 port integrated wireless router Thank you for purchasing the BoB 4 port integrated wireless router. Within minutes you will be able to connect to the internet and make Voice over Internet Protocol (VoIP) phone calls. The following is a list of features that... -
Page 5: Chapter 2 : Product Overview
ADSL connection is down. For more information on this computer on the network quickly and easily. feature and a list of support USB adapters, visit http:// www belkin com au/support Page 2... -
Page 6: Mac Address Filtering
The BoB handset is an optional device which slots Wired & Wireless LAN into the front of the BoB router and allows you to make voice calls (including VoIP where available). The router provides access for up to 4 by 10/100 Mbps... -
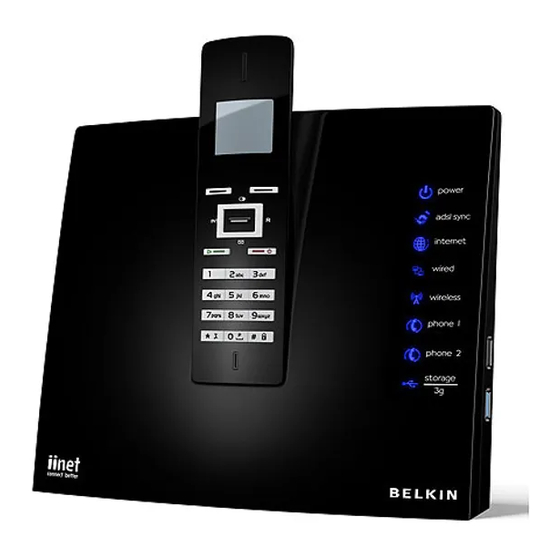
Page 7: Chapter 3 : Knowing Bob
Chapter 3 : Knowing BoB Knowing your BoB - 4 port integrated wireless router Note LED indicators are easily visible on the front of the Internet LED on Side Panel Ports: router to provide you with information about network The Internet LED shows you when the router activity and status. -
Page 8: Back Panel
Reset Button Locate handset (if installed) • Resetting the Router Press this button to signal the BoB handset to Push and hold the Reset button for one second ring, allowing you to easily find its current location then release it. When the power light becomes Useful if you have lost the handset. - Page 9 Chapter 4 : Connection & Configuration Connect & Configure your BoB Notes: Step 1. Find a suitable location Step 4. Connect the power Use 100-ohm shielded adapter Your BoB - 4 port integrated wireless router can be or unshielded twisted-...
-
Page 10: Chapter 5 : Advanced Setup
Chapter 5 : Advanced Setup Advanced Setup Method Step 1. How to log into the router Step 2. Navigating the web browser interface ISP account user After you have configured TCP/IP on a client name and password computer, use a web browser to configure the router. The router can be configured by any Java-supported browser such as Internet Explorer 5.0 or above. -
Page 11: Advanced Setup
Advanced Setup Method Note: Step 3. Using Setup Wizard VoIP port 1 is the BoB™ handset This page allows you to quickly setup basic settings of the router to get you connected quickly. After making a which slots into the front change, click on the save settings button on the screen to apply the changes. - Page 12 Chapter 5 : Advanced Setup Advanced Setup Method Note: To ensure proper screen refresh after a command entry, check that Internet Explorer 5.0 is configured as follows: Under the menu Tools/Internet Options/ General/Temporary Internet Files/Settings, the setting for ‘Check for newer versions of stored pages’...
-
Page 13: Menu Description
Chapter 5 : Advanced Setup Advanced Setup Method Menu Description Wireless (Page 19) The Wireless Menu allows you to turn on/off the System (Page 11) wireless features on your router as well as having 4 sub-menus: Within the System menu you can: Channel &... -
Page 14: System Time Setting
Chapter 5 : Advanced Setup Advanced Setup Method VoIP (Page 44) DynDNS and TZO. USB (Page 53) Configures VoIP settings for the router, this section involves extensive and detailed settings. Please You can plug-in your USB hard drive or memory read the entire section carefully before attempting stick and share these resources on your home any changes. -
Page 15: Password Setting
Chapter 5 : Advanced Setup Advanced Setup Method Note: Password Settings If your password is lost, Use this page to restrict access based on a password.By default, the password is ‘admin’ . or you cannot gain access to the user interface, press the reset button (colored blue) on the rear panel... -
Page 16: Dns
Chapter 5 : Advanced Setup Advanced Setup Method Note: If you check ‘Enabled’ and specify an IP address of 0.0.0.0, any host can manage the router. For remote management via a WAN IP address you need to connect using port 8080.Simply enter WAN IP address followed by :8080 in the address... -
Page 17: Atm Pvc
Chapter 5 : Advanced Setup Advanced Setup Method ATM PVC The router uses ATM as its WAN interface. Click on each ATM VC for WAN configuration. Parameter Description Description: Click on the VC to set the values for the connection. VPI/VCI: Virtual Path Identifier (VPI) and Virtual Circuit Identifier (VCI). -
Page 18: Atm Interface
Chapter 5 : Advanced Setup Advanced Setup Method ATM Interface Clicking on the ATM VC brings up the following screen. The router uses ATM as its WAN interface. Protocols including 1483 Routing, 1483 Bridging, MAC Encapsulated Routing (MER), PPPoA and PPPoE with LLC-SNAP and VC- MUX encapsulations are supported for each ATM PVC. -
Page 19: Clone Mac Address
Chapter 5 : Advanced Setup Advanced Setup Method Encapsulation Connect Type Shows the packet encapsulation type. Sets connection mode to always connected, automatic or manual connection. Packet encapsulation specifies how to handle multiple protocols at the ATM transport layer. Idle Time: Enter the maximum idle time for the Internet connection.(in minutes) After this time has •... -
Page 20: Lan
Chapter 5 : Advanced Setup Advanced Setup Method Use the LAN menu to configure the LAN IP address and to enable the DHCP server for dynamic client address allocation. Parameter Description LAN IP DHCP SERVER IP Address: The IP address of the router IP Subnet Mask: The subnet mask of the router •... -
Page 21: Vlan
Chapter 5 : Advanced Setup Advanced Setup Method VLAN VLAN Table: In this table you can click on the ‘ A DD VLAN’ button to add a ‘VLAN’ binding or click on ‘EDIT’ to edit an existing binding, or click on ‘DELETE’ to remove a binding. VLAN Profile: This screen will appear if you click on IGMP Snooping: enable/disable the feature to block ‘... -
Page 22: Vlan Access Control
Chapter 5 : Advanced Setup Advanced Setup Method VLAN Access Control: In this table you can enable or disable the communication between the VLAN bindings by ticking (enable) or un-ticking (disable) the corresponding name in the table. The DHCP Clients List displays the IP Address, Host Name and MAC Address of each client that has requested an IP address since the last reboot of the Router. -
Page 23: Channel And Ssid
Chapter 5 : Advanced Setup Advanced Setup Method Note: Channel and SSID If you experience poor These settings should be left as default unless you have a reason to change them. You can change the performance, you Service Set ID (SSID) and a common radio channel to be used by the router and all of its wireless clients. Be sure you configure all of its clients to the same values. -
Page 24: Wireless Access Control
Chapter 5 : Advanced Setup Advanced Setup Method Wireless Access Control Using the Access Control functionality, you can specify which PCs can wirelessly connect to the access point. Each PC has a unique identifier known as a Medium Access Control (MAC) address. With MAC filtering enabled, only the computers whose MAC address you have listed in the filtering table may connect to the router. -
Page 25: Security
Chapter 5 : Advanced Setup Advanced Setup Method Security It is important to be aware of security issues, especially when using wireless. You can configure your security settings on this page. You can set security on one SSID or both, select the appropriate SSID from the ‘Select Virtual AP’... -
Page 26: Wep
Chapter 5 : Advanced Setup Advanced Setup Method Wired Equivalent Privacy (WEP) encryption requires you to use the same set of encryption/decryption keys for the router and all of your wireless clients. See the description of the Security features below. Parameter Description Default Key ID: Select the default key. -
Page 27: Wpa/Wpa2
Chapter 5 : Advanced Setup Advanced Setup Method WPA / WPA2 Wi-Fi Protected Access (WPA) combines Temporal Key Integrity Protocol (TKIP) and 802.1x mechanisms. It provides dynamic key encryption and 802.1x authentication service. With TKIP, WPA uses 48-bit initialization vectors, calculates an 8-byte message integrity code, and generates an encryption key periodically authentication, it allows you to use 802.1x authentication for an environment with a RADIUS server installed on your network Selecting the Pre-shared Key enables WPA to use the pre-shared key in a SOHO network. -
Page 28: Wds
Chapter 5 : Advanced Setup Advanced Setup Method Wireless Distribution System (WDS) provides a means to extend the range of a Wireless Local Area Network (WLAN). WDS allows an Access Point (AP) to establish a direct link to other APs and allows stations to roam freely within the area covered by the WDS. -
Page 29: Address Mapping
Chapter 5 : Advanced Setup Advanced Setup Method Address Mapping Use Address Mapping to allow a limited number of public IP addresses to be translated into multiple private IP addresses for use on the internal LAN network. This also hides the internal network for increased privacy and security. -
Page 30: Port Forwarding
Chapter 5 : Advanced Setup Advanced Setup Method Port Forwarding Using this feature, you can put PCs with public IPs and PCs with private IPs in the same LAN area. If you configure the Port Forwarding settings, remote There is a list of commonly used applications and their users accessing services such as web or FTP at your associated port(s), to add an application to the Port local site via public IP addresses can be automatically... -
Page 31: Special Applications
Chapter 5 : Advanced Setup Advanced Setup Method Special Applications Some applications, such as Internet gaming, video conferencing, Internet telephony and others, require multiple connections. These applications cannot work with Network Address Translation (NAT) enabled. If you need to run applications that require multiple connections, use the following screen to specify the additional public ports to be opened for each application. - Page 32 Chapter 5 : Advanced Setup Advanced Setup Method NAT Mapping Table NAT Mapping Table displays the current NAPT address mappings NAT address mappings are listed 20 lines per page, click the control buttons to move forwards and backwards As the NAT mapping is dynamic, a Refresh button is provided to refresh the NAT Mapping Table with the most up-to-date values.
-
Page 33: Route
Chapter 5 : Advanced Setup Advanced Setup Method Route These pages define routing related parameters, including static routes and Routing Information Protocol (RIP) parameters. Static Route Parameters Parameter Description Index: Displays the number of the route. Network Address: Displays the IP address of the remote computer for which to set a static route. Subnet Mask: Displays the subnet mask of the remote network for which to set a static route. -
Page 34: Rip Parameter
Chapter 5 : Advanced Setup Advanced Setup Method RIP Parameter The device supports RIP v1 and v2 to dynamically exchange routing information with adjacent routers. Parameter Description General RIP Parameters RIP mode: Globally enables or disables RIP Password: A password authentication key is included in the packet. - Page 35 Chapter 5 : Advanced Setup Advanced Setup Method Routing Table Parameter Description F lags: Indicates the route status: Gateway: The IP address of the router at the next hop to which frames are forwarded. C = Direct connection on the same subnet. Interface: The local interface through which the next S = Static route.
- Page 36 Chapter 5 : Advanced Setup Advanced Setup Method Note: Security Settings (Firewall) After you check the radio button in the ‘Enable or disable Firewall features’ field, you must click the ‘SAVE SETTINGS’ button to display the list of firewall features. The router’s firewall enables access control of client PCs, blocks common hacker attacks, including IP Spoofing, Land Attack, Ping of Death, IP with zero length, Smurf Attack, UDP port loopback, Snork Attack, TCP null scan, and TCP SYN f looding.
-
Page 37: Access Control
Chapter 5 : Advanced Setup Advanced Setup Method Access Control Access Control allows users to define the outgoing traffic permitted or not-permitted through the WAN interface. In the example above, all incoming and outgoing emails are blocked. The default is to permit all outgoing traffic (see the following page for details). - Page 38 Chapter 5 : Advanced Setup Advanced Setup Method Access Control Add PC The settings in the screen shot below will block all email sending and receiving. Define the appropriate settings for client PC services (as shown above). Click ‘OK’ to save your settings. The added PC will now appear in the Access Control page.
-
Page 39: Mac Filter
Chapter 5 : Advanced Setup Advanced Setup Method MAC Filter Use this page to block access to your network using MAC addresses. The router can also limit the access of hosts within the local area network (LAN). The MAC Filtering Table allows the router to enter up to 32 MAC addresses that are allowed access to the WAN port. - Page 40 Chapter 5 : Advanced Setup Advanced Setup Method URL Blocking To configure the URL Blocking feature, use the table below to specify the web sites (www somesite.com) and/ or keywords you want to filter on your network To complete this configuration, you will need to create or modify an access rule in ‘ A ccess Control’ . To modify an existing rule, click the Edit option next to the rule you want to modify.
-
Page 41: Schedule Rule
Chapter 5 : Advanced Setup Advanced Setup Method Schedule Rule You may filter Internet access for local clients based on rules Each access control rule may be activated at a scheduled time. Define the schedule on the Schedule Rule page, and apply the rule on the Access Control page. Click ‘... -
Page 42: Intrusion Detection
Chapter 5 : Advanced Setup Advanced Setup Method Intrusion Detection The router’s firewall inspects packets at the application layer, maintains TCP and UDP session information including timeouts and number of active sessions, and provides the ability to detect and prevent certain types of network attacks such as Denial-of-Service (DoS) attacks. -
Page 43: Dmz
Chapter 5 : Advanced Setup Advanced Setup Method DoS Detect Criteria Maximum incomplete TCP/UDP sessions number from same host: Maximum half-open Total incomplete TCP/UDP sessions HIGH: fragmentation packet number from same host. Defines the rate of new un-established sessions that will cause the software to start deleting half- Incomplete TCP/UDP sessions detect sensitive open sessions. -
Page 44: Snmp
Chapter 5 : Advanced Setup Advanced Setup Method SNMP On this page you can enable the SNMP (Simple Network Management Protocol) functions for LAN, WAN or both LAN and WAN. By default it is set to disabled. Community Use the SNMP configuration screen to display and modify parameters for the Simple Network Management Protocol (SNMP). -
Page 45: Trap
Chapter 5 : Advanced Setup Advanced Setup Method Trap Parameter Description IP Address: Traps are sent to this address when errors or specific events occur on the network. Community: A community string (password) specified for trap management. Enter a word, something other than public or private, to prevent unauthorized individuals from reading information on your system. -
Page 46: Status
Chapter 5 : Advanced Setup Advanced Setup Method Status The Status page displays ADSL status information Parameter Description Status data flow and may not be optimal for real-time signals such as video transmission. Line Status: Shows the current status of the ADSL line. -
Page 47: Voip
Your BoB - 4 port integrated wireless router comes pre-configured for the iiNet VoIP service. iiNet and Belkin will only provide support for use with the iiNet VoIP service. See below for a description of the parameters. - Page 48 Chapter 5 : Advanced Setup Advanced Setup Method SIP Setting Configure your SIP parameters on this page, and click ‘SAVE SETTINGS’ to apply them. SIP, the Session Initiation Protocol, is a signalling See below for a description of the parameters. protocol for Internet conferencing, telephony, Parameter Description presence, events notification and instant messaging.
-
Page 49: Voip Advanced Setting
Chapter 5 : Advanced Setup Advanced Setup Method VoIP Advanced Setting Configure the VoIP advanced settings on this page, and click ‘OK.’ SIP is a peer-to-peer protocol. The peers in a session See the below for a description of the parameters are called User Agents (UAs). -
Page 50: Port Advanced Setting
Chapter 5 : Advanced Setup Advanced Setup Method Port Advanced Setting Configure advanced VoIP settings on this page then click ‘SAVE SETTINGS’ . Volume Gain Control Use this option to adjust the volume of calls made Inter Digit Delay through VoIP. This is the delay time before processing the dialled digits This will delay the VoIP unit dial the telephone number after the digits have been entered. -
Page 51: Dect Setting
Parameter Description to register. BoB Handset users, refer to section 7.2 Port Type Displays the port type Registering the handset with the BoB modem/router. SIP URL Shows the SIP URL Unregister DECT Handset Registration Indicates whether the user has Pressing the Unregister button once will unregister all... -
Page 52: Upnp
Chapter 5 : Advanced Setup Advanced Setup Method UPnP The Universal Plug and Play architecture offers pervasive peer-to-peer network connectivity of PCs of all form factors, intelligent appliances, and wireless devices UPnP enables seamless proximity network in addition to control and data transfer among networked devices in the home, office and everywhere in between. Enable or disable UPnP features: Enable or disable the UPnP function. -
Page 53: Qos
Chapter 5 : Advanced Setup Advanced Setup Method With converging voice and data, it is imperative to establish Quality of Service (QoS) parameters to appropriately allocate bandwidth. Will only monitor and limit upstream traffic. QoS Settings To ensure optimum voice quality, your router should prioritize voice over data packages. Therefore, we recommend enabling the QoS feature. -
Page 54: Edit Traffic Class
Chapter 5 : Advanced Setup Advanced Setup Method Edit Traffic Class This page is for user to specify a classify rule. Rule Name: Assign a Name to the rule. Traffic Type: Choose a Traffic type for the rule, or click on ‘ A dvanced Config’ for more advance options. Map to Forwarding Group: Choose which QoS group you wish to have the rule mapped to, which determines how much bandwidth is to be allocated with this rule. -
Page 55: Traffic Statistics
Chapter 5 : Advanced Setup Advanced Setup Method Traffic Statistics This page shows the WAN outbound traffic statistics of all the Diffserv forwarding groups in the last 12 hours (automatically updated every 5 mins). DDNS With a DDNS (Dynamic DNS) connection you can host your own web site, email server, FTP site and more at your own location even if you have a dynamic IP address. -
Page 56: Usb
Chapter 5 : Advanced Setup Advanced Setup Method You can plug-in your USB hard-drive or memory stick and share these resources on your home network. Once you have plugged in the USB device you can see the device information in the following ‘Status’ . IMPORTANT: The router’s USB port does not support a USB Hub, only directly connected USB Mass Storage Devices are supported. - Page 57 Chapter 5 : Advanced Setup Advanced Setup Method Advanced Setup USB FTP Server FTP service is a very common network protocol that enables you to share your files to a local or public network. By using this feature you can share any files/folders on your USB hard drive or memory stick. You need to specify which partition (maximum 4 partitions) and folders you want to share.
-
Page 58: Configuration Tools
Use this screen to update the firmware or user interface to the latest versions. Download the file to your hard drive from the Belkin web site or from another source. Then click Browse...to find the file on your computer. Select the firmware file and click ‘Open.’ Click ‘Save Settings’ to start the upgrade process. -
Page 59: Diagnostic Utility
Chapter 5 : Advanced Setup Advanced Setup Method Diagnostic Utility This page allows user use the ping function by entering the destination address and pressing the EXECUTE button. Ping results will then show on the screen. Reset Perform a reset from this page. Should your unit become unresponsive for any reason, you can simply perform a reset from this page. -
Page 60: Status
Chapter 5 : Advanced Setup Advanced Setup Method Status The Status screen displays WAN/LAN connection status, firmware and hardware version numbers, as well as information on DHCP clients connected to your network. The security log may be saved to a file by clicking ‘Save’ and choosing a location. The following items are included on the Status screen: Parameter Description INTERNET: Displays WAN connection type and status Release Click on this button to disconnect from the WAN. -
Page 61: Dhcp Client Log
ADSL connection such as Login failures, disconnections, etc. After completing hardware setup by connecting all your network devices, you should automatically be able to connect to the BoB - 4 port integrated wireless router by entering 10.1.1.1 into your Internet browsers address bar. -
Page 62: Appendices
Appendices Appendix A1 - Troubleshooting TCP/IP Configuration Double-click Internet Protocol (TCP/IP). If ‘Obtain an IP address automatically’ and ‘Obtain To access the Internet through the router, you must DNS server address automatically’ are already configure the network settings of the computers on selected, your computer is already configured for your LAN to use the same IP subnet as the router. - Page 63 Appendices Appendix A1 - Troubleshooting Manual IP Configuration Disable HTTP Proxy Follow steps 1-5 in ‘DHCP IP Configuration’ on the You need to verify that the ‘HTTP Proxy’ feature of previous page. your web browser is disabled. This is so that your browser can view the router’s HTML configuration Select ‘Use the following IP address.’...
-
Page 64: Disable Http Proxy
Appendices Appendix A1 - Troubleshooting Configuring Your Macintosh Computer Now your computer is configured to connect to the router. You may find that the instructions here do not exactly match your operating system. This is because Disable HTTP Proxy these steps and screen shots were created using Mac OS 10.2..Mac OS 7.x and above are similar, but may not You need to verify that the ‘HTTP Proxy’... -
Page 65: A2 Troubleshooting
Appendices Appendix A2 - Troubleshooting This section describes common problems you may encounter and possible solutions to them. The BoB - 4 port integrated wireless router can be easily monitored through panel indicators to identify problems. Troubleshooting Symptom Action LED Indicators Power LED is Off •... -
Page 66: B Cables
Appendices Appendix B - Cables Ethernet Cable Caution: Do not plug a phone jack connector into an RJ-45 port. For Ethernet connections, use only twisted-pair cables with RJ-45 connectors that conform to FCC standards. Specification Cable Types and Specification Cable Type Max. - Page 67 Appendices Appendix C - Specifications Standards Compliance FXS Interface CE Mark Indicator Panel Emissions Line, Phone 1-2, VoIP, USB, LAN 1-4, Wireless, Internet, power FCC Class B, VCCI Class B Dimensions Industry Canada Class B 67 5 x 214 x 177 5 mm (L x W x H) EN55022 (CISPR 22) Class B Input Power C-Tick - AS/NZS 3548 (1995) Class B...
-
Page 68: Glossary
Glossary Glossary- 1 10BASE-T IEEE IEEE 802.3 specification for 10 Mbps Ethernet over Institute of Electrical and Electronic Engineers two pairs of Category 3, 4, or 5 UTP cable IEEE 802.3 100BASE-TX Defines carrier sense multiple access with collision IEEE 802.3u specification for 100 Mbps Fast Ethernet detection (CSMA/CD) access method and physical over two pairs of Category 5 UTP cable layer specifications... - Page 69 Glossary Glossary-2 Local Area Network (LAN) A group of interconnected computer and support devices LAN Segment Separate LAN or collision domain Light emitting diode used or monitoring a device or network condition Local Area Network A group of interconnected computers and support devices. Media Access Control (MAC) A portion of the networking protocol that governs access to the transmission medium, facilitating the exchange of data between network nodes An acronym for Management Information Base.
- Page 70 EXPRESSED OR, EXCEPT AS REQUIRED BY LAW, (for example, because it has been discontinued), IMPLIED, INCLUDING THE IMPLIED WARRANTY OR Belkin will offer a refund in an amount equal to the CONDITION OF QUALITY, MERCHANTABILITY OR purchase price of the product as evidenced on the...
- Page 71 Business Support 13 24 49 bizsupport@iinet.net.au Belkin 1800 235 546 Open 24 hours a day, 7 days a week © 2009 Belkin International, Inc. All rights reserved. All trade names are registered trademarks of respective manufacturers listed. F1PI243EGau...
Need help?
Do you have a question about the BoB and is the answer not in the manual?
Questions and answers