Table of Contents
Advertisement
Quick Links
Advertisement
Table of Contents

Related Manuals for Fuji Xerox DocuCentreS2520


Summary of Contents for Fuji Xerox DocuCentreS2520
- Page 1 DocuCentre S2520 DocuCentre S2320 User Guide...
- Page 2 The data saved in the hard disk of the machine may be lost if there is any problem in the hard disk. Fuji Xerox is not responsible for any direct and indirect damages arising from or caused by such data loss.
-
Page 3: Table Of Contents
Table of Contents Table of Contents Before Using the Machine ........................9 Preface ................................... 10 Types of Manuals .............................. 11 Using This Guide..............................12 Organization of This Guide ........................12 Conventions..............................13 Safety Notes................................ 14 Electrical Safety ............................15 Machine Installation..........................16 Operational Safety ............................. - Page 4 [Support] Tab ..............................54 [Address Book] Tab .............................54 Installing the Print Driver/Scan Driver.......................57 Installing the Print Driver .........................57 Installing the Scan Driver .........................57 Uninstalling ..............................57 Product Overview............................59 Machine Components ............................60 Front, Left Side..............................60 Right Side, Rear.............................61 Inside ................................62 Duplex Automatic Document Feeder....................63 Power Source................................64 Switching the Power On ..........................64 Switching the Power Off ...........................64...
- Page 5 Table of Contents Starting the Copy Job..........................100 About Auto Rotation..........................100 Operations Performed While Copying ....................102 Canceling the Current Copy Job......................102 Checking Job Status..........................102 ID Card Copy..............................103 Advanced Copy Settings..........................105 Lighten/Darken ............................106 Original Type...............................107 2 Sided................................107 Collated.................................108 Pages per Side ............................109 Paper Supply ...............................109 Reduce/Enlarge............................110 Original Size..............................111...
- Page 6 Tools ................................. 135 System Settings Procedure.......................... 136 Enter System Administration Mode ....................136 Set Functions .............................. 136 Exit System Administration Mode ..................... 137 List of Tools Menu Items Displayed in System Administration Mode ........138 System Settings ............................... 140 Paper Tray Settings..........................140 Consumables Settings ..........................
- Page 7 Table of Contents Recipient Confirmation...........................156 User Management ............................157 User Control..............................157 Confirm/Edit..............................157 Reset Copied Impressions........................159 Machine Status .............................161 Checking Consumables ..........................162 Selecting Language ............................163 Checking the Machine’s IP Address......................164 Checking the User Account Information ....................165 Checking the Meter ............................166 Printing Reports/Lists .............................167 Notification Display............................169 ID Card Guidance Display..........................170 Quick-Button Selection Timer........................171...
- Page 8 Unable to Forward a Scan Document on the Network (SMB)..........208 Scan Image Quality Problems ......................209 Network Related Problems .......................... 210 Problems Using TCP/IP (LPD/Port9100)..................210 Problems Using CentreWare Internet Services................211 Problems With E-mail Functions ......................212 Internet/Intranet Connection Problems ..................213 IPv4 or IPv6 Connection Problems ....................
-
Page 9: Before Using The Machine
1 Before Using the Machine This chapter describes how to use this guide, as well as safety notes and legal notice you should read before using the machine. Preface ...............................10 Types of Manuals ..........................11 Using This Guide..........................12 ... -
Page 10: Preface
1 Before Using the Machine Preface Thank you for selecting the DocuCentre S2520/S2320 (hereafter referred to as "the machine"). This guide describes how to operate the machine and the precautions you should follow during operation. To get the most out of the machine and to use it effectively, be sure to read this guide before use. -
Page 11: Types Of Manuals
Types of Manuals Types of Manuals The following guides are provided with the machine. Accompanying Manuals User Guide (this guide) The guide describes how to use the copy, print, and scan features as well as how to set the paper, perform everyday maintenance, make machine status settings, perform troubleshooting, and set up a network. -
Page 12: Using This Guide
1 Before Using the Machine Using This Guide This guide is intended for first time users of the machine. It describes the basic operations for the copy, print, and scan features. Organization of This Guide This guide consists of the following chapters: ... -
Page 13: Conventions
Using This Guide Conventions The screen shots and illustrations used in this guide vary depending on the machine configuration and optional components installed. Some of the items in the screen shots may not be displayed or available depending on your machine configuration. ... -
Page 14: Safety Notes
Any unauthorized alteration including an addition of new functions or connection to external devices may not be covered by the product warranty. Contact your local Fuji Xerox representative for more information. Follow all warning instructions marked on this product. The warning marks stand for the... -
Page 15: Electrical Safety
Plug the power cord directly into a grounded electrical outlet. To prevent overheat and a fire accident, do not use an extension cord, a multi-plug adaptor or a multiple connector. Consult your local Fuji Xerox representative to check if an outlet is grounded. -
Page 16: Machine Installation
Once you notice any unusual condition, switch off and unplug this product first and contact your local Fuji Xerox representative. Machine Installation Do not locate this product where people might step on or trip over the power cord. - Page 17 Safety Notes Locate this product in a well-ventilated area. Do not obstruct ventilation openings of the product. Keep the minimum clearance as follows for ventilation and an access to the power plug. Unplug the product if an abnormal condition is noted. With Duplex Automatic Document Feeder 1100.9 325.9...
-
Page 18: Operational Safety
To prevent electric shock and injuries, never remove those covers and protectors. To avoid the risk of electric shock and a fire accident, switch off and unplug the product promptly in the following conditions, then contact your local Fuji Xerox representative. ... -
Page 19: Consumable
Other cleaning materials may result in poor performance of the product. Never use aerosol cleaners to avoid catching fire and explosion. If you need to pull out a tray to remove paper jam, contact your local Fuji Xerox representative. Do not pull out a tray, otherwise it may cause injuries. - Page 20 Never throw a toner cartridge into an open flame. Remaining toner in the cartridge may catch fire and cause burn injuries or explosion. If you have a used toner cartridge no longer needed, contact your local Fuji Xerox representative for its disposal.
-
Page 21: Location Of Warning And Caution Labels
Safety Notes Location of Warning and Caution Labels Always follow all warning instructions marked on or supplied with this product. To avoid the risk of burn injuries and electric shock, never touch the area with the "High Temperature" or "High Voltage" marks on. -
Page 22: Regulation
Changes and modifications to this product not specifically approved by Fuji Xerox may void the user's authority to operate this equipment. -
Page 23: About License
About License About License This section describes information about licenses. Be sure to read through it. Libcurl COPYRIGHT AND PERMISSION NOTICE Copyright (c) 1996 - 2006, Daniel Stenberg, <daniel@haxx.se>. All rights reserved. Permission to use, copy, modify, and distribute this software for any purpose with or without fee is hereby granted, provided that the above copyright notice and this permission notice appear in all copies. -
Page 24: Md5
1 Before Using the Machine (INCLUDING, BUT NOT LIMITED TO, PROCUREMENT OF SUBSTITUTE GOODS OR SERVICES; LOSS OF USE, DATA, OR PROFITS; OR BUSINESS INTERRUPTION) HOWEVER CAUSED AND ON ANY THEORY OF LIABILITY, WHETHER IN CONTRACT, STRICT LIABILITY, OR TORT (INCLUDING NEGLIGENCE OR OTHERWISE) ARISING IN ANY WAY OUT OF THE USE OF THIS SOFTWARE, EVEN IF ADVISED OF THE POSSIBILITY OF SUCH DAMAGE. -
Page 25: Legal Notice
Legal Notice Legal Notice Copying or printing certain documents may be illegal in your country. Penalties of fines or imprisonment may be imposed on those found guilty. The following are examples of items that may be illegal to copy or print in your country. ... - Page 26 1 Before Using the Machine...
-
Page 27: Environment Settings
2 Environment Settings This chapter describes the machine's operating environment. • Some models do not need to make the environment settings described in this chapter. Such models, Note an optional component is required. For more information, contact our Customer Support Center. ... -
Page 28: Supported Environment
2 Environment Settings Supported Environment This section describes the environment settings needed to use the machine's print and scan features. Print Feature The machine can be connected directly to a computer for use as a local printer, or can be connected to a network for use as a network printer. -
Page 29: Scan To E-Mail
Supported Environment Using the Network connection Scan with PC application Uses the Network TWAIN (SOAP) to import scan data in a computer with a TWAIN or Windows Image Acquisition (WIA) compatible application. To use this function, you must install the scan driver from the Media (Software/Product Manual). -
Page 30: Interface Cables
2 Environment Settings Interface Cables When connecting the machine directly to a computer, use a USB interface. When connecting the machine to a network, use an Ethernet interface. Using the USB Interface The machine supports the USB 2.0 interface. To connect the USB interface: Press the power switch to the [ ] position to turn the power OFF. - Page 31 Interface Cables Press the power switch to the [ ] position to turn the power OFF. Note • Make sure that the display is turned off. Connect a network cable to the Ethernet interface connector. Note • Prepare a network cable suitable for your network connection.
-
Page 32: Setting The Network Environment
2 Environment Settings Setting the Network Environment This section describes how to make the settings needed to use the TCP/IP protocol. Note • The machine supports IPv6 addresses in an IPv6 network environment. For more information, refer to "Setting the Machine's IP Address (IPv6)" (P.32). Setting the Machine's IP Address (IPv4) To use the TCP/IP protocol, you must set the machine's IP address. -
Page 33: When Using The Printer Setup Utility For Setting The Ip Address
Setting the Network Environment For information on how to check using Tools, refer to "Network Settings" (P.147). For information on how to check using CentreWare Internet Services, refer to "TCP/IP (Connectivity > Protocols)" (P.45). You can set a fixed IPv6 address for the machine using either of the following methods: ... - Page 34 2 Environment Settings Make sure that the network cable is connected to the machine, and then click [Next]. As a list of available IP addresses and Mac addresses appears, select the machine and click [Next]. If you already have the IP address of the machine, click [Enter IP Address] and directly enter the IP address on the displayed window.
- Page 35 Setting the Network Environment After confirming information displayed, click [Apply]. The specified settings are applied. Click [Finish] to exit the Printer Setup Utility for Setting IP Address. When the settings are properly configured, the machine reboots automatically. Confirm the assigned IP address after completing the setting process by one of the following methods.
-
Page 36: Activating The Communication Port To Use
2 Environment Settings Activating the Communication Port To Use Use CentreWare Internet Services to activate the communication port you want to use. You can activate the following ports: Port Description SNMP Activate this port to use the SNMP protocol (used for operations such as loading the machine's information to the print driver). - Page 37 Activating the Communication Port To Use Click [Port Settings], and check the checkbox of the desired port. Click [Apply]. Note • Restart the machine to enable the new settings.
-
Page 38: Setting The Send E-Mail Function
2 Environment Settings Setting the Send E-mail Function SMTP Server Settings Use the SMTP server to send an e-mail. Use CentreWare Internet Services to set the SMTP server. The items to be set are shown below. Item Description SMTP Server IP Address/Host Enter the SMTP server's IP address as an IPv4 or IPv6 address or in Name FQDN format (up to 256 characters). -
Page 39: E-Mail Header And Body Settings
Setting the Send E-mail Function From the menu on the left, select [Connectivity] > [Protocols]. Click [SMTP Server], and enter the settings. Click [Apply]. E-mail Header and Body Settings When sending a scanned document as an e-mail attachment, you can enter an e-mail header and body. - Page 40 2 Environment Settings Click the [Properties] tab. From the menu on the left, select [Services] > [E-mail]. Click [Defaults], and enter the [Subject], [Message], and [Maximum Attachment Size]. Click [Apply].
-
Page 41: Using Centreware Internet Services
Using CentreWare Internet Services Using CentreWare Internet Services CentreWare Internet Services CentreWare Internet Services provides services such as changing settings using a web browser on a computer connected to a TCP/IP network environment. Note • The IP address of the machine also needs to be set. For information on how to set the IP address, refer to "Setting the Network Environment"... -
Page 42: Starting Centreware Internet Services
2 Environment Settings From the [Tools] menu, select [Internet Options]. In the [General] tab, click [Settings] under [Temporary Internet Files]. In the [Settings] dialog box, select [Check for newer versions of stored pages:]. Select [Every visit to the page] or [Every time you start Internet Explorer]. Click [OK]. -
Page 43: Setting Items On Centreware Internet Services
Using CentreWare Internet Services Setting Items on CentreWare Internet Services The table below lists the menu items on the CentreWare Internet Services screens. Note • You must have a user name and a passcode to change the settings. The user ID "11111" and the passcode "x-admin"... -
Page 44: [Properties] Tab
2 Environment Settings Menu Item See Page: Address Common Tasks P.56 Book Add New Name P.56 Management P.56 Import Data P.56 Export Data P.56 Delete All Names P.56 Important • Double-byte characters cannot be used in CentreWare Internet Services (except Address Book). [Properties] Tab Description ... - Page 45 Using CentreWare Internet Services Time to Low Power Mode You can set the time elapse from the last operation until the machine enters Low Power mode. You can set a value between 1 and 60 minutes. (Default: 1) Time to Sleep Mode You can set the time elapse from Low Power mode until the machine enters Sleep mode.
- Page 46 2 Environment Settings - IP Address Resolution: You can set the method used to acquire the IP Address, Subnet Mask and Gateway Address. You can select from STATIC, DHCP, BOOTP, RARP, or DHCP/Autonet for the address acquisition method. (Default: DHCP/Autonet) - IP Address: You can enter the IP address when [STATIC] is selected for [IP Address Resolution].
- Page 47 Using CentreWare Internet Services Dynamic DNS Registration (IPv6) Sets dynamic updating of the IPv6 DNS server. Checking [Enabled] enables dynamic updating of the DNS server. Checking [Overwrite] enables dynamic updating of the data in the DNS server database. Generate Domain Search List Automatically Check [Enabled] to create domain search lists automatically.
- Page 48 2 Environment Settings You can add a recipient address for UDP IPv4 trap notification by pressing this button. - IP Address: You can enter the IP address for entry. - UDP Port Number: You can set the UDP port No. for entry (a value between 1 and 65535). - SNMP Version: You can specify the SNMP version for entry as [v1] or [v2c].
- Page 49 Using CentreWare Internet Services Server Information (WINS Server) Note • Displays when [IP Mode] is set to [IPv4] or [Dual Stack]. Protocol Displays [Enabled]. Obtain WINS Server Address Automatically You can check this checkbox to acquire the WINS server address automatically using DHCP.
- Page 50 2 Environment Settings [Ethernet] is displayed. Port Information TCP Port Number You can set the Port9100 port No. (a value between 1 and 65535). You must set a unique number for each port. (Default: 9100) Maximum Connections per Port The maximum number of connections is displayed.
-
Page 51: Network Twain
Using CentreWare Internet Services Configuration Connection [Enabled] is displayed. Physical Connection [Ethernet] is displayed. Keep Alive Timeout The keep-alive timeout period is displayed. Port Number You can set the port No. used for HTTP communication (a value between 1 and 65535). You must set a unique number for each port. - Page 52 2 Environment Settings [Apply] button You can apply changes by pressing this button. Note • Reboot the machine to enable new settings. Job Templates (Services > Scan) Network Scanning Output Color You can set the color mode from [Black & White] or [Color]. (Default: Black & White) ...
- Page 53 Using CentreWare Internet Services IPv4 Filtering IP Filtering You can check [Enabled] to enable IP Filtering. (Default: Off) IP Filter Rule List The accessible IPv4 address is displayed. [Add] button The Add IP Filter Rule - IPv4 screen is displayed. You can add the accessible IPv4 address. You can add up to 10 IPv4 addresses.
-
Page 54: [Support] Tab
2 Environment Settings System Administrator Settings (Security) You can set the system administrator's user ID and the passcode. System Administrator Settings Administrator's Login ID You can enter the system administrator's user ID (between 1 and 32 ASCII code characters in length, excludes "+", ";", "<", ">", """, "?", "[", "]", "'", "{", "}", "|", ":". - Page 55 Using CentreWare Internet Services View All Server/E-mail Address Address Number The registered numbers (4 digits) of the E-mail or Server addresses are displayed. Name The registered names of the E-mail or Server addresses are displayed. Address Type The address types of the registered addresses are displayed.
-
Page 56: Common Tasks
2 Environment Settings User Name Enter the user name to be registered with up to 96 characters in ASCII code alphabetic, numbers, and blank. Password Enter the password for SMB to be registered with up to 32 characters in ASCII code numbers, symbols, and blank. -
Page 57: Installing The Print Driver/Scan Driver
Installing the Print Driver/Scan Driver Installing the Print Driver/Scan Driver Installing the Print Driver To enable the machine to print, you must first install a print driver from the Media (Software/Product Manual). The Media (Software/Product Manual) contains the following print driver. Print Driver Name Description FX DocuCentre S2520/S2320... - Page 58 2 Environment Settings...
-
Page 59: Product Overview
3 Product Overview This chapter lists the name of each machine component, and describes basic operations such as how to turn the power ON/OFF and use the control panel. Machine Components .........................60 Power Source ...........................64 Power Saver Mode.........................65 ... -
Page 60: Machine Components
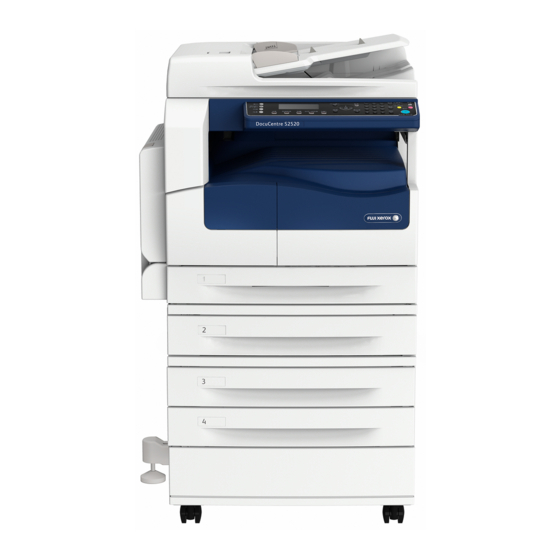
3 Product Overview Machine Components This section describes the machine components and their functions. Front, Left Side Component Description Document cover Holds document in place. Document glass Place document here. Control panel Contains the buttons, the LED indicators, and the display used for operations. -
Page 61: Right Side, Rear
Machine Components Component Description One tray module cover [B] Open this cover to remove any jammed paper from Tray 2. Tray 5 (bypass) Load paper here. The tray can be extended. Left cover [A] Open this cover to remove any jammed paper. Note •... -
Page 62: Inside
3 Product Overview Inside Component Description Toner cartridge Contains toner (the powder used to form the image). Drum cartridge Contains photoconductors. Fusing unit Fuses toner on paper. Important • Do not touch this unit as it is extremely hot. -
Page 63: Duplex Automatic Document Feeder
Machine Components Duplex Automatic Document Feeder Component Description Document feeder cover Open this cover to remove any jammed paper. Inner cover Open this cover to remove any jammed paper. Document guides Aligns the edges of documents. Document feeder tray Load documents here. Document stopper Prevents outputs from falling off. -
Page 64: Power Source
3 Product Overview Power Source Switching the Power On The following describes how to switch the power on. The machine takes approximately 19 seconds or less to warm up and to be ready to copy or print after the power is turned on. It may take slightly longer than normal depending on the device configuration. -
Page 65: Power Saver Mode
Power Saver Mode Power Saver Mode The machine is installed with the Power Saver function that will automatically cut off the electricity to the machine if no copy or print data is received for a certain duration. There are two Power Saver modes: Low Power mode and Sleep mode. ... - Page 66 3 Product Overview Exiting Low Power mode Receiving a job Pressing the <Power Saver> button Entering System Administration mode from a computer Pressing any button on the control panel Taking paper out or putting in a tray ...
-
Page 67: Control Panel
Control Panel Control Panel The names and functions of the control panel's components are described below. Component Function <Copy> button Press this button to use the Copy feature. When the Copy feature is selected, this button lights up. For more information, refer to "Copy" (P.95). <ID Card Copy>... -
Page 68: About Quick-Buttons
3 Product Overview Component Function <ClearAll> button Press this button to reset the displayed settings of each feature to default values or clear the entered numbers. The setting is returned to the same condition as the machine is powered on. <Start>... - Page 69 Control Panel Practical use of Quick-Buttons: Keep pressing the button while you calmly decide your setting value. Stop pressing the button when your desired setting is being selected. Once you get used to the Quick-Button operation, you can easily change the settings. By using the <OK>...
-
Page 70: About Icons On The Display
3 Product Overview Example) Copy > Original Type The process of the Quick-Button operation by pressing one single button (Quick-Button): New setting is applied when: 2 seconds passed after pressing the button and the Quick-Button setting screen is exited. Current setting Pressing another Quick-Button. - Page 71 Control Panel ID Card Function Icon Item Copy Scan Copy Lighten/Darken Darken +2 Darken +1 Normal Lighten +1 Lighten +2 Toner Saver Original Type Photo Photo & Text Text 1 1 Sided 2 Sided 1 2 Sided 2 1 Sided 2 ...
- Page 72 3 Product Overview ID Card Function Icon Item Copy Scan Copy Pages per Side 2 Pages 4 Pages...
-
Page 73: About The Default Display Screen
About the Default Display Screen About the Default Display Screen The [Default Display] screen lets you change the Default Display Screen — the screen displayed when turning the power ON and after returning from the Power Saver mode. Setting the Default Display You can set the default displayed screen from Copy or Scan screen. - Page 74 3 Product Overview Select the desired default display, and then press Default Display the <OK> button. Copy Scan...
-
Page 75: Account Mode
Account Mode Account Mode This section describes three different account modes that the machine offers to manage accounts effectively for copy jobs, and how to log in to the machine. Types of Account Modes You can select one of the following account modes in the System Settings: No Account Mode, Single Account Mode, or Multiple Account Mode. - Page 76 3 Product Overview The <Log In/Out> button is lit while you are <Log In/Out> button logged in to the machine. Note • You do not need to log in to the machine for a scan job or print job. To log out, press the <Log In/Out> button again. Logging in the Machine in Multiple Account Mode The following procedure describes how to log in to the machine when the machine is in Multiple Account Mode.
-
Page 77: Entering Text
Entering Text Entering Text Some operations display screens for entering text. This section describes how to enter text. You can enter numbers, letters and symbols. Use the numeric keypad to enter text. The type of characters you can select varies according to the menu. -
Page 78: Setting The Options Configuration
3 Product Overview Setting the Options Configuration You can retrieve the information of machine configuration into the print driver. Update the information of machine configuration when any optional component is changed. When using the Ethernet interface You can load the machine's option configuration automatically to the print driver. Note •... - Page 79 Setting the Options Configuration Click [Get Information from Printer]. If [Printer Searching Method] is displayed The machine's information is not loaded onto the print driver. Complete the following operations. 1) Select [Specify Address], and click [Next]. 2) Enter the printer name or IP Address in the [Printer Name or IP Address] field.
- Page 80 3 Product Overview...
-
Page 81: Loading Paper
4 Loading Paper This chapter describes the paper that can be used with the machine, precautions when handling paper, and how to load paper in trays. Paper Types............................82 Loading Paper ..........................87 Changing Paper Size ........................90 Changing the Paper Settings....................92... -
Page 82: Paper Types
Use of non-recommended paper types may result in paper jams, lower print quality, malfunctions, or damage to the machine. To achieve optimum machine performance, use only paper types recommended by Fuji Xerox. If you desire to use paper other than the paper recommended by Fuji Xerox, contact our Customer Support Center. WARNING Do not use conductive paper such as origami paper, carbonic paper or conductively-coated paper. -
Page 83: Supported Paper Type
Paper Types Duplexing (two-sided printing) The following paper types are supported for automatic duplexing: Paper Type (Quality) Lightweight (60 to 63 gsm) Plain 1 (64 to 74 gsm) Plain 2 (75 to 90 gsm) Supported Paper Type Standard Paper When printing or copying on commonly used paper (plain paper), use paper meeting the standards described below. -
Page 84: Usable Paper
4 Loading Paper Usable Paper In addition to the standard/semi-standard paper, the following paper also can be used. Basis Weight Paper Name Paper Type Notes / Countermeasure (gsm) Ncolor209 Extra-HW DocuPaper Black Plain 1 Performer+ Plain 2 Before copying or printing, fan the stack of paper well and reload it in the tray. -
Page 85: Unusable Paper
Double A Plain 2 Roxy Paper Plain 2 Unusable Paper Using paper not recommended by Fuji Xerox may cause a paper jam or machine malfunction. Use paper recommended by Fuji Xerox. Damp or wet paper Paper pre-printed with other printer or copying machine ... - Page 86 4 Loading Paper Do not load paper of mixed sizes together into a tray. Take care not to touch the print side. Oils from your skin may adhere to the print media, which may affect printing quality. If unavoidable, be sure to use a finger cot, gloves, or other means to cover your fingers before touching the print media.
-
Page 87: Loading Paper
Loading Paper Loading Paper This section describes how to load paper in a paper tray. Types of paper loaded in trays The machine automatically detects the size and orientation of paper loaded in a tray, but the paper type must be set manually. Each tray's default paper type setting is Plain 1 paper. Change the paper type setting when loading a different type of paper. -
Page 88: Loading Paper In Tray 5 (Bypass)
4 Loading Paper Important • While the machine is copying or printing, do not pull out the tray that the job uses. • To prevent paper jams or loading errors, do not load different sizes or types of paper on top of any remaining paper in a tray. - Page 89 Loading Paper Open the Tray 5 (bypass). Note • If necessary, pull out the extension tray. Pull out the extension tray gently. Load paper with the side to be copied or printed on facing down, inserting paper until its edge lightly touches against the paper feed entrance.
-
Page 90: Changing Paper Size
4 Loading Paper Changing Paper Size This section describes how to change paper size in Trays 1 to 4. Important • Do not load mixed paper sizes into a tray. Note • A paper type is preset for Trays 1 to 4. Normally, [Plain 1] is set for the trays. When changing it to a different paper type, change the paper quality settings to match the type of paper to be loaded so that you can maintain high quality printing. - Page 91 Changing Paper Size Load paper with the side to copy or print on facing up. Align the leading edge of paper with the left side of the tray. Important • Do not load paper above the maximum fill line. It may cause paper jams or machine malfunctions.
-
Page 92: Changing The Paper Settings
4 Loading Paper Changing the Paper Settings This section describes how to change the paper type setting for a tray. A paper type is preset for Trays 1 to 4. Normally, [Plain 1] is set for the trays. To maintain the same print quality after changing paper in a different quality in the same tray, you need to change the paper quality setting for the tray that matches new paper loaded. - Page 93 Changing the Paper Settings Select the desired paper type, and then press the Paper Type <OK> button. Plain 1 Plain 2 Lightweight Press the control panel's <Log In/Out> button. Note • The <Log In/Out> button light goes out when the machine has exited System Administration mode.
- Page 94 4 Loading Paper...
-
Page 95: Copy
5 Copy This chapter describes the Copy functions and operations. Overview of Copy Operations....................96 Operations Performed While Copying ................102 ID Card Copy..........................103 Advanced Copy Settings......................105 Managing the Copy Paper with Accounting ..............114... -
Page 96: Overview Of Copy Operations
5 Copy Overview of Copy Operations The basic flow of copy operations including placing document in the machine and making advanced settings is described below. Placing Document The following two methods are available to place document: Document feeder Single sheet ... -
Page 97: Document Glass
Overview of Copy Operations Remove any paper clips or staples from document before placing it in the document feeder. Place the document in the center of the document feeder, with the side to be scanned (or the front surface of a 2 sided document) facing Align the document guides to each side of document. -
Page 98: Making Advanced Settings
5 Copy • You can select a custom paper size specified for Tray 5 (bypass). For more information, refer to "Tray 5" (P.140). CAUTION Do not apply excessive force to hold thick document on the document glass. It may break the glass and cause injuries. Follow the steps below to place document on the document glass. -
Page 99: Entering The Number Of Copies
Overview of Copy Operations Press the <Copy> button. <Copy> button Make advanced settings as needed. Copy Refer to "Advanced Copy Settings" (P.105). Paper Supply... Auto Reduce/Enlarge... Auto Original Size... Auto Entering the Number of Copies You can enter a value between 1 and 999 for the number of copies. Use the numeric keypad to enter the desired Numeric keypad number of copies. -
Page 100: Starting The Copy Job
5 Copy Starting the Copy Job Press the <Start> button. <Start> button Important • If document is placed in the document feeder, do not press down on the document while it is being fed through the machine. Note • If a problem occurs, an error code appears on the screen. - Page 101 Overview of Copy Operations If none of the above conditions applied when copying, the machine does not perform Auto Rotation, which may result in a part of the image to be missing.
-
Page 102: Operations Performed While Copying
5 Copy Operations Performed While Copying While the machine is copying, you can cancel the currently executing job, and check or cancel pending jobs. Canceling the Current Copy Job To cancel the currently executing copy job: Press the <Stop> button. <Stop>... -
Page 103: Id Card Copy
ID Card Copy ID Card Copy You can copy both sides of an ID card (name card, employee card, etc.) on one side of paper. Press the <ID Card Copy> button to use this feature. Original orientation Copied output Back side Front side Original document Front side... - Page 104 5 Copy When you make copies of multiple ID cards 1) Select [Number of Cards]. ID Card Copy Auto Paper Supply... Number of Cards... 1 Card Reduce/Enlarge... Auto 2) Select a number of cards and place the ID Number of Cards cards as displayed on the screen.
-
Page 105: Advanced Copy Settings
Advanced Copy Settings Advanced Copy Settings This section describes the advanced functions available for Copy feature. Setting Item Description Page: Adjusts the copy density. P.106 Lighten/Darken Sets the document type. P.107 *1*2 Original Type Used to select one- or two-sided copying. P.107 2 Sided Collated... -
Page 106: Lighten/Darken
5 Copy Lighten/Darken You can set the density from the five levels. The farther left the position of , the darker the copy; the farther right, the lighter and the toner saver mode. Press the <Lighten/Darken> button. <Lighten/Darken> button The selection such as a brightness level and the Copy Toner Saver changes everytime the <Lighten/ Toner Saver... -
Page 107: Original Type
Advanced Copy Settings Original Type You can set the type of document to optimize copies. Press the <Original Type> button. <Original Type> button The selection of a document type changes Copy everytime the <Original Type> button is pressed. Text The selection is applied when the screen is Photo &... -
Page 108: Collated
5 Copy The selection of a copy method changes Copy everytime the <2 Sided> button is pressed. The → 1 Sided selection is applied when the screen is returned → 2 Sided to the main menu screen without pressing the →... -
Page 109: Pages Per Side
Advanced Copy Settings On The machine outputs sheets sorted into sets that are arranged in page order. When a document is placed in the document feeder, it automatically turns on (the setting can be changed to Off manually). On (Rotate) The machine outputs sheets sorted into sets that are arranged in page order by alternating between landscape and portrait orientations. -
Page 110: Reduce/Enlarge
5 Copy Select [Paper Supply], and then press the <OK> Copy button. Paper Supply... Auto Reduce/Enlarge... Auto Auto Original Size... Select the desired paper tray, and then press the Paper Supply Qty. <OK> button. Auto Auto Tray 1:A4 Tray 2:A3 The machine selects the appropriate paper tray automatically based on the document size. -
Page 111: Original Size
Advanced Copy Settings Fixed zoom ratio The machine reduces or enlarges the copy according to the selected zoom ratio. Preset XXX% The machine reduces/enlarges copies by the set zoom ratio. Note • The value displayed as the preset reduction/enlargement zoom ratio is the value set by selecting [Tools] >... -
Page 112: Original - Binding Position
5 Copy Original - Binding Position You can set the position when binding documents. Select [Original - Binding Position], and then Copy press the <OK> button. Reduce/Enlarge... Auto Original Size... Auto Flip on Long Original-Binding... Select the binding position, and then press the Original-Binding Position Qty. - Page 113 Advanced Copy Settings Select [Edge Erase], and then press the <OK> Copy button. Original-Binding... Flip on Long Output-Binding P... Flip on Long Edge Erase... Use the numeric keypad to enter a value, and then Edge Erase Qty. press the <OK> button. [0 - 40]...
-
Page 114: Managing The Copy Paper With Accounting
5 Copy Managing the Copy Paper with Accounting You can manage the copy paper usage for up to 30 users. You can set the passcode and the maximum number of copied impressions permitted for each user. The following features are available with Accounting function. ... -
Page 115: Scan
6 Scan This chapter describes the Scan functions. Scanning Procedure........................116 Loading Scan Data Using the PC-Based Application...........120 Sending Scan Data to PC as E-mail Attachment - E-mail...........121 Sending Scan Data Directly from the Machine to the PC..........123 ... -
Page 116: Scanning Procedure
6 Scan Scanning Procedure The basic flow of scan operations including placing document in the machine and making advanced settings is described below. Placing the Document The following two methods are available to load documents: Document feeder Single sheet ... - Page 117 Scanning Procedure Important • To avoid paper jams, use the document glass for mixed size, folded, wrinkled, cut-and-pasted documents, curled paper, or carbon-backed paper. If you can flatten the curled document, you can use the document. Follow the steps below to place document on the document feeder. You can place a single or multiple pages of a document.
-
Page 118: Using The Scan Feature
6 Scan Selectable document sizes in the scan driver , A4 , A4 , A3 , B5 , B5 , B4 , 5.5 x 8.5" , 7.25 x 10.5" , 8.5 × 11" , 8.5 × 11" , 8.5 × 13" , 8.5 ×... - Page 119 Scanning Procedure Scan Function Connection Details See Page E-mail Network/USB Scan data is sent to the P.121 computer as an e-mail attachment. Scan to PC (Network/ Network/USB Scan data is forwarded P.123 USB) directly from the machine to the computer. Note •...
-
Page 120: Loading Scan Data Using The Pc-Based Application
6 Scan Loading Scan Data Using the PC-Based Application This function allows you to load scan data from a TWAIN-compatible or Windows Image Acquisition (WIA)-compatible application installed on a computer. On the computer display, you can set the scanning condition and view the scanning process on the preview screen while scanning the document. -
Page 121: Sending Scan Data To Pc As E-Mail Attachment - E-Mail
Sending Scan Data to PC as E-mail Attachment - E-mail Sending Scan Data to PC as E-mail Attachment - E-mail This function allows you to send scanned data via e-mail. You can send the monochrome scanned data in PDF or TIFF or the color scanned data in PDF or JPEG to an e-mail. The network (SMTP) or USB is used for the e-mail transmission. - Page 122 6 Scan • To check the e-mail address registered for a recipient, select the recipient and press the <#> button. When you have checked the address, press the <OK> button. Make advanced settings as needed. Scan to [02] For more information on advanced settings, refer to "Advanced Color Mode...
-
Page 123: Sending Scan Data Directly From The Machine To The Pc
Sending Scan Data Directly from the Machine to the PC Sending Scan Data Directly from the Machine to the PC This function allows you to send scanned data directly from the machine to your computer. You can send the monochrome scanned data in PDF or TIFF or the color scanned data in PDF or JPEG to the specified computer. - Page 124 6 Scan Select the desired address of computer, and then PC(Network) [#]:Info Jump to [_ ] press the <OK> button. 01 pc1 Note • You can also enter the two-digit number of 02 Smith registered computer to jump to the specified 03 pc2 computer.
-
Page 125: Operations During Scanning
Operations during Scanning Operations during Scanning While the machine is scanning document, you can cancel the currently executing job, and check or cancel the pending jobs. Canceling the Current Scan Job To cancel the currently scanning job: On the machine Press the <Stop>... -
Page 126: Advanced Scanner Settings
6 Scan Advanced Scanner Settings This section describes the advanced functions available for Scan feature with [E-mail] or [PC (Network)]. Setting Item Description See Page Lighten/Darken* Adjusts the scan density. P.126 Original Type* Sets the document type. P.127 2 Sided Sets whether the document is one- or two-sided. -
Page 127: Original Type
Advanced Scanner Settings Press the <Lighten/Darken> button. <Lighten/Darken> button The selection of the brightness level changes Lighten/Darken everytime the <Lighten/Darken> button is Darken Normal Lighten pressed. The selection is applied when the screen is returned to the main menu screen without Lighten/Darken. -
Page 128: Sided
6 Scan The selection of a document type changes Scan to [01] everytime the <Original Type> button is pressed. Text The selection is applied when the screen is Photo & Text returned to the main menu screen without pressing the <OK> button. Photo You can change the displayed time length of the setting screen. -
Page 129: Resolution
Advanced Scanner Settings Resolution Sets the scan resolution. You can select 200 × 200 dpi, 300 × 300 dpi, 400 × 400 dpi or 600 × 600 dpi. Press the <Collated/Resolution> button. <Collated/Resolution> button The selection of a resolution changes everytime Scan to [01] the <Collated/Resolution>... -
Page 130: Original Size
6 Scan Select [File Format], and then press the <OK> Scan to [01] button. Color Mode... Color File Format... Original Size... Select the desired file format, and then press the File Format <OK> button. PDF (default) TIFF JPEG Supports both [Black & White] and [Color]. ... -
Page 131: Print
7 Print This chapter describes how to print using the print driver. Major Print Driver Functions ....................132 Printing ............................133 Operations during Printing .....................134... -
Page 132: Major Print Driver Functions
7 Print Major Print Driver Functions This section describes the major print driver functions used for printing. The print driver must be installed before use. For information on how to install the print driver, refer to "Installing the Print Driver/Scan Driver" (P.57). Note •... -
Page 133: Printing
Printing Printing This section describes how to print document. The procedure used to print will vary according to the application you are using. See your application's manual for the specific procedure. The steps below are the operation used for the [FX DocuCentre S2520/S2320] print driver screen. -
Page 134: Operations During Printing
7 Print Operations during Printing You can cancel the currently printing job. Stopping the Print Job To cancel the currently printing job: On the machine Press the <Stop> button. <Stop> button On the computer Double-click the printer icon located on the task bar in the lower right corner of the screen. -
Page 135: Tools
8 Tools Each function is set to the factory default (initial) settings, but you can customize these settings to match your operating environment. You can change the settings in the [Tools] screen in System Administration mode. Note • Some settings cannot be displayed on some models. An optional component is required. For more information, contact our Customer Support Center. -
Page 136: System Settings Procedure
8 Tools System Settings Procedure An overview of how to change the machine's default settings is shown below. Important • If there are any current or pending jobs, you cannot enter System Administration mode. If you still cannot enter System Administration mode, wait for 5 minutes and try again since there may be background process running. -
Page 137: Exit System Administration Mode
System Settings Procedure Exit System Administration Mode Press the <Log In/Out> button. <Log In/Out> button Note • If any settings that require to reboot the machine for the new settings to be applied, reboot the machine as the message appear. •... -
Page 138: List Of Tools Menu Items Displayed In System Administration Mode
8 Tools List of Tools Menu Items Displayed in System Administration Mode The table below lists the default settings you can change. The items displayed will vary according to your machine's configuration. Setting Item Description See Page: System Settings Used to make system settings. P.140 Paper Tray Settings Used to make the paper type setting for a... - Page 139 List of Tools Menu Items Displayed in System Administration Mode Setting Item Description See Page: Original Type Used to set the default original type value. P.154 Resolution Used to set the default scan resolution value. P.154 Color Mode Used to set the color mode for scanning. P.154 File Format (B&W) Used to set the file format of the...
-
Page 140: System Settings
8 Tools System Settings Used to make system settings. For information on how to display the [System Settings] screen, refer to "System Settings Procedure" (P.136). Paper Tray Settings Tray Settings The Tray Settings set the paper type (paper quality) for each paper tray. The Tray Settings is also used to set the paper size for Paper Tray 5 (bypass). -
Page 141: Consumables Settings
System Settings Tray 2 to 4 Sets each tray to be included in the automatic tray selection. You can select [On] or [Off]. [On] is set at the time of factory shipment. Note • [Tray 2] to [Tray 4] are displayed when the optional paper trays are mounted. Paper Size Settings Used to specify the size of paper to be automatically detected when you use standard sizes of a document or the machine is set to detect sizes of a document. -
Page 142: Region & Timer Settings
8 Tools Region & Timer Settings Region Sets the machine's region of use. You can select from [Australia], [China], [Taiwan], [Hong Kong], [Indonesia], [Korea], [Malaysia], [New Zealand], [Philippines], [Singapore], [Vietnam], or [Thailand]. [Australia] is set at the time of factory shipment. Important •... -
Page 143: Idle Timeout
System Settings The machine's power is not turned OFF completely in Low Power mode. Instead, this mode creates a balance between low power consumption and short warm-up time by controlling the temperature of the fusing unit to a level midway between the power OFF temperature and the "Ready"... - Page 144 8 Tools Select [Date & Time], and then press the <OK> Clock button. Date & Time... Date Format... yy/mm/dd Time Format... Set the date. Date [OK]:Next Screen Use the numeric keypad (buttons 0 to 9) to enter the date. 1900 / 1 / 1 Example: To enter June 18, 2014 as the date, Date...
-
Page 145: Other Settings
[* * * * * ] (*). Press the <OK> button. Maintenance Used to clear the counter of the consumables/periodic replacement parts when directed by your local Fuji Xerox representative. Important • Do not use this function except as necessary. -
Page 146: Job History Verbose
8 Tools Job History Verbose Sets the machine to record Copy and USB Scan jobs on the Job History Reports. You can select [On] or [Off]. [Off] is set at the time of factory shipment. Default Display The [Default Display] screen lets you change the Default Display screen. The screen is displayed at power ON and after returning from the Power Saver mode. -
Page 147: Network Settings
Network Settings Network Settings Used to make network environment settings. For information on how to display the [Network Settings] screen, refer to "System Settings Procedure" (P.136). IPv4 Address Solution Sets IPv4. Get IP Address Sets the method used to acquire the IP address, subnet mask, and gateway address. ... -
Page 148: Ipv6 Address Solution
8 Tools IPv6 Address Solution Sets IPv6. Set IPv6 Sets whether to use IPv6. You can select [Disable] or [Enable]. [Disable] is set at the time of factory shipment. IP Address Use the numeric keypad to enter the IP address. ... - Page 149 Network Settings IPv6 Sets whether to restrict the IPv6 addresses that can access the machine. When this setting is enabled, you can register up to 10 IP addresses/subnet masks to support.
-
Page 150: Copy Settings
8 Tools Copy Settings Used to set the functions for the Copy feature. For information on how to display the [Copy Settings] screen, refer to "System Settings Procedure" (P.136). Lighten/Darken Sets the default copy density value displayed in [Lighten/Darken]. You can select [Darken +2], [Darken +1], [Normal], [Lighten +1], [Lighten +2], or [Toner Saver]. -
Page 151: Paper Supply
Copy Settings Paper Supply Sets the paper tray displayed in [Paper Supply]. Select the default paper tray to use for copying. [Auto] is set at the time of factory shipment. Note • [Tray 2], [Tray 3], and [Tray 4] are displayed when the optional paper trays are mounted. •... -
Page 152: Back. Suppression Level
8 Tools Back. Suppression Level Sets the background suppression level used when [Background Suppression] is set to [On] in [Copy Settings]. You can select from [Low], [Normal], [Higher +1], [Higher +2], and [Higher +3]. [Normal] is the standard suppression level, [Low] is the lowest suppression Level, and [Higher +3] is the highest suppression level. -
Page 153: Id Card Copy Settings
ID Card Copy Settings ID Card Copy Settings Sets the default advanced ID Card Copy settings displayed when the control panel’s <ID Card Copy> button is pressed. Original Type Sets the default value displayed for [Original Type]. This setting optimizes the copy characteristics for the specified document type. -
Page 154: Scan Settings
8 Tools Scan Settings Used to set the functions for the Scan feature. Note • The following settings are available for the Scan to E-mail and Scan to PC (Network/USB) functions. For the TWAIN and Windows Image Acquisition (WIA) application settings, the settings that you specify with the application are applied. -
Page 155: File Format (B&W)
Scan Settings Color Scans document as color documents. File Format (B&W) Sets the default file format used for scanning in monochrome. [PDF] is set at the time of factor shipment PDF Saves the scanned document in PDF file format. ... -
Page 156: Image Compression
8 Tools You can select from [Low], [Normal], [Higher +1], [Higher +2], and [Higher +3]. [Normal] is the standard suppression level, [Low] is the lowest suppression Level, and [Higher +3] is the highest suppression level. [Normal] is set at the time of factory shipment. For more information, refer to [Copy Settings] : "Back. -
Page 157: User Management
User Management User Management When [Multiple] is selected under [User Control], you can manage the amount of copy paper used per user or group using Accounting. Used to set passcodes and the maximum number of impressions permitted for copying as well as to check the total number of impressions copied for each user or group. -
Page 158: Login Passcode
8 Tools Select [Multiple], and then press the <OK> User Control button. Single Multiple Select [Confirm/Edit], and then press the <OK> User Management button. User Control... Multiple Confirm/Edit... Reset Copied Impressions... Select the user to display or set, and then press Confirm/Edit Jump to [_ ] the <OK>... -
Page 159: Reset Copied Impressions
User Management Check the value, and then press the <Back> Copied Impressions button. Copy Limit (Unit: Impressions) Used to display or set the maximum number of impressions the user is permitted to copy. Press [Copy Limit (Unit: Impressions)]. User 01 Login Passcode... - Page 160 8 Tools...
-
Page 161: Machine Status
9 Machine Status This chapter describes how to check the basic information and status of your machine. • Some settings are not displayed on some models. An optional component is required. For more Note information, contact our Customer Support Center. ... -
Page 162: Checking Consumables
9 Machine Status Checking Consumables The [Machine Status] screen displays the status of consumables such as the toner cartridge and the drum cartridge. Follow the steps below to check the status of consumables. Press the <Machine Status> button. <Machine Status> button Machine Status Toner Status: ... -
Page 163: Selecting Language
Selecting Language Selecting Language You can select from three languages, English, Simplified Chinese, and Korean, for the user interface language used in the control panel display. Note • The default language may vary depending on the region of purchase. Follow the steps below to select the language. Press the <Machine Status>... -
Page 164: Checking The Machine's Ip Address
9 Machine Status Checking the Machine’s IP Address You can display the IPv6 or IPv4 address of your machine. Press the <Machine Status> button. <Machine Status> button In the [Machine Status] screen, select [IP Machine Status Toner Status: Address]. Language... Drum Status: IP Address... -
Page 165: Checking The User Account Information
Checking the User Account Information Checking the User Account Information You can check the total number of copied impression by the user and the maximum number of impressions the user is permitted to copy. Press the <Machine Status> button. <Machine Status> button In the [Machine Status] screen, select [User Machine Status Toner Status:... -
Page 166: Checking The Meter
9 Machine Status Checking the Meter The [Billing Information] screen shows the number of pages output by the machine, itemized as follows: Item Description Product Code Product code of your machine. Serial Number Serial number of your machine. Meter 1 The total number of pages printed for copying or printing. -
Page 167: Printing Reports/Lists
Printing Reports/Lists Printing Reports/Lists The machine can print the following reports/lists: Report/List Description System Settings Report Prints the machine's hardware configuration, IP address, version information, number of pages printed by each function, status of consumables, the items that can be set by CentreWare Internet Service, and their values. - Page 168 9 Machine Status Select the report or list to print, and then press Print Report [OK]:Print the <OK> button. System Settings Note • To cancel printing while a job is printing, press Service Settings the <Stop> button, and select [Yes] on the Job History confirmation screen.
-
Page 169: Notification Display
Notification Display Notification Display You can set whether to display the Notification screen. By default, the machine is set to display the notification. Press the <Machine Status> button. <Machine Status> button Select [Notification Display], and then press the Machine Status Toner Status: <OK>... -
Page 170: Id Card Guidance Display
9 Machine Status ID Card Guidance Display You can set whether to display the guidance of the ID Card Copy feature. By default, the machine is set to display the guidance. Press the <Machine Status> button. <Machine Status> button Select [ID Card Guidance], and then press the Machine Status Toner Status: <OK>... -
Page 171: Quick-Button Selection Timer
Quick-Button Selection Timer Quick-Button Selection Timer You can set the displayed time length of the setting screens when a Quick-Button is pressed. By default, the time length is set to 2 seconds. Press the <Machine Status> button. <Machine Status> button Select [Quick-Button Selection Timer], and then Machine Status Toner Status:... -
Page 172: Firmware Version
9 Machine Status Firmware Version You can check the firmware version of the machine. Press the <Machine Status> button. <Machine Status> button Select [Firmware Version], and then press the Machine Status Toner Status: <OK> button. Qucik-Button Selection T..Drum Status: Print Counter Status.. -
Page 173: 10 Job Status
10 Job Status This chapter describes how to check the status of current or pending jobs, and how to cancel jobs. Note • Some settings cannot be displayed on some models. An optional component is required. For more information, contact our Customer Support Center. ... -
Page 174: Checking Current/Pending Jobs
10 Job Status Checking Current/Pending Jobs You can check the status of the following current or pending jobs: Current printor scan job Pending print jobs Note • Completed jobs are not displayed. Press the <Job Status> button. <Job Status> button Used to check the jobs. -
Page 175: Canceling The Current Job
Canceling the Current Job Canceling the Current Job Press the <Job Status> button. <Job Status> button Select the current job. Active Jobs [Stop]:Delete 06/18 Print 06/18 Print 06/18 Scan Press the <Stop> button. <Stop> button Important • You may not be able to cancel a job depending on the status of the job processing. - Page 176 10 Job Status...
-
Page 177: 11 Maintenance
11 Maintenance This chapter describes how to replace consumables and clean the machine. Replacing Consumables......................178 Cleaning the Machine.......................187... -
Page 178: Replacing Consumables
It may catch fire by electric sparks inside a vacuum cleaner and cause explosion. Use a broom or a wet cloth to wipe off the spills. If you spill a large volume of toner, contact your local Fuji Xerox representative. -
Page 179: Replacing The Toner Cartridge
Important • When you replace a toner cartridge, toner may spill and soil the floor. We recommend laying paper on the floor beforehand. • The use of toner cartridges not recommended by Fuji Xerox may degrade image quality and performance. Use only the toner cartridges recommended by Fuji Xerox. - Page 180 Never throw a toner cartridge into an open flame. Remaining toner in the cartridge may catch fire and cause burn injuries or explosion. If you have a used toner cartridge no longer needed, contact your local Fuji Xerox representative for its disposal.
- Page 181 Replacing Consumables Orient the toner cartridge with the arrow () facing up, and insert it as far as it will go. Close the front cover. Note • If the front cover is not completely closed, an error code will appear and the machine will remain paused.
-
Page 182: Replacing The Drum Cartridge
Use the figures above only as a guideline. Important • The use of drum cartridges not recommended by Fuji Xerox may lower the machine's output quality or performance. Always use drum cartridges recommended by Fuji Xerox in the machine. - Page 183 Important • Do not place the new drum cartridge in an upright position. • Return the used drum cartridge to your local Fuji Xerox representative. Peel the protective sheet off the new drum...
- Page 184 11 Maintenance Insert the new drum cartridge. Tighten the two screws clockwise. Peel off the drum cartridge's protective strip. Close the front cover. • If the front cover is not completely closed, an error code will appear and the machine will remain Note paused.
- Page 185 Replacing Consumables Note • If the left cover is not completely closed, an error code will appear and the machine will remain paused. Press the <Log In/Out> button. <Log In/Out> button Use the numeric keypad to enter the passcode, and then press the <OK> button. Note •...
- Page 186 11 Maintenance Press the <Start> button. Drum Cartridge The NVM value is cleared now. MaintenancAre You Sure?A... MaintYes: Start No: Clear AllA... <Start> button Press the <Log In/Out> button. <Log In/Out> button Note • If any settings that require to reboot the machine for the new settings to be applied, reboot the machine as the message appear.
-
Page 187: Cleaning The Machine
Cleaning the Machine Cleaning the Machine This section describes how to clean the machine such as the outer casing, the document cover, the document feeder, and the document glass. WARNING When cleaning this product, use the designated cleaning materials exclusive to it. Other cleaning materials may result in poor performance of the product. -
Page 188: Cleaning The Document Presser And The Narrow Glass Strip
11 Maintenance Wipe the document cover with a soft cloth moistened with water to remove any dirt, and then wipe it with a soft, dry cloth. Important • Do not use cleaning agents other than water or neutral detergent. Note •... -
Page 189: Cleaning Document Feeder Rollers
Cleaning the Machine Cleaning Document Feeder Rollers If the document feeder rollers become soiled, smudges may appear on copies, or scanned documents and paper jams may occur. To ensure clean copies at all times, clean the document feeder rollers about once a month. Important •... - Page 190 11 Maintenance...
-
Page 191: 12 Problem Solving
12 Problem Solving This chapter provides possible solutions to various problems you may encounter with the machine. Troubleshooting..........................192 Machine Problems........................193 Image Quality Problems......................196 Copying Problems........................201 Printer Problems..........................204 Scan Problems..........................206 Network Related Problems .....................210 ... -
Page 192: Troubleshooting
12 Problem Solving Troubleshooting This section describes troubles that may occur with the machine and their solutions. Follow the troubleshooting procedure below to solve the problems. There is a problem with the [Action] Refer to "Machine Problems" (P.193). machine's operation. A message is displayed. -
Page 193: Machine Problems
Machine Problems Machine Problems Check the machine's status again if you suspect a malfunction. Symptom Possible Cause Remedy The machine is Is the power switched ON? Switch the power ON. not powered on. Refer to "Power Source" (P.64). Is the power cord plugged Switch the power OFF and make sure the into the power outlet? power plug is inserted securely. - Page 194 12 Problem Solving Symptom Possible Cause Remedy The print quality An image quality problem Take the required action described in "Image is poor. may have occurred. Quality Problems". Refer to "Image Quality Problems" (P.196). Unable to insert Did you open a cover or Do not forcibly insert or remove the tray.
- Page 195 Machine Problems Symptom Possible Cause Remedy Paper is often Are the paper guides set Load paper correctly, and align the paper jammed or correctly? guides to the paper. wrinkled. Refer to "Loading Paper in Trays 1 to 4 (Optional)" (P.87). Refer to "Loading Paper in Tray 5 (bypass)"...
-
Page 196: Image Quality Problems
12 Problem Solving Image Quality Problems If the image quality of the printout is poor, use the table below to find our most likely cause, and take the required action. If the image quality remains poor after taking the required action, contact our Customer Support Center. - Page 197 Image Quality Problems Symptom Possible Cause Remedy Copies are out of Are the document feeder's Place the document correctly, moving the position or document guides misaligned? document guides into contact with the edges crooked. of the document. Refer to "Placing Document" (P.96). Have you mounted the tray Mount the tray by inserting it securely all the securely?
- Page 198 12 Problem Solving Symptom Possible Cause Remedy Black or colored The drum cartridge has Replace the drum cartridge with a new one. lines appear in deteriorated or been Refer to "Replacing the Drum Cartridge" (P.182). printouts. damaged. The narrow glass strip is dirty. Clean the narrow glass strip. Refer to "Cleaning the Document Presser and the Narrow Glass Strip"...
- Page 199 Image Quality Problems Symptom Possible Cause Remedy The printout The paper is damp. Replace the paper with new paper. comes off on the The paper is unsuitable. Load the correct type of paper. fingers. The toner is not fused to the paper.
- Page 200 12 Problem Solving Symptom Possible Cause Remedy The printout is When using the Tray 5 Load paper of the correct type and size in the faint overall. (bypass) to print, the paper Tray 5 (bypass). size specified in the print Refer to "Loading Paper in Tray 5 (bypass)"...
-
Page 201: Copying Problems
Copying Problems Copying Problems This section provides possible solutions to various problems you may encounter when using the Copy features. Unable to Copy The table below lists possible solutions when you are unable to copy. Symptom Possible Cause Remedy The document is The document size is too The minimum size of document that can be not fed properly... - Page 202 12 Problem Solving Symptom Possible Cause Remedy Copies are too The copy density adjustment Adjust the copy density. dark or too light. is not right. Refer to "Lighten/Darken" (P.106). The document is light. Adjust the copy density. Refer to "Lighten/Darken" (P.106). The image quality setting is If the copy output of black text is too light, not correct for the document.
- Page 203 Copying Problems Symptom Possible Cause Remedy The copy is not The document has shifted out Place the document correctly. the desired size. of position. Refer to "Placing Document" (P.96). The document feeder's Place the document correctly, moving the document guides are document guides into contact with the edges misaligned.
-
Page 204: Printer Problems
12 Problem Solving Printer Problems Unable to Print The table below lists possible solutions when you are unable to print. Symptom Possible Cause Remedy Data remains in The machine's power is not Switch the machine's power ON. the printer icon. Refer to "Power Source"... - Page 205 Printer Problems Symptom Possible Cause Remedy The computer is Confirm whether the print On the computer, select the print driver not using the print driver on the computer is the supplied with the machine. If the print driver is not listed for selection, install the print driver supplied one supplied with the with the machine...
-
Page 206: Scan Problems
12 Problem Solving Scan Problems This section provides possible solutions to various problems you may encounter when using the Scan feature. Unable to Scan The table below lists possible solutions when you are unable to scan. Symptom Possible Cause Remedy The document is The document size is too The minimum size of document that can be... -
Page 207: Unable To Send Scan Data In E-Mail
Scan Problems Unable to Send Scan Data in E-mail The table below lists possible solutions when you are unable to send a scanned document as e-mail. Symptom Possible Cause Remedy Unable to send an The registered e-mail address Check the entered e-mail address. e-mail. -
Page 208: Unable To Forward A Scan Document On The Network (Smb)
12 Problem Solving Unable to Forward a Scan Document on the Network (SMB) The table below lists possible solutions when you are unable to forward a scan document on the network. Symptom Possible Cause Remedy Unable to forward Has the server been entered Check the server setting. -
Page 209: Scan Image Quality Problems
Scan Problems Scan Image Quality Problems This table below lists possible solutions to problems with the image quality of scan data. Symptom Possible Cause Remedy The scanned The document cover or Clean the document cover or document glass. image is dirty. document glass is dirty. -
Page 210: Network Related Problems
12 Problem Solving Network Related Problems This section provides possible solutions to network problems. Problems Using TCP/IP (LPD/Port9100) The table below lists possible causes for problems that occur when using TCP/IP (LPD/ Port9100), the methods to check, and the required actions to take. ... -
Page 211: Problems Using Centreware Internet Services
Network Related Problems Problems Using CentreWare Internet Services The table below lists possible solutions to problems you may encounter when using CentreWare Internet Services. Symptom Remedy Unable to connect to Is the machine operating normally? CentreWare Internet Services. Check whether the machine's power is ON. Is [Internet Services] running? Print a System Settings Report and check it. -
Page 212: Problems With E-Mail Functions
12 Problem Solving Problems With E-mail Functions A list is provided with possible solutions to problems you may encounter in not being able to send an e-mail. Symptom Remedy Unable to send an e-mail Is [Send E-mail] set to [Enabled]? Have settings such as the SMTP server's address been made correctly? Have you entered the recipient e-mail address correctly? -
Page 213: Internet/Intranet Connection Problems
Network Related Problems Internet/Intranet Connection Problems The table below lists possible causes and solutions for problems that may occur when connecting to the Internet or an intranet. Unable to Connect to the Internet or an Intranet Possible Cause Remedy The IP address has not been Check the IP address setting. -
Page 214: Ipv4 Or Ipv6 Connection Problems
12 Problem Solving Possible Cause Remedy Unable to connect due to an Types of access restrictions are listed below. Check the set access restriction set in the access restriction. proxy server, firewall or web Address (port) restriction server. SSL restriction ... - Page 215 Network Related Problems Unable to Connect to an IPv6 Address Symptom Remedy Append a scope ID to the link-local address. Unable to access the machine by specifying a link-local For example, when using Internet Explorer 7 in Windows Vista to address.
- Page 216 12 Problem Solving Other IPv6 Problems Symptom Remedy IPv6 addresses are not entered Use IPv4. correctly in output Job Logs.
-
Page 217: Error Code
Error Code Error Code This section describes error codes. An error message and error code (xxx-xxx) is displayed if printing terminated abnormally because of an error, or a malfunction occurred in the machine. Refer to the error codes in the following table to resolve problems. Important •... - Page 218 12 Problem Solving Error Code Cause and Remedy 005-122 [Cause] A document jam occurred in the document feeder. 005-123 [Remedy] Remove the jammed document. 005-125 Refer to "Document Jams" (P.234). 005-131 005-132 005-134 005-135 005-136 005-139 005-145 005-147 005-196 005-197 005-198 005-199 005-210...
- Page 219 Error Code Error Code Cause and Remedy 007-273 [Cause] Tray 4 malfunction. [Remedy] Switch off the machine power, make sure that the display is blank, and then switch on the machine power. If the same message is displayed again, contact our Customer Support Center. You can use a tray other than Tray 4.
- Page 220 12 Problem Solving Error Code Cause and Remedy 016-768 [Cause] E-mail data creation failed. [Remedy] Press the control panel's <Stop> button, and cancel the job. 016-776 [Cause] A job is canceled. [Remedy] Press the control panel's <Stop> button, and cancel the job. 016-781 [Cause] Unable to resolve the SMTP server name when sending an e-mail.
- Page 221 Error Code Error Code Cause and Remedy 024-913 [Cause] The paper size set for Tray 4 and the paper size specified for the job are not the same. [Remedy] Press the control panel's <Stop> button to cancel the job or change the paper to the specified paper size.
- Page 222 12 Problem Solving Error Code Cause and Remedy 024-960 [Cause] Tray 2 has not been inserted or the paper guides are in an unsupported position. [Remedy] Press the control panel's <Stop> button and insert Tray 2, or check the position of the paper guides. 024-961 [Cause] Tray 3 has not been inserted or the paper guides are in an...
- Page 223 Error Code Error Code Cause and Remedy 041-210 [Cause] An error occurred in Tray 3 or Tray 4. 041-211 [Remedy] Switch off the machine power, make sure that the display is blank, and then switch on the machine power. If the same message is displayed again, contact our Customer Support Center.
- Page 224 12 Problem Solving Error Code Cause and Remedy 072-105 [Cause] A paper jam occurred in the one tray module cover [B]. [Remedy] Remove the jammed paper. Refer to "Paper Jams" (P.228). 072-210 [Cause] An error occurred in Tray 2 (One Tray Module). 072-212 [Remedy] Switch off the machine power, make sure that the display is blank, 072-215...
- Page 225 [Remedy] Replace the drum cartridge. Refer to "Replacing the Drum Cartridge" (P.182). 091-406 [Cause] The drum cartridge life is over. [Remedy] Replace the drum cartridge. Contact your local Fuji Xerox representative or sales representative. 091-424 [Cause] The drum cartridge life is over.
- Page 226 Refer to "Replacing the Drum Cartridge" (P.182). 091-441 [Cause] The drum cartridge need to be replaced soon. [Remedy] Replace the drum cartridge. Contact your local Fuji Xerox representative or sales representative. 091-914 [Cause] An error occurred with the drum cartridge.
- Page 227 Error Code Cause and Remedy 093-959 [Cause] An error occurred with the drum cartridge. [Remedy] Replace the drum cartridge. Contact your local Fuji Xerox representative or sales representative. Refer to "Replacing the Toner Cartridge" (P.179). 116-317 [Cause] An error occurred.
-
Page 228: Paper Jams
<Start> button again to allow the document feeder to feed and scan the rest of the loaded documents. WARNING If you need to pull out a tray to remove paper jam, contact your local Fuji Xerox representative. Do not pull out a tray, otherwise it may cause injuries. CAUTION Do not attempt to remove a paper deeply jammed inside the product, particularly a paper wrapped around the fusing unit or the heat roller. -
Page 229: Paper Jam In Left Cover [A]
Paper Jams Error Area to Check/ Message See Page: Code Check Procedure 074-101 Paper Jam in Tray 4 1. Two tray module cover [C] P.231 074-102 Check Tray 4. 2. Tray 4 P.232 Open Cover C and remove paper. 074-104 Paper Jam at Covers B and C 1. - Page 230 12 Problem Solving Open Tray 5 (1), and then while lifting up the release lever (2) gently open the top left cover (3). If the paper is jammed around the fusing unit 1) Pull down the latch. 2) Remove the jammed paper. Note •...
-
Page 231: Paper Jam In One Tray Module Cover [B]
Paper Jams Push on the center of the left cover, close it slowly, and raise the Tray 5 (bypass). Paper Jam in One Tray Module Cover [B] Follow the steps below to clear paper jams inside the machine's one tray module cover. Pull the release lever, and slowly open the one tray module cover. -
Page 232: Paper Jams In Tray 1 To 4
12 Problem Solving Pull the release lever, and slowly open the two tray module cover. Remove the jammed paper. • The paper may be jammed in the upper part Note where it is difficult to see. Check thoroughly for jammed paper. •... -
Page 233: Paper Jams In Tray 5 (Bypass)
Paper Jams Remove the jammed paper. Note • If the paper tears, check to make sure there are no remaining shreds in the machine. Push the tray in gently until it stops. Paper Jams in Tray 5 (bypass) Follow the steps below to clear a paper jam in Tray 5 (bypass). Remove the jammed paper by referring to "Paper Jam in Left Cover [A]"... -
Page 234: Document Jams
12 Problem Solving Document Jams When a document jam occurred in the document feeder, the machine stops and an alarm beeps. A message is also displayed on the screen. Error Code Message 005-122 Document Feeder Jam 005-123 Open Document Feeder Cover and remove paper. 005-125 005-131 005-132... - Page 235 Document Jams If you cannot find the document, turn the knob to feed the document to the top, then remove it. Important • If the document has been fed into the feeder, do not pull it out directly. The document may tear.
- Page 236 12 Problem Solving Make sure that the document is not torn, wrinkled, or folded, and then reload the documents to complete the job. After removing the jammed document: Copy: Place the unscanned document again including the jammed pages. Scan (E-mail/PC(Network)): Place the entire document again.
-
Page 237: 13 Appendix
13 Appendix This chapter describes the machine specifications, optional components, and notes and restrictions. Specifications ..........................238 Printable Area ..........................243 Optional Components ......................244 Notes and Restrictions......................245... -
Page 238: Specifications
Tray 1 (standard): 60 - 90 gsm Tray 2 to 4 (optional): 60 - 216 gsm Tray 5 (bypass): 60 - 216 gsm Important • Use paper recommended by Fuji Xerox. Copying may not be performed correctly depending on the conditions. First Copy Output Document glass: 6.5 sec. - Page 239 Specifications Continuous Copy <DocuCentre S2520> Speed Paper Trays 1 to 4: Continuous 1 Sided copy/same magnification A4 , B5 , 8.5 x 11" : 25 sheets / minute A4, 8.5 x 11": 16 sheets / minute 15 sheets / minute 13 sheets / minute Paper Trays 1 to 4: Continuous 2 Sided copy/same magnification...
- Page 240 Windows 8.1 x64 Edition ® ® Microsoft Windows Server 2012 R2, Important • For information about the latest supported OS, refer to the Fuji Xerox Web site. Interface USB 2.0, Ethernet 10BASE-T/100BASE-TX Scan Functions Type Color scanner Original Size Same as the Basic Functions/Copy Functions.
- Page 241 File Format Monochrome binary: PDF/TIFF Color: PDF/JPEG *1 : The scanning speed varies depending on documents. *2 : WIA stands for Windows Image Acquisition. *3 : Please refer to the Fuji Xerox web site for the latest support operating systems.
-
Page 242: Duplex Output Unit
13 Appendix Duplex Automatic Document Feeder Type Duplex automatic document feeder Original Size/Paper Maximum: A3, 11 × 17" Weight Minimum: 38 - 128 gsm (2 Sided: 50 - 128 gsm) Capacity 110 sheets Important • When using 80 gsm paper Feeding Speed <DocuCentre S2520>... -
Page 243: Printable Area
Printable Area Printable Area The standard printable area is the area of the page within 4.0 mm from the top, bottom, left and right edges of the paper. The actual printable area may vary depending on the printer (plotter) and control language. 4 mm Unprintable area Printable area/... -
Page 244: Optional Components
13 Appendix Optional Components The following table shows the optional components available. To purchase these options, contact our Customer Support Center. Product Name Description One Tray Module A tray that can load 500 sheets of paper (when using 80 gsm paper). -
Page 245: Notes And Restrictions
Notes and Restrictions Notes and Restrictions This section describes the notes and restrictions to observe when using the machine. Notes and Restrictions on the Use of the Machine Notes on Switching Off the Power After the power is switched off, the machine performs internal power off processes for a while. -
Page 246: Notes And Restrictions On The Use Of The Copy Feature
13 Appendix Document Feeder The machine does not detect a document placed in the document feeder during Sleep mode. Notes and Restrictions on the Use of the Copy Feature Copy Feature The machine does not offer the Improves Fit function. ... -
Page 247: Notes And Restrictions On The Use Of The Scan Feature
Notes and Restrictions Meter Counts for 2 Sided Printing When printing a 2 sided print job, depending on the application being used, blank sheets can be inserted automatically to adjust pages. These blank sheets inserted by the application also are counted by the meter. ... -
Page 248: Notes And Restrictions When Connecting To Internet Or Intranet
13 Appendix could not be performed. To restart and try again, close the Windows Image Acquisition (WIA)-compatible application. Address Book When registering addresses using CentreWare Internet Services, we recommend using an Ethernet crossover cable to connect the machine to your computer to protect your e-mail address might be intercepted on the network since the machine does not support SSL. -
Page 249: Notes And Restrictions When Operating From Computers
The supported OS may vary depending on the functions. For more information, refer to "Specifications" (P.238). Important • For information about the latest supported OS, refer to the Fuji Xerox Web site. Notes and Restrictions for Using SMB This section describes notes and restrictions to observe when using SMB. -
Page 250: Notes And Restrictions For Ipv6 Connection
13 Appendix Configuration on the Computer IP addresses are managed for the entire system. Configure the settings only after consulting your network administrator. When setting the network such as IP addresses with a host used under the Network ... - Page 251 Notes and Restrictions For example, in Dual Stack mode, either the IPv4 address or IPv6 address may not be displayed, or a different IPv6 address may be displayed. When IPv6 is enabled and IPv4 is disabled on the machine, you cannot specify a storage location for the Browse feature of the Scan to PC (SMB) function.
- Page 252 13 Appendix...
-
Page 253: Index
Index Index Numerics confirm/edit................157 continuous copy..............239 10BASE-T/100BASE-TX interface ........61 continuous copy speed............239 2 sided..............107 continuous print speed............240 2 Sided button ................68 control panel ...............60 copied impressions..............158 Copy button.................67 copy limit ................... 159 about license ................23 copying problems .............. - Page 254 extension tray................89 Lighten/Darken button ............68 loading paper................87 loading paper in Trays 1 to 4 ..........87 loading paper into the Bypass tray........88 feeding speed ................242 localize kit for TH..............244 file format (B&W)..............155 localize kit for VI..............244 file format (Color) ..............155 locking casters ................60 first copy output time............
- Page 255 Index resolution ................ 129 pages per side................109 paper guides................89 Scan button .................68 paper jams ................228 scan driver ................. 57 paper size..............238 scan problems................206 paper supply ..............109 scan resolution.............. 238 paper tray capacity..............239 scan to e-mail..............121 paper tray settings..............
- Page 256 toner status................162 unable to print................. 204 Tray 1 .................. 60 uninstalling ..................57 Tray 2 .....................60 unusable paper................85 Tray 2 to Tray 4............... 140 usable paper................84 Tray 3 .....................60 USB interface................61 Tray 4 .....................60 using the Ethernet interface..........30 Tray 5 ..................140 using the USB interface............30 tray lock..................
- Page 257 DocuCentre S2520/S2320 User Guide ME7061E2-1 (Edition 1) September 2014 Fuji Xerox Co., Ltd. Copyright © 2014 by Fuji Xerox Co., Ltd.