PRESONUS RM32AI Owner's Manual
Studiolive
rm-series mixers
Hide thumbs
Also See for RM32AI:
- Owner's manual (70 pages) ,
- Visual quickstart manual (16 pages) ,
- Reference manual (19 pages)

Related Manuals for PRESONUS RM32AI


Summary of Contents for PRESONUS RM32AI
- Page 1 StudioLive RM-Series Mixers ™ Touch-Software-Controlled, Rack-mount Digital Mixing System with Active Integration ™ Owner’s Manual ® English www.presonus.com...
-
Page 2: Table Of Contents
Let’s Get a Sound and Set a Level! — 42 System Setup Overview — 7 Diagrams of Typical Setups — 46 4.9.1 RM32AI Typical Band Setup — 47 Registering Your StudioLive RM-series Mixer — 7 4.9.2 RM16AI Typical Band Setup — 48 Powering the StudioLive RM-series Mixer —... - Page 3 Exclusions and Limitations — 64 Who This Warranty Protects — 65 How Long This Warranty Lasts — 65 What PreSonus Will Do — 65 How to Get Warranty Service (USA) — 65 How to Get Warranty Service (outside of USA) — 65 7.10...
-
Page 5: Overview
RM32AI and RM16AI utilizing high-grade components to ensure optimum performance that will last a lifetime. The powerful, scalable, and compact StudioLive RM32AI and RM16AI 32x16x3 rack-mount mixers combine the all new, battle-ready UC Surface touch-control software for Windows®, Mac® OS X, and iOS® with a powerful and comprehensive set of facilities for up to 32-channel mixing. - Page 6 StudioLive™ RM-Series Mixers Overview Owner’s Manual StudioLive RM-series Digital Mixer Features • Stereo unbalanced tape inputs • 32/16 LED meter grid • 32 internal channels • 25 mix buses - 16 aux mix buses - 3 main mix buses (left, right, mono/center) - 4 internal FX buses (2 reverb, 2 delay) - Stereo solo bus •...
-
Page 7: What Is In The Box
Owner’s Manual What is in the Box What is in the Box Your StudioLive RM-series package contains the following: • PreSonus StudioLive RM32AI or RM16AI digital recording and performance mixer • 5-foot (1.5 meter), 9-pin-to-9-pin FireWire s800 cable • Ethernet cable •... -
Page 8: What You Will Need
StudioLive AI Software Library Once you’ve registered your mixer, you can download UC Surface, Capture, and Studio One Artist from your My PreSonus account. Download UC Surface for iPad and QMix-AI for iPhone/ iPod touch from the Apple App Store. -
Page 9: About This Manual
This manual covers hardware functions for the StudioLive RM32AI and RM16AI 32x16x3 rack-mount Active Integration™ digital mixers. When functional differences are called out, the RM32AI will be mentioned first, followed by the RM16AI. Note: Unless otherwise indicated, illustrated examples use images of the StudioLive RM32AI. -
Page 10: Getting Started
StudioLive™ RM-Series Mixers Getting Started Owner’s Manual Technical Support Getting Started Input Meter Mute All Tape In Mono/Center Mono/Center Port Meters Mode Select Button Jacks Level Output Microphone Headphones Headphones Headphones Main Output Main Outputs Inputs Source Select Level Output Level Outputs Power... -
Page 11: System Setup Overview
System Setup Overview System Setup Overview It only takes a few steps to get your StudioLive RM-series mixer up and running: • Register your StudioLive RM-series mixer in your My PreSonus account. • Download the StudioLive AI Software Library.** •... - Page 12 StudioLive™ RM-Series Mixers Getting Started Owner’s Manual Registering Your StudioLive RM-series Mixer 2. Log in or create a new account if you don’t already have one. 3. After logging into your account, click/tap the “Register A Product” button in the My Hardware section. 4.
-
Page 13: Powering The Studiolive Rm-Series Mixer
You can also try connecting to a computer for control. 2. If that doesn’t work, open a new technical support ticket by going to www.presonus.com/support/Contact-Technical-Support clicking on the “Click here to submit a support request” link in the “Submit an Online Technical Support Request” section. U.S. customers can also call technical support at 1-225-216-7887 Monday through Friday between 9 a.m. -
Page 14: Networking The Rm-Series Mixer
StudioLive™ RM-Series Mixers Networking the RM-series Mixer Owner’s Manual Minimum Computer System Requirements Networking the RM-series Mixer Minimum Computer System Requirements • Mac OS X 10.8 64-bit or later • Intel® Core® i3 (Core i5 or faster recommended) • 4 GB of RAM or more Windows •... -
Page 15: Networking Overview
StudioLive™ RM-Series Mixers Networking the RM-series Mixer Owner’s Manual Networking Overview Networking Overview Networking your RM-series mixer involves both hardware and software components. The entire installation and configuration procedure is given in this manual, but before beginning, you must download and install UC Surface touch- control software onto a Mac or Windows computer or an iPad, as described in Chapter 2, “Getting Started,”... - Page 16 Chapter 2, “Getting Started,” in the StudioLive AI Software Library Reference Manual. Power User Tip: When you launch UC Surface with the computer and StudioLive RM32AI or RM16AI connected to the same network, the software will automatically see the mixer.
-
Page 17: Wired Ethernet Control Setup
RISQUE DE CHOC ELECTRIQUE — NE PAS OUVRIR RISQUE DE CHOC ELECTRIQUE — NE PAS OUVRIR DESIGNED AND ENGINEERED BY PRESONUS • MANUFACTURED IN CHINA • PATENTS PENDING DESIGNED AND ENGINEERED BY PRESONUS • MANUFACTURED IN CHINA • PATENTS PENDING “PreSonus”,“STUDIOLIVE”... -
Page 18: Wireless Control Setup
StudioLive™ RM-Series Mixers Networking the RM-series Mixer Owner’s Manual Wireless Control Setup Wireless Control Setup A standard wireless Ethernet router can be used to make a wireless connection from the router to the RM-series mixer. Wireless Connection from Router to StudioLive RM Mixer By default, StudioLive RM-series mixers are configured to automatically connect to a wireless network using the following network name and password: •... - Page 19 StudioLive™ RM-Series Mixers Networking the RM-series Mixer Owner’s Manual Wireless Control Setup Power on the RM-series mixer and wait until the Power LED has turned solid red. Launch UC Surface software on a computer (Mac or Windows) or iPad that is connected to the network you want to use. The Universal Control launch window will appear and should recognize the presence of your RM mixer.
- Page 20 StudioLive™ RM-Series Mixers Networking the RM-series Mixer Owner’s Manual Wireless Control Setup Click/tap the wireless connection icon near the top of the tab. The Network List view appears, showing all of the wireless networks being seen by the RM mixer. Note: Scanning for networks can take a little time.
- Page 21 StudioLive™ RM-Series Mixers Networking the RM-series Mixer Owner’s Manual Wireless Control Setup Every time you turn on your StudioLive RM-series mixer, it will: Look for a wired Ethernet connection and use it if one is found. If no wired connection is found, it will check whether the USB Wi-Fi LAN adapter is plugged in.
-
Page 22: Connecting Your Computer To Your Network In Software
StudioLive™ RM-Series Mixers Networking the RM-series Mixer Owner’s Manual Connecting Your Computer to Your Network in Software Connecting Your Computer to Your Network in Software Windows 7+ Click/tap on the network icon in the notification area to open the Connect to Network Control Panel. 2. - Page 23 StudioLive™ RM-Series Mixers Networking the RM-series Mixer Owner’s Manual Connecting Your Computer to Your Network in Software 4. Click/tap Connect. Mac OS X 10.7 and later 1. On the Menu bar, click/tap on the Wireless Status icon. 2. From the pull-down menu select the same wireless network for which you configured your RM-series mixer.
-
Page 24: Connecting An Ipad To Your Network
StudioLive™ RM-Series Mixers Networking the RM-series Mixer Owner’s Manual Connecting an iPad to Your Network 3. Enter the network password or key. 4. Click/tap Join. Connecting an iPad to Your Network 1. Tap the Settings icon in your iPad. 2. Tap Wi-Fi in the settings list on the right. - Page 25 StudioLive™ RM-Series Mixers Networking the RM-series Mixer Owner’s Manual Connecting an iPad to Your Network 3. Wi-Fi will usually be switched on. If it is not, slide the onscreen switch to turn it on. 4. In the Choose a Network section, you should see in the list the network for which you have configured the RM-series mixer.
- Page 26 StudioLive™ RM-Series Mixers Networking the RM-series Mixer Owner’s Manual Connecting an iPad to Your Network 6. Tap the Information icon to the right of the network’s name to open its network settings. 7. Switch Auto-Join to On. You are now ready to launch UC Surface and mix on the go.
-
Page 27: Connecting An Iphone/Ipod Touch To Your Network
StudioLive™ RM-Series Mixers Networking the RM-series Mixer Owner’s Manual Connecting an iPhone/iPod touch to Your Network Connecting an iPhone/iPod touch to Your Network 1. Tap on the Settings icon in your iPhone/iPod touch. 2. Tap “Wi-Fi, ” making sure it is set to “On. ” 3. -
Page 28: How To Update Studiolive Rm Mixer Firmware
USB flash (“thumb”) drive loaded with the firmware files. All registered StudioLive AI mixers with firmware version 5651 or later have the ability to connect to a My PreSonus account and download firmware updates over the Internet. To check online for new firmware updates, simply connect your registered mixer to a network that has Internet access—without the USB flash... - Page 29 1. Make a wired network connection to the RM mixer as described in section 3.3 Wired Ethernet Control Setup of the StudioLive AI RM Series Hardware Manual. My PreSonus 2. Download the firmware files for your mixer from your account. To find these files, click on the “View More Details” link in your StudioLive registration and click the “Firmware”...
- Page 30 StudioLive™ RM-Series Mixers Networking the RM-series Mixer Owner’s Manual How to Update StudioLive RM Mixer Firmware 5. Open the firmware folder; you will find five files inside: • Initvars.scr • Recovery.scr • Rootfs.img • uImage • Upgrade.bin You will need all five files to upgrade your mixer. 6.
- Page 31 StudioLive™ RM-Series Mixers Networking the RM-series Mixer Owner’s Manual How to Update StudioLive RM Mixer Firmware 8. Remove your Wi-Fi LAN adapter (if inserted) and insert the thumb drive into the USB slot on the front of your StudioLive RM-series mixer. (Power on the mixer if it is not already on.) 9.
-
Page 32: Setting Permissions
StudioLive™ RM-Series Mixers Networking the RM-series Mixer Owner’s Manual Setting Permissions Setting Permissions Controlling your StudioLive RM mixer with an iPad, or allowing band members to control their aux mixes remotely with an iPhone/iPod touch, is extremely convenient. However, it can also put control of the RM mixer in multiple hands— some more adept than others. - Page 33 StudioLive™ RM-Series Mixers Networking the RM-series Mixer Owner’s Manual Setting Permissions 5. Click/tap in the Mix field and choose from the drop-down menu what you want the iOS device to control. All Auxes: Allows the user of the selected device to make •...
- Page 34 StudioLive™ RM-Series Mixers Networking the RM-series Mixer Owner’s Manual Setting Permissions Once you have connected and configured permissions for an iOS device, the permissions will remain the same for that device every time you connect it unless you change the permissions. Complete information about QMix-AI can be found in Chapter 5, “QMix-AI for iPhone and iPod touch, ”...
- Page 35 StudioLive™ RM-Series Mixers Networking the RM-series Mixer Owner’s Manual Setting Permissions FOH: Gives the user of the selected device full access to all UC • Surface functions, making that device the RM control master. • All Auxes: Allows the user of the selected device to make channel fader adjustments that affect all aux mixes.
- Page 36 StudioLive™ RM-Series Mixers Networking the RM-series Mixer Owner’s Manual Setting Permissions To change an access code: 1. Click/tap the Global Settings button to open the Global Settings view. 2. Click/tap the Device Settings tab. 3. Click/tap the Change Access Code button. 4.
-
Page 37: Firewire Audio Setup
FireWire device, such as a hard drive. FireWire-equipped laptop running Capture 2.0 FireWire 800 cables FireWire-equipped external hard drive 3. With Mac OS X, the RM-series mixer uses the PreSonus FireStudio driver and shows up in the Audio MIDI Setup application as a PreSonus FireStudio interface. -
Page 38: Configuration Examples
Owner’s Manual 3.11 Configuration Examples 4. With Windows, the RM-series mixer uses a PreSonus FireStudio ASIO driver, installed with UC Surface, and shows up in the Sound control panel as a PreSonus FireStudio interface. Note: You can connect your StudioLive RM-series mixer to a FireWire 400 connection on your computer or to a FireWire 400 device, but doing so lowers the bus speed of your mixer to 400 Mbps, which may result in reduced performance. - Page 39 StudioLive™ RM-Series Mixers Networking the RM-series Mixer Owner’s Manual 3.11 Configuration Examples 2. One computer for control and audio, with the computer connected wirelessly to the router and the RM mixer hardwired via Ethernet to the router. FireWire-equipped recording/control computer Ethernet cable FireWire 800 cable 3.
- Page 40 StudioLive™ RM-Series Mixers Networking the RM-series Mixer Owner’s Manual 3.11 Configuration Examples 5. Separate computers for control and audio, with the control computer (an iPad, in this example) connected wirelessly to the router. iPad control Router UC Surface Ethernet cable FireWire-equipped recording computer FireWire 800 cable...
-
Page 41: Connecting Your Rm-Series Mixer To Your Audio System
• The RM32AI and RM16AI mixers are both 32-channel mixers. The RM32AI has twice as many XLR inputs and XLR outputs (and DB25 mirrored outputs) as the RM16AI, but the RM16AI is capable of mixing an additional 16 channels of digital inputs and 8 mix outputs using the digital connections on the option card (FireWire or AVB, with the standard option card) for a full 32-channel mix with 16 aux mixes. -
Page 42: Connecting Microphones
Owner’s Manual Connecting Microphones Connecting Microphones Your StudioLive RM-series mixer is equipped with 32/16 recallable PreSonus XMAX microphone preamplifiers for use with all types of microphones. The XMAX preamplifier has a Class A input buffer allowing you to boost signals without increasing unwanted background noise. -
Page 43: Connecting Mix Outputs
StudioLive™ RM-Series Mixers Connecting Your RM-series Mixer to Your Audio System Owner’s Manual Connecting Mix Outputs Connecting Mix Outputs Mixes appear on the following connectors: • Aux mixes are on 16/8 front-panel male XLR jacks and rear-panel DB25 connectors. • Main mix on a front-panel stereo pair of male XLR jacks, with dedicated level control, and in S/PDIF digital format on a rear-panel RCA jack. -
Page 44: Connecting Headphones
StudioLive™ RM-Series Mixers Connecting Your RM-series Mixer to Your Audio System Owner’s Manual Connecting Headphones The Mono mix output is most commonly used for one of two purposes: • As a subwoofer feed; the Fat Channel EQ for the Mono output in the UC Surface software includes a lowpass filter that is used in this application. -
Page 45: Muting All Inputs
StudioLive™ RM-Series Mixers Connecting Your RM-series Mixer to Your Audio System Owner’s Manual Muting All Inputs To monitor on phones: Turn the level control all the way down. Press the Main button to select the main mix for monitoring, or the Cue button to select the current cue source. Connect a pair of headphones to the jack. -
Page 46: Let's Get A Sound And Set A Level
StudioLive™ RM-Series Mixers Connecting Your RM-series Mixer to Your Audio System Owner’s Manual Let’s Get a Sound and Set a Level! Meters/+48V Select Button The Meters/+48V button switches the meters between displaying signal levels, and showing which inputs are using +48V phantom power. In its default state, the button is off, and the meters display the signal levels. - Page 47 StudioLive™ RM-Series Mixers Connecting Your RM-series Mixer to Your Audio System Owner’s Manual Let’s Get a Sound and Set a Level! If you’re using passive speakers, connect them to your power amplifier using speaker cables. Plug your RM-series mixer into a power outlet and turn it on. Power on your powered speakers or speaker amplifier.
- Page 48 StudioLive™ RM-Series Mixers Connecting Your RM-series Mixer to Your Audio System Owner’s Manual Let’s Get a Sound and Set a Level! Launch the UC Surface software and select your mixer for control. Go to Channel 1 of the UC Surface mixer. The Fat Channel section displays the channel’s settings.
- Page 49 StudioLive™ RM-Series Mixers Connecting Your RM-series Mixer to Your Audio System Owner’s Manual Let’s Get a Sound and Set a Level! Speak or sing into your microphone at approximately the same volume you expect during the performance. 10. Move the Fat Channel Preamp slider up while watching the input meter on the Channel Strip and adjust the input gain until the meter reaches a little more than halfway up.
-
Page 50: Diagrams Of Typical Setups
StudioLive™ RM-Series Mixers Connecting Your RM-series Mixer to Your Audio System Owner’s Manual Diagrams of Typical Setups 11. Raise the Channel 1 fader until it reaches 0 dB (unity gain). 12. In UC Surface, bring up the Main mix level fader until you can comfortably listen to your microphone through your speakers. -
Page 51: 4.9.1 Rm32Ai Typical Band Setup
Connecting Your RM-series Mixer to Your Audio System StudioLive™ RM-Series Mixers Diagrams of Typical Setups Owner’s Manual 4.9.1 RM32AI Typical Band Setup acoustic electric guitar electric guitar wireless mic backup vocal mics lead vocal keyboard/DI drum kit guitar/DI amp (rhythm) -
Page 52: 4.9.2 Rm16Ai Typical Band Setup
Connecting Your RM-series Mixer to Your Audio System StudioLive™ RM-Series Mixers Diagrams of Typical Setups Owner’s Manual 4.9.2 RM16AI Typical Band Setup acoustic electric guitar electric guitar wireless mic backup vocal mics lead vocal keyboard/DI drum kit guitar/DI amp (rhythm) amp (lead) bass/DI DI Box... -
Page 53: 4.9.3 Rm32Ai Typical Church Setup
Connecting Your RM-series Mixer to Your Audio System StudioLive™ RM-Series Mixers Diagrams of Typical Setups Owner’s Manual 4.9.3 RM32AI Typical Church Setup acoustic electric guitar electric guitar keyboard/DI guitar/DI amp (rhythm) amp (lead) bass/DI drum kit hanging podium backup vocal mics... -
Page 54: 4.9.4 Rm16Ai Typical Church Setup
Connecting Your RM-series Mixer to Your Audio System StudioLive™ RM-Series Mixers Diagrams of Typical Setups Owner’s Manual 4.9.4 RM16AI Typical Church Setup acoustic electric guitar pulpit hanging wireless mic vocal mics keyboard/DI guitar/DI bass/DI drum kit choir mic DI Box acoustic piano front of sanctuary... -
Page 55: Rm Mixer Reference
StudioLive AI Software Library Manual. Covered here are the features found on the hardware mixer. For technical details, such as input and output levels, see 5.4 RM16AI and RM32AI Technical Specifications. Front Panel Power/Status LED: This displays the current state of your StudioLive RM mixer, as described below: •... - Page 56 StudioLive™ RM-Series Mixers RM Mixer Reference Owner’s Manual Front Panel Meters/+48V button: Switches the front-panel meter LEDs between displaying signals at channel inputs and indicating which channels have +48V phantom power enabled. For more information, see 4.7 Metering. Level/+48V meters: In normal operation, the Meters/+48V button is not lit, and the meters indicate signals appearing at the RM mixer’s channel inputs, with the color indicating status: •...
- Page 57 StudioLive™ RM-Series Mixers RM Mixer Reference Owner’s Manual Front Panel Tape In jacks A stereo pair of unbalanced inputs on RCA jacks, useful for returning all varieties of consumer music players and devices. For more information, see 4.3 Connecting a Stereo Playback Device. Mono/Center Out section The Mono/Center output carries the Mono or Center mix and is convenient for feeding mono sound systems, such as a center channel send for true LCR mixing or...
-
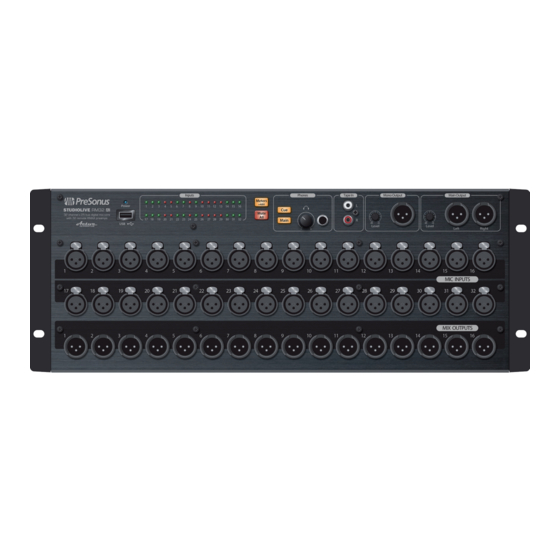
Page 58: Rear Panel
StudioLive™ RM-Series Mixers RM Mixer Reference Owner’s Manual Rear Panel Mic Inputs The 32/16 balanced XLR inputs accept a wide range of signals, from mic level to line level. The XMAX microphone preamplifiers feature Class A input buffers, ultra-low noise, and wide gain control, allowing you to boost signals without increasing unwanted background noise. -
Page 59: Studiolive Rm-Series Mixer Block Diagrams
StudioLive RM-series Mixer Block Diagrams We’ve finally made block diagrams too large for our printed manuals. Please visit the following pages on our Web site for the latest block diagrams of both StudioLive RM-series mixers, provided in Adobe PDF format: http://www.presonus.com/products/StudioLive-RM-Series/downloads... -
Page 60: Rm16Ai And Rm32Ai Technical Specifications
StudioLive™ RM-Series Mixers RM Mixer Reference Owner’s Manual RM16AI and RM32AI Technical Specifications RM16AI and RM32AI Technical Specifications RM16AI RM32AI Microphone Preamp Input Type XLR Female, balanced, locking XLR Female, balanced, locking Frequency Response to Direct Output (at unity gain) 20-40 kHz, ±0.5 dBu... - Page 61 StudioLive™ RM-Series Mixers RM Mixer Reference Owner’s Manual RM16AI and RM32AI Technical Specifications RM16AI RM32AI Noise Gate / Expander Threshold Range -84 dB to 0 dB -84 dB to 0 dB Attack Time 0.02s to 500 ms / 0.5 ms 0.02s to 500 ms / 0.5 ms...
-
Page 62: Digital Audio
StudioLive™ RM-Series Mixers RM Mixer Reference Owner’s Manual RM16AI and RM32AI Technical Specifications RM16AI RM32AI Digital Audio ADC Dynamic Range 118 dB (A-wtd, 48 kHz) 118 dB (A-wtd, 48 kHz) DAC Dynamic Range 118 dB (A-wtd, 48 kHz) 118 dB (A-wtd, 48 kHz) -
Page 63: Resources
StudioLive™ RM-Series Mixers Resources Owner’s Manual Stereo Microphone Placement Resources Stereo Microphone Placement The following are a few recording applications to help you get started with your StudioLive RM-series mixer. These are by no means the only ways to record these instruments. Microphone selection and placement is an art. - Page 64 StudioLive™ RM-Series Mixers Resources Owner’s Manual Stereo Microphone Placement Acoustic Guitar Point a small-diaphragm condenser microphone at the 12th fret, approximately 8 inches away. Point a large- diaphragm condenser microphone at the bridge of the guitar, approximately 12 inches from the guitar. Experiment with distances and microphone placement.
-
Page 65: Stereo Microphone Placement
StudioLive™ RM-Series Mixers Resources Owner’s Manual Stereo Microphone Placement Drum Overheads (XY example) Place two small-diaphragm condenser microphones on an XY stereo-microphone holder (bar). Position the microphones so that each one is at a 45-degree angle, pointed down at the drum kit, approximately 7 or 8 feet above the floor or drum riser. -
Page 66: Troubleshooting
Owner’s Manual Troubleshooting Troubleshooting PreSonus telephone technical support is available to customers in the USA on Monday through Friday from 9 a.m. to 5 p.m. Central Time by calling 1-225- 216-7887. Customers outside of the USA should contact their national or regional distributor for telephone technical support. - Page 67 StudioLive™ RM-Series Mixers Resources Owner’s Manual Troubleshooting No Output on the Solo Bus While Monitoring • Verify that the Cue button is enabled (lit) in the Phones Monitor area on the RM-series mixer’s front panel. • In the Global Settings view of UC Surface, check the following settings: - Verify that the Cue Source setting in the Global Settings view of UC Surface is set to Solo.
-
Page 68: Warranty Information
PreSonus-branded products under normal use. This Limited Warranty applies only to hardware products manufactured by or for PreSonus that can be identified by the PreSonus trademark, trade name, or logo affixed to them. Exclusions and Limitations This warranty does not cover the following: Damage caused by accident, abuse, improper installation, failure to follow instructions in the applicable owner’s manual or improper... -
Page 69: Who This Warranty Protects
PreSonus will repair or replace, at our sole and absolute option, products covered by this warranty at no charge for labor or materials. If the product must be shipped to PreSonus for warranty service, the customer must pay the initial shipping charges. PreSonus will pay the return shipping charges. -
Page 70: Limitation Of Implied Warranties
Exclusion of Damages PRESONUS’S LIABILITY FOR ANY DEFECTIVE PRODUCT IS LIMITED TO THE REPAIR OR REPLACEMENT OF THE PRODUCT, AT PRESONUS’S SOLE OPTION. IF PRESONUS ELECTS TO REPLACE THE PRODUCT, THE REPLACEMENT MAY BE A RECONDITIONED UNIT. IN NO EVENT WILL PRESONUS BE LIABLE FOR DAMAGES... - Page 71 © 2015 PreSonus Audio Electronics, Inc. All Rights Reserved. AudioBox, Nimbit, PreSonus, QMix, StudioLive, and XMAX are trademarks or registered trademarks of PreSonus Audio Electronics, Inc. Capture and Studio One are trademarks or registered trademarks of PreSonus Software Ltd. Mac and Mac OS are registered trademarks of Apple, Inc., in the U.S. and other countries.
- Page 72 StudioLive RM-Series Mixers ™ Touch-Software-Controlled, Rack-mount Digital Mixing System with Active Integration ™ Owner’s Manual 18011 Grand Bay Ct. • Baton Rouge, ® Louisiana 70809 USA• 1-225-216-7887 Part# 820-WLV0046-B www.presonus.com...