TRENDnet TEW-817DTR User Manual
Ac750 wireless travel router
Hide thumbs
Also See for TEW-817DTR:
- Quick installation manual (13 pages) ,
- Quick installation manual (13 pages)
Table of Contents
Advertisement
Quick Links
Advertisement
Table of Contents

Related Manuals for TRENDnet TEW-817DTR


Summary of Contents for TRENDnet TEW-817DTR
- Page 1 Cover Page TRENDnet User’s Guide © Copyright 2015 TRENDnet. All Rights Reserved.
-
Page 2: Table Of Contents
MAC Filter (Wireless) ....................21 Wireless Settings ......................41 Advanced wireless settings ..................22 Wireless Networking and Security ..........42 Multiple SSID...................... 22 Secure your wireless network ..................42 Advanced Settings ..................... 23 © Copyright 2015 TRENDnet. All Rights Reserved. - Page 3 Maintenance & Monitoring ............63 Change your router login password ................63 Reset your router to factory defaults ................63 Default Settings ......................64 Backup and restore configuration settings ..............64 Reboot ......................... 65 © Copyright 2015 TRENDnet. All Rights Reserved.
-
Page 4: Product Overview
TEW-817DTR TRENDnet User’s Guide Features TRENDnet’s AC750 Wireless Travel Router, model TEW-817DTR, is a powerful travel Product Overview router for on the go professionals. Concurrent high performance WiFi AC and N bands network all wireless devices. Router mode turns a wired internet connection into a wireless network. -
Page 5: Product Hardware Features
WPS LED/Button: Blinks when WPS is activated. Press and hold for 5 seconds to activate WPS. Reset button: Press and hold for 10 seconds to reset the device into default settings. © Copyright 2015 TRENDnet. All Rights Reserved. -
Page 6: Application Diagram
AP + WISP mode sets the device into Access Point mode where you can configure the device into an access point, WISP client or Repeater. Select Off to turn off the device. © Copyright 2015 TRENDnet. All Rights Reserved. -
Page 7: Creating A Network
Internet Service Provider (ISP) when you sign up for Internet service. If your modem is not working contact your ISP to verify functionality. 3. To set up wireless security on your router, see “Wireless Networking and Security” on page 8. © Copyright 2015 TRENDnet. All Rights Reserved. -
Page 8: Hardware Installation
User Name: admin Password: (xxxxxxxx) Note: User Name and Password are case sensitive. 4. Plug the TEW-817DTR into a power outlet. 8. Verify that the LED indicators on the front of the unit are illuminated: Power, and Internet. © Copyright 2015 TRENDnet. All Rights Reserved. -
Page 9: Network Status
Internet port of the router but with no successful Internet connection has been established. The Internet icon displays red to indicate that the Internet is physically disconnected. © Copyright 2015 TRENDnet. All Rights Reserved. -
Page 10: How To Choose The Type Of Security For Your Wireless Network
Setting up wireless security is very important. Leaving your wireless network open and connection speeds. TRENDnet recommends setting your router to this encryption unsecure could expose your entire network and personal files to outsiders. TRENDnet standard. If you find that one of your wireless network devices does not support recommends reading through this entire section and setting up wireless security on your WPA2 encryption, then set your router to either WPA or WPA-Auto encryption. -
Page 11: Steps To Improve Wireless Connectivity
DNS Servers Address 2 (Static IP): _____. _____._____._____ (Optional) installing additional access points or wireless extenders. Reconnect Mode: Always / On Demand / Manual (Optional) MTU:_______ (Default: 1500, change if required by ISP) © Copyright 2015 TRENDnet. All Rights Reserved. -
Page 12: Router Mode Installation
MAC Address: ___:___:___:___:___:___ Clone your PC MAC Address (Optional) Router Mode Installation In router mode, the TEW-817DTR serves as your typical network router. In this mode the TEW-817DTR offers advance configurations from setting specific WAN types to opening 4. PPTP - Standard & Russian certain ports for your applications. - Page 13 TEW-817DTR TRENDnet User’s Guide 4. Plug the TEW-817DTR into a power outlet. 5. Connect the TEW-817DTR to an available Internet connection port provided by your hotel. 6. Open your internet browser and verify you can access the Internet. Congratulations, you are now connected to the Internet using the TEW-817DTR.
- Page 14 “How to choose the type of security for your wireless network”. If the router is reset to factory defaults, the wireless encryption will reset to the network security key printed on the product labels of the router. © Copyright 2015 TRENDnet. All Rights Reserved.
-
Page 15: Wireless Settings
Disabling this setting will disable WPS functionality. performance and data rates of 802.11n. © Copyright 2015 TRENDnet. All Rights Reserved. -
Page 16: Wireless Networking And Security
2. Click on Basic, and click on Wireless. MHz typically results in substantial performance increases when connecting an 3. Under Security, click on the Security Mode drop-down list to select your wireless 802.11ac/n wireless client. security type. © Copyright 2015 TRENDnet. All Rights Reserved. - Page 17 Character set 0-9 & A-F, a-f only Alphanumeric (a,b,C,?,*, /,1,2, etc.) Selecting WPA-Enterprise / WPA2-Enterprise / WPA2-Enterprise Mixed 64-bit key length 10 characters 5 characters (WPA2-Personal recommended): 128-bit key length 26 characters 13 characters © Copyright 2015 TRENDnet. All Rights Reserved.
-
Page 18: Connect Wireless Devices To Your Router
Note: It is recommended to use port 1812 which is typical default RADIUS port. RADIUS Server Shared Secret: Enter the shared secret used to authorize your WPS. router with your RADIUS server. Recommended Hardware Push Button (PBC) Method © Copyright 2015 TRENDnet. All Rights Reserved. - Page 19 Note: You should a message on your WPS client device indicating WPS was successful. 4. Wait for your router to finsh the WPS process. Note: You should a message on your WPS client device indicating WPS was successful. © Copyright 2015 TRENDnet. All Rights Reserved.
-
Page 20: Guest Network
It differentiates your wireless network from others around you. It is recommended to use a different name from your primary wireless network to a name that you can easily identify and differentiate from the © Copyright 2015 TRENDnet. All Rights Reserved. -
Page 21: Parental Control
Delete column next to the rule you would like to delete. Note: If you device is not listed, please refer to your computer or device documentation to find the MAC address. 6. Manually enter the MAC Address or IP Address in the field. © Copyright 2015 TRENDnet. All Rights Reserved. -
Page 22: Website Filter
7. Schedule (Optional): The schedule function allows you to define a schedule when the Disabled: Disables MAC address filter. access should be active and blocking the specified website. To define a new schedule, © Copyright 2015 TRENDnet. All Rights Reserved. -
Page 23: Advanced Wireless Settings
The diagram shows an different from the primary SSID 1 and one that you can easily remember. example of a client connecting to SSID 1 and another client connecting to SSID 2. © Copyright 2015 TRENDnet. All Rights Reserved. -
Page 24: Advanced Settings
DTIM: A DTIM is a countdown informing clients of the next window for listening to channel widths 40MHz and 80MHz. broadcast and multicast messages. When the wireless router has buffered broadcast or multicast messages for associated clients, it sends the next DTIM with © Copyright 2015 TRENDnet. All Rights Reserved. -
Page 25: Table Of Contents Advanced Settings
IPv6 (Internet Protocol Version 6) is a new protocol that significantly increases the number of available Internet public IP addresses due to the 128-bit IP address structure versus IPv4 32-bit address structure. In addition, there are several integrated © Copyright 2015 TRENDnet. All Rights Reserved. -
Page 26: Clone A Mac Address
28 or refer to your computer or device documentation to find the Static IPv6 MAC address. Auto-configuration (SLAAC/DHCPv6) PPPoE 6to4 Link-Local Only 4. To save changes, click Apply. © Copyright 2015 TRENDnet. All Rights Reserved. -
Page 27: Change Your Router Ip Address
You can also use the default login URL http://tew-817dtr You can also view the current DHCP clients in the Number of Dynamic DHCP Clients list under Advanced > Setup > DHCP Client List. © Copyright 2015 TRENDnet. All Rights Reserved. -
Page 28: Set Up Dhcp Reservation
Copy your PC’s MAC: To copy your current computer’s MAC address to the field, To save changes when modifying a reservation, click Save. you can click Copy. Note: If you would like to discard the changes, click Clear. © Copyright 2015 TRENDnet. All Rights Reserved. -
Page 29: Enable/Disable Upnp On Your Router
4. To save changes, click Apply. VPN IPsec (VPN): Allows IPsec VPN client connections through your router. 4. To save changes, click Apply. Note: If you would like to discard the changes, click Cancel. © Copyright 2015 TRENDnet. All Rights Reserved. -
Page 30: Allow/Deny Multicast Streaming
Enable Daylight Saving: Check the option to enable daylight savings time and set the annual range when daylight saving is activated. 1. Sign up for one of the DDNS available service providers list under Server Address. (e.g. no-ip.com, etc.) © Copyright 2015 TRENDnet. All Rights Reserved. -
Page 31: Create Schedules
Note: The schedule defined will define the time/day the feature will be activated. Settings section. Note: Time is specified in 24-hour format. In addition, you can click Synchronize with Your Computer’s Time Settings to copy the time and date settings from your computer. © Copyright 2015 TRENDnet. All Rights Reserved. -
Page 32: Access Control (Ip Protocol Filter)
T To define a new schedule, click New Schedule and refer to page 30 “Create Schedules”. After you have created a new schedule, click the drop-down list and the new schedule will be available for © Copyright 2015 TRENDnet. All Rights Reserved. -
Page 33: Inbound Filter
Edit column next to the rule you would like to edit. You can also delete a rule by clicking under the Delete column next to the rule you would like to delete. © Copyright 2015 TRENDnet. All Rights Reserved. -
Page 34: Open A Device On Your Network To The Internet
Your router includes the DMZ (Demilitarized Zone) feature (TRENDnet IP cameras default to HTTP TCP port 80 for remote access web requests) on that makes all the ports and services available on the WAN/Internet side of the router your network to be able to view it over the Internet. -
Page 35: Special Applications
1. Setup DynDNS service (see Identify Your Network section page 29). 2. Access TRENDnet IP Camera management page and forward Port 80 (see product 4. Review the application rule settings. Click Add to save settings. documentation) © Copyright 2015 TRENDnet. All Rights Reserved. -
Page 36: Gaming
“Inbound Filter” section on page 32). Schedule (Optional): The schedule function allows you to define a schedule when the gaming rule should be turned on. To define a new schedule, click New © Copyright 2015 TRENDnet. All Rights Reserved. -
Page 37: Allow Remote Access To Your Router Management Page
7). 2. Click on Advanced and click Setup, then click on Management. 4. To save changes, click Apply. 3. Review the setting on the Remote Management section. Click Apply to save settings © Copyright 2015 TRENDnet. All Rights Reserved. -
Page 38: Add Static Routes
Note: Configuring this feature assumes that you have some general networking knowledge. © Copyright 2015 TRENDnet. All Rights Reserved. -
Page 39: Ap/Wisp Mode Setup
You can also view the current routing table under Routing Table. 3. Make sure the switch on the unit is set to AP + WISP mode. 4. Plug the TEW-817DTR into a power outlet. © Copyright 2015 TRENDnet. All Rights Reserved. - Page 40 5. Connect your wireless computer to the TEW-817DTR’s wireless network. 6. When prompted, enter the WiFi password from the sticker on the device. 8. Once logged in the TEW-817DTR management page. Click the Wizard button on the left hand side of the window to begin the installation wizard.
-
Page 41: Access Point Mode
Access Point Mode and click Apply. To change your wireless settings refer to Wireless Settings in the next In Access Point mode, the TEW-817DTR serves as your wireless access point on your section. typical network. This allows you to establish a wireless network in an existing wired only network or expand an existing wireless network. -
Page 42: Wireless Settings
SSID, change it to a name that you can easily remember. Broadcast Network Name (SSID) o Visible: Allows wireless devices to search and discover your wireless network name (also called SSID) broadcasted by your router. © Copyright 2015 TRENDnet. All Rights Reserved. -
Page 43: Wireless Networking And Security
If selecting WEP (Wired Equivalent Privacy), please review the WEP settings to configure security can be found on the sticker on the side of the router or on the device label at the and click Apply to save the changes. bottom of the router. © Copyright 2015 TRENDnet. All Rights Reserved. - Page 44 Character set 0-9 & A-F, a-f only Alphanumeric (a,b,C,?,*, /,1,2, etc.) 64-bit key length 10 characters 5 characters 128-bit key length 26 characters 13 characters Selecting WPA-Personal / WPA2-Personal / WPA2-Personal Mixed (WPA2-Personal recommended): © Copyright 2015 TRENDnet. All Rights Reserved.
-
Page 45: Connect Wireless Devices Using Wps
Advanced > Wireless (2.4GHz or 5GHz) > WPS If your wireless device has WPS PIN (typically an 8-digit code printed on the wireless device product label or located in the wireless device wireless software utility), you can use this method. © Copyright 2015 TRENDnet. All Rights Reserved. -
Page 46: Change Your Access Point Ip Address
Typically, the access point IP address settings only needs to be changed when connecting the access point to your network and configuring to the device to be in the same IP network as your existing network. Default Access Point IP Address Settings: 192.168.10.100 / 255.255.255.0 © Copyright 2015 TRENDnet. All Rights Reserved. -
Page 47: Configure Your Internet Connection
1. Log into the management page (see “Access your management page” on page 7). 2. Click on Main, and click on IPv6. 3. Select the IPv6 connection type to assign IPv6 addressing to the access point. © Copyright 2015 TRENDnet. All Rights Reserved. -
Page 48: Advanced Settings
When the wireless router has buffered broadcast or multicast messages for associated clients, it sends the next DTIM with a DTIM Interval value. Wireless clients detect the beacons and awaken to receive © Copyright 2015 TRENDnet. All Rights Reserved. -
Page 49: Wisp Mode
TEW-817DTR TRENDnet User’s Guide WISP Mode In WISP (Wireless Internet Service Provider) mode, the TEW-817DTR creates your network (wired and wireless) while connecting to your wireless internet service. Please note that the TEW-817DTR does not support captive portal services. 3. Enter the wireless security settings provided by your network admin and click Next. -
Page 50: Wireless Settings
You can also plug a device using the Ethernet port of the TEW-817DTR. network. Disabling this setting will disable WPS functionality. -
Page 51: Wireless Networking And Security
(SSID) and security key using WPA2-Personal. The predefined wireless network name and and click Apply to save the changes. security can be found on the sticker on the side of the router or on the device label at the bottom of the router. © Copyright 2015 TRENDnet. All Rights Reserved. - Page 52 Selecting WPA-Personal / WPA2-Personal / WPA2-Personal Mixed Enterprise, or WPA2-Enterprise Mixed (EAP or RADIUS). This security type is also known (WPA2-Personal recommended): as EAP (Extensible Authentication Protocol) or Remote Authentication Dial-In User Service or RADIUS. © Copyright 2015 TRENDnet. All Rights Reserved.
-
Page 53: Connect Wireless Devices To Your Router
PIN (Personal Identification Number) Method - located in router management page Note: Refer to your wireless device documentation for details on the operation of 4. Wait for your router to finsh the WPS process. WPS. © Copyright 2015 TRENDnet. All Rights Reserved. -
Page 54: Change Your Access Point Ip Address
IP address. (e.g. Instead of using the default http://192.168.10.100 your Note: You should a message on your WPS client device indicating WPS was successful. new access point IP address will use the following format using your new IP address © Copyright 2015 TRENDnet. All Rights Reserved. -
Page 55: Configure Your Internet Connection
Static Routing: Select enable to configure IPv6 settings. device is connected to. WAN IP Setting: Manually enter your assigned WAN IPv6 settings LAN IPv6 Setting: Manually enter the device’s LAN setting. 4. To save changes, click Apply. © Copyright 2015 TRENDnet. All Rights Reserved. -
Page 56: Advanced Settings
Short Preamble: Using a short preamble can potentially increase throughput as the connecting at 802.11n on both 2.4GHz and 5GHz. This setting may provide more transfer time is 96 microseconds versus the more commonly used long preamble © Copyright 2015 TRENDnet. All Rights Reserved. -
Page 57: Repeater Mode
In Repeater mode, the TEW-817DTR Is used to extend the wireless signal of an existing the error rate in some installations. The preamble is the info. sent from the wireless wireless network. -
Page 58: Wireless Settings
Broadcast Network Name (SSID) unit. You can also plug a device using the Ethernet port of the TEW-817DTR. © Copyright 2015 TRENDnet. All Rights Reserved. -
Page 59: Wireless Networking And Security
802.11g only mode. o Wireless devices that only support 802.11a will not be able to connect to a wireless network that is set to 802.11n only mode. © Copyright 2015 TRENDnet. All Rights Reserved. - Page 60 Character set 0-9 & A-F, a-f only Alphanumeric (a,b,C,?,*, /,1,2, etc.) 64-bit key length 10 characters 5 characters 128-bit key length 26 characters 13 characters Selecting WPA-Personal / WPA2-Personal / WPA2-Personal Mixed (WPA2-Personal recommended): © Copyright 2015 TRENDnet. All Rights Reserved.
- Page 61 Note: It is recommended to use port 1812 which is typical default RADIUS port. RADIUS Server Shared Secret: Enter the shared secret used to authorize your router with your RADIUS server. © Copyright 2015 TRENDnet. All Rights Reserved.
-
Page 62: Change Your Access Point Ip Address
Static IP address and it is disabled by default DHCP: Select to this option to have the device automatically obtain DHCP IP address from the connected network. © Copyright 2015 TRENDnet. All Rights Reserved. -
Page 63: Ipv6 Connection Settings
Default Value: 100 milliseconds (range: 100-1000) DTIM: A DTIM is a countdown informing clients of the next window for listening to broadcast and multicast messages. When the wireless router has buffered © Copyright 2015 TRENDnet. All Rights Reserved. -
Page 64: Maintenance & Monitoring
Before you reset your router to defaults, if possible, you should backup your router configuration first, see “Backup and restore your router configuration settings” on page 64. © Copyright 2015 TRENDnet. All Rights Reserved. -
Page 65: Default Settings
1. Log into the management page (see “Access your management page” on page 7). 2. Click on Advanced and click on Administrator, then click on Settings Management. 3. Next to Export Settings section and Export, click Export. © Copyright 2015 TRENDnet. All Rights Reserved. -
Page 66: Reboot
Advanced > Setup > Firmware TRENDnet may periodically release firmware upgrades that may add features or fix problems associated with your TRENDnet router model and version. To check if there is 4. A separate file navigation window should open. a firmware upgrade available for your device, please check your TRENDnet model and 5. -
Page 67: Wireless Client List
Default Gateway: The current gateway assigned to your router WAN port or interface configuration. Primary/Secondary DNS (Domain Name System) Server: The current DNS address(es) assigned to your router port or interface configuration. © Copyright 2015 TRENDnet. All Rights Reserved. - Page 68 MAC Address: The MAC address of your router’s 2.4GHz wireless LAN interface configuration. Network Name (SSID) / Security Mode: Displays the current 2.4GHzprimary wireless network name and security mode assigned to your router. © Copyright 2015 TRENDnet. All Rights Reserved.
-
Page 69: View Logs
You can view the current IPv6 status on your router. 1. Log into the management page (see “Access your management page” on page 7). Log Window 2. Click on Advanced and click on Administrator, then click on IPv6 Status © Copyright 2015 TRENDnet. All Rights Reserved. -
Page 70: Technical Specifications
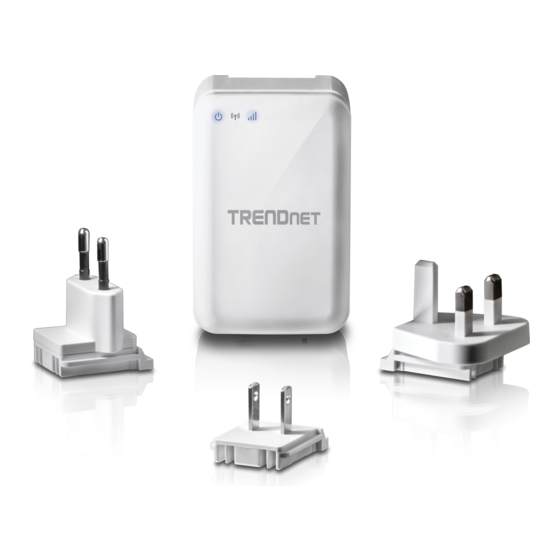
802.11n (5 GHz): FCC: 18 dBm, CE: 18 dBm (max.)/-61 dBm (typical) @ 150 VPN passthrough support Mbps 802.11ac: FCC: 14 dBm, CE: 14 dBm (max.)/-51 dBm (typical) @ 433 Mbps © Copyright 2015 TRENDnet. All Rights Reserved. - Page 71 3 year limited Package Contents TEW-817DTR Quick Installation Guide Network cable (1.5 m/5 ft.) Interchangeable power plugs: US, EU, UK *WISP mode is not compatible with captive portal wireless login pages © Copyright 2015 TRENDnet. All Rights Reserved.
-
Page 72: Troubleshooting
Wireless. d. Then click Obtain an IP address automatically and click OK. 5. Please see “Steps to improve wireless connectivity” on page 20 if you continue to have wireless connectivity problems. © Copyright 2015 TRENDnet. All Rights Reserved. -
Page 73: Appendix
2. In the Network Preference window, next to "Show:", select Network Status. You'll see Ethernet and select the TCP/IP tab. your network status and your IP address settings displayed. In MAC OS 10.5/10.6, in the left column, select Ethernet. e. Configure TCP/IP to use DHCP. © Copyright 2015 TRENDnet. All Rights Reserved. - Page 74 3. You may be prompted to enter a security key in order to connect to the network. 4. Enter in the security key corresponding to the wireless network, and click Connect. © Copyright 2015 TRENDnet. All Rights Reserved.
- Page 75 This equipment has been tested and found to comply with the limits for a Class B digital device, TRENDnet hereby declare that the product is in compliance with the essential requirements pursuant to Part 15 of the FCC Rules. These limits are designed to provide reasonable and other relevant provisions under our sole responsibility.
- Page 76 TRENDnet User’s Guide Šiuo TRENDnet deklaruoja, kad šis TEW-817DTR atitinka esminius Lietuvių reikalavimus ir kitas 1999/5/EB, 2006/95/EB ir 2009/125/EB TRENDnet tímto prohlašuje, že tento TEW-817DTR je ve shodě se [Lithuanian] Česky [Czech] základními požadavky a dalšími příslušnými ustanoveními Direktyvos nuostatas.
- Page 77 Download section limited to, duty, tax, and other fees. and look for the desired TRENDnet product to access to the GPL Code or LGPL Code. These codes are distributed WITHOUT WARRANTY and are subject to the copyrights of WARRANTIES EXCLUSIVE: IF THE TRENDNET PRODUCT DOES NOT OPERATE AS the developers.