Table of Contents
Advertisement
Advertisement
Table of Contents

Related Manuals for Invacare Shark II/SPJ+


Summary of Contents for Invacare Shark II/SPJ+
- Page 1 Yes, you can. ® Invacare® Shark II/SPJ+ Remote User manual...
- Page 2 How can you get in touch with Invacare®? If you have any questions or need support, please contact your authorised Invacare® Dealer, who has the necessary know-how and equipment plus the special knowledge concerning your Invacare® product, and can offer you all-round satisfactory service. Should you wish to contact Invacare® directly, you can reach us in Europe at the following addresses and phone numbers.
- Page 3 +44 (0)1656 77 62 20 Pencoed uk@invacare.com Bridgend CF35 5AQ WWW: www.invacare.co.uk United Kingdom Invacare Mecc San s.r.l. +39 0445 38 00 59 Via dei Pini, 62 Fax: +39 0445 38 00 34 I - 36016 Thiene (VI) italia@invacare.com ITALIA WWW: www.invacare.it...
- Page 4 +46 (0)8 761 81 08 Fagerstagatan 9 sweden@invacare.com S-163 91 Spånga finland@invacare.com Sverige WWW: www.invacare.se Tillverkare: MÖLNDAL Invacare® Deutschland GmbH : +46 (0)31 86 36 00 Kleiststraße 49 Fax: +46 (0)31 86 36 06 D-32457 Porta Westfalica ginvacare@invacare.com Deutschland LANDSKRONA ...
-
Page 5: Table Of Contents
Table of Contents Chapter Page The Shark II/SPJ+ Remote Assembly of the remote......................6 Battery charging display......................8 Adjusting speed.........................9 Using the speedometer......................9 “5 Speed” and “VSP” modes ....................10 Status display ..........................11 Activate/de-activate the immobiliser ..................11 Using the remote to control the wheelchair .................12 1.8.1 How a wheelchair with "Indirect Steering"... -
Page 6: The Shark Ii/Spj+ Remote
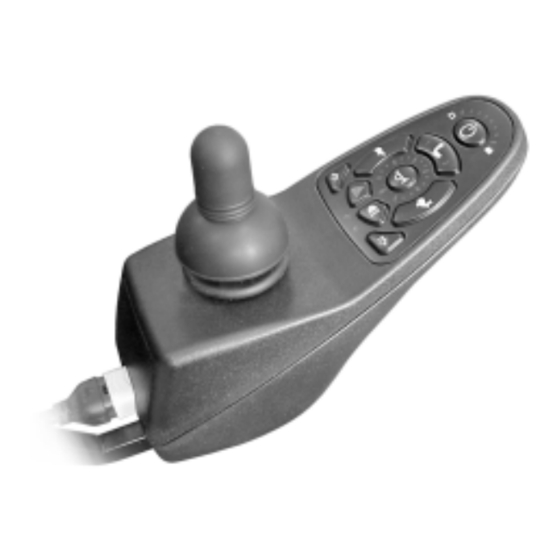
The Shark II/SPJ+ Remote Assembly of the remote Top side (standard) Battery charging display ON/OFF button Activate / connect through / deactivate adjusting mode (not available for all models) Reduce travel speed Travel speed display Horn Increase travel speed LED for “control unit activated for accompanying person“... - Page 7 Top side - including light option (not available for all models) 11) Warning indicator 12) Left hand indicator 13) Light 14) Right hand indicator 15) LED for “light activated“ Lower side 1) Combined charging socket / programming socket...
-
Page 8: Battery Charging Display
Battery charging display • Battery charging All diodes illuminated: full range! display • Only the yellow and red diodes are illuminated: Reduced range! Charge batteries before a longer trip! • Only the red diodes are illuminated: Very low range! Charge batteries as soon as possible! •... -
Page 9: Adjusting Speed
Adjusting speed The user can adjust the chair’s top speed to suit their preferences and environment. The currently selected top speed is shown on the Speedometer and can be adjusted using the “Increase Speed” (2) and “Reduce Speed” (1) buttons. Using the speedometer Each of the speedometer’s 6 large LEDs typically represent 0%, 20%, 40%, 60%, 80% and 100% of the chair’s maximum speed. -
Page 10: Speed" And "Vsp" Modes
“5 Speed” and “VSP” modes Shark II supports 2 modes of top speed adjustment – “5 Speed” and “VSP” modes. In the “5 Speed” mode pressing the Increase Speed and Decrease Speed buttons steps between one of the 5 top speeds 20% to 100%. In the “VSP”... -
Page 11: Status Display
Status display The status display serves to display error messages. For error codes see chapter "Error Codes and Diagnostic Codes" on page 18. Activate/de-activate the immobiliser Activate the immobiliser Activate • Whilst the remote is switched on, press and hold the ON/OFF button (1) for 4 seconds. -
Page 12: Using The Remote To Control The Wheelchair
• Invacare® supplies all electric vehicles from the factory with a standard drive programme. Invacare® can only assume a warranty for the safe vehicle handling of the electric vehicle – in particular tipping stability - for this standard drive programme! Will the wheelchair not drive after switching on? Check the drive-away lock (see chapter "Activate/de-activate the immobiliser "... -
Page 13: How A Wheelchair With "Indirect Steering" Reacts To Joystick Movements
1.8.1 How a wheelchair with "Indirect Steering" reacts to joystick movements. "Indirect Steering" occurs by individually applying power to the drive wheels, and is found on wheelchairs with front, rear and middle wheel drive. Travel direction The further the joystick is moved in a particular direction, the more dynamically the wheelchair reacts. -
Page 14: Operating The Electric Adjustment Options (Not Available For All Models)
1.8.2 Operating the electric adjustment options (not available for all models) Electric adjustment options are operated using the joystick. • Press the adjustment mode button once in order to activate the first adjustment option. Press the adjustment mode button twice in order to activate the second adjustment option. -
Page 15: Control Unit For An Accompanying Person (Option - Not Available For All Models)
Control unit for an accompanying person (option - not available for all models) The control unit for an accompanying person enables the control of the wheelchair to be handled by an accompanying person. 1.9.1 Layout of the remote Joystick Change over control unit to accompanying person/occupant Activate/connect through/deactive adjustment mode Set travel speed... -
Page 16: Operating The Electric Adjustment Options
1.9.2 Operating the electric adjustment options Electric adjustment options are operated by means of the joystick. The control unit must be switched over to ’accompanying person’ for the adjustment options to be operated via the control unit for the accompanying person. •... -
Page 17: Error Diagnosis
1.10 Error diagnosis If the electronic system shows a failure, please use the following guide to locate the fault. NOTE: Ensure that the drive electronics system is switched on before starting any diagnosis. If the status display is OFF: Check whether the drive electronics system is SWITCHED ON. Check whether all cables are correctly connected. -
Page 18: Error Codes And Diagnostic Codes
1.11 Error Codes and Diagnostic Codes FLASH FAULT EFFECT Comments CODE User error or drive Stops driving • Ensure that the joystick is in the neutral motors overloaded central position (simply release the joystick) and switch on again. • Drive motors overloaded. Shut electronics down and then switch on again. - Page 19 FLASH FAULT EFFECT Comments CODE Error in Shark Stops driving • Check remote bus cable and all remote connecting plugs. • Replace remote. Error in Shark Stops driving • Check all cables and connecting plugs in power module the Shark system. •...