Jenn-Air JDS9860 User Manual
Dual fuel modular downdraft slide-in range
Hide thumbs
Also See for JDS9860:
- User manual (21 pages) ,
- Use and care manual (64 pages) ,
- Use & care manual (64 pages)
Table of Contents
Advertisement
JENN-AIR
®
DUAL FUEL MODULAR DOWNDRAFT
SLIDE-IN RANGE
CUISINIÈRE ENCASTRABLE À BI-COMBUSTIBLE À
®
ÉVACUATION DESCENDANTE JENN-AIR
Use & Care Guide
For questions about features, operation/performance, parts, accessories, or service in the U.S.A., call:
1-800-JENNAIR (1-800-536-6247) or visit our website at www.jennair.com.
In Canada, call: 1-800-807-6777, or visit our website at www.jennair.ca.
Instructions d'installation et Guide d'utilisation et d'entretien
Au Canada, pour assistance, installation ou service, composez le 1-800-807-6777 ou visitez notre site web à www.jennair.ca.
Table of Contents/Table des matières ................... 2
Models/Modèles JDS9860, JDS9865
W10235521B
Advertisement
Table of Contents

Related Manuals for Jenn-Air JDS9860


Summary of Contents for Jenn-Air JDS9860
- Page 1 In Canada, call: 1-800-807-6777, or visit our website at www.jennair.ca. Instructions d’installation et Guide d’utilisation et d’entretien Au Canada, pour assistance, installation ou service, composez le 1-800-807-6777 ou visitez notre site web à www.jennair.ca. Table of Contents/Table des matières ....2 Models/Modèles JDS9860, JDS9865 W10235521B...
-
Page 2: Table Of Contents
TABLE OF CONTENTS TABLE DES MATIÈRES RANGE SAFETY ................3 SÉCURITÉ DE LA CUISINIÈRE ...........32 The Anti-Tip Bracket ..............4 La bride antibasculement............33 COOKTOP USE ................6 UTILISATION DE LA TABLE DE CUISSON ........36 Cooktop Controls.................6 Commandes de la table de cuisson ..........36 Power Failure................7 Panne de courant ...............37 Sealed Surface Burners ...............7... -
Page 3: Range Safety
RANGE SAFETY Your safety and the safety of others are very important. We have provided many important safety messages in this manual and on your appliance. Always read and obey all safety messages. This is the safety alert symbol. This symbol alerts you to potential hazards that can kill or hurt you and others. All safety messages will follow the safety alert symbol and either the word “DANGER”... -
Page 4: The Anti-Tip Bracket
The Anti-Tip Bracket The range will not tip during normal use. However, the range can tip if you apply too much force or weight to the open door without having the anti-tip bracket fastened down properly. WARNING Tip Over Hazard A child or adult can tip the range and be killed. -
Page 5: Important Safety Instructions
IMPORTANT SAFETY INSTRUCTIONS WARNING: To reduce the risk of fire, electrical shock, injury to Clean Cooktop With Caution – If a wet sponge or cloth persons, or damage when using the range, follow basic is used to wipe spills on a hot cooking area, be careful precautions, including the following: to avoid steam burn. -
Page 6: Cooktop Use
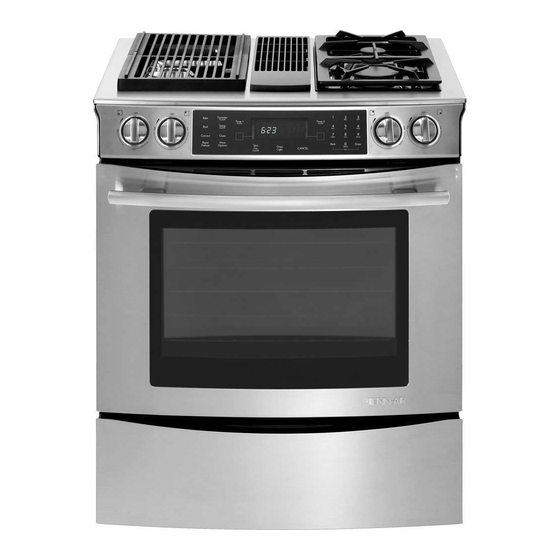
COOKTOP USE This manual covers several different models. The range you have purchased may have some or all of the items listed. The locations and appearances of the features shown here may not match those of your model. A. Surface burner locator D. -
Page 7: Power Failure
1. Remove the burner cap from the burner base and clean Power Failure according to “General Cleaning” section. 2. Clean the gas tube opening with a damp cloth. Surface Burners 3. Clean clogged burner ports with a straight pin as shown. Do In case of prolonged power failure, the surface burners can be lit not enlarge or distort the port. -
Page 8: Install Grill
4. Position burner cartridge with the mixer tube openings and For best results, use top grade meat. Thicker meat will grill igniter rods toward the orifices and terminal receptacle. Slide better than thinner cuts. cartridge until the tubes and igniters engage, then lower the When basting meats or applying sauces to foods, remember cartridge so that it rests on the cooktop surface. -
Page 9: Downdraft Ventilation System
To Remove Grill: Cookware 1. Be sure control knobs are in the “Off” position and grill components are cool. IMPORTANT: Do not leave empty cookware on a hot surface 2. Remove grill grates. cooking area, element or surface burner. 3. Lift the burner up slightly. Slide the burner away from the Ideal cookware should have a flat bottom, straight sides and a orifices and terminal receptacle. -
Page 10: Electronic Oven Control
ELECTRONIC OVEN CONTROL JDS9860 and JDS9865 A. Bake F. Timer 2 J. Rapid preheat N. Vent fan B. Favorites G. Number pads K. More options O. Oven light C. Setup H. Broil L. Clean P. Cancel D. Timer 1 I. Convect M. -
Page 11: Timers
Activating and Canceling the Clock/Day of Week Display: Locking the Oven Control and Oven Door 1. Press SETUP. 2. Select CLOCK using the left Quickset pad. The lock feature shuts down the control pads (buttons) and locks the oven door to avoid unintended use of the oven. 3. - Page 12 The self-clean cycle and automatic door lock do not operate Auto Convect Conversion (on some models) during the Sabbath Mode. The Bake temperature can be changed during an Active The oven comes from the factory set for Auto Convect Sabbath Mode. Simply press the Bake pad and then enter conversion.
- Page 13 1 BEEP to hear 1 beep only at the end of cooking. Service 7. Select the desired cook beep using the left Quickset pad. 8. Press SETUP to exit. This area of the oven control displays the Jenn-Air eXperience To change the timer beeps: Center toll-free phone number. 1. Press SETUP.
-
Page 14: Oven Use
OVEN USE Odors and smoke are normal when the oven is used the first few FOOD RACK POSITION times, or when it is heavily soiled. Roasting small cuts of meat, IMPORTANT: The health of some birds is extremely sensitive to casseroles, baking loaves of bread, the fumes given off. -
Page 15: Bakeware
Bakeware Oven Vent The bakeware material affects cooking results. Follow manufacturer’s recommendations and use the bakeware size recommended in the recipe. Use the following chart as a guide. BAKEWARE/ RECOMMENDATIONS RESULTS Light colored Use temperature and time aluminum recommended in recipe. Light golden crusts Even browning Dark aluminum and... -
Page 16: Broil
BROILING CHART Broil For best results, place food 3" (7.0 cm) or more from the broil element. Times are guidelines only and may need to be adjusted Broiling uses direct radiant heat to cook food. Changing the for individual tastes. Recommended rack positions are numbered temperature when broiling allows more precise control when from the bottom (1) to the top (5). -
Page 17: Convect Bake
Test baked goods for doneness a few minutes before the When the oven is preheated, the oven will beep, “PREHEAT” minimum cooking time with a method such as using a will turn off and “CNVT BAKE” will be displayed. “AUTO” will toothpick. -
Page 18: Convect Pastry
Convect Pastry More Options (on some models) WARNING Convect Pastry is designed to bake pastry items such as frozen pies, turnovers, cream puffs and puff pastry. Use 1, 2 or 3 racks while using this feature. Food Poisoning Hazard 1. Press CONVECT. Do not let food sit in oven more than one hour before 2. -
Page 19: Meat Probe
To Set Delay Convect (on some models): To Use: 1. Press MORE OPTIONS. 1. Press MORE OPTIONS. 2. Use the right Quickset pad to scroll to DELAY. 2. Use the right Quickset pad to scroll to KEEP WARM. 3. Select DELAY using the left Quickset pad. 3. -
Page 20: Drying (On Some Models)
To Use: 5. Select BAKE or CONVECT. Before using, insert the probe into the center of the thickest 6. If CONVECT was selected, select CNVT BAKE, CNVT ROAST portion of meat or into the inner thigh or breast of poultry, away or CNVT PASTRY. - Page 21 DRYING GUIDE CHART The length of drying times vary due to water and sugar Most fruits and vegetables dry well and retain their color when content of food, size of food pieces, amount of food being dried at 140°F (60°C). Meat and jerky should be dried between dried, humidity in the air.
-
Page 22: Thaw And Serve (On Some Models)
FOOD VARIETIES BEST FOR PREPARATION APPROX. DRY TEST FOR DONENESS DRYING TIME AT 140°F AT MINIMUM DRY TIME (60°C) [HOURS]** Basil Cut leaves 3" to 4" (7.6 cm to 2 to 5 Brittle and crumbly 10.2 cm) from top of plant just as buds appear. -
Page 23: Favorites
Favorites After each desired letter wait 3 seconds until an underline WARNING appears in the next space before entering the next letter. For example, to save lasagna, press the “JKL” pad 3 times Food Poisoning Hazard for “L,” press the “ABC” pad once for “A,” press the “STU” pad once for “S.”... -
Page 24: Range Care
RANGE CARE Self-Cleaning Cycle (on some models) The Self-Cleaning cycle uses very high temperatures, burning soil WARNING to a powdery ash. Once the oven has completely cooled, remove ash with a damp cloth. To avoid breaking the glass, do not apply a cool damp cloth to the inner door glass before it has completely cooled. -
Page 25: General Cleaning
General Cleaning IMPORTANT: Before cleaning, make sure all controls are off and PORCELAIN-COATED GRATES AND CAPS the oven and cooktop are cool. Always follow label instructions on cleaning products. Food spills containing acids, such as vinegar and tomato, should Soap, water and a soft cloth or sponge are suggested first unless be cleaned as soon as the cooktop, grates and caps are cool. - Page 26 Cleaning Method: OVEN RACKS Warm, soapy water. Glass cleaner, mild liquid cleaner or nonabrasive scrubbing Cleaning Method: pad. Self-Cleaning cycle: Do not use excessive amounts of water. See “Self-Cleaning Cycle” first. Remove racks or they will IMPORTANT: To avoid the possibility of accidentally discolor and become harder to slide.
-
Page 27: Oven Lights
The filter should always be placed at an angle. As you face the front of the range, the top of the filter should rest against Oven Door the left side of the vent opening. The bottom of the filter For normal range use, it is not suggested to remove the oven should rest against the right side of the vent chamber at the door. - Page 28 Is propane gas being used? Is the control in Sabbath Mode? See “Sabbath Mode” in The range may have been converted improperly. Contact a the “Setup” section. service technician or see “Assistance or Service” section. Is the oven temperature above 400°F (205°C)? Let the oven cool before using the self-clean cycle.
-
Page 29: Assistance Or Service
Call the dealer from whom your appliance was purchased, or call Jenn-Air Brand Home Appliances Jenn-Air at 1-800-807-6777 to locate an authorized service Customer eXperience Center company. When calling, please know the purchase date and the 553 Benson Road complete model and serial number of your appliance. -
Page 30: Warranty
In the second through fifth years from the date of purchase, when this appliance is operated and maintained according to instructions attached to or furnished with the product, Jenn-Air will pay for factory specified parts for the following components (if applicable to the... - Page 31 Keep this book and your sales slip together for future Dealer name____________________________________________________ reference. You must provide proof of purchase or installation date for in-warranty service. Address ________________________________________________________ Write down the following information about your major appliance Phone number __________________________________________________ to better help you obtain assistance or service if you ever need it. You will need to know your complete model number and serial Model number __________________________________________________ number.