Table of Contents
Advertisement
Advertisement
Table of Contents

Related Manuals for Miele KM 6312


Summary of Contents for Miele KM 6312
- Page 1 Operating and installation instructions Ceramic cooktops with induction KM 6312 KM 6317 en - AU, NZ To avoid the risk of accidents or damage to the appliance, it is essential to read these instructions before it is installed and used for the first time.
-
Page 2: Table Of Contents
KM 6312 ........ - Page 3 Contents Safety features ........... 37 Safety lock/System lock .
-
Page 4: Description Of The Appliance
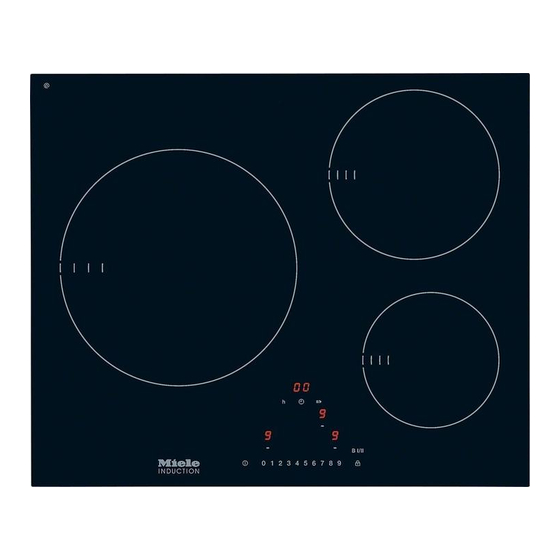
Description of the appliance Cooktops KM 6312 Cooking zone with TwinBooster bc Cooking zones with Single Booster Control panel... - Page 5 Description of the appliance KM 6317 ac Cooking zones with TwinBooster bd Cooking zones with Single Booster Control panel...
-
Page 6: Control Panel
Description of the appliance Control panel 0 1 2 3 5 6 7 8 9 Sensors a Cooktop ON/OFF b Controls for - Setting the power level - Setting the time c Safety lock d Single Booster / TwinBooster e For selecting the cooking zones f Stop and Go g - Selecting the timer - Changing the timer functions... - Page 7 Description of the appliance Indicator lamps i Safety lock j Booster Cooking zone display = Cooking zone ready for use = Keeping warm function 1 to 9 = Power setting = Setting 1 TwinBooster = Booster / Setting 2 TwinBooster ß...
-
Page 8: Cooking Zone Data
** The wattage quoted may vary depending on the size and material of the pans used. Special feature Cooktops bearing the < symbol in the top left-hand corner are suitable for connecting to the Miele|home system (available in selected countries only). -
Page 9: Warning And Safety Instructions
Warning and Safety instructions Correct application This appliance complies with all This cooktop is designed for relevant local and national safety domestic use and for use in similar requirements. Inappropriate use environments by guests in hotel or can, however, lead to personal injury motel rooms, bed &... - Page 10 Warning and Safety instructions Safety with children Packaging, e.g. cling film, polystyrene and plastic wrappings, Use the safety lock to prevent must be kept out of the reach of babies children operating the appliance or and young children. Danger of altering the settings.
- Page 11 Repairs and other work by The electrical safety of this unauthorised and unqualified persons appliance can only be guaranteed could be dangerous. Miele cannot be when continuity is complete between it held liable for unauthorised work. and an effective earthing system which...
- Page 12 H 05 VV-F Please note that the area immediately (pvc insulated), available from Miele. surrounding the cooktop is Do not connect the appliance to the electromagnetically charged, and that mains electricity supply by a this could affect a pacemaker.
- Page 13 Original Miele explode. This could result in injury and ceramic and stainless steel cooktop scalding or damage.
- Page 14 (see relevant section). Spray canisters, aerosols and other inflammable substances must not be stored in a drawer under the cooktop. Miele cannot be held liable for Cutlery inserts must be heat-resistant. damage caused by non-compliance with these Warning and Safety...
-
Page 15: Caring For The Environment
Caring for the environment Disposal of the packing Disposal of your old appliance material or machine The transport and protective packing Electrical and electronic appliances / has been selected from materials which machines often contain materials are environmentally friendly for disposal which, if handled or disposed of and can normally be recycled. -
Page 16: Before Using For The First Time
Before using for the first time Please stick the extra data plate for the appliance supplied with this documentation in the space provided in the "After sales service" section of this booklet. Cleaning for the first time ^ Remove any protective wrapping and adhesive labels. ^ Before using for the first time, clean the appliance with a damp cloth only and then wipe dry. -
Page 17: Induction
Induction How the appliance works An induction coil is located under each cooking zone. When a cooking zone is switched on, this coil creates a magnetic field which impacts directly on the base of the pan and heats it up. The cooking zone itself is heated up indirectly by the heat given off by the pan. -
Page 18: Noises
Induction Noises When using an induction cooking zone, the following noises can occur in the pan, depending on what it is made of and how it has been constructed: – On the higher power settings, it might buzz. This will decrease or cease altogether when the power setting is reduced. -
Page 19: Pans
Induction Pans Suitable pans include: – stainless steel pans with a magnetic base – enamelled steel pans – cast iron pans Unsuitable pans: – stainless steel pans without a magnetic base – aluminium and copper pans – glass, ceramic or earthenware pots and pans To test whether a pot or pan is suitable for use on an induction cooktop, hold a magnet to the base of the pan. -
Page 20: Use
Operation This ceramic cooktop is equipped with electronic sensor switches which react to finger contact. To operate a cooking zone, touch the relevant sensor. Each time you touch a sensor, an audible tone sounds. The cooking zones and the timer have to be "active" when you want to set or adjust a power setting or the duration. -
Page 21: Switching On
Switching on The cooktop must be switched on before any of the zones can be used. Do not leave the appliance unattended whilst it is being used. To switch the cooktop on ^ Touch the "s" sensor. 0 appears in each of the cooking zone displays. If no further entry is made, the cooktop will switch itself off after a few seconds for safety reasons. -
Page 22: Settings
Settings The appliance is programmed with 9 power settings at the factory. If you wish to fine-tune a setting, you can extend the power setting range (see "Programming"). The intermediate setting will be represented by an illuminated dot next to the number. -
Page 23: Auto Heat-Up
Auto heat-up When Auto heat-up has been activated, the cooking zone switches on automatically at the highest setting and then switches to the continued cooking setting which you have previously selected. The heat-up time depends on which continued cooking setting has been chosen (see chart). To activate Auto heat-up ^ Briefly touch the sensor of the required cooking zone. - Page 24 Continued cooking Heat-up time setting* in minutes and seconds (approx.) 0 : 15 0 : 15 0 : 15 0 : 15 0 : 25 0 : 25 0 : 50 0 : 50 2 : 00 5 : 50 5 : 50 2 : 50 2 : 50...
-
Page 25: Booster Function
Booster function The cooking zones are equipped with a Single Booster or a TwinBooster (see "Description of the appliance"). The Booster function enables large quantities to be heated quickly, e.g. when boiling water for cooking pasta. When activated, the cooking zones will operate with extra power for a period of 15 minutes. - Page 26 To switch on the Single Booster ^ Briefly touch the sensor of the required cooking zone. ^ Select a power setting for the cooking zone. ^ Touch the sensor B I/II. The indicator lamp for the booster will light up and h will begin to flash in the display for the cooking zone.
- Page 27 To switch off Single Booster / TwinBooster ^ Briefly touch the sensor of the required cooking zone. ^ Touch the sensor B I/II repeatedly until the indicator lamp for the Booster goes out and the power setting appears in the display. ^ Briefly touch the sensor of the required cooking zone.
-
Page 28: Keeping Warm Function
Keeping warm function Each cooking zone has a keeping warm function. The function "h" is between the power settings "0" and "1". If the keeping warm function has been activated, the cooking zone will switch off automatically after a maximum of 2 hours. This function is for keeping food that has just been cooked warm, i.e. -
Page 29: Switching Off And Residual Heat Indicators
Switching off and residual heat indicators To switch off a cooking zone ^ Touch the sensor of the required cooking zone twice. A 0 flashes in the cooking zone display for a few seconds. If the cooking zone is still hot, the residual heat indicator will then appear in the display. -
Page 30: Tips On Saving Energy
Tips on saving energy – Use a lid whenever possible to minimise heat loss. Uncovered Covered – Select a smaller pan when cooking small quantities. A small pot requires less energy than a larger, less filled pot. – Cook with as little water as possible. –... -
Page 31: Timer
Timer The cooking zone has to be switched on if you wish to use the timer. The timer can be used for two different functions: – To set the minute minder – To set a cooking zone to switch off automatically. A duration of between 1 minute (01) and 9 (9^) hours can be set. -
Page 32: Minute Minder
Timer Minute minder Setting the minute minder Minutes Example: You want to set the minute minder to 15 minutes. ^ Switch the cooktop on. ^ Touch the "m" sensor. "00" appears in the display, "0" flashes on the right. First the tens digit is set then the units digit. ^ Touch a number on the selection scale to set the tens digit (here: 1). - Page 33 Timer Hours Touch the required number on the selection scale to set the hours. Half hours can be selected by touching the area between two numbers. Example: You want to set the timer to 2 hours 30 minutes. ^ Switch the cooktop on. ^ Touch the "m"...
- Page 34 Timer Change ^ Touch the "m" sensor. ^ Set a new minute minder time as described above. Delete ^ Touch the "m" sensor. "00" appears in the display.
-
Page 35: To Switch A Cooking Zone Off Automatically
Timer To switch a cooking zone off automatically You can set a time after which the cooking zone will switch off automatically. All cooking zones can be programmed for the same time. If the time programmed is longer than the maximum operational time allowed, the cooking zone will switch off after the maximum time allowed (see relevant section). -
Page 36: To Use Both Timer Functions At The Same Time
Timer To use both timer functions at the same time The minute minder and automatic switch-off functions can be used at the same time. If you have programmed in one or more switch-off times, and would like to use the minute minder as well: Touch the "m"... -
Page 37: Safety Features
Safety features Safety lock/System lock Keep children away from the cooktop for their own safety. Your appliance is equipped with a safety lock to prevent the cooktop and the cooking zones being switched on or any settings being altered. The safety lock can be activated when the cooktop is switched on. - Page 38 Safety features To activate Three-finger operation (factory default setting) ^ Touch the $ sensor and the selector sensors of both of the right-hand cooking zones simultaneously until the safety lock indicator light and LC appear in the timer display. The indicator light and LC will go out after a short time. One-finger operation ^ Touch the $ sensor until the safety lock indicator light and LC appear in the timer display.
-
Page 39: Stop And Go
Safety features Stop and Go The Stop and Go function reduces the power setting of all cooking zones to 1. The settings for the cooking zones and the timer settings cannot be changed, the cooktop can only be switched off. When deactivated, the cooking zones continue to operate on the power settings last set. -
Page 40: Safety Cut-Out
Safety features Safety cut-out Safety switch-off with an over-long cooking time If one of the cooking zones is heated for an unusually long period of time (see chart), and the power settings are not altered, the cooktop will switch itself off automatically and the corresponding residual heat indicator will appear. -
Page 41: Overheating Protection
– fats or oils being heated up on the highest power setting – insufficient ventilation to the underside of the appliance – a hot cooking zone being switched on again after a power-cut. If the overheating protection mechanism triggers again, contact Miele. -
Page 42: Cleaning And Care
Cleaning and care Do not use a steam cleaning appliance to clean this appliance. The steam could reach the electrical components and cause a short circuit. The appliance should be cleaned regularly, preferably after each use. Allow it to cool down to room temperature before cleaning. - Page 43 Wipe all coarse soiling off using a damp cloth. Stubborn soiling may need to be removed with a shielded scraper blade. Then clean the cooktop with the Original Miele ceramic and stainless steel cooktop cleaner (see "Optional accessories"), applied with kitchen paper or a clean cloth. Do not apply cleaner whilst the cooktop is still hot, as this could result in marking.
-
Page 44: Programming
Programming You can change the default settings of the programme options (see chart). Several settings can be altered in succession. After calling up the programming, P (programme) and S (status) appear in the timer display; in all cooktops with three cooking zones another selection scale will light up in the rear left. - Page 45 Programming How to save the settings ^ Touch the s sensor until the displays go out. How to avoid saving the settings ^ Touch the $ sensor until the sensors go out.
- Page 46 Programming Programme* Status** Setting 00 Demonstration mode and Demonstration mode on factory default settings ("dE" appears in the timer display for a few seconds after switching on the cooking zone) Demonstration mode off Factory default settings reinstated 02 Power setting range 9 power settings (1, 2, 3 ...
- Page 47 Programming Programme* Status** Setting One-finger locking using $ Safety lock Three-finger locking using $ and the sensor buttons on the two right-hand cooking zones System lock Activating the system lock manually Activating the system lock manually and automatically Auto heat-up Warning tone if the sensors are covered Sensor switch reaction...
-
Page 48: Problem Solving Guide
Problem solving guide With the aid of the following guide, minor problems can be easily corrected without contacting Miele. This will save you time and money because you won't need to book a service technician. The following information may help you to find the reason for a fault, and to correct it. - Page 49 Problem solving guide Problem Possible cause Remedy There is a strange smell The smell and any or vapours when a new vapours will dissipate appliance is being after a short time. used. If this happens, ß will There is no pan or an Use suitable pans (see flash in the relevant unsuitable pan on the...
- Page 50 Problem solving guide Problem Possible cause Remedy Power setting 9 is If both zones are automatically reduced operated on power if the combined setting 9, the overall cooking and casserole power outlet might be zones are set to power exceeded. setting 9.
- Page 51 Interrupt the power supply to the cooktop for approx. 1 minute. If this does not solve the problem, please call Miele. FE flashes alternately with a number in the timer display. FE 44 The overheating See "Overheating protection".
-
Page 52: Optional Accessories
These products can also be obtained from Miele (see back cover for contact details) or from your Miele Chartered Agent. Saucepans and frying pans Miele offers a full range of saucepans and frying pans. These have been specially designed to perfectly meet the functioning and dimensions of Miele appliances. -
Page 53: Safety Instructions For Installation
Safety instructions for installation After installing the cooktop, ensure All electrical work should be that the connection cable cannot come undertaken by a suitably qualified into contact with the underside of the and competent person in strict appliance. Make sure that there is no accordance with current national mechanical obstruction, such as a and local safety regulations. -
Page 54: Safety Clearances
Safety clearances Safety clearance above the appliance When two or more appliances are installed together below a rangehood, e.g. a gas appliance and an electric cooktop, which have different safety distances given in the installation instructions, you should select the greater distance of the two. - Page 55 Safety clearances Side / rear clearances to the cooktop Ideally the cooktop should be installed with plenty of space on either side. There may be a wall at the rear and a tall unit or wall at one side. On the other side, however, no unit or divider should stand higher than the cooktop (see illustrations).
- Page 56 Safety clearances Safety clearance underneath the Interim shelf cooktop It is not necessary to install an interim shelf underneath the cooktop. To ensure sufficient ventilation to the cooktop, a certain gap must be left A gap of 10 mm is needed at the back between the underside of the cooktop for laying the mains connection cable.
-
Page 57: Notes On Installation
Notes on installation Cooktops with frames and Tiled worktop bevelled edges Seal between the cooktop and the worktop Grout lines a and the hatched area underneath the cooktop frame must be smooth and even. If they are not, the cooktop will not sit flush with the worktop and the sealing strip The sealing strip under the edge of the underneath the cooktop will not provide... -
Page 58: Cooktop With Frame Or Bevelled Edge
Cooktop with frame or bevelled edge Building-in dimensions KM 6317 a Front b Building-in height c Miele|home connection d Mains connection box The mains connection cable (L=1440 mm) supplied is not fixed. -
Page 59: Installation
Cooktop with frame or bevelled edge Installation Installing the cooktop ^ Feed the mains connection cable Preparing the worktop down through the cut-out. ^ Make the worktop cut-out for one or ^ Place the cooktop centrally in the more appliances as applicable. cut-out. -
Page 60: Flush-Fitted Cooktops
Flush-fitted cooktops Building-in dimensions KM 6312 a Front Cut-out dimensions for granite or b Building-in height marble worktops. c Miele|home connection Please take careful note of the inset d Stepped cut-out for granite or marble diagram. worktops e Mains connection box The mains connection cable (L=1440 mm) supplied is not fixed. -
Page 61: Installation
Flush-fitted cooktops Installation The cooktop can be installed – in a suitable cut-out in a granite or Flush fit cooktops are only suitable marble worktop. for installation in granite, marble, tiled or solid wood worktops. – in a suitable cut-out in a tiled or solid See "Building-in dimensions"... - Page 62 Flush-fitted cooktops Granite and marble worktops Installing the cooktop ^ Feed the mains connection cable Preparing the worktop down through the cut-out. ^ Centre the cooktop b in the cut-out. ^ Connect the cooktop to the mains. ^ Check that the cooktop works. ^ Seal the remaining gap c with a silicone sealant that is heat-resistant to at least 160 °C.
- Page 63 Flush-fitted cooktops Solid wood / tiled / glass Connecting the mains connection cable to the appliance worktops The mains connection cable must Preparing the worktop cut-out be connected by a suitably qualified and competent electrician in accordance with current local and national safety regulations.
-
Page 64: Electrical Connection
Electrical connection Important All electrical work should be carried The wires in the mains lead are out by a suitably qualified and coloured in accordance with the competent person in strict following code: accordance with national and local safety regulations. Green/yellow = earth Blue = neutral... -
Page 65: Wiring Diagram
Electrical connection Wiring diagram N.B. This appliance is supplied single phase... -
Page 66: After Sales Service, Data Plate
After sales service, data plate The address and phone number of your nearest Miele office is given on the back page. The voltage and rated load are given on the data plate. Please quote this data, together with the model description and serial number when contacting Miele. - Page 68 Alteration rights reserved/ 2612 M.-Nr. 07 839 991 / 02...