Table of Contents
Advertisement
Available languages
Available languages
Quick Links
MICROSISTEM: RADIO/PLAYER CD cu USB si Cititor de CARD
1.SIGURANTA
1.1 Intentionati sa folositi
Microsistemul DVD reda muzica de pe CD si muzica,video si fotografii de pe DVD si
USB.Aparatul poate reda fotografii de pe CD inregistrate in system Kodak.
Cititi manualul cu atentie.
-
datorita marei varietati de produse cu conectare de memorie externa
(USB,SD/MC) si uneori datorita functiilor specifice producatorilor nu se poate
garata ca aparatul va recunoaste toate sistemele sau ca va deschide toate variantele
posibile teoretic.
MANUAL DE UTILIZARE
Advertisement
Table of Contents

Related Manuals for Akai AMD20


Summary of Contents for Akai AMD20
- Page 1 MANUAL DE UTILIZARE MICROSISTEM: RADIO/PLAYER CD cu USB si Cititor de CARD 1.SIGURANTA 1.1 Intentionati sa folositi Microsistemul DVD reda muzica de pe CD si muzica,video si fotografii de pe DVD si USB.Aparatul poate reda fotografii de pe CD inregistrate in system Kodak. Cititi manualul cu atentie.
- Page 2 DVD urile si playerele DVD sunt fabricate conform intelegerilor internationale de cod regional.Ca atare aparatul va reda numai discurile cu codul regional pentru care a fost fabricat. Daca codul de pe eticheta aparatului nu corespunde cu codul de pe disc acesta nu poate fi redat. Aparatul a fost construit in tehnologia protectiei copierii pentru a preveni copierea discului pe oricare media.Daca un video recorder este conectat la acest aparat ,imaginea video de la iesire va fi distorsionata pe toata durata inregistrarii.
- Page 3 2.Difuzoare 2.Perechi de fire pentru difuzoare 1.Telecomanda 2.Baterii (AAA) 1.Cablu RCA 1.Manual de utilizare. 3.Instalare * Asezati aparatul pe o suprafata neteda orizontala *Conectati difuzoarele la aparat.Cititi paragraful “Instalarea difuzoarelor” *Conectati aparatele exterioare.Cititi paragraful “Conectarea echipamentelor externe” *Conectati aparatul la retea. * Instalati bateriile in Telecomanda.Cititi paragraful “Telecomanda”...
- Page 4 Conectarea la difuzoare Apasati lamela pentru a deschide mufa.Tineti apasat . Conectati capetele firelor la difuzoare imperechind polaritatile – si + Eliberati lamele pentru a bloca firele. Conectarea la aparat. Apasati lamlele pentru a deschide mufa. ...
- Page 5 Aparatul are urmatoarele iesiri video (in ordinea preferintelor) Componenta: Conectati un cablu corespunzator Pr/Y/Pb la mufele COMPONENT VIDEO OUT. SCART: Introduceti un cablu corespunzator la mufa SCART OUT. S-Video: Introduceti un cablu corespunzator la mufa S-VIDEO OUTPUT. ...
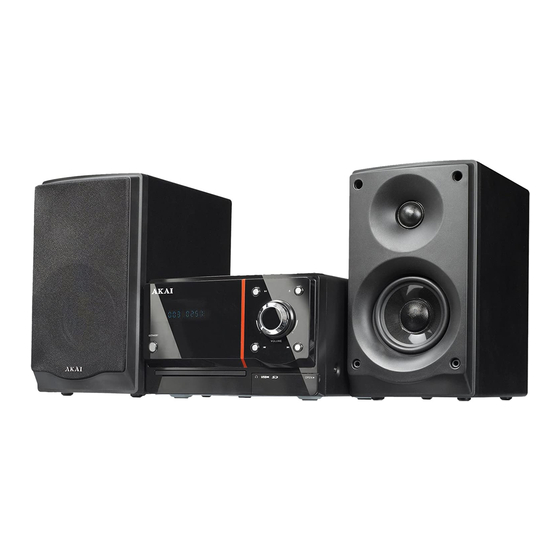
- Page 6 Panoul Frontal 1. Butonul Standby 2. Afisajul 3. Locas Disc 4. Senzor Telecomanda 5. Jack Casca 6. Slot USB 7. Slot Card Memorie 8. Protectie pentru mufele conecatre echipamente externe 9. Butonul Melodi/Capitol Anterior 10. Butonul Melodie/Capitol Urmator 11. Butonul Volum 12.
- Page 7 35 Butonul STEP 36 Butonul A-B REPEAT 37 Butonul REPEAT 38 Butonul STOP 39 Butonul ZOOM 40 Butonul MENU 41 Butonul SUBTITLE/AUTO 42 Butonul PREV 43 Butonul NEXT 44 Butonul Afisaj pe Ecran(OSD) 45 Butonul ANGLE 46 Butonul PLAY/PAUSE 47 Butonul OPEN/CLOSE Functiile radio 48 Butonul SEARCH+ 49 Butonul SEARCH-...
- Page 8 Pentru a regla volumul ,apasati butoanele VOL+ sau VOL- (18) Pentru a regla volumul la fiecare difuzor separat ,apasati butonul CH-LEVEL(23) .Apoi apasati butoanele VOL+ sau VOL – (18) Pentru a selecta tonul (bass/inalte) apasati butonul TONE(22) .Pentru reglajul tonului ,apasati butonul VOL+ sau VOL-(18) ...
- Page 9 Apasati butoanele sageti (19) pentru a alege un parametru din menu. Apasati ENTER pentru a selecta parametrul. In timpul redarii urmatoarele functii sunt accesibile: Pentru a selecta un capitol (DVD) sau o melodie (CD) ,apasati butoanele digitale (16).
- Page 10 Timp disc Capitol Titlu Timp Capitol Timp Titlu. Intrarile posibile pentru CD sunt: Timp Melodie Melodie Specifica Apasati butoanele digitale pentru a alege selectia. Folosirea functiei PROGRAM Apasati butonul PROGRAM (30) pentru a intra in functia PROGRAM Apasati butoanele digitale pentru a selecta melodia dorita, si folositi butoanele sageti sus jos pentru a selecta intrarea urmatoare.
- Page 11 Pentru inversarea imaginii vertical sau orizontal ,apasati butoanele sageti sus/jos(19) Pentru rotirea imaginii stanga sau dreapta ,apasati butoanele sageti stanga/dreapta(19). NOTA: Derularea imaginilor(Slide Show ) se opreste in modul zoom.Rotatia imaginii si efectele de imagine nu sunt active in modul zoom. Folosirea functiei redare CD Video ...
- Page 12 Datorita marei varietati de produse cu porturi USB si fabricanti cu functii specifice nu se poate niciodata garanta ca acest aparat va recunoaste toate dispozitivele USB. 5.6 Functiile SD/MMC Dupa ce ati conectat dispozitivul ,menu continut se afiseaza pe ecranul TV. ...
- Page 13 In sectiunea LAST MEMORY apasati buroanele sageti pentru a porni sau opri aceasta functie.Cand este pornita aparatul isi aminteste ultimul timp de redare al discului. Pagina Programare Audio Programarea audio Analog. DOWNMIX:Alegeti LT/RT pentru mixarea canalelor 5.1 in canale stereo stanga- dreapta.Alegeti STEREO pentru a mixa canalele 5.1 in semnal audio stereo.
- Page 14 GAMMA: regleaza intensitatea culorii. LUMA DELAY: Compenseaza intarzierea semnalului de culoare Pagina Programare Preferinta NOTA: Functiile generale ale sistemului pot sa fie fixate pe un player fara disc. TIP TV Alegeti formatul iesire video pentru a se potrivi la sistemul TV :PAL,MULTI sau NTSC.
- Page 15 Problema Actiunea Sunet lipsa sau incomplet Verificati daca echipamentul extern este conectat corect si este pornit. Verificati cablurile si conectarea lor Verificati daca ati selectat corect sursa. Verificati volumul si daca nu este actionat mutingul Nu se alimenteaza Verificati daca cablul de retea este corect conectat la retea Verificati daca butonul de retea de pe panoul spate este pornit.
- Page 16 Imaginea nu acopera ecranul Alegeti formatul de ecran din menu setup(programare) Alegeti formatul ecran din menu de start al discului Redarea MP3 Lipsa sunet sau sunet Daca MP3 este amestecat cu alte fisiere pe CD ,aparatul incomplet poate sa redea fisierele MP3 ca zgomot fara sunt sau sa rejecteze discul Verificati daca fisierele MP3 redate sunt in format corect sau alegeti alt fisier pentru redare.
- Page 17 Distorsiuni > -60 dB( 1kHz) Sistem televiziune PAL/NTSC Raspuns in frecventa 20 Hz ~ 20 kHz Cod regiune Sistem difuzoare Parametru valoare Impedanta 4 ~ 16 ohmi Material carcasa lemn Lungime fire 100 cm Generale Telecomanda baterii 2 x 1,5 V tip AAA Tipuri disc redate DVD/DVD-R/DVD-RW/CD-R/CD-RW/DIVX /SVCD/VCD/CD-DA...
- Page 18 Microset: Radio / DVD-player with USB-port and Cardreader AMD20 User manual NL 29 Gebruiksaanwijzing FR 57 Manuel de l’utilisateur ES 85 Manual de instrucciones DE 113 Gebrauchsanleitung Οδηγίες χρήσεως EL 144...
-
Page 19: Table Of Contents
Table of contents Safety ................3 Intended use ..............3 Labels in this manual ............3 General safety instructions ..........4 Preparations for use ........... 4 Unpacking ................4 Package contents ............5 Installation ..............5 Installing the speakers .............6 Connecting random equipment ........7 Remote control..............9 Functions .............. -
Page 20: Safety
AMD20 Safety Intended use The DVD Micro System plays music from CDs and music, videos and photos from DVDs and USB. The appliance also plays photos from Kodak picture CDs. Read the manual carefully before the first use. Due to the great variety of products with external memory connection (USB, SD/MMC, etc.) and their sometimes quite... -
Page 21: General Safety Instructions
A note gives additional information, e.g. for a procedure. General safety instructions WARNING Do not put force on the appliance. The appliance can fall and can cause serious injury. CAUTION Do not spill any liquid on the appliance. WARNING Do not insert any objects in the ventilation holes. CAUTION Do not block the ventilation holes. -
Page 22: Package Contents
AMD20 We recommend that you retain the original carton and packing materials in case it ever becomes necessary to return your product for service. This is the only way to safely protect the product against damage in transit. If you do dispose of the carton and the packing materials, please remember to recycle with due care to the environment. -
Page 23: Installing The Speakers
This appliance is equipped with rubber feet to prevent it from moving. The feet are made from non-migrating material specially formulated to avoid leaving any marks or stains on furniture. However, certain types of furniture polishes, wood preservatives or cleaning sprays cause the rubber to soften and leave marks or a residue on the furniture, and potentially risk the surface to become damaged. -
Page 24: Connecting Random Equipment
AMD20 Connection to speakers ● Press the latches to open the terminals. Keep the latches depressed. ● Connect the wire ends to the speakers matching the (+) and (-) polarity markings. ● Release the latches to lock the wire ends. -
Page 25: Video Connections
Audio connections (input) ● Stereo audio: Connect a suitable cable to the R/L channels of the LINE IN connection. Audio connections (output) The appliance has the following audio outputs: ● Stereo audio: Connect a suitable cable to the R/L channels of the AUDIO OUT connection. -
Page 26: Remote Control
AMD20 Remote control Install batteries ● Remove the battery cover. ● Insert the batteries matching the (+) and (-) polarity markings. ● Re-install the battery cover. CAUTION Incorrect installation can cause battery leakage and corrosion which will damage the appliance. Corrosion, oxidation,... -
Page 27: Functions
Functions DVD Micro System Front panel Standby button Display Disc tray Remote sensor Headphone jack USB slot Memory card slot Cover for connection of external devices Previous track/chapter button 10 Next track/chapter button 11 Volume dial 12 Play/Pause button 13 Open/close button... -
Page 28: Remote Control
AMD20 AMD20 Back panel 14 Master power switch 6~16 ohm LINE INPUT Remote control General functions 15 Standby button 16 Digit buttons (0-10+) 17 SETUP button 18 VOLUME +/- button 19 Arrow buttons 20 SOUND EFFECT button (S.EFFECT) 21 USB button... -
Page 29: Tuner Functions
DVD functions 28 GO TO button 29 PLAYBACK CONTROL button (PBC) 30 PROGRAM button (PROG) 31 FWD button 32 REV button 33 TITLE button 34 AUDIO button 35 STEP button 36 A-B REPEAT button 37 REPEAT button 38 STOP button 39 ZOOM button 40 MENU button 41 SUBTITLE/AUTO button... -
Page 30: Operation
AMD20 Operation All functions of the appliance are accessible using the remote control. All instructions refer to operation with the remote control, unless indicated otherwise. Master power switch The appliance is equipped with a master power switch (14) located at the back panel. - Page 31 ● To select the tone (bass/treble), press the TONE button (22). To adjust the tone, press the VOL + button or the VOL - button (18). ● To switch between sound effects (concert/living/hall/bath/cave/arena/ church), press the S.EFFECT button (20). Press the button once again to exit this function.
-
Page 32: Dvd/Cd Functions
AMD20 ● Select the DVD mode. Then select the correct function with the USB button (21). ● To start playback, press the PLAY/PAUSE button (46) once. ● For extended instructions, read the paragraph "SD/MMC functions" further on in this manual. -
Page 33: Using The Program Function
● Normally, if an MP3 disc is loaded, the unit will take longer time to read the initial data. ● A DVD that does not match the region code cannot be read by this appliance. ● If a disc contains mixed content (e.g. MP3 and video files), the appliance will only recognise, list and play one content type. -
Page 34: Using The Zoom Function
AMD20 ● Press the A-B REPEAT button again to select the ending point (B). The appliance plays the section repeatedly. ● To cancel the A-B REPEAT function, press the A-B REPEAT button again. The appliance will resume the normal playback. -
Page 35: Radio Functions
Using the Video CD playback function ● Press the PBC button (29) to switch on the playback function. ● Insert a Video CD. ● To start playback, press the PLAY/PAUSE button (46) once. ● Press the PBC button (29) to quit the playback and return to the main menu. -
Page 36: Sd/Mmc Functions
AMD20 During playback, the following functions are available: ● To select a track, press the PREV button (42) or the NEXT button (43) until the desired track is set. ● To pause playback, press the PLAY/PAUSE button (46) once; to resume playback, press the button again. - Page 37 ● Press the SETUP button (17). ● Press the arrow buttons (left and right) (19) to select a menu. The submenu is displayed directly. ● Press the arrow buttons (up and down) to enter the submenu. ● Press the ENTER button (24) to select a setting, or the left arrow button to cancel the selection.
- Page 38 AMD20 Digital audio setup DIGITAL OUTPUT ● Select SPDIF OFF to switch off the digital audio signal output. ● Select SPDIF RAW to set the digital audio signal output to its raw format (DTS/Dolby Digital 5.1). ● Select SPDIF PCM to set the digital audio signal output to PCM format.
- Page 39 ● The composite video output is the default setting for video output. ● If the video output results in a poor image, then press the V-Mode button (26) until the image is good. COLOUR SETTING ● SHARPNESS: Adjust the screen sharpness. ●...
-
Page 40: Cleaning And Maintenance
AMD20 DEFAULT ● Restore the default settings of the appliance. Password setup page ● PASSWORD MODE: Switch the password function on or off. Enter the correct password to switch the mode on or off. ● PASSWORD: Change the default password. Enter the current password in the first box. -
Page 41: Troubleshooting
Troubleshooting Trouble Action No sound or incomplete audio Check if the random equipment are switched on and set correctly. Check cables for connection problems. Check if the correct source is selected. Check volume or mute setting. No power Check if the power cord has been properly connected to the power outlet. -
Page 42: Mp3 Playback
AMD20 Remove the disc and leave the appliance powered on for one or two hours. No sound or incomplete audio Select another audio track. During SCAN, SLOW MOTION or SINGLE STEP the sound is muted. No scan or skip possible Some discs are programmed to refuse user action at certain sections. -
Page 43: Technical Data
Trouble Action No sound on the unit system. Input source is low. Increase the volume level on the audio source device. No picture Check if the TV is switched on and set to the correct A/V input. Check cables for connection problems. Check cables for damage. -
Page 44: Speaker System
AMD20 Disc output Parameter Value Laser type Semiconductor Signal/noise ratio > 80 dB (1 kHz) Frequency range ≥ 70 dB (1 kHz) Distortion ≤ -60 dB (1 kHz) Wow and flutter Below the limit of the appliance Television system PAL/NTSC... -
Page 45: Disposal Of Used Electrical And Electronic Equipment
For more detailed information about recycling of this product, please contact your local city office, your household waste disposal service or the shop where you purchased the product. For more information and warranty conditions, please visit: www.akai.eu...