
Related Manuals for Elation PLATINUM SPOT 5R PRO


Summary of Contents for Elation PLATINUM SPOT 5R PRO
- Page 1 PLATINUM SPOT 5R PRO Elation Professional 6122 S Eastern Ave Los Angeles, Ca 90040 www.elationlighting.com 01/08/2011 – Visage Version 1.0...
-
Page 2: Table Of Contents
Platinum Spot 5R Pro™ CONTENTS General Information………………………………………………………..………………...…… 3 a. Introduction……………..………………………………………………………………… b. Unpacking………………………..………………………………………..……………… c. Customer Support………………………..……………………………….……………… 3 d. Warranty Registration…………….……………….……………………………….…… e. Discharge Lamp Warning………………………....……………………………. Safety Instructions……………………………………………………………..…..…………. Features………………………………………………………………..………………..………… General Guidelines…………..…………………………………………………...………………. 9 Fixture Overview………………………..…………………………………………...……………. 10 Lamp Installation…………………………………..…………………………………...…………. 13 a. Lamp Protection Circuitry.………………………..……………………….…..………… b. Lamp installation……………………………………………..…………….……..……… 14 c. -
Page 3: General Information
INTRODUCTION: Congratulations, you have just purchased one of the most innovative and reliable lighting fixtures on the market today! The Platinum Spot 5R Pro™ has been designed to perform reliably for years when the guidelines in this booklet are followed. -
Page 4: Warranty Registration
Lamp Replacement: Please note that due to the nature of the Platinum 5RLamp and the optical path of the Platinum Spot 5R Pro it is imperative to replace the lamp at the rated 2000 hour lamp life! UV RADIATION: This fixture emits intense UV radiation, which is harmful to the eyes and skin. - Page 5 Platinum Spot 5R Pro™ To achieve the intensity associated with discharge lamps, these lamps use gas sealed in a high-pressure environment to emit a brilliant output. Due to the high pressure involved with the construction of the lamp, the lamp may explode during prolonged extensive use. This risk is increased with age;...
-
Page 6: Safety Instructions
2. Never touch the fixture during normal operation. This can cause severe personnel injuries and/or damage to the fixture. 3. Be sure to unplug the Platinum Spot 5R Pro™ from the power outlet before performing any service related issues. 4. Lamp Replacement; Allow at least 15 minutes after disconnecting main power before you open the Platinum Spot 5R Pro™. - Page 7 Platinum Spot 5R Pro™ may increase the risk of damage and/or personal injury. 10. To reduce the risk of fire or shock, do not expose this fixture to rain or moisture. 11. Do not attempt to operate this fixture if the power cord has become damaged or frayed.
-
Page 8: Features
Platinum Spot 5R Pro™ 3. FEATURES • Pan 540° or 630˚ (User selectable) / Tilt 270° • 3 operation mode: DMX controlled, stand alone, or sound activated • 8 user colors plus white (including UV filter) • User selectable color change modes (mode 1: full colors, mode 2: split-colors) •... -
Page 9: General Guidelines
Platinum Spot 5R Pro™ 4. GENERAL GUIDELINES This fixture is a professional lighting effect designed for use on stage, in nightclubs, in theatres, etc. Do not attempt operation or installation without a proper knowledge on how to do so. This fixture was designed for indoor use only. -
Page 10: Fixture Overview
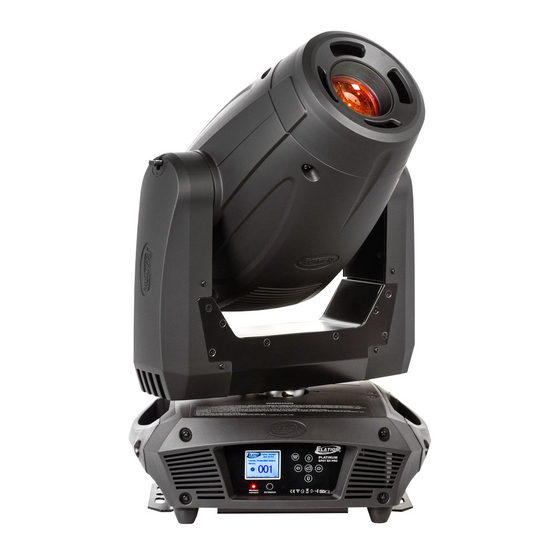
Platinum Spot 5R Pro™ 5. FIXTURE OVERVIEW 1: Lens 2: Display 3: Wireless indicator 4:DC Switch 5: Microphone 6: Left Button 7: Down Button 8: Right Button 9: Mode/Esc Button 10:Up Button 11:Enter Button 12: Wireless DMX Antenna 13: Handle... - Page 11 Platinum Spot 5R Pro™ 1. Lens – Main output lens. 2. LED Menu Display – Full color animated menu display. Wireless indicator –Wireless indicator. 4. DC Switch -Controls menu and display power when the unit is disconnected from mainpower. 5. Microphone – This microphone receives external low frequencies to trigger the unit in Sound-Active mode.
- Page 12 Platinum Spot 5R Pro™ 13. Carrying Handle – Please use this intergraded handled to move the fixture form location to location. Never carry the fixture by the head. 14. Lamp Access Panel – This panel provides access to the lamp and lamp socket assembly.
-
Page 13: Lamp Installation
Platinum Spot 5R Pro™ 6. LAMP INSTALLATION INSTRUCTIONS Installing or replacing the lamp For a proper and safe lamp change, please read this chapter carefully and follow all instructions. Lamp Protection Circuitry Because of the nature of the extreme heat associated with the Platinum 5R lamp and the tight nature of the internal optical system it is imperative that the lamp be replaced every 2000 hours. -
Page 14: Lamp Installation
Platinum Spot 5R Pro™ • Before the Platinum Spot 5R Pro™ is put into operation be sure all covers have been replaced, otherwise you risk damage to the retina and expose to UV radiation! • When replacing an old lamp, always be sure to replace with an approved replacement. -
Page 15: Lamp Optimization
Platinum Spot 5R Pro™ 7. Be sure to reset the lamp run time in the system menu to avoid any possibly of the lamp protection circuitry from accidently shutting off the lamp during normal operation. 8. If the lamp protection circuitry has already been initiated and the lamp run time is not reset the “Replace the Lamp”... -
Page 16: Mounting And Installation
3.5 feet Mounting The Platinum Spot 5R Pro™ is fully operational in two different mounting positions, hanging upside-down from a ceiling, or set on a flat level surface (see illustration on next page). Be sure this fixture is kept at least 0.5m away from any flammable materials (decoration etc.). -
Page 17: Mounting Points
Platinum Spot 5R Pro™ Mounting points Overhead mounting requires extensive experience, including amongst others calculating working load limits, a fine knowledge of the installation material being used, and periodic safety inspection of all installation material and the fixture. If you lack these qualifications, do not attempt the installation yourself. -
Page 18: Securing
Securing the Platinum Spot 5R Pro™ Regardless of the rigging option you choose for your Platinum Spot 5R Pro™ always be sure to secure your fixture with a safety cable. The fixture provides a built-in rigging point for a safety cable on the hanging bracket as illustrated above. -
Page 19: Understanding Dmx
1 to that fixture no matter where it is located in the DMX chain. The Platinum Spot 5R Pro™ can be controlled via DMX-512 protocol. The Platinum Spot 5R Pro™ is a 23channel DMX fixture (23 default, can also be 21 or 34). The DMX address is set electronically using the controls on the LCD menu. -
Page 20: 3-Pin To 5-Pin Conversion
Platinum Spot 5R Pro™ Be sure to follow the above figure when making your own cables. Do not use the ground lug on the XLR connector. Do not connect the cable’s shield conductor to the ground lug or allow the shield conductor to come in contact with the XLR’s outer casing. Grounding the shield could cause a short circuit and erratic behavior. -
Page 21: Dmx Terminator
Platinum Spot 5R Pro™ DMX-512 connection with DMX terminator A DMX terminator should be used in all DMX lines especially in longer runs. The use of a terminator may avoid erratic behavior in your DMX line. A terminator is a 120 ohm 1/4 watt resistor that is connected between pins 2 and 3 of a male XLR connector (DATA + and DATA -). - Page 22 In the case of the Platinum Spot 5R Pro™, which is a 23 channel fixture (default), you should set the starting DMX address of the first unit to 1, the second unit to 24 (23 + 1), the third unit to 47 (23 + 24), and so on.
-
Page 23: Fixture Menu
LED Control Panel: The control panel located on the base of the fixture allows you to access the main menu and make all necessary adjustments to the Platinum Spot 5R Pro™. During normal operation, tapping the “MODE/ESC” key once will access the fixture’s main menu. - Page 24 Platinum Spot 5R Pro™ Default settings shaded. Set Dmx Address A001~AXXX DMX address setting Value Display PAN…… DMX value display Set To Slave Slave1,Slave2,Slave3 Slave setting Auto Program Master / Alone Auto program Music Control Master / Alone Music control...
- Page 25 Platinum Spot 5R Pro™ Temperature C/F Celsius/ Fahrenheit Temperature switch between C˚/F˚ Initial Effect PAN =XXX Initial effect position De-Act WDMX De-activate WDMX Wireless DMX Activate WDMX Activate WDMX Act & Data Out Act & Data Out Rest WDMX Mem...
- Page 26 Platinum Spot 5R Pro™ 9.1 Function Mode: 9.1. “Set DMX Address” 9.1.1 DMX address setting – This function is used to set or adjust the fixture’s starting DMX address. Every device controlled by DMX has to have a unique starting address.
- Page 27 Platinum Spot 5R Pro™ 9.1.5 Music control This function is similar to the “Auto Program” described in the previous section with the exception that this function will advance the built-in program via sound. 9.2 Information: 9.2.1 Time information These functions will detail different time functions associated with the fixture.
- Page 28 Platinum Spot 5R Pro™ Clear Last Run This function will allow the “Last Run Hours” function be cleared and reset. L-Timer Password Use this function to enter the “Clear Lamp Time” password. Password is “038” Clear Lamp Time This function resets the lamp “ON” time to zero. Please reset the lamp “ON” time at every lamp replacement.
- Page 29 Platinum Spot 5R Pro™ 9.3.3 Lamp On Via DMX When engaged, this function will allow the lamp to be switched “on” via a DMX controller. Select “ON” to enable this function or “OFF” to disable it. 9.3.4 Lamp Off Via DMX When engaged, this function will allow the lamp to be switched “off”...
- Page 30 Movement Speed – This function changes the speed function of the Pan and Tilt motors. Use this function intergrading Platinum Spot 5R Pro into lighting rigs that includes original Design Spot 250s. There are 3 different mode variations;...
- Page 31 Platinum Spot 5R Pro™ Mic Sensitivity – This function makes the internal microphone more or less sensitive to sound. This function only works in conjunction with the sound active modes. The default setting is 70% and setting range from 0% to 99%.
- Page 32 Platinum Spot 5R Pro™ the Mode/Esc Button for 3 seconds to regain access to the menu commands. 9.4.4 Temperature C/F – This function changes the temperature the unit will display from either Celsiusor Fahrenheit. Fahrenheit is set as the default measurement.
- Page 33 Platinum Spot 5R Pro™ 9.6.1 Test Channel –This menu function allows the user to select each individual fixture channel and test it’s function independently from the control board. 9.6.1 Lamp adjustment (manual control) –This function readies the fixture for lamp optimization in a simple single step procedure.
- Page 34 9.8.4 Rec Controller -The Platinum Spot 5R Pro features an integrated DMX recorder. Pre-programmed scenescan be transmitted to the fixture via any DMX compliant controller. This function allows those scenes to be stored in to the fixture’s built-in memory and then subsequently used to create the user-defined programs.
-
Page 35: Dmx Addressing
Platinum Spot 5R Pro™ 10. DMX ADDRESSING Setting the DMX address -After the fixture is turned “ON” it will immediately complete a reset process that test all the fixture’s functions. When the reset process concludes the LCD will display the fixture’s current DMX. If the fixture is not receiving a DMX signal, the display will flash continuously. - Page 36 Platinum Spot 5R Pro™ Controller Settings: 1. Set the DMX value of channel 1 to a value of 7. 2. Set the DMX value of channel 2 to a value of 7 or 8. When channel 2 is set to "7" you can adjust the starting address between 1 and 255. When set to "8"...
-
Page 37: Operation
Platinum Spot 5R Pro™ 11. OPERATION Operating Modes: The Platinum Spot 5R Pro™ can operate in six different modes. This next section will detail the differences in the operating modes. • Auto Program Mode (Master) - The fixture will chase through the built-in programs, sending a DMX control signal to all other fixtures connect via DMX cables instruction for a synchronized light show. - Page 38 A DMX controller allows you to create unique programs tailored to your individual needs. The Platinum Spot 5R Pro™ uses 17 (default up to 24) DMX channels. See page 42 for detailed description of the DMX traits. To control your fixture in DMX mode, follow the set-up procedures on pages 19-22 as well as the set-up specifications that are included with your DMX controller.
-
Page 39: Working With Built-In Programs
Platinum Spot 5R Pro™ 12. WORKING WITH BUILT-IN PROGRAMS The fixture comes equipped with a built-in DMX recorder that allows custom programs to be installed and recalled directly from the fixture’s control board. Programs can be created and stored using the fixture’s control board or by using an external DMX controller. The following instructions will detail the procedures for using the on-board system menu as well as using a DMX compliant controller. - Page 40 Platinum Spot 5R Pro™ “PAN-Fine” – precision pan movement. “TILT” – tilt movement. “TILT-Fine” – precision tilt movement “Move Speed” – adjust pan and tilt motor speed “Gobo Wheel 1” – select gobos from gobo wheel 1 “Gobo Rot. 1” – adjust gobo 1 indexing or rotation “Gobo Wheel 2”...
- Page 41 Platinum Spot 5R Pro™ The control will store a maximum of 10 programs. A program can store one or a maximum of 64 scenes. Keep in mind that a scene can only be access when it is stored inside one of the 10 available programs.
-
Page 42: Dmx Channel Traits
Platinum Spot 5R Pro™ 13. DMX CHANNEL TRAITS: The chart below details the channel layout for 23 DMX channels (default). In 8bit mode the “Pan Fine” and “Tilt Fine” channels are not used, thus converting the fixture into a 21-channel DMX fixture. - Page 43 Platinum Spot 5R Pro™ 112-127 Color 8 128-189 Forwards rainbow effect from fast to slow 190-193 No rotation 194-255 Backwards rainbow effect from slow to fast Color Wheel Fine : 0-255 Color Wheel colour change to any position Fine Cyan Color...
- Page 44 Platinum Spot 5R Pro™ 190-193 No rotation 194-255 Backwards gobo rotation from slow to fast Rotating gobo indexing Fine 0-255 Fine indexing Fixed Gobos : Open/hole 8-15 Gobo 1 16-23 Gobo 2 24-31 Gobo 3 32-39 Gobo 4 40-47 Gobo 5...
- Page 45 Platinum Spot 5R Pro™ 128-135 Macro 1 136-143 Macro 2 144-151 Macro 3 152-159 Macro 4 160-167 Macro 5 168-175 Macro 6 176-183 Macro 7 184-191 Macro 8 192-199 Macro 9 200-207 Macro 10 208-215 Macro 11 216-223 Macro 12...
- Page 46 Platinum Spot 5R Pro™ Dimmer intensity: 0-255 Intensity 0 to 100% Fine Dimmer intensity: 0-255 Dimmer intensity fine Iris: 0-191 Max. diameter to Min.diameter 192-223 Pulse closing fast to slow 224-255 Pulse opening slow to fast Iris Fine: 0-255 Iris Fine...
- Page 47 Platinum Spot 5R Pro™ 136-143 Macro17 144-151 Macro18 152-159 Macro19 160-167 Macro20 168-175 Macro21 176-183 Macro22 184-191 Macro23 192-199 Macro24 200-207 Macro25 208-215 Macro26 216-223 Macro27 224-231 Macro28 232-239 Macro29 240-247 Macro30 248-255 Random CMY Lamp on/off, reset, internal programs:...
-
Page 48: Error Codes
Platinum Spot 5R Pro™ 14. ERROR CODES: When power is applied, the unit will automatically enter a “reset/test” mode. This mode brings all the internal motors to a home position. If there is an internal problem with one or more of the motors an error code will flash in the display in the form of “XXer” were as XX will represent a motor function. - Page 49 Platinum Spot 5R Pro™ defective motor IC drive on the main PCB). Color-wheel error: The color wheel is not located in the default position after start-up or after a reset command.This message will appear after a fixture reset if the color wheel’s magnetic-indexing circuit malfunctions (sensor failed or magnet is missing) or there is a stepper motor failure (defective motor or a defective motor IC drive on the main PCB).
- Page 50 Platinum Spot 5R Pro™ malfunctions (sensor failed or magnet missing) or the stepping-motor isdefective (or its driver circuit on the main PCB). The focus motor is not located in the defaultposition after the reset. Cyan Color Er (Cyan Color-wheel error) This message will appear after the reset of the fixture if the magnetic-indexing circuit malfunctions (sensor failed or magnet missing) or the stepping-motor is defective (or its drive circuit on the main PCB).
-
Page 51: Cleaning And Maintenance
Platinum Spot 5R Pro™ 15. CLEANING AND MAINTENANCE The following points have to be considered during the inspection: 1. Be sure all screws and fasteners are securely tightened at all times. Lose screws may fall out during normal operation resulting in damage or injury as larger parts could fall. -
Page 52: Photometric Data
Platinum Spot 5R Pro™ 16. PHOTOMETRIC DATA: ©Elation Professional, Los Angeles, Ca www.ElationLighting.com... -
Page 53: Gobo Patterns
Platinum Spot 5R Pro™ 17. GOBOS: ©Elation Professional, Los Angeles, Ca www.ElationLighting.com... -
Page 54: Dimensional Drawings
Platinum Spot 5R Pro™ 18. DIMENSIONAL DRAWINGS: ©Elation Professional, Los Angeles, Ca www.ElationLighting.com... -
Page 55: Circuit Schematic
Platinum Spot 5R Pro™ 19. CIRCUIT SCHEMATICS ©Elation Professional, Los Angeles, Ca www.ElationLighting.com... - Page 56 United States of America, including possessions and territories. It is the owner’s responsibility to establish the date and place of purchase by acceptable evidence, at the time service is sought. B. For warranty service, send the product only to the Elation Professional factory. All ®...
- Page 57 The consumer’s and or Dealer’s sole remedy shall be such repair or replacement as is expressly provided above; and under no circumstances shall Elation Professional® be liable for any loss or damage, direct or consequential, arising out of the use of, or inability to use, this product.
-
Page 58: Technical Specifications
Platinum Spot 5R Pro™ 21. TECHNICAL SPECIFICATIONS Power supply Power Requirements AC 100V-240V~, / 50Hz/60Hz 5A/250V, GMA (5x20mm fine-wire fuse) Fuse Protection 400 Watts Power Consumption Lamp Type Platinum 5R (Phillips) Lamp Wattage 150-189 Life time 2000 Hrs Color temperature 8000˚... - Page 59 Platinum Spot 5R Pro™ Weights and Measures Width of the base 13” / 33.25cm (Including Handles) Length of the base 14” / 35.74cm (Without Handles) Width of Head 14” / 35.49cm Height (head vertical) 17.6” /44.63cm Weight (net) 16.5 Kgs / 36.4 Lbs Operating Noise Levels (Base level 46.8dB)
- Page 60 Platinum Spot 5R Pro™ Elation Professional 6122 S. Eastern Ave. Los Angeles, Ca. 90040 323.582.3322 Phone 323.832.9142 Fax www.ElationLighting.com email: Info@ElationLighting.com ©Elation Professional, Los Angeles, Ca www.ElationLighting.com...