Table of Contents

Related Manuals for Elation 15R


Summary of Contents for Elation 15R
- Page 1 PLATINUM SPOT 15R PRO KEEP THIS MANUAL FOR FUTURE NEEDS...
- Page 2 Please check carefully that there is no damage caused by transportation. Should there be any, consult your dealer and don’t install this device. Features ·Lamp: Philips PLATINUM 15R ·3 DMX Channels mode: 21/23/34 channels ·Stand alone operation with Master/Slave function, sound activated via built in microphone.
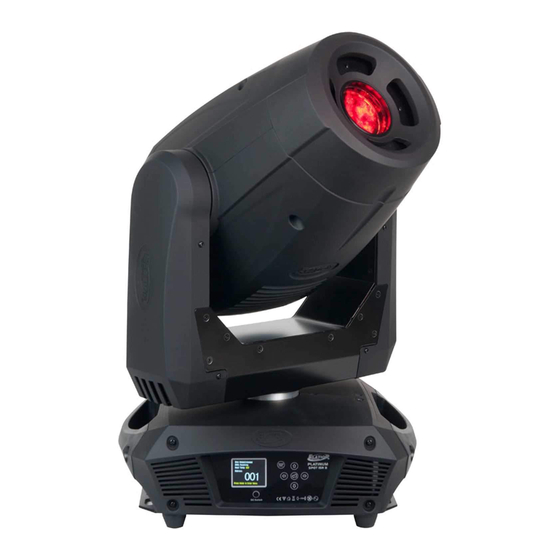
- Page 3 · ris from 5%~100% with pulse iris effect. ·Zoom: 9°~27° linear zoom ·Strobe/shutter: High speed shutter, 0-13 Hz or random strobe ·Control board with full color LCD graphic display and touch-keyboard ·Auto-program: 7 pre-built programs can be selected. ·Software-upload by optional accessory via DMX line Overview 1) Lens 2) Display...
-
Page 4: Safety Instructions
SAFETY INSTRUCTIONS This device has left the factory in perfect condition. In order to maintain this condition and to ensure a safe operation, it is absolutely necessary for the user to follow the safety instructions and warning notes written in this user manual. Important: Damages caused by the disregard of this user manual are not subject to warranty. -
Page 5: General Guidelines
Please be aware that damages caused by manual modifications to the device are not subject to warranty. Keep away from children and non-professionals. GENERAL GUIDELINES This device is a lighting effect for professional use on stages, in discotheques, theatres, etc., the device was designed for indoor use only. -
Page 6: Mounting The Device
Do not install lamps with a higher wattage. They generate higher temperatures than which the device was designed for. For the installation, you need one: PLATINUM 15R Procedures: 1) Unscrew the 3 screws (A, B, C) on the bottom of the housing, holding the plate where the lamp is underneath. -
Page 7: Installation Via The Omega Holders
Overhead mounting requires extensive experience, including amongst others calculating working load limits, installation material being used, and periodic safety inspection of all installation material and the device. If you lack these qualifications, do not attempt the installation yourself. Improper installation can result in bodily injury. Before mounting make sure that the installation area can hold a minimum point load of 10 times the device’s weight. -
Page 8: Dmx-512 Control Connection
d) Pull the safety-rope through the holes on the bottom of the base and over the trussing system or a safe fixation spot. Insert the end in the carabine and tighten the safety screw. Notice: this step is quite important to ensure that the fixture will not drop out by the damage of the clamp. -
Page 9: Operting Instructions Of The Internal Dmx Wireless System
Projector DMX start address selection All fixtures should be given a DMX starting address when using a DMX signal, so that the correct fixture responds to the correct control signals. This digital starting address is the channel number from which the fixture starts to “listen”... -
Page 10: Control Board
1)Connect the transmitter with the DMX controller 2)To make the fixture installed with wireless receiver log in to the transmitter a) Initially, the indicator on the receiver fixture should be in Solid red b) Press and hold the configuration button on transmitter for less than 3 seconds the red/ green LEDs on the transmitter and the receiver fixture will flash rapidly for about 5~ 10 seconds while the system goes through its setup procedure. -
Page 11: Main Menu Functions
To access the display menu via the internal battery, press the DC switch button for 2seconds; To shut off the display immediately, choose the commend " Reset All" menu and press "Enter" button, otherwise, the display will automatically switch off about 1 minute from last button press. Main Menu Functions Set Dmx Address Set Dmx Address... -
Page 12: Main Functions
De-Act WDMX De-Act WDMX De-Act WDMX De-Act WDMX De-Act WDMX De-Act WDMX Wireless DMX Wireless DMX Activate WDMX Activate WDMX Activate WDMX Activate WDMX Activate WDMX Activate WDMX Act & Data Out Act & Data Out Act & Data Out Act &... -
Page 13: Music Control
“Set DMX Address” - DMX address setting – This function is used to set or adjust the fixture’s starting DMX address. Every device controlled by DMX has to have a unique starting address. The addressing feature is what allows DMX to function properly. -
Page 14: Time Information
Information: Time information These functions will detail different time functions associated with the fixture. Current Time This function displays the running time of the fixture from the last power on. The display shows “XXXX”, where “XXXX” represents the number of hours the fixture has been running. -
Page 15: Software Version
Clear Lamp Time This function resets the lamp “ON” time to zero. Please reset the lamp “ON” time at every lamp replacement. This procedure tracks the lamp running time so the lamp can be replaced at the end of it’s recommended duty cycle. •... -
Page 16: Status Setting
When engaged, this function will allow the lamp to be switched “off” via a DMX controller. Select “ON” to enable this function or “OFF” to disable it. Lamp On at Temp. The fixture is designed to shut the lamp off when an excessive temperature is sensed inside the head by the on-board CPU. - Page 17 No DMX Status – This function dictates how the fixture will function if it looses DMX signal during normal operation. The default function is set to hold, in which the fixture will lock into the last DMX signal it received and remain in that position until it is turned off or begins receiving a new DMX signal.
- Page 18 original DS-250. Tilt speed will be the same as speed 2. Mic Sensitivity – This function makes the internal microphone more or less sensitive to sound. This function only works in conjunction with the sound active modes. The default setting is 70% and setting range from 0% to 99%. Hibernation –...
-
Page 19: Effect Adjust
the menu commands. Temperature C/F – This function changes the temperature the unit will display from either Celsius or Fahrenheit. Fahrenheit is set as the default measurement. Initial effect – This function allows a user to create and assign a custom “Home Position”... - Page 20 fixture channel and test it’s function independently from the control board. Lamp adjustment (manual control) – This function readies the fixture for lamp optimization in a simple single step procedure. This function will center the pan and tilt motors and at the same time open the shutter and bring the dimmer to 100%. The pan and tilt function will still operate if the fixture needs to be positioned to a flat clear surface.
- Page 21 Select program – This function allows the user to select one of ten of the user defined built-in programs. This program is then accessed in “Function Mode” under “Program Run.” Edit program – This function allows the user to edit the built-in programs. Edit Scenes –...
-
Page 22: Instructions On Use
INSTRUCTIONS ON USE: DMX channel´s functions and their values (34 DMX channels): DMX channel´s functions and their values (34 DMX channels): DMX channel´s functions and their values (34 DMX channels): DMX channel´s functions and their values (34 DMX channels): DMX channel´s functions and their values (34 DMX channels): Mode/Channel Mode/Channel Mode/Channel... - Page 23 50-59 Rot. gobo 5 60-69 Rot. gobo 6 70-79 Rot. gobo 7 80-89 Rot. gobo 8 90-104 Rot. gobo 1 shake 105-119 Rot. gobo 2 shake 120-134 Rot. gobo 3 shake 135-149 Rot. gobo 4 shake 150-164 Rot. gobo 5 shake 165-179 Rot.
- Page 24 176-182 Gobo 9 shake slow to fast 183-189 Gobo 10 shake slow to fast 190-196 Gobo 11 shake slow to fast 197-203 Gobo 12 shake slow to fast 204-210 Gobo 13 shake slow to fast 211-217 Gobo 14 shake slow to fast 218-255 Gobo wheel rotation from slow to fast Fixed gobo indexing Fine ...
- Page 25 0-31 Shutter closed 32-63 No function (shutter open) 64-95 Strobe effect slow to fast 96-127 No function (shutter open) 128-159 Pulse-effect in sequences 160-191 No function (shutter open) 192-223 Random strobe effect slow to fast 224-255 No function (shutter open) ...
-
Page 26: Error Message
112-119 Macro14 120-127 Macro15 128-135 Macro16 136-143 Macro17 144-151 Macro18 152-159 Macro19 160-167 Macro20 168-175 Macro21 176-183 Macro22 184-191 Macro23 192-199 Macro24 200-207 Macro25 208-215 Macro26 216-223 Macro27 224-231 Macro28 232-239 Macro29 240-247 Macro30 248-255 Random CMY 0-19 20-29 30-39 40-59 60-79... - Page 27 PAN- movement Er (PAN-yoke movement error) This message will appear after the reset of the fixture if the yoke’s magnetic- indexing circuit malfunction (sensor failed or magnet missing) or the stepping-motor is defective (or its driving IC on the main PCB). The PAN- movement is not located in the default position after the reset. TILT- movement Er (TILT-head movement error) This message will appear after the reset of the fixture if the head’s magnetic- indexing circuit malfunctions (sensor failed or magnet missing) or the stepping-motor is defective (or its...
-
Page 28: Cleaning And Maintenance
CLEANING AND MAINTENANCE The following points have to be considered during the inspection: 1) All screws for installing the devices or parts of the device have to be tightly connected and must not be corroded. 2) There must not be any deformations on the housing, color lenses, fixations and installation spots (ceiling, suspension, trussing). - Page 29 XM542-V1.0-NR...