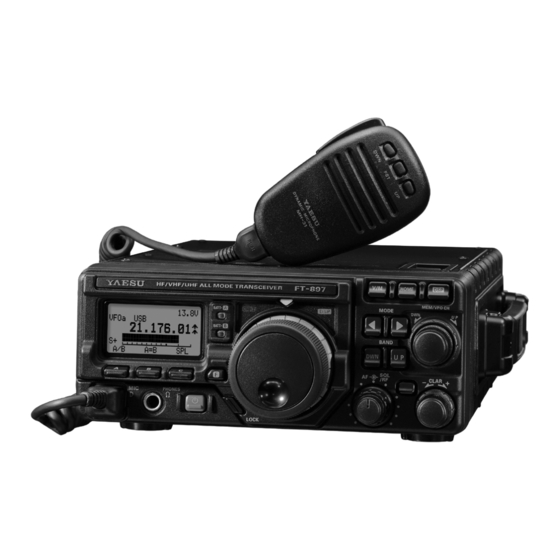
Yaesu FT-897D Operating Manual
Hf/vhf/uhf all mode transceiver
Hide thumbs
Also See for FT-897D:
- Brochure & specs (2 pages) ,
- Technical supplement (146 pages) ,
- Technical supplement (125 pages)
Table of Contents
Advertisement
Quick Links
Download this manual
See also:
Technical Supplement
HF/VHF/UHF
ALL MODE TRANSCEIVER
FT-897D
Operating Manual
VERTEX STANDARD CO., LTD.
4-8-8 Nakameguro, Meguro-Ku, Tokyo 153-8644, Japan
VERTEX STANDARD
US Headquarters
10900 Walker Street, Cypress, CA 90630, U.S.A.
YAESU EUROPE B.V.
P.O. Box 75525, 1118 ZN Schiphol, The Netherlands
YAESU UK LTD.
Unit 12, Sun Valley Business Park, Winnall Close
Winchester, Hampshire, SO23 0LB, U.K.
VERTEX STANDARD HK LTD.
Unit 5, 20/F., Seaview Centre, 139-141 Hoi Bun Road,
Kwun Tong, Kowloon, Hong Kong
Advertisement
Table of Contents

Related Manuals for Yaesu FT-897D


Summary of Contents for Yaesu FT-897D
- Page 1 4-8-8 Nakameguro, Meguro-Ku, Tokyo 153-8644, Japan VERTEX STANDARD US Headquarters 10900 Walker Street, Cypress, CA 90630, U.S.A. YAESU EUROPE B.V. P.O. Box 75525, 1118 ZN Schiphol, The Netherlands YAESU UK LTD. Unit 12, Sun Valley Business Park, Winnall Close Winchester, Hampshire, SO23 0LB, U.K.
- Page 2 Contents...
- Page 3 (include the 60 m band: USA version) plus the 6 m, 2 nal Processing (Bandpass Filtering, Noise Reduction, Notch, m, and 70 cm bands, the FT-897D includes operation on and Microphone Equalizer); IF Shift; Clarifier (“R.I.T.”); the SSB, CW, AM, FM, and Digital modes, yielding the most IF Noise Blanker;...
- Page 4 CW (option YF-122CN installed): 300 Hz/1.0 kHz AF Output: 2.5 W (@4 Ohms, 10% THD or less) 4-16 Ohms AF Output Impedance: Specifications are subject to change without notice, and are guaranteed within the amateur bands only. FT-897D O Page 2...
- Page 5 Active-Tuning Antenna System ATBK-100 VHF/UHF Antenna Base/Counterpoise Kit MMB-80 Mounting Braket VL-1000 Solid-State Linear Amplifier MD-200 Desktop Microphone MH-36 DTMF Microphone MH-59 Remote Control Microphone CT-62 CAT Interface Cable CT-39A Packet Cable CT-58 BAND DATA Cable FT-897D O Page 3...
- Page 6 OWER ONNECTIONS The FT-897D is designed use from (1) an external DC power source, (2) internal battery (requires optional FNB-78 Ni-MH battery pack), or (3) AC power source (requires optional FP-30 Internal AC Power Supply). External DC power source operation Ì...
- Page 7 (Figure 1 and 2). for a long time, disconnect the AC plug from the AC 3. Attach the FP-30 to the bottom of the FT-897D, then wall outlet. affix it in place with the six screws removed in the above steps (Figure 3).
- Page 8 Charging The optional FNB-78 Ni-MH Battery Pack provides 13.2 Volts of DC power for your FT-897D, with a maximum ca- Charging of the FNB-78 requires the use of the optional pacity of 4500 mAh (you may install the two FNB-78 into CD-24 Charge Adapter.
-
Page 9: Base Station Earth Grounding
Bonding the rear panel Ground Amplifier Supply lug of the FT-897D transceiver to the vehicle or vessel’s ground system should clear up any such difficulties. Vertex Standard does not recommend the use of “on glass” "Daisy Chain"... -
Page 10: Base Station Antenna Installations
When installing a “balanced” antenna such as a Yagi or di- communications. The FT-897D is designed for use with any pole, remember that the FT-897D is designed for use with antenna system providing a 50 Ω resistive impedance at the an (unbalanced) coaxial feedline. - Page 11 430 MHz directional arrays. The 20 Watt power output sup- adequate ventilation around the cabinet of the FT-897D. plied by the FT-897D, combined with the directivity of a The cooling system of the transceiver must be free to draw beam antenna, can cause immediate heating of human or...
- Page 12 The ring connection of the ACC jack, when AC voltages of any magnitude. closed to ground, places the FT-897D into the transmit mode, and sends a steady CW carrier, for amplifier (or antenna Most amplifier control relay systems require only low tuner) adjustment purposes.
- Page 13 (“stereo”) plug. If a two-conductor plug the bottom case to lower the front of the FT-897D. is used, the key line will be constantly shorted to ground.
-
Page 14: Main Dial
Shift feature, which allows you to use the MEM/VFO low more rapid frequency navigation (a small “running CH knob to adjust the center frequency of the IF filter’s man” icon will be observed in the bottom right-hand passband response. corner of the LCD). FT-897D O Page 12... - Page 15 : IF SHIFT Active : Clarifier Active Meter Status S meter : PO meter : Key Lock “ON” Multi Function Key Status : Modulation Meter / : Fast Tuning Step : SWR Meter : ALC Meter FT-897D O Page 13...
- Page 16 Press the [ C ]( VOX ) key enable the VOX (voice-operated transmitter switching system) in the SSB, AM, and FM modes. Press and hold in the [ C ]( VOX ) key for one second to recall Menu Mode No-088 [ VOX GAIN ] (for setting the VOX gain level). FT-897D O Page 14...
- Page 17 Press the [ C ]( STEP ) key to select the channel steps for Spectrum Scope Monitor. Press and hold in the [ C ]( STEP ) key for one second to activate the MAX HOLD feature, which will display and hold the peak signal strength level for each channel. FT-897D O Page 15...
- Page 18 10 dB. The ATT feature does not function on 144/430 MHz. [ C ] Key: NAR Press the [ C ]( NAR ) key to select the low-deviation mode required for HF FM operation on 29 MHz. FT-897D O Page 16...
- Page 19 Press the [ C ]( ATC ) key to activate a 1750-Hz burst tone for 2 seconds when pressing the PTT switch while the channel is clear. You may program the configuration of this key by the Menu Mode No-067 [ PG C ] . FT-897D O Page 17...
- Page 20 VDC. For base station operation, the optional FP-30 The “TX Request” connection, when shorted to ground, puts the FT-897D into the transmit mode, and sends out External AC power supply may be attached to the bot- tom of the transceiver and connect the output pigtail of a steady CW carrier, for linear amplifier or manual an- the FP-30 to this jack.
- Page 21 Selects the battery pack to be used, when you have in- This 3.5-mm 2-pin jack is used for connection to an ana- stalled two optional FNB-78 Ni-MH battery packs into log meter (not produced by Vertex Standard). the FT-897D. Please refer to the MENU No-060 and No-061. SIGNAL FT-897D O...
-
Page 22: Lcd Contrast
14 MHz 5 MHz 15 MHz turn on the MAIN switch on the FP-30 before turning on the POWER switch on the FT-897D. When shut- 3.5 MHz 18 MHz BAND ting down, please turn off the POWER switch on the FT- 897D before turning off the MAIN switch on the FP-30. - Page 23 The SQL/RF Gain control is configured differently, depend- among the eight settings for the operating modes, respec- ing on the country to which the FT-897D has been exported. tively. In the U.S. version, the default function of this control is “RF Gain.”...
- Page 24 HANGING THE PEED 082 [ SSB STEP ] for SSB/CW/Digital. See pages 56, 59, By default, the FT-897D begins operation in the “fine tun- and 62 for details. ing” mode for the main tuning dial. However, a faster tuning If you press the MEM/VFO CH knob momentarily, then...
- Page 25 5 MH PERATION ON U.S. V ERSION The FT-897D includes the capability for transmission and reception on the five spot frequencies assigned to the Ama- teur Service in the United States. To operate on the 5 MHz band: 1. Press the V/M key once to enter the “Memory” mode (a memory channel number “M-nnn”...
- Page 26 2) You may change the knob that controls the Clarifier offset from the DIAL to the MEM/VFO CH knob via Menu Mode No-021 [ CLAR DIAL SEL ] . FT-897D O Page 24...
- Page 27 LSB mode) or No-017 [ CAR USB R ] (for USB mode). This allows you to set up a higher or lower listening pitch, if you prefer such as compared to the default passband response. See page 57. FT-897D O Page 25...
- Page 28 4. Press the [ C ]( DBF ) key once more to disable the DSP Bandpass Filter. 100 Hz~1000 Hz 1000 Hz~6000 Hz FT-897D O Page 26...
- Page 29 3. Press the [ B ]( DNF ) key once more to turn the Notch Filter off. Do not activate this filter in the CW mode, as incoming CW signals will be notched out of the audio passband! FT-897D O Page 27...
- Page 30 Just press and hold in the POWER switch for one second to turn the transceiver back on after an APO shutdown, as usual. The APO feature will be disabled while using the Beacon or ARTS features, even if the APO feature is set to “ON.” FT-897D O Page 28...
- Page 31 ECEIVER CCESSORIES FT-897D O Page 29...
-
Page 32: Vox Operation
The delay time for return to the receive mode is set independently on CW and voice modes; for CW, use Menu Mode No-024 [CW DELAY] (see next chapter). FT-897D O Page 30... -
Page 33: Af Speech Processor Operation
Excessive advancement of the Compression Level may lead to distortion. Each operator’s voice pattern is different, so try several settings to find the one which is best for your voice. FT-897D O Page 31... - Page 34 • Press and hold in the [ F ] key for one second to enter operation. the Menu mode. 8. The FT-897D also has a “CW SPOT” feature, utilizing • Rotate the MEM/VFO CH knob to Menu Mode No- the sidetone. Because the sidetone is a representation of 024 [ CW DELAY ] .
- Page 35 No-025 [ CW KEY REV ] . • Rotate the DIAL knob to select the new setting. • When done, press and hold in the [ F ] key for one second to save the new setting and exit to normal operation. FT-897D O Page 33...
-
Page 36: Repeater Operation
One press of the [ A ]( TON ) key will acti- vate the CTCSS tone encoder. In this situation, you will observe the “TEN” indicator on the display. If FT-897D O Page 34... -
Page 37: Tone Search Scanning
No-003 [ 430MHz ARS ] (see page 56). If your local repeaters need a 1750-Hz burst tone for access (typically in Europe), press and hold in the front panel’s [ HOME ] key to trans- mit the burst tone (FM mode only). FT-897D O Page 35... -
Page 38: Dcs Operation
Split Tone Operation Another form of tone access control is Digital Code Squelch, The FT-897D can be configured in a “Split Tone” configu- or DCS. It is a newer, more advanced tone system that is ration via the Menu mode. -
Page 39: Cw Identifier Setup
2. Rotate the DIAL to select the desired ARTS™ Beep mode (see above). 3. When you have made your selection, press and hold the [ F ] key for one second to save the new setting and exit to normal operation. FT-897D O Page 37... - Page 40 DIAL knob to adjust the AFSK level within Use this technique to set up any digital mode. the FT-897D for seven to eight dots of indication on the ALC meter. 7. Press and hold in the [ F ] key for one second to save the new AFSK level setting and return to normal operation.
-
Page 41: Psk31 Operation
TNC to the spond, you may program in a corresponding display shift, FT-897D, use Menu Mode No-071 [ PKT 1200 ] (for 1200 using Menu Mode No-036 [ DIG DISP ] . - Page 42 PERATION Monitoring of HF WeatherFax broadcasts is easily accom- This transceiver provides convenient split-frequency opera- plished using the FT-897D. tion, using the VFO-A and VFO-B, for DX working and other operating situations requiring unique split frequency Before proceeding, be certain that the WeatherFax demodu- pairs.
-
Page 43: Automatic Tuning
[ B ]( DOWN ) key (to lower the antenna). 120 on all bands). Or make the setting “ATAS(HF&50),” While you hold in one of these keys, the FT-897D will gen- if you are using the ATAS-100/-120 on 7 ~ 50 MHz,... - Page 44 (this may take up to one minute). There- after, the transmitter will be engaged, and the ATAS-100/- 120 will be automatically adjusted for best SWR. The “TUNE” icon will then disappear from the LCD, and you will be ready for operation. FT-897D O Page 42...
-
Page 45: Antenna Tuner Memory System
5. Set up the FC-30 and FT-897D per the illustration, then space with matching data on seldom-used frequencies. turn on the transceiver’s power again. Do not set up... - Page 46 In step 6 above, pressing the PTT switch does not activate the transmitter. It simply sends a signal to the microprocessor that an indepen- dent Transmit frequency is being stored on the same chan- nel as a previously-stored Receive frequency. FT-897D O Page 44...
-
Page 47: Memory Channel Recall
M-101 ~ M-120 Mf-01 ~ Mf-20 M-121 ~ M-140 Mg-01 ~ Mg-20 M-141 ~ M-160 Mh-01 ~ Mh-20 M-161 ~ M-180 Mi-01 ~ Mi-20 M-181 ~ M-200 Mj-01 ~ Mj-20 M-P1L ~ M-P5U Mk-1L ~ Mk-5U FT-897D O Page 45... - Page 48 TAG] instantly by pressing and holding in the “HOME” indication will appear on the display. [C](TAG) key for one second. 2. Press the HOME key once more to return to the previ- ously-used frequency (either a VFO frequency or a memory channel). FT-897D O Page 46...
- Page 49 [ C ] key for one second to enable the “Meter peak hold” feature. 5. To disable the Spectrum Scope, press the [ A ]( SCOP ) key once more. The receiver’s audio output and S-meter are dis- abled when using the Spectrum Scope. FT-897D O Page 47...
-
Page 50: Scanning Operation
Scanning Operation BUSY: In this mode, the scanner will halt until the other In order for the FT-897D to scan automatically, the Squelch station’s transmission ceases (at which point the must be set so that the background noise is silenced, be- squelch will close). - Page 51 Memory Channel “M-001.” the memory channel number will change to become a 2. Set the FT-897D for operation on another memory chan- “dot;” this shows that this channel now is not included nel, or on a VFO frequency.
- Page 52 8. Press the [ C ]( PMS ) key momentarily. Tuning and scan- ning are now limited to the 144.30 - 148.00 MHz range until you press the V/M key to return to memory or VFO operation. FT-897D O Page 50...
- Page 53 MERGENCY RAINING EATURE : 5167.5 kHz REQUENCY The FT-897D provides a CW Training feature, which sends random Morse Code five-character groups via the sidetone U.S. V ERSION (heard in the speaker), so you can improve your CW profi- Section 97.401(d) of the regulations governing amateur ra- ciency whether or not the bands are open.
- Page 54 EATURE The FT-897D’s unique “Beacon” feature allow you to set up the transceiver to send a repetitive message. For example, on a DX-pedition, the FT-897D beacon might be activated on a 50 MHz frequency, to alert DXers as to possible band openings.
-
Page 55: Display Lamp Mode
ISPLAY USTOMIZATION Display Lamp Mode Display Color The FT-897D illumination lamp has four options for acti- The LCD color may be changed using the Menu Mode for vation of the illumination. different operating status conditions. For example, the dis- play may be configured to show a different color accord-ing... - Page 56 038 DIG MODE Selects the mode and sideband in the DIG (Digital) mode. PSK31-U/USER-L/USER-U Defines the carrier frequency offset during DIG (USER-L or USER- 039 DIG SHIFT –3000 ~ +3000 Hz 0 Hz U) mode operation. FT-897D O Page 54...
- Page 57 Enables/disables/selects the antenna port to be used for 091 XVTR SEL OFF/X VTR A/X VTR B Transverter operation. 1: Depends Mon transceiver version. 2: Depends on operating band and transceiver version. FT-897D O Page 55...
- Page 58 MENU MODE No- 014 [ BEEP VOL ] Function: Selects the beep volume level. Available Values: 0 ~ 100 Default: 50 Press the [ B ] key to monitor the level during adjustment. FT-897D O Page 56...
- Page 59 “50 (42) wpm,” as the delay will make it impossible to trans- station for a CW QSO without having to change your mit. FT-897D’s Mode selection, if Menu #022 is set to “On.” MENU MODE No- 029 [ CW SIDE TONE ] MENU MODE No•023 [ CW BFO ]...
- Page 60 Function: Defines the displayed frequency offset during Function: Setting of the display contrast level. DIG (USER-L or USER-U) mode operation. Available Values: 1 ~ 13 Available Values: –3000 ~ +3000 Hz Default: 5 Default: 0 Hz FT-897D O Page 58...
- Page 61 The data will now have been copied to the current VFO, and FM modes. Best voice-mode interference although the original HOME contents will remain intact on rejection will usually be obtained with a setting of between the previously-stored HOME channel. 2130 and 2770 Hz. FT-897D O Page 59...
- Page 62 [ F ] key for one second to save the A/N (Alpha-Numeric) name entry and exit to normal operation. 8. During Memory operation, press the [ F ] key momen- FT-897D O Page 60...
- Page 63 MENU MODE No•068 [ PG ACC ] sion. Function: Programming the optional MH-59 microphone’s [ ACC ] button assignment. Available Values: All Multi Functions, all Menu Items (ex- cept Menu #065 through 070), MONI, Q.SPL, TCALL, ATC and USER. Default: MONI FT-897D O Page 61...
- Page 64 ATAS-100/-120 on the all amateur bands STOP: The scanner will stop when a signal is received, and which enable to the FT-897D transceiver. will not restart. The [ A ]( TUNE ) key will activate the optional TUNER: MENU MODE No •078 [ SCAN RESUME ]...
- Page 65 Interface Cable CT-62 is a connection start bit, 8 data bits, no parity bit, and two stop bits. cable for the FT-897D and your computer. The CT-62 has a built-in level converter, allowing direct connection from the There are 17 instruction opcodes for the FT-897D, listed in rear panel CAT/LINEAR jack to the serial port of your com- the chart on next page.
- Page 66 0: Discriminator is Centered 1: Discriminator is Off-Center SSB/CW/AM mode:0 CTCSS/DCS Code 0: CTCSS/DCS Code is Matched 1: CTCSS/DCS Code is Un-Matched CTCSS/DCS OFF:0 Squelch Status 0: Squelch "OFF" (Signal present) 1: Squelch "ON" (No signal) FT-897D O Page 64...
- Page 67 6. If cloning is successful, turn the “destination” radio off. Now turn the “source” radio off. 7. Remove the clone cable. Channel and operating data for both radios are now identical. They both may be turned on now for normal operation. FT-897D O Page 65...
- Page 68 “FIL-1” slot. Press the [ C ] (2.3, the DC cable from the INPUT jack on the rear panel of the transceiver, when operating the FT-897D with a DC 500, or 300) key (in Multi Function Row “n”) to activate power supply or optional FP-30 AC power supply.
-
Page 69: Parts List
3. Remove the four rubber lugs and their four screws (Fig- ure 2), then position mounting plates “B” and “C” so that their holes align with those on the FT-897D, and secure using the supplied screws (Figure 3). 4. To install the FC-30, position the FC-30 so that the mounting plate “A”... - Page 70 ATELLITE PERATION Press the [ F ] key momentarily, then rotate the MEM/VFO Although the FT-897D is not capable of “full duplex” op- eration (simultaneous transmission and reception), its flex- CH knob one click counter-clockwise to re-select Multi Function Row “a” [A/B, A=B, SPL]. Press the [ A ]( A/B ) key ible memory system is ideal for configuring a set of memo- ries for LEO satellite work.
- Page 71 MH-59 Switches and Control The optional MH-59 Remote Microphone provides con- trol of the major functions of the FT-897D from the microphone’s keypad. The MH-59 includes a rotary con- trol knob for adjust the operating frequency and receiver audio volume level.
- Page 72 This key generates the DTMF “7” tone during trans- [ A ] key mission, and frequency entry digit “7” during Direct This key emulates the function of the FT-897D’s front Keypad Frequency Entry. panel [ A ] key. This key generates the DTMF “A” tone during trans- [ 8 ( DWN BAND )] key mission.
- Page 73 [ C ] ) by the MEM/VFO CH knob. memory channels. In many ways, these keys emulate Press and hold in this key for one second to activate the function of the FT-897D’s DIAL knob. the “Menu” mode. This key generates the DTMF “D” tone during trans- mission, and frequency entry digit “point”...
- Page 74 FT-897D O Page 72...
- Page 75 1. Changes or modifications to this device not expressly approved by VERTEX STANDARD could void the user’s authorization to operate this device. 2. This device complies with part 15 of the FCC Rules. Operation is subject to the following two conditions; (1) this device may not cause harmful interference, and (2) this device must accept any interference including interference that may cause undesired operation.
- Page 76 Copyright 2004 VERTEX STANDARD CO., LTD. A l l r i g h t s r e s e r v e d No portion of this manual may be reproduced without t h e p e r m i s s i o n o f VERTEX STANDARD CO., LTD.