Table of Contents
Advertisement
Quick Links
USER'S MANUAL
Part 2
AT&T Small Business System
Speakerphone with Intercom and
Caller ID Call Waiting 974
Please also read
Part 1 — Important
Product Information
© 2004 Advanced American Telephones. All Rights Reserved.
AT&T and the Globe Design are trademarks of AT&T Corp., licensed to Advanced American Telephones.
Advertisement
Table of Contents

Related Manuals for AT&T Small Business System Speakerphone


Summary of Contents for AT&T Small Business System Speakerphone
- Page 1 USER’S MANUAL Part 2 AT&T Small Business System Speakerphone with Intercom and Caller ID Call Waiting 974 Please also read Part 1 — Important Product Information © 2004 Advanced American Telephones. All Rights Reserved. AT&T and the Globe Design are trademarks of AT&T Corp., licensed to Advanced American Telephones.
- Page 2 In case of difficulty, visit our Service Center at www.telephones.att.com 1 800 222–3111. or call © 2004 Advanced American Telephones. All Rights Reserved. AT&T and the Globe Design are trademarks of AT&T Corp., licensed to Advanced American Telephones. Printed in Singapore. Issue 1AT&T 04/04...
-
Page 4: Table Of Contents
CONTENTS PRODUCT OVERVIEW..... 1 Assign the Line Group for this Phone ........ 39 BEFORE YOU BEGIN....2 Erase All Settings and Return Parts List ..........2 the Phone to Default Settings ... 40 Tools Needed ........2 Set This Phone to be the DSL Users.......... - Page 5 DIRECTORY OPERATION ADDING A FAX MACHINE.. 85 Using a Fax Switch......85 continued Remove a Name and Number GENERAL PRODUCT from the Directory ...... 66 CARE ..........86 Remove All Entries from the Directory......... 66 TECHNICAL SPECIFICATIONS....... 87 INTERCOM OPERATION..67 Basic Intercom Operations ....
-
Page 6: Product Overview
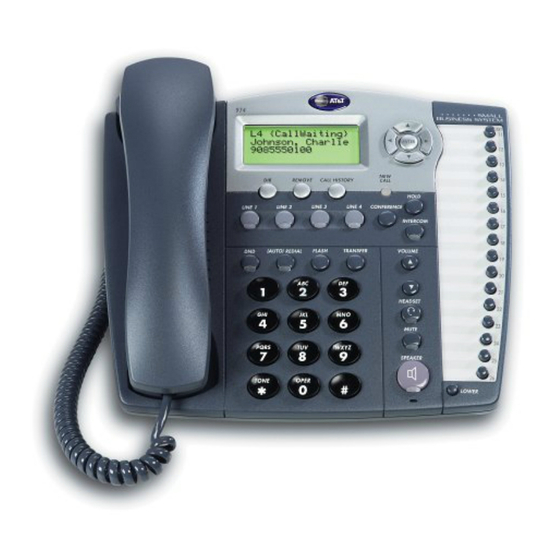
PRODUCT OVERVIEW This AT&T Small Business System Speakerphone with Intercom and Caller ID Call Waiting 974 is expandable to a 16-extension telephone system. The 974 is compatible with AT&T 945, 984, 944, 955 and 964 telephones. (See BEFORE YOU BEGIN starting on page 2 and EXPANDING THE PHONE SYSTEM beginning on page 93 for details.) -
Page 7: Before You Begin
BEFORE YOU BEGIN Parts List Your box should include: This User’s Quick Manual Start Guide Two seven-foot twisted pair line cords Handset Eight-inch line cord Base unit with wedge attached Coiled handset cord Power adapter Tools Needed You will also need a small Phillips head screw driver to install your phone. - Page 8 This 974 telephone is fully compatible with any AT&T Small Buisiness System 945 or 984 units you may have installed. You can use a total of 16 945/974/984 units together as extensions in your phone system. This 974 telephone is also compatible with any AT&T 964/955/944 phones you have previously installed.
-
Page 9: Dsl Users
DSL Users Installation of a DSL splitter and an AT&T Z800A filter is required to use the advanced features of this telephone if you have DSL (Digital Subscriber Line) service. Set-Up for DSL Users If you are a DSL (Digital Subscriber Line) customer, you may experience interference with the advanced features of this telephone. -
Page 10: Glossary
¥ NOTE: If your DSL service provider cannot supply a DSL splitter, it is possible to purchase an outdoor DSL splitter (such as a Corning or Allen Tel brand DSL splitter) over the Internet. If you are a new DSL customer, your DSL service provider will likely ask you if you have more than one telephone line in your home or business. - Page 11 Glossary continued from page 5 Home Area Code: This is the area code for your telephone number. Most users simply dial the seven digits of a phone number to make a call within their own area code and 11 digits outside of their area code. If this applies to you, you should enter your own area code into the unit as the Home Area Code.
-
Page 12: Programmable Features List
PROGRAMMABLE FEATURES LIST Default settings indicated by *. FEATURE: FUNCTION: OPTIONS: ONE TOUCH Choose default mode Intercom* or Telephone PREFERENCE for One Touch (EXT) buttons. EXTENSION NO Assign an extension 11*-26 number to this phone. RINGER ON /OFF Turn the ringer on or On* or Off off for each line. - Page 13 Programmable Features List continued from page 7 Default settings indicated by *. FEATURE: FUNCTION: OPTIONS: PRIME LINE Assign a line on this Line 1*, 2, 3, 4 phone to be selected automatically when you lift the handset, press K, or press h.
- Page 14 Default settings indicated by *. FEATURE: FUNCTION: OPTIONS: RESET ALL Return all features to default settings. CONSOLE Specify whether your On or Off* phone is the Centrex Console phone for your phone system. CSL DELAY RING Set the time to delay Off*, 2, 4, 6, up to ring for Centrex 30 seconds...
-
Page 15: Audible Signals
Audible Signals WHEN YOU HEAR: IT MEANS: A RAPID DOUBLE-RING You have an incoming intercom call. PATTERN, REPEATING A LONG SINGLE RING, You have an incoming transferred call. REPEATING A SHORT SINGLE RING, The extension number you just REPEATING programmed has already been assigned. Choose another number for this extension. -
Page 16: Installation
INSTALLATION If you are installing multiple phones in your telephone system, you must install and program one set at a time. If more than one extension is assigned the same extension number, a repeating short ring (error ring) sounds at the extension you are programming and the screen display includes EXT XX is already used Assign new EXT #. - Page 17 Battery Installation continued from page 11 Pull on the tab to remove the battery compartment cover. Insert a 9V battery (purchased separately) following the polarity markings in the battery compartment. Polarity Markings Replace the battery compartment cover and the screw. If you are wall mounting the phone, turn to “Wall Installation”...
-
Page 18: Table/Desk Installation
Table/Desk Installation For best results, follow the directions in “Battery Installation” on page 11 before installing the phone. Connect the telephone line cords to the telephone and wall jacks as shown in the appropriate illustration below. Use only the line cords that came with this phone. •... - Page 19 Table/Desk Installation continued from page 13 Connect the handset cord. Plug one end of the coiled handset cord into the jack on the left side of the phone. Plug the other end into the handset and hang up. Connect the power adapter to the telephone. Use only the power adapter provided with this product.
-
Page 20: Wall Installation
Wall Installation For best results, follow the directions in “Battery Installation” on page 11 before installing the phone. If the wedge is still attached to the underside of the base unit, follow Step 1 in “Battery Installation” on page 11 to remove the wedge. - Page 21 Wall Installation continued from page 15 Connect the power adapter to the telephone. Use only the power adapter provided with this product. 1 800 222–3111 To obtain a replacement, call Plug one end of the power adapter into the jack labeled POWER on the back of the phone.
- Page 22 Mount the phone on the wall. • Four One-Line Jacks (To use this installation option, you’ll need to purchase and install a blank wall plate. Modular telephone jacks Lines 3 and 4 Blank Two-line wall adapters plate Standard Power electrical adapter outlet Modular...
- Page 23 Wall Installation continued from page 17 • Two Two-Line Jacks Modular telephone jack Lines 3 and 4 Modular telephone jack Lines 1 and 2 Power Standard adapter electrical outlet Initialization. If no battery is installed when you connect the power cord, the phone runs a quick self-test and the screen displays Initializing..
-
Page 24: Convenience Ports
Convenience Ports If you want to connect another device (such as a modem or fax machine) to the wall jack, you can use the jacks on the phone labeled AUX. These convenience ports use Lines 3 and 4; a call picked up on Line 3 or 4 at another extension may interrupt fax, modem, or message transmission. -
Page 25: Menu Operation
MENU OPERATION All of the feature setup, memory programming and some individual feature operations for the 974 use menus shown in the screen display. Use the navigation buttons (<, >, +, -, E) to begin, end and move through menu operations (for example, feature setup). Press E to activate a menu operation. -
Page 26: Menu Structure
Menu Structure Use the menu operation to set up the values for the 974 features. Access the menu by pressing E when the phone is idle. The menu structure for the feature setup menu is below. TIME/DATE ONE TOUCH PREFERENCE SPECIAL OPTIONS INTERCOM LINE USAGE... -
Page 27: Shortcut To Language Menu
Shortcut to Language Menu This phone comes programmed for English screen displays. If you need to change the screen language to Spanish or French, you can use these steps to reach the LANGUAGE menu more quickly. Press E to begin feature setup. Press + twice. -
Page 28: Feature Setup
FEATURE SETUP Set One Touch Preference Choose whether pressing an EXT button automatically initiates an intercom or One Touch call. If you want to place One Touch calls using only one button, set this feature to TELEPHONE. If you want to place intercom calls using only one button, set this feature to INTERCOM. -
Page 29: Assign An Extension Number To Your Phone
Assign an Extension Number to Your Phone Every individual phone in your telephone system MUST be assigned a unique extension number for the intercom feature to work. Press E to begin feature setup. Press - until the screen display includes PHONE SETTINGS. -
Page 30: Turn The Ringer On Or Off For Each Line
Turn the Ringer On or Off for Each Line Press E to begin feature setup. Press - until the screen display includes PHONE SETTINGS. Press E. The screen display includes EXTENSION NO. Press - until the screen display includes RINGER ON/OFF. Press E. -
Page 31: Select The Ringer Type
Select the Ringer Type You can choose a ring pattern for incoming phone calls. ¥ NOTE: Incoming intercom calls use Ringer Type 1 and cannot be changed. Press E to begin feature setup. Press - until the screen display includes PHONE SETTINGS. -
Page 32: Set Delay Ring
Set Delay Ring Set the length of time before incoming calls will ring at this extension. ¥ NOTE: If you choose to set a delayed ring on a phone with Voice Mail service, the phone may not ring at all before Voice Mail picks up the call. -
Page 33: Turn Auto-Mute On Or Off
Turn Auto-Mute On or Off Choose whether sounds at this extension will be heard automatically in response to a page (Auto-Mute Off) or only when M is pressed. Auto-Mute Off permits hands-free conversation and room monitoring; Auto-Mute On protects privacy. Press E to begin feature setup. -
Page 34: Set Dial Mode
Set Dial Mode Press E to begin feature setup. Press - until the screen display includes PHONE SETTINGS. Press E. The screen display includes EXTENSION NO. Press - until the screen display includes TONE/PULSE and the current setting. Press < or > to toggle between Tone and Pulse. -
Page 35: Set The Time And Date
Set the Time and Date Press E to begin feature setup. Press - until the screen display includes TIME/DATE. Press E. The screen display includes HOUR and the current hour setting. Press < or > until the correct hour is shown. Press - to save the hour setting. -
Page 36: Turn Line Usage On Or Off For Each Line
Turn Line Usage On or Off for Each Line If you are not using all four phone lines at this extension, you need to turn off Line Usage for the unused lines. If you expand to a second, third or fourth line, turn Line Usage back on. -
Page 37: Assign The Prime Line (Line Preference)
Assign the Prime Line (Line Preference) Press E to begin feature setup. Press - until the screen display includes SPECIAL OPTIONS. Press E. The screen display includes LINE USAGE. Press - until the screen display includes PRIME LINE and the current setting. Press <... -
Page 38: Set Automatic Mode
Set Automatic Mode Choose the mode (headset or speakerphone) to be used automatically when you press a LINE button with the handset in the cradle. Press E to begin feature setup. Press - until the screen display includes SPECIAL OPTIONS. Press E. -
Page 39: Set The Scroll Rate
Set the Scroll Rate You can choose the speed for the Rapid Scroll feature. (See “Rapid Scroll” on page 22 for details.) Press E to begin feature setup. Press - until the screen display includes SPECIAL OPTIONS. Press E. The screen display includes LINE USAGE. -
Page 40: Turn Screen Backlight On Or Off
Turn Screen Backlight On or Off Press E to begin feature setup. Press - until the screen display includes SPECIAL OPTIONS. Press E. The screen display includes LINE USAGE. Press - until the screen display includes LCD BACKLIGHT and the current setting. Press <... -
Page 41: Turn Covm Indicators On Or Off For Each Line
Turn COVM Indicators On or Off for Each Line If you subscribe to Voice Mail service with your local telephone service provider, turn the COVM indicator on to have the screen display the appropriate line numbers when there are messages waiting. If you do not subscribe to Voice Mail service, turn the COVM indicators off for each line. -
Page 42: Reset Covm Indicator
Reset COVM Indicator If a COVM indicator remains on when there are no messages on that line, you may have received a false signal from your local telephone service provider. You can clear the indicator manually. Press E to begin feature setup. Press - until the screen display includes SPECIAL OPTIONS. -
Page 43: Program Home And Local Area Codes
Program Home and Local Area Codes You can program this phone to recognize one Home and up to five Local Area Codes. See “Home Area Code” and “Local Area Codes” on page 6 for definitions. Press E to begin feature setup. Press - until the screen display includes SPECIAL OPTIONS. -
Page 44: Assign The Line Group For This Phone
Assign the Line Group for this Phone Press E to begin feature setup. Press - until the screen display includes SPECIAL OPTIONS. Press E. The screen display includes LINE USAGE. Press - until the screen display includes LINE GROUP and the current setting. Press >... -
Page 45: Erase All Settings And Return The Phone To Default Settings
Erase All Settings and Return the Phone to Default Settings If you reset all features to the default settings, all previous feature programming will be erased. You will need to program your preferences for every feature again. You cannot undo the RESET ALL command. -
Page 46: Set This Phone To Be The Centrex Console Phone
You will need to program the next two features if this phone is the designated Console Phone for your Centrex system. Set This Phone to be the Centrex Console Phone ¥ NOTE: This feature is for use with Centrex systems only. Press E to begin feature setup. -
Page 47: Set The Centrex Console Delayed Ring Time
Set the Centrex Console Delayed Ring Time ¥ NOTE: This feature is for use with Centrex systems only. Set the length of time the phone will route your calls to the Centrex Console phone. One ring is about six seconds. Press E to begin feature setup. -
Page 48: Telephone Operation
TELEPHONE OPERATION ¥ NOTE: When you make a call, the phone selects the Prime Line you programmed (See “Assign the Prime Line” on page 32). When you answer a call, the phone automatically selects the ringing line. Make or Answer a Call ¥... - Page 49 Make or Answer a Call continued from page 43 Headset You can use this phone hands-free when you install any industry standard two-band 2.5mm headset (purchased separately). For best results use an AT&T two-band 2.5mm headset. Make sure the headset is plugged into the headset jack. You will hear a double-beep if you press h when the headset is not plugged in.
-
Page 50: Switch Between Handset, Headset And Speakerphone
Switch Between Handset, Headset and Speakerphone To switch from handset to headset or speakerphone, press h or K, then replace i i i i i i i i i the handset. (In order to use the headset, it must be plugged in.) To switch from speakerphone to handset, lift the handset. -
Page 51: Call Privacy
Call Privacy To ensure call privacy, this phone allows only one set at a time to use a line. Cancel Call Privacy During the call, press the LINE button for the call. You’ll hear a short beep. Others can now join the call. i i i i i i i i i... -
Page 52: Volume
Volume Handset/Speakerphone/Headset Volume Control When you are on a call, press VOLUME + to increase call volume. Press VOLUME - to decrease volume. You will hear a beep when you reach the minimum or maximum level. Ringer Volume When the phone is ringing, press VOLUME + or VOLUME - to adjust the ringer volume.This phone has four ringer volume levels. -
Page 53: Redial Stack
Redial Stack The last six numbers dialed from this extension are automatically stored in the redial memory stack. You can review the numbers in the redial memory and dial one if you wish. When the phone is not on a call, press Press + or - to scroll through the last six numbers dialed at this extension. -
Page 54: Hold
Hold While on a call, press and release H. The LINE light for the line on hold flashes slowly in green, and a double-beep i i i i i i i i i sounds every 30 seconds to remind you the call is on hold. -
Page 55: Mute
Mute Mute allows you to hear the other party, but the other party can’t hear you. To activate this feature, press and release M. The MUTE light goes on. To return to the conversation, press and release M again. ¥ NOTE: Switching from handset to speakerphone or headset, or from speakerphone or headset to handset, changing lines, and putting a call on hold also cancels... -
Page 56: Conference Calls
Conference Calls This feature lets you set up a three-party call by using two lines at the same time. You can also join an intercom call with a call on an outside line. The outside line call must be established first because an intercom call cannot be placed on hold. -
Page 57: Transfer A Call
Transfer a Call You can transfer a call you answer to any other system phone. Once you transfer a call, it can be picked up at any other system phone, not just at the extension you called. For information about using the display screen menus, see MENU OPERATION beginning on page 20. -
Page 58: Low Battery Indicator
Transfer a Call and Speak to the Receiving Party While on a call: Press H. Press I. The screen displays: 12:08HPMHHH12/26 EXTH11 INTERCOMHTO_ PAGEHHHHHHHHHHHx Press E. The screen displays 12:08HPMHHH12/26 EXTH11 Paging PAGE Press the EXT button for the extension where you’re transferring the call. -
Page 59: Lights And What They Mean
Lights and What They Mean LIGHT: STATUS: MEANS: LINE On steadily, This line is in use at this green extension. On steadily, This line is in use at another extension. Flashing slowly, This line is on hold at this green extension. -
Page 60: One Touch Operation
ONE TOUCH OPERATION This telephone has 32 One Touch locations where you can store phone numbers you wish to dial using fewer keys than usual. You can store up to 24 digits in each location. The steps used to dial numbers stored in One Touch locations vary according to how you programmed the One Touch Preference. -
Page 61: Store A Number In A One Touch Location
Store a Number in a One Touch Location For information about using the display screen menus, see MENU OPERATION on page 20. Press E to enter the feature menu. Press E. The screen display includes PREFERENCE and the current setting. Press - until the screen display includes PROGRAM. - Page 62 Store a Pause in a One Touch Entry You can include a pause while storing a dialing sequence which requires one during actual dialing. While you are entering the number to be stored, the screen display includes PAUSE. Press E where you want to store a pause. Each pause counts as one digit.
-
Page 63: Review A One Touch Entry
Review a One Touch Entry For more information using the display screen menus, see MENU OPERATION on page 20. Press E to enter the feature menu. Press E. The screen display incudes PREFERENCE. Press - until the screen display includes VIEW. Press E. -
Page 64: Dial A One Touch Number
Dial a One Touch Number The steps used to call a One Touch number depend on how you programmed the One Touch Preference (see “Set One Touch Preference” on page 23). If One Touch Preference is set to INTERCOM Lift the handset —... -
Page 65: Directory Operation
DIRECTORY OPERATION This phone can store up to 200 names and phone numbers in the directory. Names can be up to 16 characters long and numbers can be 24 digits long. Because directory entries are stored in alphabetical order, you may wish to enter names with the last name first in order to maintain consistency with the information stored automatically through the Caller ID function of this system. -
Page 66: Store A Name And Number In The Directory
Store a Name and Number in the Directory Press D to begin working with the directory. Press - until the screen display includes ADD ENTRY. Press E. The screen display includes (ENTER NAME).. Use the dial pad keys and the chart below to enter the letters, digits or symbols you wish to store. - Page 67 Store a Name and Number in the Directory continued from page 61 Use the dial pad keys to enter the phone number you wish to store — OR — Press R to copy the last number dialed at this extension onto the screen. Press >...
-
Page 68: Directory Number
Store a Temporary Tone Signal in a Directory Number If you have dial pulse (rotary) service, you can store tone signals in a directory number. When you reach the place in the dialing sequence where you wish tone dialing to begin, press - until the screen displays: JIMTERXNAMELLXX 555_... -
Page 69: Review Directory Entries
Review Directory Entries Press D to begin working with the directory Press + or - to scroll through the directory entries — OR — Press the dial pad key for the first character of the entry you wish to review until the character you are looking for is displayed. -
Page 70: Edit A Directory Entry
Edit a Directory Entry Find the directory entry you wish to change by following the directions under “Review Directory Entries” on page 64. When the entry you want to edit is displayed, press E. The screen display includes DIAL. Press - until the screen display includes EDIT NAME. -
Page 71: Dial A Number From The Directory
Dial a Number from the Directory Find the entry for the number you wish to call by following the directions under “Review Directory Entries” on page 64. Press E. The screen display includes DIAL. Press E. The phone will automatically select i i i i i i i i i... -
Page 72: Intercom Operation
INTERCOM OPERATION This 974 telephone is fully compatible with any AT&T Small Business System Speakerphone 945 or 984 units you may have installed. You can use a total of 16 945/974/984 units together as extensions in your phone system. This 974 telephone is also compatible with any AT&T 964/955/944 phones you have previously installed. -
Page 73: Basic Intercom Operations
Basic Intercom Operations OPERATION: FUNCTION: INTERCOM Any two extensions connected to Line 1 can ring each other. PAGE Lets you “announce” over the speaker of the phone you’re calling. The person you’ve called can respond just by talking. PAGE ALL Lets you “announce”... -
Page 74: Make An Intercom Call With The Handset
Make an Intercom Call with the Handset If One Touch Preference is set to INTERCOM, skip to Step 2 — OR — If One Touch Preference is set to TELEPHONE, press I. Press the EXT button for the party you wish to call, then lift the handset. -
Page 75: Make An Intercom Call With The Speakerphone Or Headset
Make an Intercom Call with the Speakerphone or Headset With the handset in the cradle: If One Touch Preference is set to INTERCOM, Skip to Step 2 — OR — If One Touch Preference is set to TELEPHONE, press I. The phone will automatically activate the line in the mode (headset or speakerphone) of the last call made. -
Page 76: Answer An Intercom Call
Answer an Intercom Call ¥ NOTE: An intercom call can be answered at any extension in the phone system by pressing I. When you receive an intercom call you will hear a repeating double-ring pattern and your screen displays INTERCOM FROM with the extension number of the caller. -
Page 77: Page A Specific Extension (Single-Phone Page)
Page a Specific Extension (Single-phone Page) Press I. The screen displays: 12:08HPMHHH12/26 EXTH11 INTERCOMHTO_ PAGEHHHHHHHHHHHx Press E. The screen displays: 12:08HPMHHH12/26 EXTH11 Paging PAGE Press the EXT button for the party you wish to page. The screen display is similar to: 12:08HPMHHH12/26 EXTH11 PAGEH15... -
Page 78: Page All System Phones
Page All System Phones Press I. The screen displays: 12:08HPMHHH12/26 EXTH11 INTERCOMHTO_ PAGEHHHHHHHHHHHx Press - until the screen displays: 12:08HPMHHH12/26 EXTH11 INTERCOMHTO_ PAGEHALLHHHHHHHx Press E. The screen displays: 12:08HPMHHH12/26 EXTH11 PAGEHALL Once the page is answered at another extension, speak and your voice will be heard at all idle extensions in your phone system. -
Page 79: Make An Intercom Conference Call
Make an Intercom Conference Call A system phone on a two-way conversation on an outside line can invite a third party at an intercom extension into the conversation. Follow the directions under “Conference Calls” on page 51, making sure to establish the non-intercom call first. -
Page 80: Caller Id Operation
CALLER ID OPERATION This telephone has a Caller ID feature that works with Caller Identification service provided by your local telephone company. There is a fee for this service, and it may not be available in all areas. This phone can provide information only if both you and the caller are in areas offering Caller Identification service, and if both telephone companies use compatible equipment. -
Page 81: Caller Id Display
Caller ID Display When you receive incoming Caller ID information, the screen display is similar to: 12:08PMX12/26 L2 SMITH,XJOHN 5550123 PAGEHHHHHHHHHHHx The time and date of the call, the caller’s name and phone number are included in the display if sent by the caller’s telephone company. -
Page 82: Calls Received On Two Or More Lines Simultaneously
Calls Received on Two or More Lines Simultaneously Your screen can display the Caller ID information for only one call at a time, but you can switch between the information for two or more ringing lines by pressing < or >. For example, if Line 3 of the phone is ringing, the screen displays the Caller ID information for Line 3: 12:08PMX12/26 L3... -
Page 83: Display Screen Messages
Display Screen Messages DISPLAY: MEANS: PRIVATE NAME The other party is blocking name information. PRIVATE NUMBER The other party is blocking telephone number information. UNKNOWN NAME Your phone company is unable to receive information about this caller’s name. UNKNOWN NUMBER Your phone company is unable to receive information about this caller’s number. -
Page 84: Message Waiting And New Call Light
Message Waiting and NEW CALL Light This light stays on when you have received call information but have not yet reviewed it. If you subscribe to a voice mail service, this light flashes when you have unretrieved messages waiting. The screen also displays information about the number of new calls and voice mail messages waiting. - Page 85 Call History continued from page 79 Review Records in Call History Press C. The screen displays the numbers of total calls and new calls in call history: CALLXHISTORY 198XCALLS 115XNEW Press - to view the previous (most recent) caller’s information —...
-
Page 86: Remove Calls From Call History
Remove Calls from Call History Remove a Specific Call Record from Call History Locate the call record you wish to delete following the instructions under “Review Records in Call History” on page 80. Press R. The screen display includes Removed!. Then the screen displays the previous record in call history. -
Page 87: Dial A Number From Call History
Dial a Number from Call History As you review call history records you can dial a displayed phone number. Locate the number you wish to call in call history (see “Review Records in Call History” on page 80). The screen display is similar to: 10:27AMX11/12XL3 i i i SMITH,XJOHN... -
Page 88: Save A Name And Number From Call History To The Directory
Save a Name and Number from Call History to the Directory Locate the call history record number you wish to save (see “Review Records in Call History” on page 80). The screen display is similar to: 10:27AMX11/12XL3 SMITH,XJOHN 5550123 CL#001XXXXXXXNEW ¥... -
Page 89: Save A Number From Call History To A One Touch Location
Save a Number from Call History to a One Touch Location Locate the call history record you wish to save (see “Review Records in Call History” on page 80). The screen display is similar to: 10:27AMX11/12XL3 SMITH,XJOHN 5550123 CL#001XXXXXXXNEW ¥ NOTE: If a call history record does not include a phone number, it cannot be saved to the directory. -
Page 90: Adding A Fax Machine
ADDING A FAX MACHINE ¥ NOTE: Do not connect a fax machine to Line 1. Doing so will interrupt the telephone’s intercom data channel. You may wish to use a fax machine with your phone. Choose Line 2, 3 or 4 for the fax machine, and connect it according to the manufacturer’s instructions for installation and use. -
Page 91: General Product Care
GENERAL PRODUCT CARE To keep your phone working and looking good, follow these guidelines: • Avoid putting it near heating appliances and devices that generate electrical noise (for example, motors or fluorescent lamps). • DO NOT expose it to direct sunlight or moisture. •... -
Page 92: Technical Specifications
TECHNICAL SPECIFICATIONS TECHNICAL SPECIFICATIONS 0.3B Power Adapter Input: AC 120V, 60Hz Output: DC 12V, 500mA Battery One 9V alkaline battery required Intercom Signal Frequency Data 455 KHz... -
Page 93: In Case Of Difficulty
IN CASE OF DIFFICULTY If you have difficulty operating this phone, try the suggestions below. www.telephones.att.com For Customer Service, visit our website at 1 800 222–3111 or call . Have the serial number, found on the underside of your phone, available when contacting Customer Service. - Page 94 TELEPHONE OPERATION PROBLEM SOLUTION A Repeating Short Ring The extension number you chose is (Error Ring) Sounds at already assigned. Begin again and choose All Extensions When a different extension number from 11 to You Assign an 26 (see “Assign an Extension Number Extension Number to Your Phone”...
- Page 95 TELEPHONE OPERATION PROBLEM SOLUTION LINE Lights Remain • Make sure the phone is programmed On When No Line is for that line to be absent. (See “Turn Connected Line Usage On or Off for Each Line” on page 31.) • Make sure that your Line Groups are programmed properly.
- Page 96 TELEPHONE OPERATION PROBLEM SOLUTION Operation During This phone will operate during a power a Power Failure failure if a working battery has been installed. You will be able to answer calls with the handset or headset, and dial calls using the keypad and the One Touch or Redial features.
- Page 97 CALLER ID OPERATION PROBLEM SOLUTION No Caller ID Caller ID information is transmitted by the Information is telephone company between the first and Received second rings. Allow your phone to ring at least twice to receive Caller ID information. PROBLEM SOLUTION NEW CALL •...
-
Page 98: Expanding The Phone System
EXPANDING THE PHONE SYSTEM When you combine two or more 945/974/984/944/955/964 phones you create an interacting system where phones share lines. If you have only 945/974/984 phones on your phone system, you can have up to 16 phones and up to 19 telephone lines. If you have one or more 944/955/964 phones in your phone system, you can have up to 12 phones and up to 15 telephone lines. -
Page 99: Private Lines
Private Lines You can use the fourth line on each extension as a private line. A private line is a telephone number assigned to just one extension. ¥ NOTE: You must program the lines you are using at each extension so that the phone knows which lines are shared and which are private. -
Page 100: Centrex Operation
CENTREX OPERATION Setup Checklist Before expanding your system or installing for Centrex, review the installation checklist. If you have Centrex, contact your local telephone company for further information about Centrex service. • The phone number for Line 1 must be the same on all phones in order for the Intercom and Page features to work. -
Page 101: Set Ring Delay Duration
Set Ring Delay Duration This feature allows other system telephones’ calls to ring at the Console phone. After a specified ring delay, the calls will ring at the Console phone. (See “Set the Centrex Console Delayed Ring Time” on page 42.) Answer a Delayed Ring The Console phone rings and the screen displays the extension number of the intercom sending the delayed ring. -
Page 102: Index
INDEX + 6, 20, 22, 48, 60 - 6, 20, 22, 48, 60 call history 75, 79, 80, 81, 82, 83, x 20 call information 75 < 6, 20, 22, 60 call privacy 46 > 6, 20, 22, 60 Call record 81 () 20 call volume 47 Call Waiting 50... - Page 103 COVM ON/OFF 8 DSL service 4, 5, 67 COVM RESET 37 DSL service provider 4, 5 CSL DELAY RING 9 DSL splitter 4, 5 date 30 English 22, 42 day of the month 30 E 6, 20, 48, 53, 60, 72–74 day of the week 30 erase all settings 40 default mode 44, 45...
- Page 104 handset 2, 14, 15, 33, 43, 45, 47–49, 50, 53, 67, 69, 70, 71, 91 L1/L2 jack 13 handset cord 2, 14, 15 L3/L4 jack 13 handset tab 15 Language 9, 22, 42 headset 8, 33, 43–45, 47, 48, 50, LCD Backlight 8 53, 54, 59, 71, 72, 82, 91 Lights 54...
- Page 105 multi-phone system 6 power cord 14, 91 power failure 11, 14, 18, 91 Mute 50, 54 M 50, 72 POWER jack 14, 16 prime line 6, 8, 32, 43 MUTE light 50, 72 privacy 28, 89 private line 93 Navigation buttons 6, 20 PRIVATE NAME 78 NEW CALL light 79 PRIVATE NUMBER 78...
- Page 106 screen display 20 Tone Signals Do Not Activate a Remote Device 90 Screen Displays POWERFAIL 91 Tone 29 scroll button 22 touch tone 50, 57 scroll rate 8, 34 transfer 52, 53, 54 single-phone page 67, 72 t 52, 53 speaker 74 transfer ring 53 K 6, 8, 44, 48, 59, 71, 73...