Table of Contents
Advertisement
Advertisement
Table of Contents

Related Manuals for Boss Audio Systems BV7975


Summary of Contents for Boss Audio Systems BV7975
- Page 1 10 R - 02 1011...
- Page 2 This radio is equipped with the most advanced "TOUCH SENSE PANEL", so that it is easy and convenient to use while driving. TIPS Here are some tips to show you how easy it is to use this touch sense panel: Using a very light touch on the radio panel will activate that feature.
-
Page 3: When Parked
Warnings When Driving USE OF CONTROLS OR ADJUSTMENTS OR Keep the volume level Iow enough to be aware PERFORMANCE OR PROCEDURES OTHER of the road and traffic conditions. THAN THOSE SPECIFIED HEREIN MAY RESULT IN HAZARDOUS RADIATION CAUTION EXPOSURE. In some countries, it's unlawful to operate a DO NOT OPEN COVERS AND DO NOT vehicle while video is displayed in the REPAIR BY YOURSELF PLEASE REFER... -
Page 4: Installation
Installation Removing the unit INSTALLATION CAUTION Insert fingers into the 1. Before finally installing the unit, connect the Fra me groove in the front of frame wiring temporarily and make sure it is all and pull out to remove the frame. connected properly and the unit and works properly. -
Page 5: Connecting The System
Connecting the System Wiring Diagram-audio/video Connections SUB-WOOFER OUTPUT BLUE SUB-W OUT WOOFER Brake Switch PINK Connect to Parking Brake. PARKING BRAKE ( ) 2.5m extension wire Ground YELLOW CAMERA INPUT CAMERA IN YELLOW VIDEO INPUT VIDEO IN VCR or MultiMedia AUDIO (1) INPUT (RIGHT) GAME CONSOLE AUDIO IN (1) R... - Page 6 Connecting the System Wiring Diagram - Power / Speakers (ISO) (Not supplied) ANTENNA FUSE ANTENNA EXTENDER JACK CABLE 20-PIN AUDIO/POWER HARNESS (See Figure 1 ) (Not supplied) RCA-TO-RCA CABLES GREY WHITE REAR CHANNEL BLACK WHITE FRONT CHANNEL BLUE/WHITE STRIPE Connect to power amplifier, If not used, POWER Tape bare end of wire.
- Page 7 Panel Control Operation Panel Open/Close Operation Panel Tilt Adjustment End user can adjust the panel viewing angle of This unit is equipped with the most advanced full logic motorized slide down system. You can the display to obtain the optimum viewing angle enjoy this advance technology with just a inside the vehicle.
-
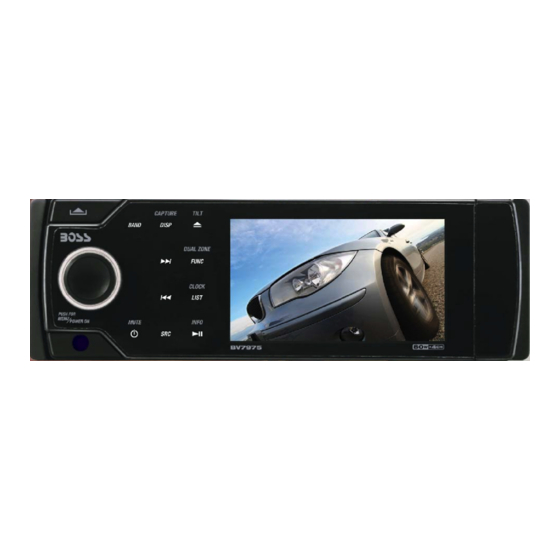
Page 8: Source Unit
Name Of Buttons and Theirs Functions Source Unit USB / A/V IN JACK DOOR Decriptions Item MUTE Press this button to turn the mute On / Off. POWER OFF Long press this button to turn Off the unit. PLAY / PAUSE Press this button to Pause / resume Play the music under Media player mode. - Page 9 Name Of Buttons and Theirs Functions EJECT Press this button to eject the Disc. Long press this button to entering adjust the panel viewing angle. PANEL TILT TUNE UP/DOWN Under the tuner mode, press and hold momentarily to enter into the Auto Seek / Manual Seek mode..
-
Page 10: Buttons And Theirs Functions
Name Of Buttons and Theirs Functions Remote Control Decriptions No. Button Item Press this button to turn the mute On / Off. POWER POWER ON When the unit is power on, long press this button to turn Off the unit. Once the unit power off, press this button to turn On the unit. - Page 11 Name Of Buttons and Theirs Functions Under the tuner mode, press this button to access the Manual Seek mode. Under the media player mode, press this button fast backward through the music under media player mode. UP/DOWN Use these buttons to move cursor up/down/left/right. LEFT/RIGHT Under the tuner mode, press this button access Auto Seek mode.
-
Page 12: System Menu Operations
System Menu Operations Main System Menu Sub-W 1. Level:Rotate Volume Knob to adjust the Subwoofer lever from 00 to 12. Long press the Menu ( center vol button ) 2. LPF:Rotate Volume Knob button to button to access the System Menu mode, then adjust the Low pass filter (LPF) as user can rotate to select the desired mode. -
Page 13: Display Setting
System Menu Operations Display Setting Preset EQ Setting Under the Display Setting menu, there are have Under the Preset EQ Setting, there are have 9 below options for selection: different types of preset equalizer available for user selection. Once access into the EQ menu, Standby Under “Ignition On But Power Off”... -
Page 14: Image Setting
System Menu Operations Image Setting In this menu user can select his/her favor image as wallpaper on the playback mode. There are two sources of images for selection: This unit includes 10 pre-loaded Gallery images. User can select these 10 pre-loaded images as wallpaper on the playback mode. -
Page 15: Tuner Operation
Tuner Operation [ S ] SOURCE BUTTON [ L ] LIST BUTTON Press button to select Tuner playback You can get into the Store List to select the mode then press button as confirm the desired staion to Recall. selection. TUNING UP/DOWN [ B ] BAND BUTTON BUTTON... -
Page 16: Media Player Operations
Media Player Operations (Disc/USB/SD Memroy Card) Unsupported Discs This unit can play various video/audio format which stored into disc/USB or SD Memory 8 cm Disc card on Media Player. CDV, CDI, CDG, The following chart helps you to check if a MultiMedia RAM disc is supported by this unit, as well as what functions are available for a given disc type. -
Page 17: General Operation
Media Player Operations (Disc/USB/SD Memroy Card) General Operation Insert the USB Stick [ S ] SOURCE BUTTON Press button to select Disc, USB, SD Card, then press SEL button to start playback. ] PLAY/PAUSE BUTTON CAUTION Press button to pause the music. Press the This unit does not support any portable pause button again to resume play. -
Page 18: Multimedia Operations
MultiMedia Operations Once a MultiMedia disc is inserted into the unit, Disc During playback to change the the unit will automatically start the playback Audio audio language(MultiMedia/Divx only). from the beginning of the disc. Under the Video Setting mode, Video Setting ] PLAY/PAUSE BUTTON user can rotate... -
Page 19: Dual Zone Operation
Dual Zone Operation This unit is equipped with the most advance 3. The TFT screen will display the Rear Source “Dual Zone” feature. This function is useful if the mode for 10 seconds. User has 10 seconds user would like to select different modes of the to make the desired operation on the Rear Audio and Video output source for Front and Source's function on the Front Panel or... -
Page 20: No Video Signal
AV-In Mode Tips Select the AV Mode Be sure to connect the Parking Brake Your can connect up to 2 optional devices, connection lead. ( please see more details on “ Wiring Diagram.”) press the button to enter into the AV mode: AV in - 1 = Front panel AV in NOTE AV in - 2 = RCA back of unit... -
Page 21: Wallpaper Setting
Wallpaper Setting Setting the Background Screen 3. The confirmation display appears as confirmed the image is stored in to MY (Wallpaper) IMAGE. This unit allows user change the background TIPS screen on the playback mode. This function is called wallpaper change. User can select the Those capture images will store in the desired image on the below operation to set as SYSTEM MENU_ DISPLAY _MY IMAGE. -
Page 22: Highlight Features
Highlight Features Motion Pictures Display Mode Standby Display Mode The unit has 3 different types of motion Under “Ignition On But Power Off” condition, pictures that can display under user can set up the Standby display mode for playback Mode. Pressing the ' ' button below: repeatedly can switch between the 3... -
Page 23: Specifications
Specifications TFT Screen Section Screen Size: 3.6 (Measured Diagonally) Screen Type: TFT Liquid Crystal Display active matrix Resolution: 320 x 240 MultiMedia / CD Section See “ Disc Note” for more details description Compatible Disc/Format > 90 dB Signal to Noise Ratio Dynamic Range >... -
Page 24: Troubleshooting
Troubleshooting Before going through the check list, check wiring connection. If any of the problems persist after check list has been made, consult your nearest service dealer. Symptom Cause Solution The car ignition is not on. No power If the power supply is properly connected to the car accessory terminal, switch the ignition key to “ACC”...