Omron BP652 Instruction Manual
7 series automatic wrist blood pressure monitor
Hide thumbs
Also See for BP652:
- Instruction manual (31 pages) ,
- Instruction manual (39 pages) ,
- Instruction manual (39 pages)
Table of Contents
Advertisement
Advertisement
Table of Contents

Related Manuals for Omron BP652


Summary of Contents for Omron BP652
- Page 1 INSTRUCTION MANUAL 7 series Automatic Wrist Blood Pressure Monitor Model BP652...
-
Page 2: Table Of Contents
TABLE OF CONTENTS TABLE OF CONTENTS Before using the Monitor Introduction ......................3 Safety Information ....................4 Operating the Device ................4 Care and Maintenance ................. 5 Operating Instructions Before Taking a Measurement ................6 Know Your Unit ....................7 Unit Display ...................... -
Page 3: Introduction
Frequently measuring the blood pressure in your wrist will provide your physician with an accurate indication of changes in your blood pressure. The BP652 comes with the following components: The BP652 IntelliSense Automatic Wrist Blood Pressure Monitor is intended for home use. -
Page 4: Safety Information
SAFETY INFORMATION To assure the correct use of the product, basic safety measures should always be followed including the warnings and cautions listed in this instruction manual. SAFETY SYMBOLS USED IN THIS INSTRUCTION MANUAL Indicates a potentially hazardous situation which, if not avoided, WARNING could result in death or serious injury. -
Page 5: Care And Maintenance
SAFETY INFORMATION Do not use a cellular phone near the device. It may result in an operational failure. Use only Omron authorized parts and accessories. Parts and accessories not approved for use with the device may damage the unit. batteries. This may damage the unit. -
Page 6: Before Taking A Measurement
BEFORE TAKING A MEASUREMENT To ensure a reliable reading follow these recommendations: 1. Avoid eating, drinking alcohol, smoking, exercising, and bathing for 30 minutes before taking a measurement. Rest for at least 15 minutes before taking the measurement. 2. Stress raises blood pressure. Avoid taking measurements during stressful times. 3. -
Page 7: Know Your Unit
Automatic Wrist Blood Pressure Monitor BP652 Model 5329415-9A INTRODUCTION ® ® Thank you for purchasing the OMRON BP652 IntelliSense Automatic Wrist Blood Pressure Monitor . Fill in for future reference. DATE PURCHASED: __________________ SERIAL NUMBER: ____________________ 2 “AAA” Alkaline Batteries... -
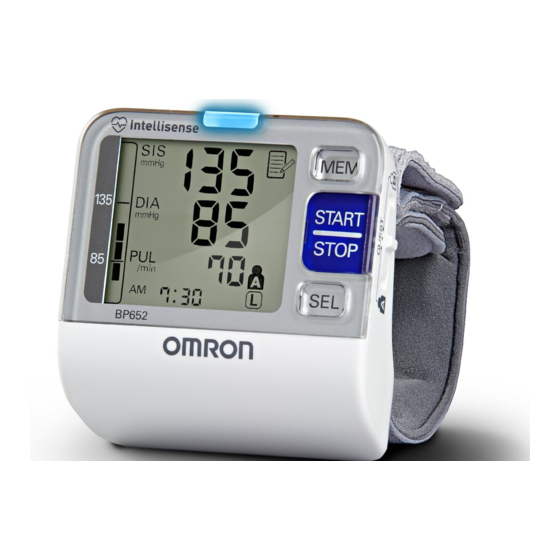
Page 8: Unit Display
UNIT DISPLAY Positioning indicator Diastolic blood pressure Memory symbol (Displayed when viewing values stored in memory) Systolic blood pressure Average value symbol (Refer to “Using the Deflation symbol Memory Function” .) Irregular heartbeat symbol Movement error symbol (Displayed if you move Blood pressure level your body during the indicator... -
Page 9: Display Symbols
DISPLAY SYMBOLS IRREGULAR HEARTBEAT SYMBOL ( When the monitor detects an irregular rhythm two or more times during the measurement, the Irregular Heartbeat Symbol ( ) will appear on the display with the measurement values. rhythm that varies by less than 25% from the Pulse average rhythm or 25% more than the average rhythm detected while the monitor is measuring... - Page 10 DISPLAY SYMBOLS This is a general guideline because blood pressure depends on age and morbidity. A lower home blood pressure goal may be recommended for certain patients, including diabetic patients, pregnant women, and patients with renal failure. WARNING Self-diagnosis and treatment using measured results may be dangerous. Follow the instructions of your physician or licensed healthcare provider.
-
Page 11: Battery Installation
BATTERY INSTALLATION CAUTION 1. Press the hook on the bottom of the battery cover and lift the cover off in the direction of the arrow. (negative) polarities match the polarities of the battery compartment as indicated. 3. Set the date and time. 4. - Page 12 BATTERY INSTALLATION BATTERY REPLACEMENT Low Battery Indicator When the Low Battery Indicator appears on the display, turn the monitor off and remove all the batteries. Replace with 2 new batteries at the same time. Long-life alkaline batteries are recommended. WARNING plenty of clean water.
-
Page 13: Setting The Date And Time
SETTING THE DATE AND TIME time. 1. TO START THE SETTING Press the Date/Time Setting button ( ) to adjust the date and time. 2. SETTING THE YEAR Press the Date/Time Setting button ( ) to advance by increments of one year. Press the Date/Time Setting button ( ) to set the current year. - Page 14 SETTING THE DATE AND TIME 4. SETTING THE DAY Press the Date/Time Setting button ( ) to advance by increments of one day. Press the Date/Time Setting button ( ) to set the current day. 5. SETTING THE HOUR The time is set using AM or PM. Press the Date/Time Setting button ( ) to advance by increments of one hour.
-
Page 15: Setting The Advanced Positioning Sensor (Aps)
SETTING THE ADVANCED POSITIONING SENSOR (APS) You can change the options for various settings on your monitor. Pressing the SET button to change a setting. Press the MEM button to select the options for that setting. the power off. SETTING THE POSITIONING INDICATOR 1. -
Page 16: Setting For Right Or Left Wrist Measurement
SETTING THE ADVANCED POSITIONING SENSOR (APS) SETTING FOR RIGHT OR LEFT WRIST MEASUREMENT 1. While in the setting mode, press the SET button until the wrist symbol ( ) appears on the display. Positioning indicator, the monitor skips this process. 2. -
Page 17: Resetting To The Default Setting
SETTING THE ADVANCED POSITIONING SENSOR (APS) on1: The buzzer sounds only when the monitor is in proper position. on2: The buzzer sounds a series of two short blips if your wrist is too far away from the measuring position, and beeps when your wrist is in the proper position. oFF: The buzzer will not sound. -
Page 18: Applying The Wrist Cuff
APPLYING THE WRIST CUFF CAUTION Read all of the information in the instruction manual and any other literature in the box before operating the unit. CAUTION This device is intended for use in measuring blood pressure and pulse rate in the adult population. Do not use this device on infants or persons who cannot express their intentions. -
Page 19: Applying The Cuff On The Right Wrist
APPLYING THE WRIST CUFF 5. Fold the remaining part of the wrist cuff back out of the way. APPLYING THE CUFF ON THE RIGHT WRIST When taking a measurement using the right wrist position the cuff as shown in the illustration. -
Page 20: Taking A Measurement
TAKING A MEASUREMENT The monitor is designed to take measurements and store the measurement values in memory for two people using USER ID A and USER ID B. The monitor can be used to 2. Select your User ID (A or B). User A User B 3. - Page 21 TAKING A MEASUREMENT 5. Press the START/STOP button. All symbols appear on the display. The Heartbeat Symbol ( Remain still and do not move until the entire measurement process is completed. NOTE: 5. After the monitor has detected your blood pressure blood pressure and pulse rate are displayed.
-
Page 22: Using The Memory Function
USING THE MEMORY FUNCTION Every time you complete a measurement the monitor stores the blood pressure and pulse rate for each user (A and B) in the memory. The monitor automatically stores up to 100 sets of measurement values (blood pressure and pulse rate) for each user (A and B). -
Page 23: To Delete All Values Stored In The Memory
USING THE MEMORY FUNCTION NOTES: values. 3. Press the START/STOP button to turn the monitor off. TO DELETE ALL VALUES STORED IN THE MEMORY The values stored in the memory are deleted by User ID. You cannot partially delete values stored in the memory. All values for the user you select will be deleted. 1. -
Page 24: Care And Maintenance
Use only authorized parts and accessories. Use the unit in a manner consistent with the instructions provided in this manual. CAUTION Use only Omron authorized parts and accessories. Parts and accessories not approved for use with the device may damage the unit. CAUTION... -
Page 25: Error Indicators
ERROR INDICATORS SYMBOL CAUSE CORRECTION Take another measurement and Monitor could not remain still until the measurement is detect pulse wave. complete. Remove the monitor from your Cuff not applied wrist. correctly. Wait 2-3 minutes. Take another measurement. Device error. Contact Customer Service. -
Page 26: Troubleshooting Tips
TROUBLESHOOTING TIPS PROBLEM CAUSES AND SOLUTIONS Replace both batteries with new ones at the same No power. time. Check the battery installation for proper No display appears on the unit. placement of the battery polarities. Blood pressure varies constantly. Many factors including stress, time of day, how you wrap the Measurement values appear too cuff, may affect your blood pressure. -
Page 27: Fcc Statement
FCC STATEMENT Note: POTENTIAL FOR RADIO/TELEVISION INTERFERENCE (for U.S.A. only) This product has been tested and found to comply with the limits for a Class B digital device, pursuant to part 15 of the FCC rules. These limits are designed to provide reasonable protection against harmful interference in a residential installation. -
Page 28: Limited Warranty
THAT MAY BE IMPOSED BY LAW, IF ANY, ARE LIMITED IN DURATION TO THE PERIOD OF THE ABOVE EXPRESS WARRANTY. OMRON SHALL NOT BE LIABLE FOR LOSS OF USE OR ANY OTHER SPECIAL, INCIDENTAL, CONSEQUENTAIL OR INDIRECT COSTS, EXPENSES OR DAMAGES. - Page 29 SPECIFICATIONS BP652 (HEM-6052-Z) Model: LCD Digital Display Display: Pressure: 0 to 299 mmHg, Pulse: 40 to 180/min. Measurement Range: Pressure: ±3mmHg or 2% of reading Accuracy/Calibration: Pulse: ±5% of reading Automatic by electric pump Inflation: Automatic pressure release valve Deflation:...
- Page 30 Omron Healthcare, Inc. 1200 Lakeside Drive Bannockburn, IL 60015 www.omronhealthcare.com Copyright © 2010 Omron Healthcare, Inc. Made in China 5329415-9A...