Omron INTELLISENSE BP760 Instruction Manual
7 series blood pressure monitor with comfit cuff
Hide thumbs
Also See for INTELLISENSE BP760:
- Instruction manual (88 pages) ,
- Instruction manual (45 pages)

Related Manuals for Omron INTELLISENSE BP760


Summary of Contents for Omron INTELLISENSE BP760
- Page 1 INSTRUCTION MANUAL 7 series Blood Pressure Monitor with ComFit Cuff BP760 Model...
-
Page 2: Table Of Contents
TABLE OF CONTENTS Before Using the Monitor Introduction ..........4 Safety Information . - Page 3 TABLE OF CONTENTS Taking a Measurement ........27 Cuff Wrap Guide .
-
Page 4: Before Using The Monitor
• Staple your purchase receipt here • Register your product on-line at www.register-omron.com Your new digital blood pressure monitor uses the oscillometric method of blood pressure measurement. This means the monitor detects your blood’s movement through your brachial artery and converts the movements into a digital reading. -
Page 5: Safety Information
Follow the instructions of your physician or licensed healthcare provider. DO NOT adjust medication based on measurement results from this blood pressure monitor. Take medication as prescribed by your physician. Only a physician is qualified to diagnose and treat High Blood Pressure. - Page 6 SAFETY INFORMATION OPERATING THE DEVICE (continued) This device is intended for use in measuring blood pressure and pulse rate in the adult population. Do not use this device on infants or persons who cannot express their intentions. Read the Special Conditions section (page 30) of the instruction manual if your systolic pressure is known to be more than 220 mmHg.
-
Page 7: Risk Of Electrical Shock
Do not submerge the device or any of the components in water. Store the device and the components in a clean, safe location. Changes or modification not approved by Omron Healthcare will void the user warranty. Do not disassemble or attempt to repair the... -
Page 8: Before Taking A Measurement
BEFORE TAKING A MEASUREMENT To ensure a reliable reading follow these recommendations: 1. Avoid eating, drinking alcohol, smoking, exercising, and bathing for 30 minutes prior to taking a measurement. Rest for at least 15 minutes prior to taking the measurement. 2. -
Page 9: Operating Instructions
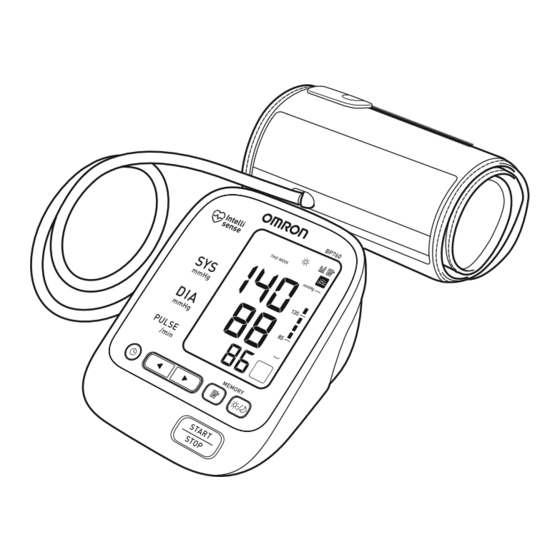
KNOW YOUR UNIT Main Unit: SET Button Up/Down ) Buttons Air Jack Display Morning/Evening Average ) Button Memory ( ) Button Start/Stop Button Battery Compartment AC Adapter Jack... - Page 10 KNOW YOUR UNIT Components: Air Tube Air Plug (Connects to Air Jack) Arm Cuff Storage Case Quick Start Guide Housing Cord AC Adapter INSTRUCTION MANUAL 7 series Blood Pressure Monitor with ComFit Cuff BP760 Model Instruction Manual...
-
Page 11: Unit Display
UNIT DISPLAY Morning Average Symbol Evening Average Symbol Date/Time Display Irregular Heartbeat Symbol Average Value Symbol Week Display Memory Symbol Systolic Blood Pressure Morning Hypertension Symbol Movement Symbol Blood Pressure Level Indicator Diastolic Blood Pressure Deflation Symbol Heartbeat Symbol Cuff Wrap Guide Low Battery Indicator Pulse Display / Memory Number... -
Page 12: Display Symbols
IRREGULAR HEARTBEAT SYMBOL ( When the monitor detects an irregular rhythm two or more times during the measurement, the Irregular Heartbeat Symbol ( display with the measurement values. An irregular heartbeat rhythm is defined as a rhythm that varies by less than 25% from the average rhythm or 25% more than the average rhythm detected while the monitor is measuring the systolic and diastolic blood... -
Page 13: Morning Hypertension Symbol
85 for the Diastolic Blood Pressure value when viewing the Morning Averages and the Evening Averages in the memory. Omron Healthcare recommends you contact your physician if the MORNING HYPERTENSION SYMBOL and/or the HEARTBEAT SYMBOL appear on the display with your measurement values. -
Page 14: Heartbeat Symbol
DISPLAY SYMBOLS HEARTBEAT SYMBOL ( ) TAKING A MEASUREMENT The Heartbeat Symbol flashes on the display during the measurement. The Heartbeat Symbol flashes at every heartbeat. AVERAGE VALUE SYMBOL ( The Average Value Symbol is displayed when you press the memory button. -
Page 15: Using The Ac Adapter
USING THE AC ADAPTER IMPORTANT SAFETY INSTRUCTIONS SAVE THESE INSTRUCTIONS FIRE OR ELECTRIC SHOCK, CAREFULLY FOLLOW THESE INSTRUCTIONS. For connection to a power supply not in the U.S.A., use an attachment plug adapter of the proper configuration for the power outlet. - Page 16 USING THE AC ADAPTER TO CONNECT THE AC ADAPTER ① Insert the AC Adapter Plug into the AC Adapter Jack on the back side of the monitor as illustrated. ② Plug the AC Adapter into a 120V AC outlet (60 cycles). TO DISCONNECT THE AC ADAPTER ①...
-
Page 17: Battery Installation
BATTERY INSTALLATION 1. Remove the battery cover with pulling the hook up while pushing it in the direction of the arrow. 2. Install 4 “AA” size batteries so the + (positive) and - (negative) polarities match the polarities of the battery compartment as indicated. -
Page 18: Battery Replacement
BATTERY INSTALLATION BATTERY REPLACEMENT When the Low Battery Indicator appears on the display screen turn the monitor off and remove all the batteries. Replace with four new batteries at the same time. Longlife alkaline batteries are recommended. CAUTION If battery fluid should get in your eyes, immediately rinse with plenty of clean water. -
Page 19: Setting The Date And Time
If the date and time are not set, “-:--” appears during or after measurement. The Blood Pressure Monitor automatically stores up to 60 measurement values with the dates and times. The monitor also calculates weekly averages for measurements in the morning and in the evening. Morning and Evening averages are stored for this week and the last seven weeks. - Page 20 SETTING THE DATE AND TIME 1. TO START THE SETTING Press the SET button to adjust the date and time. The year flashes on the display. 2. SETTING THE YEAR The year can be set between 2010 and 2040. When the display reaches 2040, it will return to 2010.
- Page 21 SETTING THE DATE AND TIME 3. SETTING THE MONTH Press the Up button ( by increments of one month. Press the SET button to set the current month. The day flashes on the display. 4. SETTING THE DAY Press the Up button ( by increments of one day.
- Page 22 SETTING THE DATE AND TIME 5. SETTING THE HOUR The time is set using AM or PM. Press the Up button ( by increments of one hour. Press the SET button to set the current hour. The minute flashes on the display. 6.
-
Page 23: Applying The Arm Cuff
APPLYING THE ARM CUFF CAUTION Read all of the information in the instruction manual and any other literature in the box before operating the unit. CAUTION This device is intended for use in measuring blood pressure and pulse rate in the adult population. Do not use this device on infants or persons who cannot express their intentions. - Page 24 APPLYING THE ARM CUFF 3. Sit on a chair with your feet flat on the floor. Place your left arm on a table so the cuff is level with your heart. 4. Hold the thumb grip on the cuff securely with your right hand. 5.
- Page 25 APPLYING THE ARM CUFF 6. Apply the cuff to your left upper arm so the blue stripe is on the inside of your arm and aligned with your middle finger. The air tube runs down the inside of your arm. The bottom of the cuff should be approximately 1/2"...
-
Page 26: Applying The Cuff On The Right Arm
APPLYING THE ARM CUFF APPLYING THE CUFF ON THE RIGHT ARM When taking a measurement using the right arm use this instruction for Step 6 on page 25. Apply the cuff to your right upper arm so the thumb grip is centered on the inside of your inner arm. -
Page 27: Taking A Measurement
TAKING A MEASUREMENT The monitor automatically determines your ideal inflation level. In rare circumstances when a higher inflation may be necessary, the monitor automatically re-inflates the cuff up to 30 mmHg higher than the initial inflation and restarts the measurement. WARNING Contact your physician for specific information about your blood pressure. - Page 28 TAKING A MEASUREMENT 1. Press the START/STOP button. All symbols appear on the display. The cuff starts to inflate automatically. As the cuff inflates, the monitor automatically determines your ideal inflation level. This monitor detects the pulse during inflation. Do not move your arm and remain still until the entire measurement process is completed.
- Page 29 Follow the instructions of your physician or licensed healthcare provider. WARNING DO NOT adjust medication based on measurement results from this blood pressure monitor. Take medication as prescribed by your physician. Only a physician is qualified to diagnose and treat High Blood Pressure. WARNING...
-
Page 30: Special Conditions
TAKING A MEASUREMENT SPECIAL CONDITIONS CAUTION Inflating to a higher pressure than necessary may result in bruising where the cuff is applied. If your systolic pressure is known to be more than 220 mmHg, press and hold the START/STOP button until the monitor inflates 30 to 40 mmHg higher than your expected systolic pressure. -
Page 31: Using The Memory Function
USING THE MEMORY FUNCTION The monitor is designed to store the blood pressure and the pulse rate in the memory every time a measurement is completed. The monitor automatically stores up to 60 sets of measurement values (blood pressure and pulse rate). When 60 sets of measurement values are stored, the oldest record is deleted to save the most recent values. -
Page 32: To Display The Measurement Values
USING THE MEMORY FUNCTION TO DISPLAY THE MEASUREMENT VALUES 1. Press the Memory button ( The Average Symbol ( reading is shown. 2. Press the Down button ( measurement values on the screen. The values are displayed from the most recent to the oldest. NOTE: The date and time are alternately displayed with the measurement values. -
Page 33: Morning And Evening Averages
USING THE MEMORY FUNCTION MORNING AND EVENING AVERAGES The monitor calculates and displays a weekly average for measurements taken in the morning ( weeks of Morning Averages and 8 weeks of Evening Averages. NOTE: The week begins Sunday at 4:00 AM MORNING AVERAGES Morning averages are based on the first reading. -
Page 34: To Display Morning And Evening Averages
USING THE MEMORY FUNCTION TO DISPLAY MORNING AND EVENING AVERAGES 1. Press the Morning/ Evening Average button ( the Morning or Evening average. The average for the current week “THIS WEEK” appears on the display. 2. Press the Down ( With each press of the Down ( from 1 week ago to the older. -
Page 35: Display Combinations
USING THE MEMORY FUNCTION DISPLAY COMBINATIONS In addition to the Morning Average and Evening Average Symbols, the monitor may also display the Morning Hypertension Symbol if the morning average for that week is above the AHA guidelines. (See page 13 for details.) Depending on your measurement results, these may be displayed in the following combinations. -
Page 36: To Delete All Values Stored In The Memory
USING THE MEMORY FUNCTION The Morning Hypertension Symbol appears if the weekly average for morning measurements is above 135/85. In this case the Morning Hypertension Symbol is displayed when the Evening Average is displayed, regardless of the values for the Evening Average. -
Page 37: Care And Maintenance
CARE AND MAINTENANCE To keep your digital blood pressure monitor in the best condition and protect the unit from damage, follow the directions listed below: Keep the monitor in the storage case when not in use. Make sure the AC adapter is placed under the main unit so that it does not damage the display. - Page 38 CARE AND MAINTENANCE Use the unit consistent with the instruction provided in this manual. CAUTION Changes or modification not approved by Omron Healthcare will void the user warranty. Do not disassemble or attempt to repair the unit or components. CAUTION Use only Omron authorized parts and accessories.
-
Page 39: Error Indicators And Troubleshooting Tips
ERROR INDICATORS AND TROUBLESHOOTING TIPS ERROR INDICATORS SYMBOL Air plug disconnected. Arm cuff not applied correctly. Air is leaking from the arm cuff. Cuff over inflated. The arm cuff was inflated above 299 mmHg when inflating the cuff manually. Movement during measurement. Clothing is interfering with the arm cuff. -
Page 40: Troubleshooting Tips
ERROR INDICATORS AND TROUBLESHOOTING TIPS TROUBLESHOOTING TIPS PROBLEM No power. No display appears on the unit. Measurement values appear too high or too low. CAUSES AND SOLUTIONS Replace all four batteries with new ones. Check the battery installation for proper placement of the battery polarities. -
Page 41: Fcc Statement
FCC STATEMENT NOTE: POTENTIAL FOR RADIO/TELEVISION INTERFERENCE (for U.S.A. only) This product has been tested and found to comply with the limits for a Class B digital device, pursuant to part 15 of the FCC rules. These limits are designed to provide reasonable protection against harmful interference in a residential installation. -
Page 42: Limited Warranties
® BP760 IntelliSense ® Automatic Blood Pressure Monitor, excluding the arm cuff, is warranted to be free from defects in materials and workmanship appearing within 5 years from the date of purchase, when used in accordance with the instructions provided with the monitor. The arm cuff is warranted to be... -
Page 43: Specifications
Model: Display: Measurement Range: Accuracy/Calibration: Pressure: ±3mmHg or 2% of reading Inflation: Deflation: Rapid Air Release: Measurement Method: Oscillometric method Power Source: Battery Life: Operating Temperature 50ºF to 104ºF (10ºC to 40ºC) /15 to 90% RH /Humidity: Storage Temperature /Humidity/Air Pressure: /700 - 1060 hPa Main Unit Weight: Main Unit Dimensions: Approx. - Page 44 Manufactured by OMRON HEALTHCARE Co., Ltd. Made in China Distributed by: Omron Healthcare, Inc. 1200 Lakeside Drive Bannockburn, IL 60015 www.omronhealthcare.com Copyright © 2010 Omron Healthcare, Inc.