Table of Contents
Advertisement
Quick Links
Advertisement
Table of Contents

Related Manuals for EchoStar HDS-600RS


Summary of Contents for EchoStar HDS-600RS
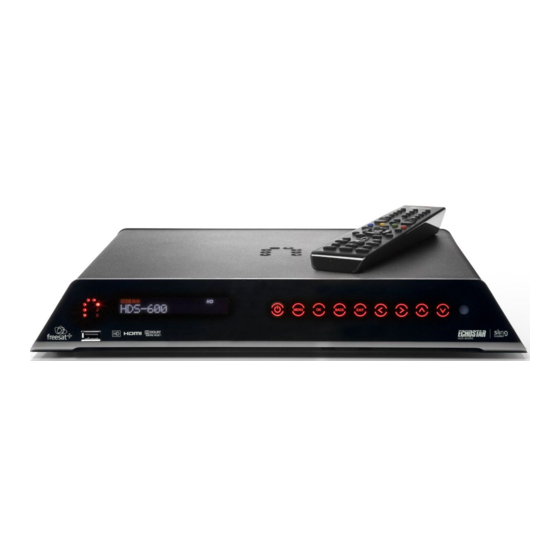
- Page 1 HDS-600RS User Guide...
-
Page 3: Important Safety Information
IMPORTANT SAFETY INFORMATION! Read these instructions carefully before using the product. Install Safely Place the unit on its feet on a firm, stable, horizontal surface. Unplug the equipment from the power socket during installation and follow all connection instructions. ... - Page 4 Equipment Care Unplug the equipment from the power socket before cleaning. Clean with a dry or slightly damp cloth. If the equipment is damaged, unplug it from the power socket and have it checked by qualified personnel before operating it any further. Hard Drive ...
-
Page 5: Table Of Contents
Contents IMPORTANT SAFETY INFORMATION! ......... 1 Introduction..............6 Unpacking the Box................ 7 Controls and Connectors ............. 8 Front View..................8 Back View ..................8 Remote Control ................9 Putting It All Together..........10 Satellite Inputs ................10 Connecting to the Internet............10 Remote Control ................ - Page 6 Using Apps.................. 42 Internet Connection Information..........42 Using TV anywhere............43 Creating A Sling Account ............43 Using SlingPlayer ............... 43 Your HDS-600RS Sling Settings..........44 Sling ID ..................44 Sling Client Connections............. 45 Rename your HDS-600RS ............45 Change Password ..............45...
- Page 7 Contacting Customer Support ........... 56 Remote Control TV Codes ..........57 Programming the Remote with Control Codes......57 Scanning through Control Codes ..........57 TV Manufacturers’ Control Codes..........58 Symbols and Icons ............67 Symbols on HDS-600RS ............. 67 Information Icons................ 68...
-
Page 8: Introduction
1. Introduction Thank you for purchasing your EchoStar Sling-Loaded HDS-600RS freesat+ set-top box. The HDS-600RS is a state-of-the-art high definition digital video recorder (DVR) combining dual channel freesat satellite television reception with the flexibility of personal video recording. Slingloaded™ – watch TV anywhere and control the HDS-600RS ... -
Page 9: Unpacking The Box
Unpacking the Box Carefully unpack the box and familiarise yourself with each item: The HDS-600RS unit 1 Power cable 1 HDMI cable 1 Network cable 1 Remote control 2 AAA size batteries User manual and Quick Start Guide ... -
Page 10: Controls And Connectors
Controls and Connectors This section shows the main features of your HDS-600RS unit. Front View Sling Activity Light Status Display LEDs flash to indicate Shows current channel and other information. remote access to unit via SlingPlayer. Power button USB socket... -
Page 11: Remote Control
Remote Control TV control - see page 23 (left to right) : TV On/standby TV AV : scroll TV inputs : HDS-600RS On/ Standby Record and Playback Controls (see page 28) Main Menu Programme Guide Library (see page 38) (see page 32) -
Page 12: Putting It All Together
600RS from the mains. With the connection to your router in place, reconnect your HDS-600RS to the mains. It may take the HDS-600RS a few minutes to start up the first time once connected to a router – thereafter it should start up quickly. -
Page 13: Remote Control
Remote Control 1. Remove the wrapping from the two AAA batteries supplied with the unit. 2. Turn the remote control over. Open the battery cover by pressing down on symbol and pushing the cover (as shown below). 3. Slide the two AAA size batteries into the compartment so that ‘+’ and ’-‘ marks on the batteries and inside the remote control match up. -
Page 14: Hdmi-Tv Connections
HDMI-TV Connections Satellite dish If you intend to use a single input ensure that it is connected to LNB1 (the left-hand connector). LNB1 LNB2 Power supplied cable. Ethernet HDMI-enabled TV Connect to broadband router. You could also connect a VCR or DVD Player using the upper SCART socket. -
Page 15: Scart-Based Connections
SCART-based Connections Satellite dish VCR/DVD Player If you intend to use a Connect to upper SCART single input ensure that it socket. is connected to LNB1 (the left-hand connector). LNB1 LNB2 Power supplied cable. Ethernet SCART-enabled TV Connect to broadband router. -
Page 16: Audio Connections
Audio Connections Your TV is equipped with basic speakers and audio is transmitted on the HDMI and SCART connections. However, for the best performance, you could connect external audio equipment such as a music centre or home theatre system using one of the two available audio outputs: RCA/phono sockets for stereo audio (white and red jacks). -
Page 17: Getting Started
(On/Standby button) either on the remote or on the front of the unit. Please be patient - the HDS-600RS may take up to a minute to initialise. When you switch on your HDS-600RS for the first time, the Setup Wizard is displayed. -
Page 18: Step 1: Enter Your Postcode
STEP 1: Enter your Postcode 1. Using the numbered buttons on the remote*, enter your postcode. The HDS-600RS needs your postcode to be able to download programme information relevant to your area. 2. If you make a mistake, press the RED button to delete the last character you entered. -
Page 19: Step 2: Set The Pin (Optional)
STEP 2: Set the PIN (optional) The unit now gives you the option to set a PIN code to restrict the viewing of any programmes broadcast or recorded with parental guidance advice. Before a user can view these programmes, they will need to enter the PIN code. Tip. -
Page 20: Step 3: Search For Services
STEP 3: Search for Services The HDS-600RS starts a search for channels and compiles a list of the TV and radio services it has found. A bar at the bottom of the screen shows the progress of the tuning process. -
Page 21: Step 4: Watching Tv
STEP 4: Watching TV If the HDS-600RS has successfully completed its search for channels the screen shown above is displayed (if this is not the case, see Tuner Issues on the next page). Press OK to watch TV. The unit will show the first channel in its list of detected channels. -
Page 22: Tuner Issues
Tuner Issues Your HDS-600RS will display one of the following screens if it discovers a problem with your satellite reception: One input OK, problem with other input (in this example, LNB2): Problem with both inputs:... -
Page 23: Single Tuner Mode
LNB1 – see page 8. Note. If your satellite dish only has a single LNB do not attempt to split this to create two inputs for the HDS-600RS. This approach does not work. You will need to install a multiple-LNB. -
Page 24: Checking The Signals
Checking the Signals To check the signal strength after running the wizard, press the BLUE button. The signal check page shows two spots on the screen, indicating the signal status on each of the inputs. A RED spot indicates a connection problem; a GREEN spot shows that the connection is acceptable. -
Page 25: Controlling Your Tv
Controlling your TV The HDS-600RS remote control has a number of buttons that can be used to control your TV. These are: TV AV Volume up/down Mute TV On/Standby TV source To be able to use these buttons, your HDS-600RS remote needs to ‘learn’ the appropriate codes from your TV’s remote (you could also program the remote... -
Page 26: Viewing
Viewing Changing Channel You can change channel in several ways: Press the channel up or channel down key. Enter the channel number. Press OK to display the channel list and use the ▲ and ▼ keys to select the desired channel and then press OK to view. -
Page 27: The Information Bar
The Information Bar The Information Bar is displayed across the bottom of the screen for a few seconds whenever you change channel. It shows details about the current channel and programme. You can also view it at any time by pressing the i key. -
Page 28: Subtitles
Subtitles Press the SUB key to display the Subtitle menu. Use the ▲ and ▼ keys to select the subtitle language. Press OK to select. Tip. If you use subtitles, you won’t be able to access text services at the same time. For Language selection, see page 47. -
Page 29: Watching Freesat On Demand Tv
Watching freesat On Demand TV To access BBC iPlayer, and soon ITV Player, your HDS-600RS must be connected to a suitable broadband connection (see page 42). BBC iPlayer can be found at Channel 901 and ITV Player will be at Channel 903 when it launches. -
Page 30: Pause, Rewind And Fast Forward
Thereafter, it will begin to play back the programme from where you left off and continue to save live transmissions. Tip. The HDS-600RS saves up to one hour of the current channel’s transmissions for you to rewind and replay. This buffer is reset whenever you change channel: you can only rewind as far as the last channel change. -
Page 31: Recording Programmes
Recording Programmes Press the RECORD button to start recording live If you want to record a different channel: Press the GUIDE button, browse to and highlight the programme you want to record (see page 34) and then press the RECORD button. -
Page 32: Stopping A Recording
Stopping a Recording To cancel the recording of a live programme, press (stop) button. Press the OK button to stop the recording or press the Back button to dismiss the message and continue recording the programme. To stop the recording of a future programme, select it in the guide (see page 34) or info bar (see page 25), press the Record button and then follow the on- screen prompts. -
Page 33: Moving On
4. Moving On The previous chapter described the basic use of your HDS-600RS unit for watching TV and for making and viewing recordings. This section describes the advanced features: the Programme Guide, Favourites and Library. The Main Menu Press the MAIN MENU button on the remote to access the unit’s... -
Page 34: Using The Guide
You can set a reminder from the Info bar (see page 25) or from the Guide (see above). When you do so, the HDS-600RS will alert you two minutes before the programme is scheduled to start so you can switch channels or record the programme. -
Page 35: The Guide's Genres
Dealing with a reminder Press OK to switch channels and view the programme. Press the Record button to record the programme and continue with your current viewing. Press the Back button to dismiss the reminder and continue with your viewing. -
Page 36: Using Programme Information
Using Programme Information Within a channel list, use the ▲ and ▼ keys to select the channel of interest and then use the ◄ and ► keys to highlight programmes. Information about the programme is provided in the icon area at the top of the screen (see page 68). -
Page 37: Creating A Favourites List
Creating a Favourites List freesat provides you with access to over 140 TV channels. Finding your usual viewing channels in the full listing can therefore be difficult and time-consuming. To make channel selection easier, you can create up to four Favourites lists: reduced listings showing just those channels that you watch regularly. -
Page 38: Editing A Favourites List
Editing a Favourites List Press the YELLOW button to create or edit the Favourites list. Press the TV/RADIO key on the remote to toggle between radio and TV services. - Page 39 Adding channels To add a channel to the Favourites list, select it in the left-hand list using the ▲ and ▼buttons. Then press OK. The channel is added to the Favourites list. Deleting channels To delete a channel from the Favourites list: 1.
-
Page 40: Using The Library
Main Menu or directly by pressing the LIB key on the remote control. Tip. Your HDS-600RS is fitted with a 500GB hard drive with a capacity to record about 120 hours of HD programmes or 300 hours of SD programmes. - Page 41 Deleting a recording immediately 1. Select the recording you want to delete using the ▲ and ▼buttons. 2. Press the RED key to delete the selected recording immediately. Deleting a recording after a specified period 1. Select the recording in the Library list. 2.
-
Page 42: Managing Scheduled Recordings
Managing Scheduled Recordings To view a list of current and future recordings: 1. Select LIBRARY from the main menu. 2. Select the Scheduled Recordings option. Creating a recording schedule manually Tip. It is easier to schedule recordings of complete programmes using the guide. - Page 43 Editing a recording schedule To edit an existing timer event: 1. Use the ▲ and ▼ keys to select it and then press OK. 2. Use the ▲ and ▼ and ◄ and ► keys to navigate around the menu and change the Channel number, Type, Date, Time and Duration, Repeat and Subtitle options as required.
-
Page 44: Using Apps
The Apps menu is reserved for future Internet-based video, audio and information services. Services will automatically be added to this menu as they become available as part of HDS-600RS software updates (see page 53). Internet Connection Information Click on the SlingLoaded icon in the Apps menu for information about setting... -
Page 45: Using Tv Anywhere
4. Click on your HDS-600RS and enter the unit’s password (see page 44). Should you require them, your default SlingPlayer password is 'admin', and your default PIN on the HDS-600RS is '0000'. The same PIN is used for parental controls (see page 50). -
Page 46: Your Hds-600Rs Sling Settings
(see page 50). Sling ID The Sling ID is a unique number that identifies your HDS-600RS. No matter where you are in the world, using the Sling ID, SlingPlayer can locate your HDS-600RS and connect to it. -
Page 47: Sling Client Connections
Sling account. If you access several Sling-loaded devices from your account, ensure that the name distinguishes it from other devices. The default name is HDS-600RS. Change Password Use the 0-9 & A-Z keys to change the Sling password. -
Page 48: Sling 'Activity Light' Settings
Sling ‘Activity Light’ Settings Use these settings to determine how the Sling activity lights (the LEDs on the left side of the set-top box) are used to indicate when the unit is being accessed remotely. Enable All Display when someone is using Sling to connect to the box from a remote location (default setting). -
Page 49: Settings
6. Settings The Settings menu allows you to configure the unit and to set personal preferences. Navigate the menus using the ▲ ▼ ◄ and ► keys. Press the OK key to choose an option. Note. In the following tables, a setting marked by a * symbol is the default factory setting. -
Page 50: Tv, Audio & Library Setup
TV, Audio & Library Setup The TV, Audio & Library menu allows you to select the correct display and audio outputs to suit your TV and to set up the Library settings for the recording and playback of programmes. The following table lists the options. Please visit www.myechostar.com/support if you need any help. - Page 51 Category Menu Sub-menu Options Digital HDMI Auto* Audio PCM Stereo Only Setup SPDIF PCM Stereo Dolby Digital* Midnight mode Off* HDCP Setup Always On* Automatic Library Recording Recording Start: Timed Setup Setup Auto* Auto Conflict Resolution Series Never Recording Always Prompt* Allow Never...
-
Page 52: Sling
Sling See TV anywhere (page 43) Parental Control This menu allows you to safeguard your children from unsuitable programmes by restricting their access to certain channels or media types. It relies on you creating and applying a secure PIN code to channels or programmes. It should be memorable for you, but not for your children, and you should change it regularly. -
Page 53: Menu Preferences
Menu Preferences Use this menu to change the appearance of text in the settings menus. Transparency Solid (Menu background is opaque but clearer) Medium* High (Menu backgrounds are fully transparent) Network Setup This menu can be used to view and configure network settings. In most cases, Auto Setup will correctly configure your network and internet connection via a local DHCP server or DHCP-enable router. -
Page 54: Technical Information
Technical Information This menu displays software version and other technical information about the unit. Tuning Preferences Choose the channel to be displayed when the HDS- Services 600RS is powered up. Autoscan Perform a full scan for services. Manual scan Carry out a manual scan for services by setting Set Frequency, Symbol Rate and LNB Polarisation (advanced users only) Regional channel... -
Page 55: Getting Help
A pop-up message will be displayed on screen whenever an update has occurred. Automatic Software Updates If a new version of the HDS-600RS software is available, a pop-up message is displayed on screen. Follow the instructions to download and install the update (requires an active internet connection). -
Page 56: Faqs
Check that the HDS-600RS is plugged in, switched on and has had sufficient time to warm up. Make sure the HDS-600RS is not in Standby (you can bring the unit out of standby by pressing the standby button on the front of the unit). - Page 57 Ensure that you are holding the remote control correctly with the lens at the top of the control pointing at the HDS-600RS. Ensure that the receiver on the HDS-600RS is not covered by, for example, papers and that the remote is within range.
-
Page 58: Contacting Customer Support
TV anywhere doesn’t work Check that your HDS-600RS is connected to your router and that the Ethernet cables are firmly inserted at both ends. Check there is a broadband connection available (see page 42). Can you access the Internet from other devices? Contact your Internet Service Provider if there is a problem. -
Page 59: Remote Control Tv Codes
8. Remote Control TV Codes Programming the Remote with Control Codes Search the table in this section for your TV manufacturer. Make a note of the control code (or codes) used by the manufacturer. Use the following procedure to program your remote control: 1. -
Page 60: Tv Manufacturers' Control Codes
TV Manufacturers’ Control Codes TV Manufacturer Control Codes TV Manufacturer Control Codes ATLANTIC 049 050 071 113 152 236 379 A.R. SYSTEMS 049 152 ATORI ACCENT 049 152 AUCHAN 107 425 ACEC AUDIOSONIC 049 074 076 152 182 195 213 379 421 ACER 484 329 AUDIOTON... - Page 61 TV Manufacturer Control Codes TV Manufacturer Control Codes BRANDT 074 182 186 453 DAENYK ELECTRONIQUE BRAUN DAEWOO 049 123 152 193 195 226 379 456 464 BRENDSTAR DAINICHI 123 379 BRINKMANN 049 152 163 DANSAI 049 076 141 152 195 379 BRIONVEGA 049 065 083 152 167 172 324 DANSETTE...
- Page 62 TV Manufacturer Control Codes TV Manufacturer Control Codes ELIN 020 049 107 139 152 172 195 379 GENERAL 064 074 182 ELITE 049 123 152 GENERAL TECHNIC ELMAN 045 168 GENEXXA 049 123 152 307 426 ELTA 195 076 379 GERICOM 031 043 EMERSON...
- Page 63 TV Manufacturer Control Codes TV Manufacturer Control Codes HITACHI 018 020 033 049 050 074 086 099 KAMBROOK 102 104 107 110 126 127 139 150 152 162 168 171 182 186 218 238 307 379 014 309 HITACHI FUJIAN KAMP HITSU 123 195 380...
- Page 64 TV Manufacturer Control Codes TV Manufacturer Control Codes 454 053 LOEWE OPTA 035 046 049 065 120 144 152 213 MIVAR 046 050 072 081 090 120 379 391 407 414 421 434 LOGIK 131 225 MONACO LOGIX MORGAN_S 049 152 LUMA 071 107 110 152 171 172 195 210 MOTION...
- Page 65 TV Manufacturer Control Codes TV Manufacturer Control Codes 142 152 163 168 324 369 407 421 O GENERAL PHILHARMONIC OKANO 049 076 102 152 421 PHILIPS 008 049 050 065 079 089 112 152 160 182 193 216 217 220 226 247 249 324 427 455 482 025 OLEVIA PHOCUS...
- Page 66 TV Manufacturer Control Codes TV Manufacturer Control Codes RECTILIGNE 049 152 SEI SINUDYNE REDIFFUSION 018 059 104 105 139 171 172 307 SELECO 040 071 079 107 110 152 171 172 210 236 243 307 369 REDIFFUSION(UK) 150 162 SENCORA REDSTAR 049 152 SENTRA...
- Page 67 TV Manufacturer Control Codes TV Manufacturer Control Codes STENWAY 123 378 TEKON STERN 040 071 079 107 110 152 171 236 TELEAVIA 008 074 182 186 218 424 453 462 463 243 307 STRATO 049 076 152 195 TELECOR 049 107 123 152 379 STRONG TELEFAC SUNKAI...
- Page 68 TV Manufacturer Control Codes TV Manufacturer Control Codes UNIC RADIO WHITE 049 050 113 152 213 379 WESTINGHOUSE UNITED 049 152 491 WINBOOK UNIVERSUM 002 004 018 020 049 074 076 094 WINCO 107 131 152 163 172 195 197 210 213 247 320 357 375 379 407 408 421 428 429 437 454 UNIVOX...
-
Page 69: Symbols And Icons
9. Symbols and Icons Symbols on HDS-600RS Symbol Meaning The product complies with applicable EU directives. Do not dispose of with normal household waste. Caution, read the instructions. The equipment has additional insulation and does not need to be earthed. -
Page 70: Information Icons
Symbol Meaning Sling logo. This logo tells you the receiver is capable of place shifting your TV content. HD logo This logo tells you the receiver is capable of receiving and displaying HD content. Information Icons Icon When displayed (programme guide or info bar) Contains one or more subtitle components. - Page 71 Programme has an associated recommendation. This is a radio service (audio only). This is a text only (i.e. MHEG) service. A future recording has been scheduled for this programme. This programme is currently being recorded. A Reminder has been set for this programme. Channel N/A.
- Page 72 NOTES...
- Page 73 NOTES...
- Page 74 NOTES...
- Page 76 HDMI, the HDMI Logo and High-Definition Multimedia Interface are trademarks or registered trademarks of HDMI Licensing LLC. Copyright Π2011 EchoStar Technologies L.L.C. Sling Media, SlingLoaded and SlingPlayer are trademarks or registered trademarks of Sling Media, Inc. All other brand and product names are or may be trademarks of, and are used to identify products or services of, their respective owners.