Table of Contents
Advertisement
Quick Links
Gigaset Communications GmbH
Frankenstr. 2a, D-46395 Bocholt
Manufactured by Gigaset Communications GmbH
under trademark license of Siemens AG.
As of 1 Oct. 2011 Gigaset products bearing the
trademark 'Siemens' will exclusively use the trademark 'Gigaset' .
© Gigaset Communications GmbH 2010
All rights reserved. Subject to availability.
www.gigaset.com
DL500
DX600
DX800
GIGASET. INSPIRING CONVERSATION.
A
A ISDN
A all in one
Advertisement
Table of Contents

Related Manuals for Siemens Gigaset DL500A


Summary of Contents for Siemens Gigaset DL500A
- Page 1 Manufactured by Gigaset Communications GmbH under trademark license of Siemens AG. As of 1 Oct. 2011 Gigaset products bearing the trademark 'Siemens' will exclusively use the trademark 'Gigaset' . © Gigaset Communications GmbH 2010 All rights reserved. Subject to availability.
-
Page 2: Gigaset Dx800A All In One, Dx600A Isdn And Dl500A
Gigaset DX800A all in one, DX600A ISDN and DL500A – your perfect companion Gigaset DX800A all in one, DX600A ISDN and DL500A – your perfect companion ... impressive inside and out. Go crazy for the vibrant 3.5" TFT display, first-class sound quality and elegant exterior. - Page 3 Gigaset DX800A all in one, DX600A ISDN and DL500A – your perfect companion User guide This document only describes how to get started with your Gigaset phone and its key func- tions in condensed form. There is a detailed description of the phone and its functions and a description of its Web configurator on the enclosed CD.
-
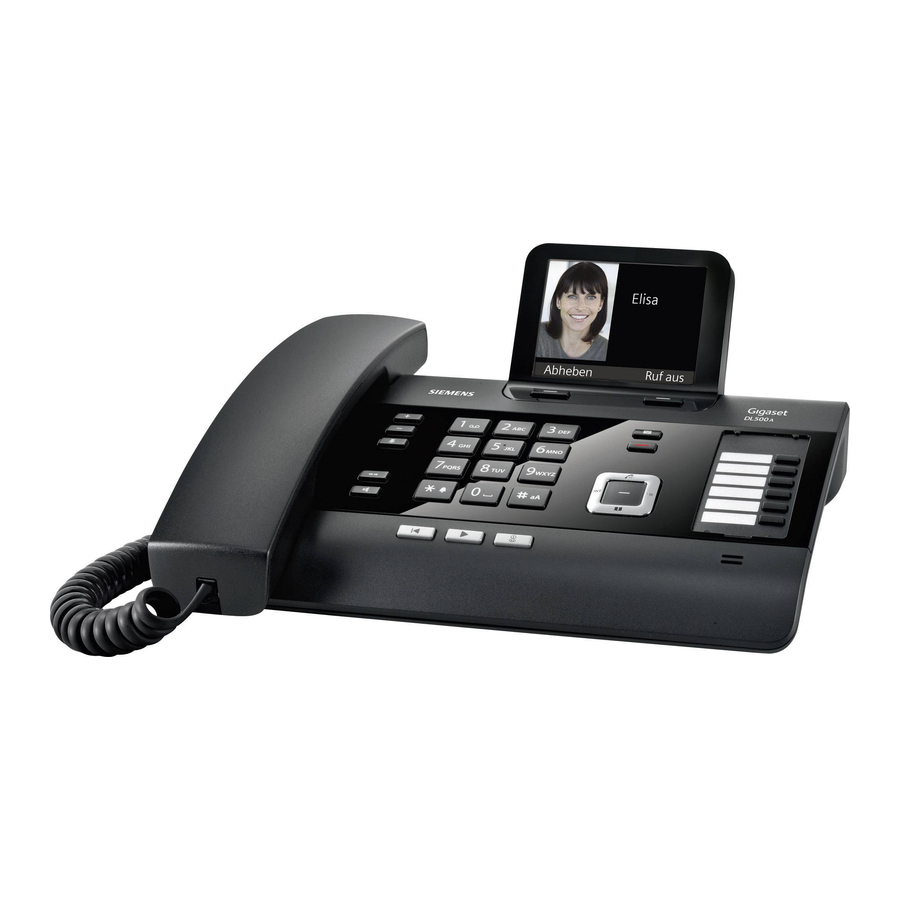
Page 4: Base Overview
Base overview Base overview 8 9 10 11 1 Adjust volume S = quieter; R = louder 9 Mute key During a call/message playback: During a call: Activate/deactivate microphone Handsfree/receiver volume; 10 * key When an external call is being signalled: Activate/deactivate ringer (press and hold);... -
Page 5: Display Icons
Display icons Display icons Display in idle status (example) · Ã Base status 06:30 Ã (two lines) Current month/year Mar 2010 Appointment entered Time 13:52 in calendar Internal name INT 1 Current date Calls Calendar Status display in the headers: The following icons are displayed dependent on the settings and the operating status of your base: Answering machine icon DX600A/DX800A:... -
Page 6: Table Of Contents
Contents Contents Gigaset DX800A all in one, DX600A ISDN and DL500A – your perfect companion ......... . . 1 Base overview . - Page 7 Menu overview Gigaset DL500A ........62...
-
Page 8: Safety Precautions
Safety precautions Safety precautions Warning Be sure to read this user guide and the safety precautions before using your telephone. Explain their content and the potential hazards associated with using the telephone to your children. Use only the power adapter supplied, as indicated on the underside of the base. Use only the cables supplied for fax, fixed line, ISDN, LAN and receiver connection and connect these to the intended port only. -
Page 9: First Steps
First steps First steps Checking the package contents 1 One base 2 One receiver to be connected to the base 3 One (coiled) cable for connecting the handset to the base 4 One power cable for connecting the base to the mains power supply 5 This quick guide 6 One CD 7 Various connection cables (device-specific):... -
Page 10: Setting Up The Base
– One cable for connecting a fax device to the base (6 pin with 2 mini western jacks 6/6) Gigaset DL500A: – One Ethernet (LAN) cable (Cat 5 with 2 RJ45 modular jacks) for connecting to a router (LAN/Internet) or PC –... -
Page 11: Connecting The Base
First steps Connecting the base The following diagram is an overview of all connections for your base. The individual connections are described in detail below. Follow the steps in the order given below: 1 Connect the receiver to the base. 2 Connect the base to the telephone network. - Page 12 First steps 1. Connecting the receiver to the base Underside of the base *) The LAN2 and FAX connections are not available for all devices 1 Insert the jack, which can be found on the longer straight end of the connection cable, into the connection port marked with the symbol ^ on the underside of the base.
- Page 13 First steps 2. Connecting the base to the telephone network Underside of the base ¢ *) The LAN2 and FAX connections are not available for all devices ( page 10) ¢ 1 Insert one end of the phone cable ( page 8) from the rear into the recess in the housing.
- Page 14 First steps 3. Connecting the base to the mains power supply ¢ *) The LAN2 and FAX connections are not available for all devices ( page 10) 1 Insert the small jack on the power cable from the rear into the recess in the housing.
- Page 15 First steps 4. Connecting the base with a router (Internet) or PC For the Gigaset DX800A all in one, the connection to a router is mainly needed for the Internet telephony VoIP (Voice over Internet Protocol). You can set up and con- figure up to six accounts (VoIP phone numbers) from one or several VoIP provider(s) on the base.
- Page 16 3 Then insert the second Ethernet cable plug into a LAN socket on the router. Gigaset DX800A all in one: ¢ You are now able to establish VoIP connections within Gigaset.net ( page 40). Gigaset DL500A: You have completed the setup for the base. For more information see page 33, "Date/time".
-
Page 17: Gigaset Dx600A Isdn, Dx800A All In One
First steps Gigaset DX600A ISDN, DX800A all in one: Setting up the base – installation wizard As soon as the phone is connected to the mains power supply, the firmware is started. If no connections have been generated on the base yet, the installation wizard starts. - Page 18 First steps Connection Procedure ¢ GigasetDX600A ISDN 1. ISDN wizard ( page 17) 3. Registration wizard 4. Connection wizard ¢ GigasetDX800A all in one 1. ISDN wizard ( page 17) for connection to ISDN and VoIP 2. IP wizard 3. Registration wizard 4.
- Page 19 First steps ISDN Wizard Start ISDN installation wizard? ¤ §Yes§ Press the display key to start installation. Ð ISDN Wizard This wizard helps you detect and configure your ISDN phone - ¤ numbers (MSNs). §OK§ Press the display key to start automatic MSN assignment.
- Page 20 First steps If no MSNs were found, No MSNs detected. is shown. You are prompted to enter your MSNs manually: ISDN Wizard Ð Please enter your MSN data. Back ¤ §OK§ Press the display key to enter the MSNs manually. ¤...
- Page 21 First steps 2. VoIP wizard – making VoIP settings Is started on the Gigaset DX800A all-in-one. You will see the following display: IP Wizard Start IP installation wizard? Before you can use the Internet (VoIP) to phone any other numbers on the Internet, the fixed line or the mobile phone network, you need the services of a VoIP provider who supports the VoIP SIP standard.
- Page 22 First steps Starting the VoIP wizard Prerequisite: The base is connected to the router. Your router is connected to the ¢ Internet ( page 14). ¤ Press on the centre of the w control key or on the right display key §Yes§...
- Page 23 First steps You will see the following display: IP Wizard Do you have a code for Auto Configuration? Your VoIP provider has supplied you You have received an auto configura- with an authentication name/pass- tion code (Activation Code) from your word and, where applicable, a user VoIP provider: ¤...
- Page 24 First steps Downloading VoIP provider data The connection wizard establishes a connection with the Gigaset configuration server on the Internet. Various profiles with general access data for different VoIP providers can be downloaded here. After a brief period you will see the following display: Select your country A list of countries is loaded.
- Page 25 First steps Entering user data for your VoIP account You will now be prompted to enter your personal access data for your VoIP account. The following are provider-dependent: User Name, Authentication Name, Authentication Password Please note ..when entering access data, it is case sensitive. To switch between upper and lower case and digits, press the # key (several times if necessary).
- Page 26 First steps Provider Data ¤ User Name: Using the keypad, enter the user name that you received from your VoIP provider. ¤ < C §OK§ Press the key under on the display screen. IP Wizard Û Once you have made all the necessary Registering with entries, the VoIP wizard tries to register the base with the VoIP provider.
-
Page 27: Registration Wizard
First steps 3. Registration wizard Is started on Gigaset DX800A all-in-one and Gigaset DX600A ISDN. The registration wizard helps you register handsets to the base. Please note Registration §No§ Press the left display key , if you do not wish to register any handsets. This closes the registration wizard and the connection wizard is started ¢... -
Page 28: Connection Wizard
First steps Then "Register a handset?" is shown in the display again (see above/page 26). ¤ §Yes§ Press the display key if you wish to register another handset and perform the steps listed above with this additional handset. §No§ Press to close the registration wizard and start the connection wizard. - Page 29 First steps Starting the connection wizard Connection Wizard ¤ Assign connections §Yes§ Press the display key , if you to desk phone wish to change the setting for the INT 1? send and receive connection of the base (internal name INT 1). ¤...
- Page 30 First steps (Display for ISDN connection) If you do not want calls to MSN1 or INT 1 your fixed line connection number Receive calls for signalled on the base: ¤ Press right on the control key v MSN1: to set to No. Receive calls for MSN2: Back...
- Page 31 First steps (Display for ISDN connection) ¤ Press down on the control key s INT 1 to switch to the next phone MSN1: number. Select either Yes or No as described above. ¤ Receive calls for Repeat the steps for each phone MSN2: number.
- Page 32 First steps If the base is to make calls via a differ- INT 1 ent connection/phone number: ¤ Press right on the control key v Connection for repeatedly, until the required outgoing calls connection is displayed. MSN1 Back Save ¤ §Save§...
- Page 33 First steps Completing the installation This completes the installation. The following is shown in the display: Setup ‰ Setup complete Afterwards, the base changes to idle status (for an example of the display in idle sta- ¢ page 4). The answering machines of the base to which you assigned a receive connection are activated and switched on in answer and record mode with a standard ¢...
-
Page 34: Date/Time
Internet (at regular intervals). Or you set the date and time manually on the base (see below). Gigaset DL500A By default, your base is configured so that the date and time are transferred from a time server on the Internet, provided it is connected to the Internet. You can also set the date and time manually via the base menu or one of the registered handsets (see below). -
Page 35: Guide
First steps Guide Now you have successfully set up your base, you will certainly want to adapt it to your personal requirements. Use the following guide to quickly locate the most important subjects. This user guide only briefly describes a few functions of your phone. You can find a detailed description of the entire range of functions of your phone in the detailed user guide on the enclosed CD. -
Page 36: Making Calls
(e.g., outside of range), does not answer or if network) or via the Internet (VoIP). there are already three internal connections, Please note the busy tone sounds. Gigaset DL500A: Calling all internal parties For this device, the following send and ("group call") receive connections mentioned, as well... -
Page 37: Activating/Deactivating Handsfree/Open Listening Mode
Making calls Activating/deactivating Muting the base Using the mute key P you can switch the handsfree/open listening mode microphone of the receiver, the base (hands- free mode) and a connected headset off or ¤ Press the handsfree key d to activate/ on again during an external call (also during deactivate open listening in receiver a conference call or call swapping). -
Page 38: Using Lists
Using lists Using lists Call lists Prerequisite: Calling Line Identification The options are: Presentation (CLIP) Redial list The options are: Incoming message list Accepted calls list Call lists Outgoing calls list Missed alarms list Missed calls list Answering machine list List of all calls Redial list Ê... -
Page 39: Using Directories
Using directories Using directories Editing entries ¢ s (Select entry). §View§ §Edit§ Press the display keys one after The options are: ¢ the other. (Local) directory ( page 38) ¤ Perform changes and save. Public online directory/classified direc- ¢ tory on the Internet ( page 39) Dialling with the directory (dependent on provider) Personal online... -
Page 40: Using Online Telephone Directories
Using directories Using online telephone Using the private directories net directory You can use public online directories (= Some providers offer users the option of cre- online directories and classified directories ating and managing a private net directory e.g., "Yellow Pages") depending on your pro- on the Internet. -
Page 41: Using The Gigaset.net Directory (Gigaset Dx800A)
Using directories Using the Gigaset.net Data protection note directory (Gigaset DX800A) When you enter your nickname, this is saved on a central Gigaset server. The nickname appears in the Gigaset.net Using Gigaset.net (a VoIP-Service of Gigaset directory, and other subscribers that use Communications GmbH) you can directly the Gigaset.net service can call you using (without an account or other settings) call... -
Page 42: Sending Sms (Text Messages)
Sending SMS (text messages) §Send§ Sending SMS Press the display key. The SMS is sent. (text messages) §OK§ Save Select and press . The mes- sage is saved in the draft list. You Your base is delivered ready to send SMS can edit and send it later. -
Page 43: Operating The Base Answering Machine
Operating the base answering machine Operating the base Operating via the base answering machine The speaker activates automatically if you receive an acoustic prompt or message while operating. You can deactivate the You can operate the answering machine that handsfree mode by picking up the receiver. is integrated into the base using the keys on ¢... -
Page 44: Deleting Messages
2. Press the ý key: All answering message. h (press briefly) or 4 machines are activated. During time stamp playback: Gigaset DL500A ¤ Press the ý key to activate or deacti- Skip to previous message. During message playback: vate the answering machine. -
Page 45: Activating/Deactivating Call Screening
Operating the base answering machine Accepting a call from the Activating/deactivating answering machine call screening ¤ While recording a call: c / §Accept§ While recording a message, you can screen Recording stops and you can speak to the a call via the speaker on the base or on the caller. -
Page 46: Activating The Answering Machine
Operating the base answering machine Calling the answering machine and Activating the answering machine ¤ playing messages Phone home and let the phone ring until you hear: "Please enter PIN" (approx. Dial your own number. 50 seconds). ¤ Enter the system PIN. When you hear your announce- ment, press 9 and enter the Your answering machine is activated. -
Page 47: Registering Bluetooth Devices
Registering Bluetooth devices Registering Bluetooth Generally you can enter a PIN of your choice for a data device/GSM mobile telephone. devices You must also enter this PIN in the data device/mobile phone (handshake). Via Bluetooth™ your base can communicate For a headset, you only need to enter a PIN if with other Bluetooth devices wirelessly the headset transmits a PIN not equal to (range approx. -
Page 48: Using Gsm Mobile Phones - Link2Mobile
Setting up the base Using GSM mobile phones – Making calls via the GSM connection If the prerequisites are fulfilled, you can Link2mobile™ make calls on your base via the GSM connec- tion as described in the "Making calls" chap- You can make a call on your base and/or a ter on page 35. -
Page 49: Setting The Display
Setting up the base ¤ Setting the display You can enter data in the following fields: Time Control Prerequisite: The date and time have Setting the screensaver/slide show already been set. Select On or Off. You can display a screensaver when the base is in idle status. -
Page 50: Setting Ringers
Setting up the base Setting ringers Setting time control for external calls You can specify a time period when you do Setting the volume not want the base to signal external calls You can choose between five volumes and e.g., during the night. the "crescendo"... -
Page 51: Activating/Deactivating Advisory Tones
Setting up the base Activating/deactivating Setting your own area code advisory tones You should save your own country and area code in the base, particularly if you want to In idle status: ¢ Ï Settings ¢ make calls with the base via the GSM con- Audio Settings ¢... -
Page 52: Customer Service & Assistance
Customer Service & Assistance Customer Service & Assistance You have questions? As a Gigaset customer, you can take advantage of our comprehensive serv- ice offerings. You can find help quickly in the comprehensive User Manual on the supplied product CD and in the service pages of our Gigaset online portal. Please register your phone right after purchase on www.gigaset.com/gr/service thus enabling us to provide you even with better service in case of questions or in case of a war- ranty claim. -
Page 53: Questions And Answers
Customer Service & Assistance Questions and answers Authorisation If you have any questions about the use of DL500A:This device is intended for ana- your base, visit our website at logue phone lines in the Greek telephone net. www.gigaset.com/service DX600A:This device is intended for ISDN for assistance 24/7. -
Page 54: Menu Overview Gigaset Dx800A All In One
Menu overview Gigaset DX800A all in one Menu overview Gigaset DX800A all in one Please note Your base menu displays, different functions depending on the connection type (Internet and analogue fixed line or Internet and ISDN). Functions that are only displayed if the telephone is connected with the analogue fixed line additionally say "only for fixed line connection". - Page 55 Menu overview Gigaset DX800A all in one ¢ ò Bluetooth page 46 Activation Search for Headset Search for Mobile Search for Data Device Known Devices Own Device É Additional Features Info Centre Resource Directory Screensavers Caller Pictures Sounds Capacity ¢ Ê...
- Page 56 Menu overview Gigaset DX800A all in one ¢ Ì Answering Machine page 42 Play Messages Net AM: Fixed Line Only for fixed line connection Net AM: ISDN Only for ISDN connection Net AM: IP1 Net AM: IP2 Net AM: IP6 Answer Machine 1 Answer Machine 2 Answer Machine 3...
- Page 57 Menu overview Gigaset DX800A all in one Set Key 1 Net AM: Fixed Line Only for fixed line connection Net AM: ISDN Only for ISDN connection Net AM: IP1 Net AM: IP2 Net AM: IP6 Answer Machine Í Organizer Calendar Alarm Clock Missed Alarms Î...
- Page 58 Menu overview Gigaset DX800A all in one Registration Register Handset De-register Handset ¢ Telephony Area Codes page 50 Send Connections INT 1 ... INT 8 Receive Connections INT 1 ... INT 8 Answer Machine 1 ... Answer Machine 3 Dialling Mode Auto.
-
Page 59: Menu Overview Gigaset Dx600A Isdn
Menu overview Gigaset DX600A ISDN Menu overview Gigaset DX600A ISDN To open the main menu: press v when the base is in idle mode. Ç Select Services Next Call Withhold Number Keypad Control Call Divert Internal MSN1 MSN2 MSN10 Call Waiting Withhold # All Calls Busy on Busy Transfer (ECT) - Page 60 Menu overview Gigaset DX600A ISDN ¢ Ê Call Lists page 37 All Calls Outgoing Calls Accepted Calls Missed Calls Ë Messaging ¢ New SMS page 41 Incoming Draft Settings Service Centres Notification E-mail ¢ Ì Answering Machine page 42 Play Messages Network Mailbox Answer Machine 1 Answer Machine 2...
- Page 61 Menu overview Gigaset DX600A ISDN Í Organizer Calendar Alarm Clock Missed Alarms Î Contacts ¢ Directory page 38 ¢ Network Directory Online Directory The accessible online directo- page 39 ries are displayed, with pro- Yellow Pages vider-specific names Prv.NetDir Ï Settings ISDN Wizard Date/Time...
- Page 62 Menu overview Gigaset DX600A ISDN ¢ Telephony Area Codes page 50 Send Connections INT 1 ... INT 8 Receive Connections INT 1 ... INT 8 Answer Machine 1 ... Answer Machine 3 Dialling Mode Auto. Tone Dial Auto. Keypad Dial of * and # Access Code System Reset...
-
Page 63: Menu Overview Gigaset Dl500A
Menu overview Gigaset DL500A Menu overview Gigaset DL500A To open the main menu: press v when the base is in idle mode. Ç Select Services Call Divert Fixed Line Call Waiting Withhold # All Calls Network Mailbox Fixed Destination Call ¢... - Page 64 Menu overview Gigaset DL500A ¢ Ì Answering Machine page 42 Play Messages Network Mailbox Answering Machine Activation ¢ Announcements Record Announcemnt. page 42 Play Announcement Delete Announcemnt. Record Advisory Msg. Play Advisory Message Delete Advisory Msg. ¢ Recordings page 44 ¢...
- Page 65 Please note This quick user guide only describes a small proportion of your base's functions. A detailed description of all functions in the menu tree can be found in the long user guide for your Gigaset DL500A on the enclosed CD.
-
Page 66: Index
Index Index Call lists ........Call screening during recording Calling . - Page 67 Index Manual redial ..........Medical equipment .
- Page 68 Index ......Scope of delivery Warning tone, see Advisory tones ......
-
Page 69: Insert Strip - Labelling Function Keys
Insert strip – labelling function keys Insert strip – labelling function keys On the telephone: Indented area on the housing including function keys Tabs Function keys ¤ Remove the protective film from the Tabs indented area next to the function ¤...