Table of Contents
Advertisement
Advertisement
Table of Contents

Related Manuals for Toshiba D-VR18DTKB


Summary of Contents for Toshiba D-VR18DTKB
- Page 1 E9NG1BD_EN.book Page 1 Monday, April 7, 2008 5:54 PM DVD VIDEO RECORDER / VIDEO CASSETTE RECORDER D-VR18DTKB OWNER’S MANUAL DVD -RW/R +RW/R RECORDING DVD/VIDEO CASSETTE RECORDER D-VR18DT ON/STANDBY DUBBING PROGRAM VCR/DVD © 2008 Toshiba Corporation...
-
Page 2: Introduction
E9NG1BD_EN.book Page 2 Monday, April 7, 2008 5:54 PM Introduction Precautions WARNING : TO REDUCE THE RISK OF FIRE OR ELECTRIC SHOCK, DO NOT EXPOSE THIS APPLIANCE TO RAIN OR MOISTURE. The lightning flash with CAUTION arrowhead symbol, within an equilateral triangle, is intended to RISK OF ELECTRIC SHOCK alert the user to the presence of... -
Page 3: Connection To Power
E9NG1BD_EN.book Page 3 Monday, April 7, 2008 5:54 PM The wire which is coloured brown must be connected A NOTE ABOUT RECYCLING to the terminal which is marked with the letter L or This product’s packaging materials are recyclable coloured red. and can be reused. - Page 4 E9NG1BD_EN.book Page 4 Monday, April 7, 2008 5:54 PM Notice for the Progressive Scan Outputs Consumers should note that not all high definition television sets are fully compatible with this product and may cause artifacts to be displayed in the picture. In case of picture problems with 480 or 576 progressive scan output, it is recommended that the user switch the connection to the ‘standard definition’...
-
Page 5: Accessories Supplied
TOSHIBA INFORMATION SYSTEMS (U.K.) LTD, DUBBING REC MODE SETUP TIMER SET TIMER PROG. 1.3x/0.8xPLAY Toshiba Court, Weybridge Business Park, Addlestone SE-R0307 Road, Weybridge,Surrey, KT15 2UL, United Kingdom • RF cable Maintenance CLEANING THE UNIT Use a soft cloth slightly moistened with a mild detergent solution. -
Page 6: Table Of Contents
E9NG1BD_EN.book Page 6 Monday, April 7, 2008 5:54 PM Table of Contents Introduction ..........2 Editing ...........69 Precautions ............2 Guide to a Title List..........69 Features ..............7 Editing Discs............69 Guide to the Owner’s Manual........ 8 Functional Overview..........11 Function Setup ........76 Installing Batteries in the Remote Control... -
Page 7: Features
E9NG1BD_EN.book Page 7 Monday, April 7, 2008 5:54 PM Playback Features Theatre surround sound: The following features are available with this unit. When the unit is connected to an amplifier or a decoder compatible with Dolby Digital or DTS, you Recording can enjoy theatre-quality surround sound from discs The unit is compatible with DVD-RW, DVD+RW discs,... -
Page 8: Guide To The Owner's Manual
E9NG1BD_EN.book Page 8 Monday, April 7, 2008 5:54 PM Protecting titles (VR mode DVD-RW disc only): Page 73] Guide to the Owner’s Manual To avoid accidental editing or erasing of titles, the protect function is useful when set to “ON” in the Original list. - Page 9 Because of problems and errors that can occur during the creation of DVD and CD software and/or the manufacture of DVD and CD discs, Toshiba cannot guarantee that product will play every feature of every DVD bearing the DVD logo and/or every CD bearing the CD logo. As one of the creators of DVD technology, Toshiba DVD players are manufactured using the highest standards of quality, and as a result, such incompatibilities are rare.
- Page 10 Performance of any other discs are not guaranteed. • DVD contains MP3, Windows Media™ Audio or JPEG files • Toshiba is not liable for any damage or loss • DVD-RW/-R recorded in non compatible recording caused directly or indirectly by the malfunction of...
-
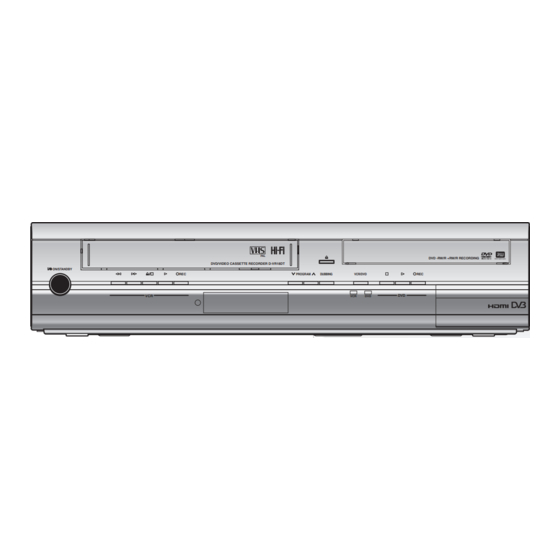
Page 11: Functional Overview
E9NG1BD_EN.book Page 11 Monday, April 7, 2008 5:54 PM Functional Overview Front Panel DVD -RW/R +RW/R RECORDING DVD/VIDEO CASSETTE RECORDER D-VR18DT ON/STANDBY PROGRAM DUBBING VCR/DVD VIDEO 17 16 1312 You can also turn on the unit by pressing these buttons. ON / STANDBY button 13 DUBBING button (DVD / VCR) •... -
Page 12: Rear Panel
E9NG1BD_EN.book Page 12 Monday, April 7, 2008 5:54 PM Rear Panel HDMI OUT DIGITAL COMPONENT AUDIO OUT VIDEO OUT DVD/VCR AV2(DECODER) ANTENNA COAXIAL AUDIO AV1(TV) 1 Mains cable 6 AV2 (DECODER) socket (DVD / VCR) • Connect to a standard AC outlet. •... -
Page 13: Remote Control
E9NG1BD_EN.book Page 13 Monday, April 7, 2008 5:54 PM Remote Control 6 AUDIO button (DVD / VCR) • When receiving a bilingual broadcast, press to change the audio out setting to “Main”, “Sub” OPEN/ INPUT CLOSE SELECT HDMI and “Main/Sub”. •... - Page 14 E9NG1BD_EN.book Page 14 Monday, April 7, 2008 5:54 PM 17 TIMER SET button (DVD / VCR) 29 RED/GREEN/YELLOW/BLUE button • Press to set the unit in timer-standby mode. In • Press to follow the DVB instruction displayed the timer-standby mode, press to cancel the on-screen.
-
Page 15: Installing Batteries In The Remote Control
E9NG1BD_EN.book Page 15 Monday, April 7, 2008 5:54 PM Installing Batteries in the Switching DVD / VCR mode Remote Control Because this product is a combination of DVD recorder and VCR recorder, you must select which Install two R6 (AA) batteries (supplied) into the component you want to operate first. -
Page 16: Guide To On-Screen Displays
E9NG1BD_EN.book Page 16 Monday, April 7, 2008 5:54 PM Title name information Guide to On-Screen Displays Title Name My Title DISPLAY Menu (only when DVD+RW/+R, VR mode DVD-RW/-R or unfinalised Video mode DVD-RW/-R disc is in playback) Press [DVD] first. <MP3 Tag Information>... -
Page 17: Tape Counter
E9NG1BD_EN.book Page 17 Monday, April 7, 2008 5:54 PM 4 Audio status of the currently playing General Setting back video tape 5 Tape counter General Setting 6 Recording or playing back speed Playback 7 Status of the current tape Parental Lock Display Audio Out Video... -
Page 18: Disc Only
E9NG1BD_EN.book Page 18 Monday, April 7, 2008 5:54 PM DVD Menu / CD Playback Mode <DVD Menu menu> DVD Menu Format Finalise Disc Protect OFF Delete All Playlists <CD Playback Mode menu> CD Playback Mode Random Play Programme Play PBC (Video CD only) Slide Show 1 Format (DVD-RW, DVD+RW only): Allows you to format the disc. -
Page 19: Front Panel Display Guide
E9NG1BD_EN.book Page 19 Monday, April 7, 2008 5:54 PM Front Panel Display Guide 1 Title / Track and Chapter number : Appears when a tape is in the unit. : Appears when a disc is in this unit. Title / track number Appears when dubbing. -
Page 20: Connections
E9NG1BD_EN.book Page 20 Monday, April 7, 2008 5:54 PM Connections To Aerial jack Antenna Cable Audio/Video cable (not supplied) Signal Scart/RCA cable (not supplied) Scart adaptor (not supplied) RF cable Scart cable (supplied) (not supplied) HDMI OUT DIGITAL COMPONENT AUDIO OUT VIDEO OUT DVD/VCR AV2(DECODER) - Page 21 E9NG1BD_EN.book Page 21 Monday, April 7, 2008 5:54 PM If the connected device is not compatible with HDMI AUDIO IN Component BITSTREAM, audio will be output as PCM even if you Video IN select “Stream” in “Dolby Digital” setting. (See page 79.) Audio Component Copyright protection system...
-
Page 22: Digital Audio For Better Sound Quality
E9NG1BD_EN.book Page 22 Monday, April 7, 2008 5:54 PM For clear digital sound quality, use Note the DIGITAL AUDIO OUT (COAXIAL) • When you record a TV programme from a Satellite jack to connect your digital audio Box, you must connect a Scart cable to equipment. -
Page 23: Basic Setup
E9NG1BD_EN.book Page 23 Monday, April 7, 2008 5:54 PM Basic Setup Initial Setting Channel Setting When you turn on this unit for the first time, you need You can retune this unit or edit the channel setting by to follow these steps. the following methods. - Page 24 E9NG1BD_EN.book Page 24 Monday, April 7, 2008 5:54 PM Select “ANALOG Channel Setup” Auto Tuning (ANALOG) using [U / D], then press ANALOG [ENTER / OK]. Programme the tuner to scan only the analogue Select “Manual Tuning” using channels you can receive in your area. [U / D], then press [ENTER / OK].
- Page 25 E9NG1BD_EN.book Page 25 Monday, April 7, 2008 5:54 PM Skip a Preset Channel Auto Tuning (DVB) ANALOG You can set the unit to skip channels. You can no You can programme the tuner to scan only the DVB longer receive or watch when you access channels channels that you can receive in your area.
- Page 26 E9NG1BD_EN.book Page 26 Monday, April 7, 2008 5:54 PM • You can also switch the mode by using Manual Tuning (DVB) [PROG. • You can select any DVB channels using [the Number buttons] when you are in analogue or external input (AV1/AV2/AV3/DV(AV4)) mode. You can preset a DVB channel manually and •...
- Page 27 E9NG1BD_EN.book Page 27 Monday, April 7, 2008 5:54 PM Edit Channels (DVB) Edit Group Lists With “Edit Channels” menu, you can see all the You can sort each DVB channel into 8 different memorised DVB channels and sort them into the favourite group lists (“Group1”...
- Page 28 E9NG1BD_EN.book Page 28 Monday, April 7, 2008 5:54 PM Adult Lock Channel Move You can set the unit to limit the access to the DVB You can change the order of the DVB channels when channels. you use [PROG. ] by swapping positions of two channels.
-
Page 29: Tv View Operation
E9NG1BD_EN.book Page 29 Monday, April 7, 2008 5:54 PM Signal Information TV View Operation The following operations are available while viewing You can check the detailed information of the current TV channels through this unit’s tuner. DVB channel. Follow steps in “Auto Tuning Selecting the TV Aspect Ratio (DVB)”... -
Page 30: Selecting The Audio Mode
E9NG1BD_EN.book Page 30 Monday, April 7, 2008 5:54 PM e.g.) Daily mode Selecting the Audio Mode Daily mode ANALOG 18/01/2008 (Friday) Date 18/01/2008 You can switch between TV audio modes by pressing Time 10:30:56 10:25-11:10 news [AUDIO ]. Each mode is indicated on the TV 12:00-13:00 show 1 ITV1 screen. -
Page 31: Dvb Menu Setting
E9NG1BD_EN.book Page 31 Monday, April 7, 2008 5:54 PM Select “Stereo”, “Right” or “Left” using [L / P]. DVB Menu Setting Select your desired audio language You can make settings of the digital tuner from the using [U / D]. DVB Menu. -
Page 32: Language Setting
E9NG1BD_EN.book Page 32 Monday, April 7, 2008 5:54 PM Language Setting About You can check the current DVB system software Follow steps in “Pincode version of this unit. Setting for Adult Lock” on page 31. Follow steps in “Pincode Select “Language” using [U / D], Setting for Adult Lock”... -
Page 33: Setting The Clock
E9NG1BD_EN.book Page 33 Tuesday, April 8, 2008 6:21 PM • The clock cannot be set automatically if you are not receiving a channel in your area that carries a time Setting the Clock signal. In this case, set the clock manually. •... -
Page 34: Recording
E9NG1BD_EN.book Page 34 Monday, April 7, 2008 5:54 PM Recording Restrictions on Recording Information on DVD Recording You cannot record copy-protected video using this unit. Copy-protected video includes DVD-Videos and Type of Discs some satellite broadcasts. If copy-protected material is detected, recording will This unit can record on DVD-RW/-R discs and pause or stop automatically and an error message DVD+RW/+R discs. -
Page 35: Formatting A Disc
E9NG1BD_EN.book Page 35 Monday, April 7, 2008 5:54 PM • Since recording is performed using the Variable Bit Rate (VBR) method, the actual remaining time for Formatting a Disc recording may be a little shorter than the remaining time displayed on the OSD, depending on the picture you are recording. -
Page 36: Make Recording Compatible
E9NG1BD_EN.book Page 36 Monday, April 7, 2008 5:54 PM Select your desired setting using Make Recording Compatible [U / D], then press [ENTER / OK]. Aspect Ratio (Video mode) DVD+RW DVD+RW D D VD+R DVD+R VD+R Auto Use this feature to make the unfinalised +VR mode 4 : 3 discs recorded on other unit recordable on this unit. -
Page 37: Reformatting A Disc Manually
E9NG1BD_EN.book Page 37 Monday, April 7, 2008 5:54 PM Select “Yes” using [U / D], then If you want to set “Auto Chapter” off, select “OFF” using [U / D], then press [ENTER / OK]. press [ENTER / OK]. e.g.) VR mode DVD-RW disc Are you sure? Auto Chapter 5 minutes... -
Page 38: Selecting The Sound Mode
E9NG1BD_EN.book Page 38 Monday, April 7, 2008 5:54 PM Setting Bilingual Recording Audio Selecting the Sound Mode Video DVD-RW DVD-RW DVD-R DVD-R D D VD+R DVD+RW VD+RW W D D VD+R DVD+R VD+R This unit can receive bilingual broadcasts. You can select either “Main” or “Sub” audio to record a bilingual broadcast in Video mode or +VR mode. -
Page 39: Basic Recording
E9NG1BD_EN.book Page 39 Monday, April 7, 2008 5:54 PM Select “PCM” or “Dolby Digital” Press [REC ] to start recording. using [U / D], then press The “●” mark will be displayed on the TV screen briefly. [ENTER / OK]. To pause the recording, press [PAUSE p]. -
Page 40: One-Touch Timer Recording (Otr)
E9NG1BD_EN.book Page 40 Monday, April 7, 2008 5:54 PM Note One-touch Timer Recording • You cannot use the pause function during One- touch Timer Recording. (OTR) • The unit will be turned off automatically under the following conditions. - No space remains on the disc. Video DVD-RW DVD-RW... -
Page 41: Timer Recording
E9NG1BD_EN.book Page 41 Monday, April 7, 2008 5:54 PM Enter the time to start and to end using [U / D], then press [P]. Timer Recording Select the channel number to record Video using [U / D], then press [P]. DVD-RW DVD-RW DVD-RW... - Page 42 E9NG1BD_EN.book Page 42 Monday, April 7, 2008 5:54 PM Note Checking, Cancelling or Correcting • If you have not set the clock, the clock setting the Timer Programming Information window will appear instead of the Timer Programming list. Continue from the step 4 in Press [TIMER SET] so that the “Manual Clock Setting”...
- Page 43 E9NG1BD_EN.book Page 43 Monday, April 7, 2008 5:54 PM • When all timer recordings are complete, the If the Timer Programming did not icon flashes. To play back or eject the recorded disc, press [TIMER SET], and then press [PLAY P] or Complete Correctly [OPEN / CLOSE O].
-
Page 44: Timer Recording (Epg)
E9NG1BD_EN.book Page 44 Monday, April 7, 2008 5:54 PM If the recording time entirely overlaps: • The shorter timer programming (PROG. 1) is not Timer Recording (EPG) recorded. PROG. 1 Video DVD-RW DVD-RW DVD-RW DVD-RW DVD-R DVD-R D D VD+R DVD+RW VD+RW W PROG. -
Page 45: Series Link Timer Recording
E9NG1BD_EN.book Page 45 Monday, April 7, 2008 5:54 PM Note Series Link Timer Recording • If you delete or correct one of the series link timer recording programmes, all related programmes will be deleted or corrected. Video DVD-RW DVD-RW DVD-RW DVD-RW DVD-R DVD-R... -
Page 46: Satellite Link
E9NG1BD_EN.book Page 46 Monday, April 7, 2008 5:54 PM Press [ENTER / OK]. Satellite Link “To Standby Mode” is highlighted. You can set the unit to start recording whenever it Satellite Link detects the video scart control from the external tuner. Preparing for the Satellite Link Timer Recording: Start Mode... -
Page 47: Settings For External Equipment
E9NG1BD_EN.book Page 47 Monday, April 7, 2008 5:54 PM Example 3 Settings for External Equipment Timer Recording Video Colour System Satellite Link When you record from external equipment or copy a Actual videotape to a DVD disc, you can set the format Auto, Recording PAL or SECAM. -
Page 48: Information On Dv Dubbing
E9NG1BD_EN.book Page 48 Monday, April 7, 2008 5:54 PM When you want to record to the disc: Press [DVD]. Information on DV Dubbing Press [OPEN / CLOSE O] to open the This function helps you to copy the contents in the disc tray, then place the disc to DVC (digital video camcorder) to DVD or VCR easily. -
Page 49: Dvc To Dvd Dubbing
E9NG1BD_EN.book Page 49 Monday, April 7, 2008 5:54 PM The following instructions are described with DVC to DVD Dubbing the operations using the remote control of this unit. Video 1 DV icon DVD-RW DVD-RW DVD-RW DVD-RW DVD-R DVD-R DVD-R DVD-R D D VD+R DVD+RW VD+RW W... -
Page 50: Dubbing Mode
E9NG1BD_EN.book Page 50 Monday, April 7, 2008 5:54 PM To stop dubbing; Dubbing Mode 1 Select “Control” using , then press [ENTER / OK]. 2 Select “DVD” using , then press Video DVD-RW DVD-RW DVD-RW DVD-RW DVD-R DVD-R DVD-R DVD-R D D VD+R DVD+RW VD+RW W... - Page 51 E9NG1BD_EN.book Page 51 Monday, April 7, 2008 5:54 PM Press [DUBBING]. Press [VCR]. VCR to DVD duplication will start. Make sure to select a recording mode using [REC MODE]. (See page 85.) Press [STOP S] to stop the Rewind or fast forward the tape to the point where recording.
-
Page 52: Setting A Disc To Protect
E9NG1BD_EN.book Page 52 Monday, April 7, 2008 5:54 PM Setting a Disc to Protect Finalising Discs Video DVD-RW DVD-RW DVD+RW DVD+RW D D VD+R DVD+R VD+R D D VD-R DVD-RW VD-RW W DVD-RW DVD-RW DVD-R DVD-R D D VD+R DVD+RW VD+RW W To prevent accidental over-recording, editing or erasing of recordings, you can protect them using... - Page 53 E9NG1BD_EN.book Page 53 Monday, April 7, 2008 5:54 PM Hint • Finalising a disc in Video mode and +VR mode automatically creates a Title menu. • After you finalise the DVD+RW disc, you can call up the title list by pressing [TOP MENU], or you can call up the Title menu by pressing [DISC MENU].
-
Page 54: Playback
E9NG1BD_EN.book Page 54 Monday, April 7, 2008 5:54 PM Playback Select the desired title using [U / D / L / P], then press Basic Playback [ENTER / OK]. Pop up window will appear. Hint for DVD Playback Select “Play From Start” using The contents of a DVD are generally divided into [U / D], then press [ENTER / OK]. -
Page 55: Playing Back A Divx
E9NG1BD_EN.book Page 55 Monday, April 7, 2008 5:54 PM It is recommended that files to be played back in Playing Back an Audio CD, MP3 or this unit are recorded under the following specifications: JPEG [MP3] • Sampling frequency : 44.1 kHz or 48 kHz JPEG JPEG JPEG... - Page 56 E9NG1BD_EN.book Page 56 Monday, April 7, 2008 5:54 PM DivX Subtitle DivX ® ® The subtitle created by the user can be displayed during DivX playback. ® DivX DivX ® ® This unit allows you to play back the files purchased After the DivX file is selected, the ®...
- Page 57 E9NG1BD_EN.book Page 57 Monday, April 7, 2008 5:54 PM Hint for the purchased or rental official DivX • If the track extends beyond the scope of screen, a ® down arrow “ ” appears, indicating that the user Certified product can view another part on the previous page.
- Page 58 E9NG1BD_EN.book Page 58 Monday, April 7, 2008 5:54 PM Playing Back Discs Using the Disc Playing Back a Disc Using the Title Menu Menu Video DVD-V DVD-V DVD-V DVD-V DVD-RW DVD-RW DVD-R DVD-R D D VD+R DVD+RW VD+RW W A DVD contains a disc menu, which lists the contents and enables you to customise playback.
-
Page 59: Pbc Function For Video Cds
E9NG1BD_EN.book Page 59 Monday, April 7, 2008 5:54 PM Cancelling and Recalling the PBC PBC Function for Video CDs Function This unit conforms to ver.1.1 and ver.2.0 of the Video (PBC OFF) CD standard playback control (PBC) function. This Insert a Video CD. enables you to play back interactive software using menu screens. -
Page 60: Special Playback
E9NG1BD_EN.book Page 60 Monday, April 7, 2008 5:54 PM • Picture quality of DivX files in fast reverse is ® lower than that in fast forward. Special Playback • For some DivX files, Fast forward/Fast reverse ® may not function. Resume Playback Hint •... -
Page 61: Normal Playback
E9NG1BD_EN.book Page 61 Monday, April 7, 2008 5:54 PM During playback, press Slow Forward / Slow Reverse [1.3x/0.8x PLAY]. Playback Px0.8 : Press [1.3x/0.8x PLAY] once during playback. Plays back approximately at 0.8 times of Video DVD-V DVD-V DVD-RW DVD-RW DVD-RW DVD-RW DVD-R... -
Page 62: Chasing Playback During Recording
E9NG1BD_EN.book Page 62 Monday, April 7, 2008 5:54 PM Select the desired zoom position Note using [U / D / L / P], then press • All markers are erased when you perform the [ENTER / OK]. following operations. - Opening the disc tray. Zoom playback will start. - Page 63 E9NG1BD_EN.book Page 63 Monday, April 7, 2008 5:54 PM Using the [TIME SLIP] button Chapter: To move to for chapter, press [ With [TIME SLIP], if you leave your couch while you Enter a desired chapter number to search are watching TV through this unit, you can come back / D] or [the Number buttons], then using [ and watch rest of the programme from right where...
-
Page 64: Search
E9NG1BD_EN.book Page 64 Monday, April 7, 2008 5:54 PM Track Search Search JPEG JPEG JPEG DivX DivX DivX ® ® (PBC OFF) Title / Chapter Search Using [SKIP B / F] buttons Video DVD-V DVD-V DVD-RW DVD-RW DVD-RW DVD-RW DVD-R DVD-R During playback, press [SKIP F] to skip the current track and move to... -
Page 65: Repeat / Random / Programme Playback / Slide Show
E9NG1BD_EN.book Page 65 Monday, April 7, 2008 5:54 PM Time Search Repeat / Random / Programme Video Playback / Slide Show DVD-V DVD-V DVD-RW DVD-RW DVD-RW DVD-RW DVD-R DVD-R D D VD+R DVD+RW VD+RW W D D VD+R DVD+R VD+R DivX DivX ®... -
Page 66: Random Playback
E9NG1BD_EN.book Page 66 Monday, April 7, 2008 5:54 PM • Chapter/Track repeat will be cancelled whenever a Select the desired track using Chapter/Track is skipped forward or backward. [U / D], then press [ENTER / OK] or • For some DivX files, A-B Repeat playback may not ®... -
Page 67: Selecting The Format Of Audio And Video
E9NG1BD_EN.book Page 67 Monday, April 7, 2008 5:54 PM icon using [L / P], then Select the press [ENTER / OK] within 1 second, Selecting the Format of Audio or wait for 1 second to display the and Video selection menu. You can select the format of audio and video to suit Select a desired audio soundtrack or the content of the disc you are playing back. -
Page 68: Switching Camera Angles
E9NG1BD_EN.book Page 68 Monday, April 7, 2008 5:54 PM Select “OFF”, “Type 1” or “Type 2” This function reduces noise in the playback picture. When playing back discs recorded in long time modes using [U / D], then press such as EP or SLP, select “Type 1” or “Type 2”. [ENTER / OK]. -
Page 69: Editing
E9NG1BD_EN.book Page 69 Monday, April 7, 2008 5:54 PM Editing 10 Preview window: Preview of the selected title is displayed here. Guide to a Title List 11 Playback status: Indicating the current playback status of the selected title. Title list allows you to check the titles recorded on the Press [RETURN / BACK] to exit the title list. -
Page 70: Deleting Titles
E9NG1BD_EN.book Page 70 Monday, April 7, 2008 5:54 PM Deleting Titles Note • If you delete the title in DVD+RW disc, deleted title will be displayed as “Empty”. Video DVD-RW DVD-RW DVD-RW DVD-RW DVD-R DVD-R D D VD+R DVD+RW VD+RW W •... - Page 71 E9NG1BD_EN.book Page 71 Monday, April 7, 2008 5:54 PM Select “Yes” using [U / D], then Use [SKIP B / F], [REV r], [FWD f], [PLAY P] and [PAUSE p] press [ENTER / OK]. to find where you create a new The name you edited becomes the title.
-
Page 72: Hiding Chapters
E9NG1BD_EN.book Page 72 Monday, April 7, 2008 5:54 PM Adding or Deleting Chapter Markers Hiding Chapters for Video Mode DVD-RW Disc DVD+RW DVD+RW D D VD+R DVD+R VD+R Video You can hide chapters from the title list. DVD-RW DVD-RW Hidden chapters are skipped during playback. For titles in Video mode DVD-RW disc, you set or edit chapter at every selected time interval. -
Page 73: Protecting Titles
E9NG1BD_EN.book Page 73 Monday, April 7, 2008 5:54 PM Use [SKIP B / F], [REV r], Protecting Titles [FWD f], [PLAY P] and [PAUSE p] to find where you want to divide the DVD-RW DVD-RW DVD-RW title. Original Select “Title Dividing” using [U / D], To prevent the accidental editing or erasing of the titles, you can protect them in the Original menu. -
Page 74: Adding Titles To A Playlist
E9NG1BD_EN.book Page 74 Monday, April 7, 2008 5:54 PM Press [RETURN / BACK] or [STOP S] Deleting All Playlists to exit. Writing on the disc starts. DVD-RW DVD-RW It may take awhile to write the data on a disc. All Playlists can be deleted if they are no longer Note needed. - Page 75 E9NG1BD_EN.book Page 75 Monday, April 7, 2008 5:54 PM Select “Delete” using [U / D], then Deleting Parts of Titles press [ENTER / OK]. DVD-RW DVD-RW Edit - Scene Delete You can delete a specific part of a title. Even when a title is deleted from the Playlist, the Start original title will remain as it is.
-
Page 76: Function Setup
E9NG1BD_EN.book Page 76 Monday, April 7, 2008 5:54 PM Function Setup The following table is the contents which you can set and the default settings. Refer to the following table for useful operation. Setup Items (highlight is the default) Contents Playback Parental Lock Set the parental level for DVD disc playback. - Page 77 E9NG1BD_EN.book Page 77 Monday, April 7, 2008 5:54 PM Setup Items (highlight is the default) Contents Recording Auto Chapter Insert chapter marks periodically. pages 36-37 5 minutes 10 minutes 15 minutes 30 minutes 60 minutes Recording Audio Select (XP) Set the recording audio type. (Only when the pages 38-39 Dolby Digital recording mode is set to “XP”.)
-
Page 78: Playback
E9NG1BD_EN.book Page 78 Monday, April 7, 2008 5:54 PM Note Playback • “Parental Lock” function may not be available on some discs. • It may be difficult to determine if some DVDs In stop mode, press [SETUP]. Select support “Parental Lock” function. Be sure to confirm “General Setting”... - Page 79 E9NG1BD_EN.book Page 79 Monday, April 7, 2008 5:54 PM Dynamic Range Control (Default: ON) (DVD only) Settings for MPEG (Default: PCM) (DVD only) Select a setting using [U / D], then Set to “ON” to make the dynamic range narrower. press [ENTER / OK].
- Page 80 E9NG1BD_EN.book Page 80 Monday, April 7, 2008 5:54 PM 5. Subtitle Language (Default: OFF) Auto: Automatically select the best resolution setting (“Frame” or “Field”) based on the (DVD only) data characteristics of the pictures. Set “Subtitle language”. Field: Select “Field” when the pictures are still unstable even if “Auto”...
-
Page 81: Display
E9NG1BD_EN.book Page 81 Monday, April 7, 2008 5:54 PM Display Video In stop mode, press [SETUP]. Select In stop mode, press [SETUP]. Select “General Setting” using [U / D], “General Setting” using [U / D], then press [ENTER / OK]. then press [ENTER / OK]. -
Page 82: Divx
E9NG1BD_EN.book Page 82 Monday, April 7, 2008 5:54 PM Select the desired setting using [U / D], then press [ENTER / OK]. DivX ® Video Out SCART (RGB) In stop mode, press [SETUP]. Select Component (Progressive) Component (Interlace) “General Setting” using [U / D], •... -
Page 83: Hdmi
E9NG1BD_EN.book Page 83 Monday, April 7, 2008 5:54 PM 2. HDMI Audio (Default: ON) If you do not want to output the audio through HDMI HDMI (when you digitally output the audio through the DIGITAL AUDIO OUT (COAXIAL) jack to your audio In stop mode, press [SETUP]. -
Page 84: Reset All
E9NG1BD_EN.book Page 84 Monday, April 7, 2008 5:54 PM Reset All In stop mode, press [SETUP]. Select “General Setting” using [U / D], then press [ENTER / OK]. Select “Reset All” using [U / D], then press [ENTER / OK]. General Setting Playback Display... -
Page 85: Vcr Functions
E9NG1BD_EN.book Page 85 Monday, April 7, 2008 5:54 PM VCR Functions Playback Recording and One-touch Timer Recording (OTR) Press [ ON / STANDBY] to turn on Basic Recording the unit. To play back a tape, turn on the TV and be sure to select the input to which the unit is connected. -
Page 86: Dvc To Vcr Dubbing
E9NG1BD_EN.book Page 86 Monday, April 7, 2008 5:54 PM Accidental erasure prevention DVC to VCR Dubbing To prevent accidental recording on a recorded cassette, remove its record tab. To record on it later, cover the hole with cellophane tape. This function helps you to copy the contents in the DVC (digital video camcorder) to VCR. -
Page 87: Search
E9NG1BD_EN.book Page 87 Monday, April 7, 2008 5:54 PM Search Other Operations Index Search Press [VCR] first. To cue or review picture during playback (Picture Search): Press [VCR]. Press [FWD f] or [REV r] during playback. Press it again and the unit will search in super high Press [SEARCH] so that the index speed (in the LP mode only). -
Page 88: Hi-Fi Stereo Sound System
E9NG1BD_EN.book Page 88 Monday, April 7, 2008 5:54 PM Hi-Fi Stereo Sound System This unit will record and playback Hi-Fi stereo sound. In addition, it has a NICAM stereo sound decoder. This unit will receive stereo and bilingual broadcasts and it is possible to record in several ways and to play back the sound. -
Page 89: Others
E9NG1BD_EN.book Page 89 Monday, April 7, 2008 5:54 PM Others Troubleshooting Before requesting service for this unit, check the table below for a possible cause of the problem you are experiencing. Some simple checks or a minor adjustment on your part may eliminate the problem and restore proper operation. - Page 90 E9NG1BD_EN.book Page 90 Monday, April 7, 2008 5:54 PM Symptom Remedy TV channels cannot be changed. • Check if the connections are made securely and correctly. • Check if the cables are damaged. • Try channel setting by following the steps on pages 23 to 29. Only specific channels do not appear.
- Page 91 E9NG1BD_EN.book Page 91 Monday, April 7, 2008 5:54 PM Symptom Remedy Playback does not start from the beginning. • Resume function may be activated. Refer to page 60 to cancel the resume point. Playback cannot be performed. • Check if the playable disc is inserted. •...
- Page 92 E9NG1BD_EN.book Page 92 Monday, April 7, 2008 5:54 PM Error message Cause Solution Disc Error • An unplayable disc is inserted in the unit. • Insert a standard disc. (See pages 9 to — Please eject the disc. — • The disc is upside down. 10.) Playback feature may not be •...
-
Page 93: Language Code
E9NG1BD_EN.book Page 93 Monday, April 7, 2008 5:54 PM Language Code Language Code Language Code Language Code Language Code Abkhazian 4748 French 5264 Lithuanian 5866 Sindhi 6550 Afar 4747 Frisian 5271 Macedonian 5957 Singhalese 6555 Afrikaans 4752 Galician 5358 Malagasy 5953 Siswat 6565... -
Page 94: Glossary
E9NG1BD_EN.book Page 94 Monday, April 7, 2008 5:54 PM Glossary Analogue audio Finalise Region code An electrical signal that directly To make DVDs that have been Regions associate discs and represents sound. In contrast, recorded playable in DVD players. It players with particular areas of the digital audio can also be an is possible to finalise DVD-RW/-R... -
Page 95: Specifications
E9NG1BD_EN.book Page 95 Monday, April 7, 2008 5:54 PM Specifications General VCR video heads Four heads Power requirements 220–240 V ± 10%, 50 Hz ± 0.5% Power consumption 35 W Power consumption (standby) 5.0 W (When “FL Dimmer” is set to “OFF”: 3.3 W) Weight 4.9 kg Dimensions (width x height x depth) - Page 96 E9NG1BD_EN.book Page 96 Monday, April 7, 2008 5:54 PM Printed in China 1VMN25253 / E9NG1BD ★★★★★...