Table of Contents
Advertisement
Quick Links
Advertisement
Table of Contents

Related Manuals for Transcend TS8GMP330W


Summary of Contents for Transcend TS8GMP330W
- Page 1 User’s Manual Digital Music Player TS8GMP330W/P/K...
-
Page 2: Table Of Contents
Table of Contents Introduction︱ ︱ ︱ ︱ ..................5 Package Contents︱ ︱ ︱ ︱ ................5 Features︱ ︱ ︱ ︱ ....................7 System Requirements︱ ︱ ︱ ︱ ................ 7 Safety Precautions︱ ︱ ︱ ︱ ................8 General Use ........................8 Backing up Data .........................8 Caution: Risk of Deafness ....................8 Reminders ..........................9 Player Controls︱... - Page 3 Playlist Playback (*.m3u) ....................21 File Navigator ........................22 RADIO Mode︱ ︱ ︱ ︱ ..................23 Listening to the Radio ..................... 23 Selecting a Radio Station ....................23 Recalling a Saved Station ....................23 Recording the Radio ......................23 Channel List ........................24 Save Station ........................
- Page 4 Ordering Information︱ ︱ ︱ ︱ ................ 38 Recycling & Environmental Considerations︱ ︱ ︱ ︱ ........39 Transcend Limited Warranty︱ ︱ ︱ ︱ ............40...
-
Page 5: Introduction
The stylish MP330 from Transcend will change the way you think about digital music forever. Package Contents︱ ︱ ︱ ︱... - Page 6 Line-In Recording Cable Quick Start Guide...
-
Page 7: Features
Features︱ ︱ ︱ ︱ upports MP3, WMA and WAV music files Vivid all-white OLED screen displays clear text at any angle and in any light Recordable FM Radio with 20 station presets Built-in microphone and direct Line-In recording (for CD players, or other devices) Playlist Builder Karaoke-style synchronized lyrics display A-B repeat allows continuous replay of a designated section of a track... -
Page 8: Safety Precautions
To maintain battery health, be sure to complete at least one full discharge/charge cycle per month. • Backing up Data Transcend does NOT take any responsibility for data loss, or damage during operation. If you • decide to store data on your MP330 we strongly advise that you regularly backup the data to a computer, or other storage medium. -
Page 9: Reminders
Follow the procedures in the “Disconnecting from a Computer” section to properly remove your MP330 • from a computer. Transcend occasionally releases firmware updates for certain products. We suggest you visit • http://www.transcend-info.com and download the latest firmware version for your device. -
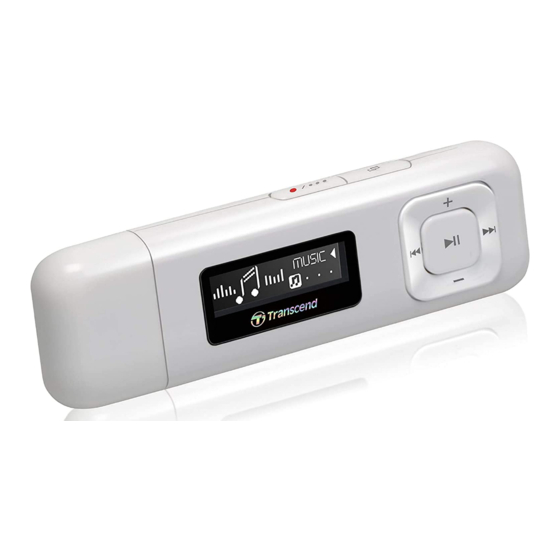
Page 10: Player Controls
Player Controls︱ High-speed USB 2.0 Connector White Monochrome OLED Display Options / Record Back / Main Menu Hold Switch Volume Up Play / Pause / Power Next / Fast-Forward Volume Down Previous / Rewind Reset Button Microphone Headphone Jack Lanyard Attachment Loop Line-In Port... -
Page 11: Music Playback Screen
Music Playback Screen︱ ︱ ︱ ︱ ICON INDICATION Record Source Built-in Microphone, FM Radio or Line-In Record Quality Indicates the Record Quality, Low Quality, Medium Quality, High Quality Normal, Random, Repeat One, Repeat All, Repeat Folder, Folder, Shuffle Repeat Mode in Folder and A-B Repeat EQ Mode Normal, Bass, Jazz, Soft, Classical, Pop, Rock, User EQ... -
Page 12: Basic Operation
This can permanently damage your digital music player. When charging the battery, Please plug the MP330 directly into your computer’s built-in USB port or use the Transcend USB Power Adapter (optional). Power ON Press and hold the button to turn on the player. -
Page 13: Play A Song
The power off animation will be displayed: • Play a Song Press the button to play a selected music or recording file. Pause a Song Press to pause and un-pause a song or recording during playback. Next Track Press to skip to the next available song. Previous Track Press to go back to the previous song. -
Page 14: Music Mode
MUSIC Mode︱ 1. Press and hold the button to power ON the unit. The Main Menu will appear. If the MP330 is already on, press the button to enter the Main Menu. 2. Use the buttons to select “MUSIC” and press 3. -
Page 15: Eq Mode
1. While playing a song in MUSIC mode, press the button to open the Options menu. 2. Use to select “Repeat” and press 3. Use the buttons to select a repeat mode and press to confirm. EQ Mode There are eight equalizer modes to choose from: Normal, Bass, Jazz,... -
Page 16: Srs Wow Mode
SRS WOW MODE There are four equalizer modes to choose from: SRS WOW, SRS 3D, Focus, TruBass 1. While playing a song in MUSIC mode, press the button to open the Options menu. SRS WOW MODE 2. Use the buttons to select “ ”... -
Page 17: Adding A Song To My Playlist
Adding a Song to My Playlist This function will add your favorite songs into My Playlist. While playing a song in MUSIC mode, press the button to open the Options menu. to select “Add to My Playlist” and press Lyrics Sync This feature displays the lyrics of a song (if available) simultaneously during music playback. -
Page 18: My Playlists
My Playlists For quick and easy playback of your favorite songs, the MP330 supports custom playlist builder. 1. In the MUSIC menu, use to select “My Playlists” and press 2. Use to select “My Playlist” and press 3. Use the buttons to move up and down the list of files. -
Page 19: Import Playlist (*.M3U)
Import Playlist (*.m3u) For quick and easy playback of your favorite songs, the MP330 supports M3U playlist import. The MP330 can store up to 10 m3u playlists, with naming convention LIST0.m3u, LIST1.m3u, LIST2.m3u… LIST9.m3u. 1. Insert the MP330 into an available USB port on your computer. 2. - Page 20 3. When your playlist is complete, click the “Unsaved list” button at the top of the List pane and click “Save list as” to open the “Save As” dialog box. (Wording for this action may vary depending on your version of Windows Media Player)
-
Page 21: Playlist Playback (*.M3U)
4. The playlist must be saved to the top layer of the MP330 drive. Type the name of the playlist using the naming convention LIST0.m3u, LIST1.m3u, LIST2.m3u… LIST9.m3u, and save using the m3u file format. 5. Safely remove the MP330 from the computer using the steps found in the section Disconnecting from a Computer. -
Page 22: File Navigator
2. Use to select “List” and press 3. Use to select the LIST you want to play and press 4. Use the buttons to move up and down the list of files, highlight the file you want to play from the playlist and press File Navigator The File Navigator is a fast and convenient way of moving between tracks, files and folders. -
Page 23: Radio Mode
RADIO Mode︱ ︱ ︱ ︱ Listening to the Radio 1. Plug in the earphones . (Earphones must be plugged-in to listen to the Radio) 2. Press the button to enter the Main Menu. 3. Use the buttons to select “RADIO” and press 4. -
Page 24: Channel List
Ex: “20101F12.WAV “ would be the twelfth FM recording made on January 1 , 2012. FM recording are saved in the /RECORD/FM folder. Use the File Navigator in MUSIC mode to locate and play back recordings To adjust the FM recording sample rate, please see “Settings / Record Quality” Channel List This function will display all saved Radio stations ( CH 01 to CH 20). -
Page 25: Fm Band
2. Use to select “Auto Search” and press FM Band The MP330 allows you choose World FM Band (87.5MHz~108.0MHz) or Japan FM Band (76.0MHz~90.0MHz). 1. In RADIO mode, press to open the Options menu. 2. Use to select “FM Band“ and press 3. -
Page 26: Record Mode
RECORD Mode︱ ︱ ︱ ︱ There are two ways to use the player’s record functions: Press the button to open the Main Menu and select RECORD. Press and hold the button for 2 seconds in any mode. Hold The MP330 supports three different types of recording: Voice Recording Line-in Recording FM Radio Recording... -
Page 27: Line-In Recording
Line-in Recording 1. Press and hold the button for 2 seconds in any mode (except Radio) or select RECORD from the Main Menu to activate the MP330’s Line-In recording. 2. An automatically generated file name for your recording will appear on the screen. 3. -
Page 28: Settings
Settings︱ 1. Press the button to enter the Main Menu. 2. Use the buttons to select “SETTINGS” and press 3. To exit the SETTINGS menu, press the button. Source Record Select between MIC (Built-In Microphone), LINE-IN (for CD Players or other sources) or AUTO(Automatic detection) as the Audio Recording method used by the MP330. -
Page 29: Auto Power Off
2. Use to select a Sleep delay time and press . You can choose from “Disable” , “15 min”, “30 min”, or “60 min”. When the selected time is reached, the MP330 will automatically power off. Auto Power Off This function sets a time delay to automatically power-off the MP330 after a certain period of time with no user input. -
Page 30: Contrast
Contrast The contrast of the OLED display can be adjusted for brighter or darker text. Higher contrast levels will drain the battery faster, while lowering the contrast level will provide better battery life. 1. Use to select “Contrast” and press 2. -
Page 31: Language
3. Adjust the values of each field with the buttons. 4. Press to confirm your new time settings. Tip: You can view a full-screen version of the player’s internal clock by pressing in the Main Menu. Language Set the MP330’s display language, including menus, song/album titles, artist names, and lyrics. The player supports 13 User languages. -
Page 32: Driver Installation
Driver Installation︱ ︱ ︱ ︱ ® Driver Installation for Windows 2000, XP and Vista ® No drivers are required. These Windows Operating Systems have built-in drivers to support the MP330. Plug ® your MP330 into an available USB port and Windows will install the necessary files. -
Page 33: Connecting To A Computer
Connecting to a Computer︱ Transferring Files to the MP330 If you want to use your MP330 to listen to music other than the Radio, you must transfer music files to the player. When the MP330 is connected to a computer it is locked into transferring files. You will not be able to play or record any music at this time. - Page 34 4. Always disconnect the MP330 from a computer by selecting the “Safely Remove Hardware” icon in ® the Windows System Tray at the bottom of the computer screen. While files are being transferred from a computer to the MP330, the screen will display a “WRITING…”...
-
Page 35: Disconnecting From A Computer
Disconnecting from a Computer Always follow the procedures listed below before you disconnect the MP330. Disconnecting the MP330 in Windows 2000, XP and Vista 1. Select the Hardware icon in the system tray. 2. The Safely Remove Hardware pop-up window will appear. Select it to continue. 3. -
Page 36: Troubleshooting
If you are unable to remedy a problem from the following hints, please consult your dealer, service center, or local Transcend branch office. We also have FAQ and Support services on our website. Operating system cannot detect the MP330 Check the following: Is your MP330 properly connected to the USB port? If not, unplug it and plug it in again. - Page 37 MP330 requires to operate. To re-install the system information, please visit http://www.transcend-info.com/Support/DLCenter/ and download a Firmware Update for your MP330. How do I find out what Windows Media Player version I am using? Open your Windows Media Player program.
-
Page 38: Specifications
Plug the MP330 directly into your computer’s USB port or a Transcend USB Power Adapter to properly charge its internal battery. Specifications︱ Size (L x W x H): 85 mm × 25.5 mm × 11.5 mm Weight: Music Formats: MP3, WMA and WAV... -
Page 39: Recycling & Environmental Considerations
Recycling & Environmental Considerations︱ ︱ ︱ ︱ Recycling the Product (WEEE): Your product is designed and manufactured with high quality materials and components, which can be recycled and reused. When you see the crossed-out wheel bin symbol attached to a product, it means the product is covered by the European Directive 2002/96/EC: Never dispose of your product with other household waste. -
Page 40: Transcend Limited Warranty
Duration of Warranty: The Transcend MP330 is covered by this warranty for a period of two (2) years from the date of purchase. Proof of purchase including the date of purchase is required for warranty service. Transcend will inspect the product and decide whether to repair or replace it.