Table of Contents
Advertisement
Advertisement
Table of Contents

Related Manuals for Transcend MP870 8GB


Summary of Contents for Transcend MP870 8GB
- Page 1 User’s Manual Digital Music Player MP870...
-
Page 2: Table Of Contents
Table of Contents .................... 6 Introduction︱ ︱ ︱ ︱ ................... 6 Package Contents︱ ︱ ︱ ︱ ....................8 Features︱ ︱ ︱ ︱ ................8 System Requirements︱ ︱ ︱ ︱ .................. 9 Safety Precautions︱ ︱ ︱ ︱ General Use ........................9 Caution: Risk of Deafness....................9 Reminders ........................10 .................. - Page 3 Custom Settings ......................21 Playback Speed........................24 Lyrics Sync........................24 Add Bookmark .........................25 Add to My Playlist ......................25 Removing a Song from My Playlist ................26 Delete ..........................27 File Information ........................28 ..................29 Record Mode︱ ︱ ︱ ︱ Voice Recording.......................29 Line-in Recording ......................30 Recording the Radio......................31 ..................
- Page 4 ..................49 E-BOOKS Mode︱ ︱ ︱ ︱ Reading E-Books and Text files ..................49 Advance to........................49 Auto Page Turn Interval....................50 Font Size ...........................51 Add Bookmark .........................51 Delete ..........................51 ................... 53 File Management︱ ︱ ︱ ︱ Browsing the Internal Memory or microSD Card ............53 Moving &...
- Page 5 ..................73 Specifications︱ ︱ ︱ ︱ ................73 Ordering Information︱ ︱ ︱ ︱ ..........74 Recycling & Environmental Considerations︱ ︱ ︱ ︱ ..............75 Transcend Limited Warranty︱ ︱ ︱ ︱...
-
Page 6: Introduction
Introduction︱ Thank you for purchasing Transcend’s MP870, an advanced MP3 Player that can play music and display videos and photos. The MP870 combines all the advantages of a great sounding portable MP3 player with the benefits of a USB flash drive, and includes many extra features such as a Recordable FM Radio, advanced digital voice recording, karaoke-style lyrics display, A-B repeat functions and variable track playback speeds. - Page 7 Line-In Recording Cable Quick Start Guide Protective Silicone Cover...
-
Page 8: Features
Features︱ 2.4-inch QVGA (240 x 320 pixel) full-color TFT display MP3, WMA, OGG, FLAC and WAV music files Playback music and videos (MPEG4 SP(Xvid),RM/RMVB and FLV files) View photos (JPEG, BMP, GIF and PNG files) and e-book (.txt) files Recordable FM Radio with 20 station presets Built-in microphone and direct Line-In recording (for CD players, or other devices) Playlist Builder microSD / microSDHC memory card slot... -
Page 9: Safety Precautions
To maintain battery health, be sure to complete at least one full discharge/charge cycle per month. • Backing Up Data Transcend does NOT take any responsibility for data loss, or damage during operation. If you • decide to store data on your MP870 we strongly advise that you regularly backup the data to a computer, or other storage medium. -
Page 10: Reminders
Follow the procedures in the “Disconnecting from a Computer” section to properly remove your MP870 • from a computer. Transcend occasionally releases firmware updates for certain products. We suggest you visit • http://www.transcendusa.com and download the latest firmware version for your device. -
Page 11: Mp870 Controls
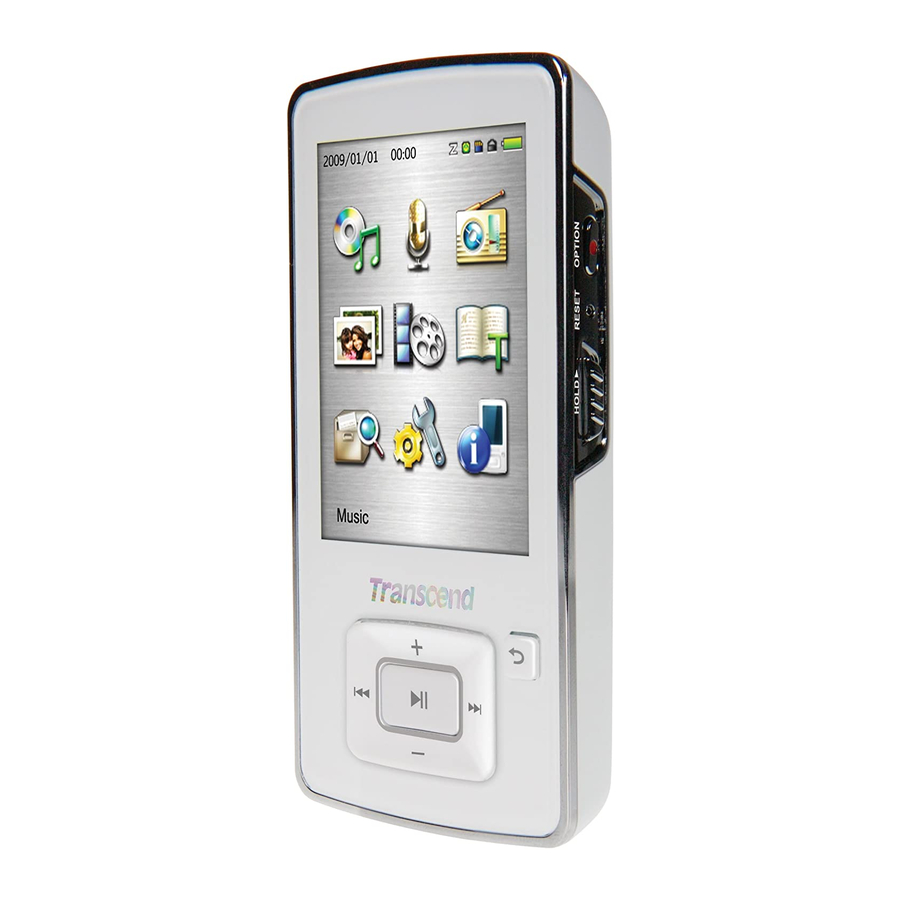
MP870 Controls︱ 2.4" Full-Color TFT Display Microphone Speaker Option / Record Button Reset Switch Hold Switch Back / Menu Button Next / Fast Forward Volume Down Volume Up Power / Play / OK Button Previous / Rewind Headphone Jack High-Speed Mini USB 2.0 Port Line-In Port Lanyard Attachment Hole microSD Card Slot... -
Page 12: Music Playback Screen
Music Playback Screen︱ ICON INDICATION Date & Time Displays current date and time (RTC) Sleep Sleep Timer is enabled Auto Power Off Auto Power Off function is enabled microSD Card microSD Card is inserted Lock Hold switch is enabled (controls are locked) Battery Battery power level (Play),... -
Page 13: Basic Operation
This can permanently damage your digital music player. When charging the battery, Please plug the MP870 directly into your computer’s built-in USB port or use the Transcend USB Power Adapter (optional). Power ON Press and hold the button to turn on the player. -
Page 14: Power Off
hold switch is enabled. You must switch off the Hold mode before you can operate the player. Power OFF Press and hold the button to turn off the MP870. It takes a few seconds for the MP870 to completely power down. ο... -
Page 15: File Navigator
File Navigator The File Navigator is a fast and convenient way of moving between tracks, files and folders. Choose FILE MANAGEMENT from the Main Menu or select Internal Memory / microSD Card in the MUSIC, VIDEO, PHOTO, or E-Books modes to open the File Navigator. Once the source device is chosen (Internal Memory or microSD Card), a list of available files for the current mode will be shown (except in FILE MANAGEMENT mode, which displays all files). -
Page 16: Repeat / Shuffle Functions
4. Use the buttons to highlight “OK” and press to permanently delete the file, or select “Cancel”to return to File Navigator mode without deleting. Repeat / Shuffle Functions Please see the “REPEAT” section in the Music mode for detailed instructions. A-B Repeat Please see the “A-B REPEAT”... - Page 17 3. To remove the microSD card, gently push the card inward with your fingernail until it springs free, then pull it directly out of the slot. For best results and compatibility, we strongly recommend using a Transcend microSD Card. ο...
-
Page 18: Music Mode
MUSIC Mode︱ Playing Audio Files 1. Press and hold to power ON the unit. The Main Menu will appear. If the MP870 is already on, press and hold the button to enter the Main Menu. Use the buttons to select “Music” mode and press Use the buttons to select the source location of the song you want to play (“Internal Memory”... -
Page 19: Adjusting The Volume
Adjusting the Volume While playing a song, press once or press and hold until you reach the desired volume level. A-B Repeat 1. While playing a song in the MUSIC mode, press the button to open the Options menu. 2. Select “A-B Repeat” and press to enable this function. -
Page 20: Repeat Mode
5. The marked section of the song will playback in a continuous loop. 6. Press the button once more to stop the A-B repeat function. Repeat Mode There are seven Repeat modes to choose from: Normal (plays all music files available one time, in consecutive order) Repeat One (continuously repeats the current song) Repeat All... -
Page 21: Equalizer (Eq) Mode
Equalizer (EQ) Mode There are many preset Equalizer Modes to choose from: Normal, Rock, Pop, Classical, Soft, Jazz, Bass Boost, User EQ, SRS WOW, SRS WOWHD, and SRS Custom Mode. 1. While playing a song in the MUSIC mode, press the button to open the Options menu. - Page 22 A. User EQ: The User EQ allows you to customize a 5-band equalizer to your personal preference. 1. While playing a song in the MUSIC mode, press the button to open the Options menu. 2. Use the buttons to select “Custom Settings” and press 3.
- Page 23 4. Use the buttons to select the SRS mode you want to adjust, then press to enter. 5. Press the buttons to adjust the value. 6. Press to confirm and return to the “SRS Custom Settings” menu. C. Fade In / Fade Out: When this function is enabled, the volume will gradually decrease at the end of each song, and gradually increase as the next song starts.
-
Page 24: Playback Speed
5. Press to confirm and return to the “Custom Settings” menu. Playback Speed The speed at which an audio file is played can be increased or decreased. Note: this function only works when playing MP3 format files. (Adjustment range: -4 ~ +4. Normal speed is 0) 1. -
Page 25: Add Bookmark
Ex: for the MP3 file “GM-Last_Christmas.mp3”, the LRC lyrics file must be named “GM-Last_Christmas.lrc” 1. In the MUSIC mode, press the button to open the Options menu. 2. Use the buttons to select “Lyrics Sync” and press 3. Select “On” to use Lyrics Sync, or “Off” to turn the function off. 4. -
Page 26: Removing A Song From My Playlist
2. Use the buttons to select “Add to My Playlist” and press 3. Select the playlist you want to add the song to. (My Playlist 1” ~ “My Playlist 5”) 4. Press the button to add the currently playing song to the highlighted playlist. Removing a Song from My Playlist 1. -
Page 27: Delete
5. Highlight the song you want to remove and press the button. 6. Use the buttons to select “OK” and press to remove the song (note: this will only remove the selected song from the current playlist, and will not actually delete the file from the microSD card or internal memory). -
Page 28: File Information
3. Use the buttons to highlight “OK” and press to permanently delete the currently playing file, or select“Cancel”to return to the Options menu without deleting. File Information This option will display all information about the audio file currently playing (Song Title, Album, Artist, Genre, Year, Total Time, Bit Rate, Sample Rate, File Format). -
Page 29: Record Mode
Record Mode︱ Use the buttons to select “Record” and press There are three recording modes: All recordings can be accessed in FILE MANAGEMENT mode or by using the File Navigator in ο MUSIC mode To adjust the recording sample rate, please see the “Settings / Record Quality” section of this ο... -
Page 30: Line-In Recording
5. Use the buttons to highlight “OK” and press to finish the recording. Voice recordings are named and numbered in this format: “MYearMonthDay###.WAV” ο Ex: M091216003.WAV represents the third voice recording made on December 16th, 2009 Voice recordings are saved in the INTERNAL MEMORY / RECORD / MIC ο... -
Page 31: Recording The Radio
5. Use the buttons to highlight “OK” and press to finish the recording. Line-In recordings are named and numbered in this format: “LYearMonthDay###.WAV” ο Ex: L091216003.WAV represents the third Line-In recording made on December 16th, 2009 Line-In recordings are saved in the INTERNAL MEMORY / RECORD / LINE IN ο... -
Page 32: Radio Mode
RADIO Mode︱ Listen to the Radio 1. Plug in the earphones . (Earphones must be plugged-in to listen to the Radio). 2. Press and hold the button to enter the Main Menu. 3. Use the buttons to select “Radio” and press 4. -
Page 33: Adjusting The Volume
Note: If you have already saved your favorite stations to the Station List, you can press and then use the buttons to quickly switch between your saved stations. Press again to adjust the frequency manually. Adjusting the Volume Press once or press and hold until you reach the desired volume level. -
Page 34: Auto Search
2. Press the button to open the Options menu. 3. Use the buttons to select “Save Station” and press to bring up the saved channel list. 4. Use the buttons to select your desired channel number, and press again to save the current radio station to that channel. -
Page 35: Recalling A Saved Station
The previous 20 channels in station list will be reset first when using this function. ο Recalling a Saved Station 1. In the RADIO mode press to open the Options menu. 2. Use the buttons to select “Station List” and press to display your saved stations (CH01 to CH20). -
Page 36: Fm Band
FM Band The MP870 allows you choose World FM Band (87.5MHz~108.0MHz) or Japan FM Band (76.0MHz~90.0MHz). 1. In the RADIO mode press to open Option menu. 2. Use the buttons to select “FM Band” and press 3. Select “World FM Band” or “Japan FM Band,” then press to confirm. -
Page 37: Recording The Radio
Recording the Radio 1. Select a radio station that you want to record. 2. Press and hold the button for 2 seconds to begin recording the station. 3. An automatically generated file name for your recording, along with the current record quality, FM frequency, and file destination will appear on the screen. -
Page 39: Photo Mode
PHOTO Mode︱ Displaying Photos 1. Press and hold the button to enter the Main Menu. 2. Use the buttons to select “Photo” and press 3. The File Navigator will open. Use the buttons to select the source location of the photo you want to view (“Internal Memory”... -
Page 40: Browse Mode
Browse Mode This option lets you adjust the way files are displayed on the screen when browsing for a specific photo. 1. In the PHOTO mode, select “Browse Mode.” and press 2. Use the buttons to select “List” or “Thumbnail” and press Rotate 1. -
Page 41: Zoom In / Zoom Out
Zoom In / Zoom Out 1. When viewing an image in the PHOTO mode, press the button to open the Options menu. 2. Use the buttons to select “Zoom” and press 3. Select “Zoom In” or “Zoom Out” and press to confirm. -
Page 42: Slideshow Effects
3. Use the buttons to select the desired interval time, press to confirm. (Adjustment range: 1sec ~ 10sec). Note: Large image files sometimes take a while to decode before they are displayed. If the decoding ο time takes longer than the slideshow interval, the photo will be displayed immediately after it is decoded. Slideshow Effects This function adjusts the way that each image transitions onto the screen during Slideshow playback. -
Page 43: Set As Desktop Background
Set as Desktop Background Sets current picture as the music player’s main menu background image. 1. When viewing an image in the PHOTO mode, press the button to open the Options menu. 2. Use the buttons to select “Set as Desktop Background”, press to confirm. -
Page 44: File Information
3. Use the buttons to highlight “OK” and press to permanently delete the currently displayed picture, or select “Cancel”to return to the Options menu without deleting. File Information This option will display all information about the photo file currently playing (File Name, Resolution, File Size, Date Created) 1. -
Page 45: Video Mode
VIDEO Mode︱ Playing Video Files 1. Press and hold the button to enter the Main Menu. 2. Use the buttons to select “Video” and press 3. Use the buttons to select the source location of the video you want to play (“Internal Memory”... -
Page 46: Repeat Mode
6. During video playback press to go to the next available video, and press to go back. 7. To fast forward, press and hold . To rewind, press and hold 8. To adjust the volume, press The MP870 only supports video files encoded in MPEG4 SP(Xvid) / FLV /RM /RMVB video format. ο... -
Page 47: Add Bookmark
3. Select a repeat mode and press to confirm. Add Bookmark This function can be used to mark a specific part of a video so you can easily return to it in the future. 1. While viewing a file in the VIDEO mode, press the button to open the Options menu. -
Page 48: File Information
File Information This option will display all information about the video file currently playing (File Name, Resolution, Frame Rate, Bit Rate, Total Time, File Size). 1. While viewing a file in the VIDEO mode, press the button to open the Options menu. 2. -
Page 49: E-Books Mode
E-BOOKS Mode︱ To read E-Books on your MP870, you must first transfer “.txt ” files to the player Reading E-Books and Text files 1. Press and hold the button to enter the Main Menu. 2. Use the buttons to select “E-Books” and press 3. -
Page 50: Auto Page Turn Interval
3. Press to increase or decrease percentage in 5% steps and press to confirm. (Adjustment range: 0% ~100%) Auto Page Turn Interval Sets the speed at which pages are automatically turned. 1. While reading a text file in the E-BOOKS mode, press the button to open the Options menu. -
Page 51: Font Size
Font Size 1. While reading a text file in the E-BOOKS mode, press the button to open the Options menu. 2. Use the buttons to select “Font Size” and press 3. Use the buttons to select the font size (Small, Medium, Large) you want, press confirm and continue reading. - Page 52 3. Use the buttons to highlight “OK” and press to delete the text file currently open, or select “Cancel”to return to the Options menu without deleting.
-
Page 53: File Management
File Management︱ Browsing the Internal Memory or microSD Card 1. Press and hold the button to enter the Main Menu. 2. Use the buttons to select “File Management” and press 3. Use the buttons to select either “Internal Memory” or “microSD Card” and press 4. -
Page 54: Deleting Files
2. Use the buttons to select “Move” or “Copy” and press . (Note: “Move” will transfer the selected item to a new location and deletes it from the original location. “Copy” will copy the item to the new location without deleting the original) 3. - Page 55 3. Use the buttons to highlight “OK” and press to delete the file, or select “Cancel” to return to the previous screen.
-
Page 56: Settings
Settings︱ The Settings Menu 1. Press and hold the button to go to the Main Menu. 2. Use the buttons to select “Settings” and press 3. To exit the SETTINGS menu, press the button. Record Quality The quality of an audio recording can be set to Low, Medium, or High. Higher recording quality settings require more memory space to save the recorded WAV files. -
Page 57: Record Source
Maximum Record Time / Quality Table Sample rate Channels Low (8KHz) 1 (mono) 256 hrs 512 hrs Med (16KHz) 1 (mono) 128 hrs 256 hrs High (32KHz) 1 (mono) 64 hrs 128 hrs Sample rate Channels Low (8KHz) 2 (stereo) 128 hrs 256 hrs FM / Line In... -
Page 58: Screen Saver
2. Use the buttons to select your desired amount of gain and press to confirm. Adjustment range: 1 ~ 7 or Off (7=highest gain, 1=lowest gain) Screen Saver This function lets you enable/disable the screen saver, and set the screen saver’s auto-activation time delay. 1. -
Page 59: Sleep Timer
Sleep Timer This function sets a time delay to automatically power OFF the MP870, regardless of playback status. 1. In the SETTINGS menu, use the buttons to select “Sleep Timer” and press 2. Use buttons until you reach the desired time delay and press to confirm. -
Page 60: Brightness
Brightness This option lets you adjust the brightness of the screen. 1. In the SETTINGS menu, use the buttons to select “Brightness” and press 2. Use buttons until you reach the desired level of brightness and press to confirm. (Adjustment range: 1 ~ 5) USB Connection Type ®... -
Page 61: Menu Animation
® Linux computer) Menu Animation Changes the effect displayed during menu interface transitions. 1. In the SETTINGS menu, use the buttons to select “Menu Animation” and press 2. Use the buttons to select “Normal”, “Zoom” or “Push” and press to confirm. Default Background Image When a user-selected picture is set as the background image, this option can be used restore the original look of the MP870 menus. -
Page 62: Format Internal Memory
Format Internal Memory This option will permanently delete all files stored in the player’s internal memory. Please be sure to backup any songs, pictures, or other files you want to save before proceeding. 1. In the SETTINGS menu, use the buttons to select “Format Internal Memory”... -
Page 63: Date & Time
2. Use the buttons to select “OK” and press 3. A confirmation screen will appear. Select “OK” again only if you are sure you want to erase all data on , or select “Cancel”to return to the SETTINGS menu. the microSD card and press Date &... -
Page 64: Language
3. Adjust the values of each field with the buttons. 4. Press to confirm your new time settings. Language Sets the MP870’s display language, including menus, song/album titles, artist names, and lyrics. The player supports 13 User languages. 1. In the SETTINGS menu, use the buttons to select “Language”... -
Page 66: Driver Installation
Driver Installation︱ Driver Installation for Windows 7, Vista, XP and 2000 ® No drivers are required. These Windows Operating Systems have built-in drivers to support the MP870. ® Plug your MP870 into an available USB port and Windows will install the necessary files. -
Page 67: Connecting To A Computer
Connecting to a Computer︱ Transferring Files to the MP870 If you want to use your Digital Music Player to do more than listen to the radio, you must transfer music files, pictures, movies or TXT files to the MP870. You can also use the MP870 as a portable flash drive to transfer your important documents and other files. -
Page 68: Disconnecting The Mp870 In Windows
USB Charge & Playback: For charging the battery while continuing to use the music playback functions of the player. No data transfer is possible in this mode. Note: Both connection modes will charge the internal battery, however when “USB Data Transfer” is chosen, the player’s audio and video functions will not be available. -
Page 69: Disconnecting The Mp870 In Mac Os 10.0 Or Later
4. Unplug the MP870 from your computer. Disconnecting the MP870 in Mac OS 10.0 or Later 1. Drag and drop the Disk icon that corresponds to your MP870 into the trashcan. 2. Unplug your MP870 from the USB port. ... -
Page 70: Troubleshooting
MP870 for repair. If you are unable to remedy a problem from the following hints, please consult your dealer, service center, or local Transcend branch office. We also have FAQ and Support services on our websites. Operating system cannot detect the MP870 Check the following: Is your MP870 properly connected to the USB port? If not, unplug it and plug it in again. - Page 71 2. While recording, if the remaining battery capacity goes below 10% the MP870 will automatically save the recording. Intermittent music playback Unplug the earphones and plug them back in again to make sure they are securely connected. MP870 Powers OFF automatically The MP870 features SLEEP Mode and Auto Power Off functions, which are power-saving features.
- Page 72 digital music player is not outputting stable or adequate voltage to charge the player’s internal battery. This message does not indicate a problem with the music player.
-
Page 73: Specifications
Up to 10 years 10. Erase Cycles: ≥ 100,000 times 11. Signal-to-Noise ≥ 90dB Ratio: 12. Certificates: CE, FCC, BSMI 13. Warranty: 2-years Ordering Information︱ Device Description Memory Size Transcend P/N MP870 Digital Music Player TS4GMP870 MP870 Digital Music Player TS8GMP870... -
Page 74: Recycling & Environmental Considerations
Recycling & Environmental Considerations︱ ︱ ︱ ︱ Recycling the Product (WEEE): Your product is designed and manufactured with high quality materials and components, which can be recycled and reused. When you see the crossed-out wheel bin symbol attached to a product, it means the product is covered by the European Directive 2002/96/EC: Never dispose of your product with other household waste. -
Page 75: Transcend Limited Warranty
Transcend is also not responsible for damage or failure of any third party equipment, even if Transcend has been advised of the possibility. This limitation does not apply to the extent that it is illegal or unenforceable under applicable law. - Page 76 Register online at http://www.transcendusa.com/registration All specifications are subject to change without notice. ο Transcend Information, Inc. www.transcendusa.com *The Transcend logo is a registered trademark of Transcend Information, Inc. *All logos and marks are trademarks of their respective companies.